
How to Deploy Milvus Vector Database on Vultr Kubernetes Engine
Introduction
Milvus is an open-source, distributed database designed to efficiently manage vector data. Its actual real-world use cases include integration with applications such as recommendation systems, Natural Language Processing (NLP), image and video retrieval. By leveraging vector data, Milvus DB is a crucial component for systems that rely on similarity-based search and retrieval of high-dimensional data points.
To scale a Milvus database system on your Vultr Kubernetes Engine (VKE) cluster, install a Milvus operator that enables the deployment and management of the Milvus cluster.
This article explains how to install Milvus DB on a Vultr Kubernetes Engine (VKE) cluster. You are to deploy a Milvus operator and install a Milvus cluster. Then, you will apply custom resource definitions to set up external access to the database service and test the external service by creating a new database.
Prerequisites
Before you start:
- Deploy a Vultr Kubernetes Engine (VKE) Optimized Cloud Compute cluster with at least:
5nodes- 4GB RAM
- 2 vCPUs
- Deploy a Vultr Docker Server to use as the management machine
- Using SSH, access the server as a non-root user
- Install and configure Kubectl to access the VKE Cluster
Deploy a Milvus Operator
You can install a Milvus Operator to a VKE cluster in two ways. You can either use a helm chart or Kubectl. In this section, deploy a Milvus Operator to your cluster using Kubectl. Then, change the PVC storage class and install Cert-Manager to handle the process of renewing and obtaining cluster SSL certificates as described in the steps below.
Milvus DB requires Vultr high performance PVCs to work well. Disable the default cluster Vultr Block Storage HDD annotation class
$ kubectl patch storageclass vultr-block-storage-hdd -p '{"metadata": {"annotations":{"storageclass.kubernetes.io/is-default-class":"false"}}}'Enable the Vultr Block Storage high-performance class
$ kubectl patch storageclass vultr-block-storage -p '{"metadata": {"annotations":{"storageclass.kubernetes.io/is-default-class":"true"}}}'When successful, your output should look like the one below:
 storageclass.storage.k8s.io/vultr-block-storage-hdd patched
 storageclass.storage.k8s.io/vultr-block-storage patched
Install the latest Cert-Manager version
$ kubectl apply -f https://github.com/jetstack/cert-manager/releases/download/v1.5.3/cert-manager.yamlThe above command installs version
1.5.3, visit the Cert-Manager releases page to verify the latest versionOutput:
 customresourcedefinition.apiextensions.k8s.io/certificaterequests.cert-manager.io created
 customresourcedefinition.apiextensions.k8s.io/certificates.cert-manager.io created
 customresourcedefinition.apiextensions.k8s.io/challenges.acme.cert-manager.io created
 customresourcedefinition.apiextensions.k8s.io/clusterissuers.cert-manager.io created
 customresourcedefinition.apiextensions.k8s.io/issuers.cert-manager.io created
 customresourcedefinition.apiextensions.k8s.io/orders.acme.cert-manager.io created
 namespace/cert-manager created
 ........
View the Cert-Manager pods to verify that the installation is successful
$ kubectl get pods -n cert-managerOutput:
 NAME                                      READY   STATUS    RESTARTS   AGE
 cert-manager-679895f5-8wxg9               1/1     Running   0          47s
 cert-manager-cainjector-b78544fd4-l86s8   1/1     Running   0          47s
 cert-manager-webhook-cd8bbbd67-ktjg2      1/1     Running   0          47s
Install the Milvus operator
$ kubectl apply -f https://raw.githubusercontent.com/zilliztech/milvus-operator/main/deploy/manifests/deployment.yamlOutput:
 namespace/milvus-operator created
 serviceaccount/milvus-operator-checker created
 serviceaccount/milvus-operator created
 customresourcedefinition.apiextensions.k8s.io/milvusclusters.milvus.io created
 customresourcedefinition.apiextensions.k8s.io/milvuses.milvus.io created
 customresourcedefinition.apiextensions.k8s.io/milvusupgrades.milvus.io created
 clusterrole.rbac.authorization.k8s.io/milvus-operator-checker-role created
 clusterrole.rbac.authorization.k8s.io/milvus-operator-manager-role created
Verify that the Milvus operator is ready and running in your cluster
$ kubectl get pods -n milvus-operatorOutput:
 NAME                               READY   STATUS      RESTARTS   AGE
 milvus-operator-7f48446758-csq5f   1/1     Running     0          84s
 milvus-operator-checker-nh54m      0/1     Completed   0          84s
Install a Milvus Cluster
Milvus Custom Resource Definitions (CRDs) allow you to create custom resources and schemas. When installed, CRDs can be managed using operators. In this section, install the Milvus cluster by defining Milvus CRDs, apply the cluster configuration, and verify that the cluster pods are running as described below.
Using a text editor such as
nano, edit themilvus_cluster.yamlfile$ nano milvus_cluster.yamlAdd the following configurations to the file
 apiVersion: milvus.io/v1beta1
 kind: Milvus
 metadata:
   name: milvus-cluster
   labels:
     app: milvus
 spec:
   mode: cluster
   dependencies: {}
   components:
     mixCoord:
       replicas: 1
     dataNode:
       replicas: 1
     indexNode:
       replicas: 1
     queryNode:
       replicas: 1
   config:
     common:
       security:
         authorizationEnabled: true
Save and close the file.
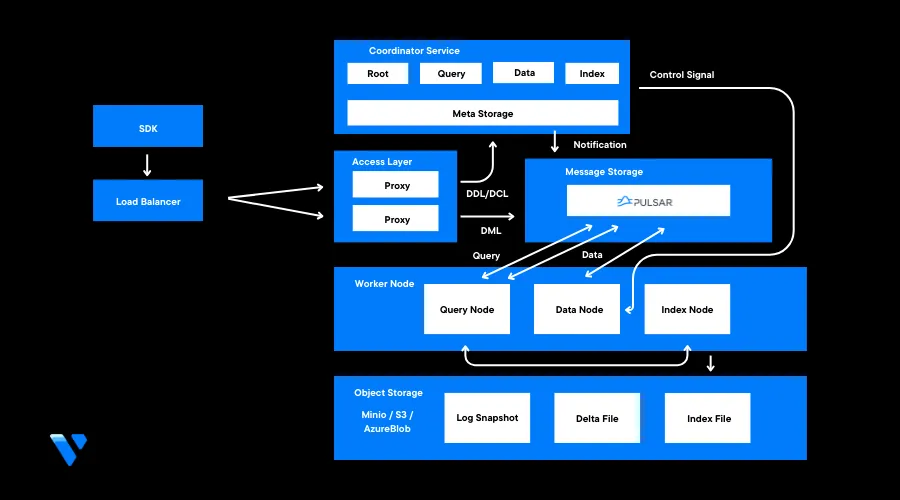
In the above configuration, no dependencies are defined as Milvus relies on default dependencies such as etcd, minio, and pulsar. Below is what each dependency does:
etcd: Supports Milvus's metadata storage and accessminio: MinIO and S3 are supported as storage engines for data persistencepulsar: Supports the Milvus cluster's reliable storage and the publication/subscription of message streams
Below is the function of each defined Milvus component:
mixCoord: Includes coordinators such as query coordinator, index coordinator, root coordinator, and data coordinator. These are responsible for load-balancing, maintaining index metadata, and maintaining background data operationsdataNode: Retrieves incremental log data, converts it to log snapshots, and stores it to a Milvus block storage volumeindexNode: Builds Vector indexesqueryNode: Performs a hybrid search of vector and scalar dataauthorizationEnabled: When set totrue, it allows you to apply and control user access to the database to increase security and reliability
Apply the Milvus cluster configuration
$ kubectl apply -f milvus_cluster.yamlOutput:
milvus.milvus.io/milvus-cluster createdWait for at least 10 minutes and verify the Mivus cluster status
$ kubectl get milvus milvus-cluster -o yamlWhen successful, your output should look like the one below:
   - lastTransitionTime: "2023-10-12T19:52:42Z"
     message: Milvus components are all updated
     reason: MilvusComponentsUpdated
     status: "True"
     type: MilvusUpdated
   endpoint: milvus-cluster-milvus.default:19530
   ingress:
     loadBalancer: {}
   observedGeneration: 1
   replicas:
     dataNode: 1
     indexNode: 1
     mixCoord: 1
     proxy: 1
     queryNode: 1
   status: Healthy
As displayed in the above output,
status: Healthyshows that the deployment is successfully created and running. Also, the number of replicas for each component should match your Milvus CRD configuration.Verify the Milvus cluster pods status
$ kubectl get podsOutput:
 NAME                                               READY   STATUS      RESTARTS   AGE
 milvus-cluster-etcd-0                              1/1     Running     0          5m45s
 milvus-cluster-etcd-1                              1/1     Running     0          5m45s
 milvus-cluster-etcd-2                              1/1     Running     0          5m45s
 milvus-cluster-milvus-datanode-667456bf77-9wsnr    1/1     Running     0          75s
 milvus-cluster-milvus-indexnode-57789b66cf-bg92m   1/1     Running     0          75s
 milvus-cluster-milvus-mixcoord-6c559b6b4f-p5bh9    1/1     Running     0          75s
 milvus-cluster-milvus-proxy-7c64b67f85-bxrdt       1/1     Running     0          75s
 milvus-cluster-milvus-querynode-78c487875-w6rm4    1/1     Running     0          75s
 milvus-cluster-minio-0                             1/1     Running     0          5m45s
 milvus-cluster-minio-1                             1/1     Running     0          5m45s
 milvus-cluster-minio-2                             1/1     Running     0          5m45s
 milvus-cluster-minio-3                             1/1     Running     0          5m45s
 milvus-cluster-pulsar-bookie-0                     1/1     Running     0          5m44s
 milvus-cluster-pulsar-bookie-1                     1/1     Running     0          5m43s
 milvus-cluster-pulsar-bookie-2                     1/1     Running     0          5m43s
 milvus-cluster-pulsar-bookie-init-44kc6            0/1     Completed   0          5m45s
 milvus-cluster-pulsar-broker-0                     1/1     Running     0          5m45s
 milvus-cluster-pulsar-proxy-0                      1/1     Running     0          5m45s
 milvus-cluster-pulsar-pulsar-init-dbg4z            0/1     Completed   0          5m45s
 milvus-cluster-pulsar-recovery-0                   1/1     Running     0          5m45s
 milvus-cluster-pulsar-zookeeper-0                  1/1     Running     0          5m45s
 milvus-cluster-pulsar-zookeeper-1                  1/1     Running     0          4m50s
 milvus-cluster-pulsar-zookeeper-2                  1/1     Running     0          3m59s
As displayed in the above output, all required pods are running and execution jobs are complete. By default Milvus creates pods the dependencies before all components.
When all Pods are running, the Milvus Cluster creates the necessary Vultr high performance storage volumes in your account. Verify the PVC status to verify the available block storage volumes
$ kubectl get pvcAccess the Vultr Console and verify that the listed object storage volumes in your output are available in your account.
Enable External Access to MilvusDB
In this section, set up an external access service using the Vultr Cloud Control Manager (CCM) and LoadBalancer service to expose the database using the Milvus default port 19530 as described below.
Create a new file
external_access.yaml$ nano external_access.yamlAdd the following configurations to the file
 apiVersion: v1
 kind: Service
 metadata:
   name: milvus-external
   annotations:
     service.beta.kubernetes.io/vultr-loadbalancer-protocol: "tcp"
 spec:
   type: LoadBalancer
   ports:
     - name: milvus
       port: 19530
       protocol: TCP
       targetPort: milvus
   selector:
     app.kubernetes.io/instance: milvus-cluster
     app.kubernetes.io/managed-by: milvus-operator
     app.kubernetes.io/name: milvus
     milvus.io/service: "true"
Save and close the file.
The above configuration exposes the Milvus service through the default TCP port
19530. ThetargetPortis set tomilvusto encounter any MilvusDB default port changes.Apply the external deployment to your cluster
$ kubectl apply -f external_access.yamlOutput:
service/milvus-external createdWait for at least
6minutes to deploy the Load balancer resource. Then, view the cluster service$ kubectl get svc milvus-externalVerify the External-IP value in your output like the one below:
 NAME              TYPE           CLUSTER-IP      EXTERNAL-IP      PORT(S)           AGE
 milvus-external   LoadBalancer   10.10.4.1       192.0.2.100      27017:32096/TCP   106s
In the above output,
192.0.2.100is the load balancer external IP Address you can use to access the Milvus DB.
Test Access to MilvusDB
Using Pip, install the
pymilvusmodule on your server$ pip3 install pymilvusThe above command installs
pymilvus: An open-source Python SDK designed to interact with MilvusDB.Create a new Python application file
$ nano milvusDb.pyAdd the following contents to the file. Replace
192.0.2.100with your actual Milvus load balancer IP Addressfrom pymilvus import connections, db, utility conn = connections. connect(host="192.0.2.100", port="19530" , user="root" , password="Milvus") database_name = "book1" database = db.create_database(database_name) print(f"Database '{database_name}' created successfully.") list = db.list_database() print(f"All available databases are {list}")Save and exit the file.
The above application file connects to your Milvus service from your local terminal as the Milvus user
rootuser and the passwordMilvussince the clusterauthorizationEnabledfield is set totrue.In addition, the application creates a
bookdatabase and prints all the available databases. You can create a maximum of up to64Milvus databases on top of thedefaultdatabase to manage user privileges within the database.Run the application
$ python3 milvusDb.pyWhen successful, your output should look like the one below:
 Database 'book1' created successfully.
 All available databases are ['default', 'book1']
As displayed in the above output, a new database is created that confirms a connection to the Milvus cluster is working correctly. You can perform more functions such as creating collections and vector searches.
Scale the Milvus Cluster
In this section, scale your Milvus Cluster by increasing and decreasing the number of replica pods running in your cluster. Scaling is important when managing resource allocation depending on your user traffic requirements.
Scale the Cluster Up
To increase the number of pods, Edit the
milvus_cluster.yamlfile$ nano milvus_cluster.yamlChange the
queryNode:replicas value to4to set a new number of replica podsapiVersion: milvus.io/v1beta1 kind: Milvus metadata: name: milvus-cluster labels: app: milvus spec: mode: cluster dependencies: {} components: mixCoord: replicas: 1 dataNode: replicas: 1 indexNode: replicas: 1 queryNode: replicas: 4 config: common: security: authorizationEnabled: trueSave and close the file.
Apply the change to your cluster
$ kubectl apply -f milvus_cluster.yamlOutput:
milvus.milvus.io/milvus-cluster configuredView the list of running Milvus Cluster pods
$ kubectl get podsVerify that the
milvus-querynodepods are at least4similar to the output below:NAME READY STATUS RESTARTS AGE milvus-cluster-etcd-0 1/1 Running 0 18m milvus-cluster-etcd-1 1/1 Running 0 18m milvus-cluster-etcd-2 1/1 Running 0 18m milvus-cluster-milvus-datanode-667456bf77-6tthb 1/1 Running 0 13m milvus-cluster-milvus-indexnode-57789b66cf-fpvnd 1/1 Running 0 13m milvus-cluster-milvus-mixcoord-6c559b6b4f-x5jtg 1/1 Running 0 13m milvus-cluster-milvus-proxy-7c64b67f85-vtc82 1/1 Running 0 13m milvus-cluster-milvus-querynode-78c487875-2727q 1/1 Running 0 45s milvus-cluster-milvus-querynode-78c487875-872qs 1/1 Running 0 45s milvus-cluster-milvus-querynode-78c487875-h2zq4 1/1 Running 0 13m milvus-cluster-milvus-querynode-78c487875-xz2jc 1/1 Running 0 45s milvus-cluster-minio-0 1/1 Running 0 18m milvus-cluster-minio-1 1/1 Running 0 18m milvus-cluster-minio-2 1/1 Running 0 18m milvus-cluster-minio-3 1/1 Running 0 18m milvus-cluster-pulsar-bookie-0 1/1 Running 0 17m milvus-cluster-pulsar-bookie-1 1/1 Running 0 17m milvus-cluster-pulsar-bookie-2 1/1 Running 0 17m milvus-cluster-pulsar-bookie-init-rfqsg 0/1 Completed 0 18m milvus-cluster-pulsar-broker-0 1/1 Running 0 18m milvus-cluster-pulsar-proxy-0 1/1 Running 0 18m milvus-cluster-pulsar-pulsar-init-czptk 0/1 Completed 0 18m milvus-cluster-pulsar-recovery-0 1/1 Running 0 18m milvus-cluster-pulsar-zookeeper-0 1/1 Running 0 18m milvus-cluster-pulsar-zookeeper-1 1/1 Running 0 16m milvus-cluster-pulsar-zookeeper-2 1/1 Running 0 16m
Scale the Cluster Down
Modify the
milvus_cluster.yamlfile to decrease the number of pods$ nano milvus_cluster.yamlReduce the number of
queryNodereplicas to2apiVersion: milvus.io/v1beta1 kind: Milvus metadata: name: milvus-cluster labels: app: milvus spec: mode: cluster dependencies: {} components: mixCoord: replicas: 1 dataNode: replicas: 1 indexNode: replicas: 1 queryNode: replicas: 2 config: common: security: authorizationEnabled: trueSave and close the file.
Apply the change to your cluster
$ kubectl apply -f milvus_cluster.yamlOutput:
milvus.milvus.io/milvus-cluster configuredView the list of running pods
$ kubectl get podsVerify that the
milvus-querynodepods are2instead of4similar to the output below:NAME READY STATUS RESTARTS AGE milvus-cluster-etcd-0 1/1 Running 0 22m milvus-cluster-etcd-1 1/1 Running 0 22m milvus-cluster-etcd-2 1/1 Running 0 22m milvus-cluster-milvus-datanode-667456bf77-6tthb 1/1 Running 0 17m milvus-cluster-milvus-indexnode-57789b66cf-fpvnd 1/1 Running 0 17m milvus-cluster-milvus-mixcoord-6c559b6b4f-x5jtg 1/1 Running 0 17m milvus-cluster-milvus-proxy-7c64b67f85-vtc82 1/1 Running 0 17m milvus-cluster-milvus-querynode-78c487875-872qs 1/1 Running 0 5m29s milvus-cluster-milvus-querynode-78c487875-h2zq4 1/1 Running 0 17m milvus-cluster-minio-0 1/1 Running 0 22m milvus-cluster-minio-1 1/1 Running 0 22m milvus-cluster-minio-2 1/1 Running 0 22m milvus-cluster-minio-3 1/1 Running 0 22m milvus-cluster-pulsar-bookie-0 1/1 Running 0 22m milvus-cluster-pulsar-bookie-1 1/1 Running 0 22m milvus-cluster-pulsar-bookie-2 1/1 Running 0 22m milvus-cluster-pulsar-bookie-init-rfqsg 0/1 Completed 0 22m milvus-cluster-pulsar-broker-0 1/1 Running 0 22m milvus-cluster-pulsar-proxy-0 1/1 Running 0 22m milvus-cluster-pulsar-pulsar-init-czptk 0/1 Completed 0 22m milvus-cluster-pulsar-recovery-0 1/1 Running 0 22m milvus-cluster-pulsar-zookeeper-0 1/1 Running 0 22m milvus-cluster-pulsar-zookeeper-1 1/1 Running 0 21m milvus-cluster-pulsar-zookeeper-2 1/1 Running 0 20m
Verify MilvusDB Block Storage Resources
MilvusDB creates at least 20 high performance Vultr block storage volumes on your account. If multiple volumes fail or get deleted, your Milvus Cluster may run into errors. To keep track of your account billing and MilvusDB resources, verify the available storage volumes on your Vultr account as described in the steps below.
Visit the Vultr Console
Click Products
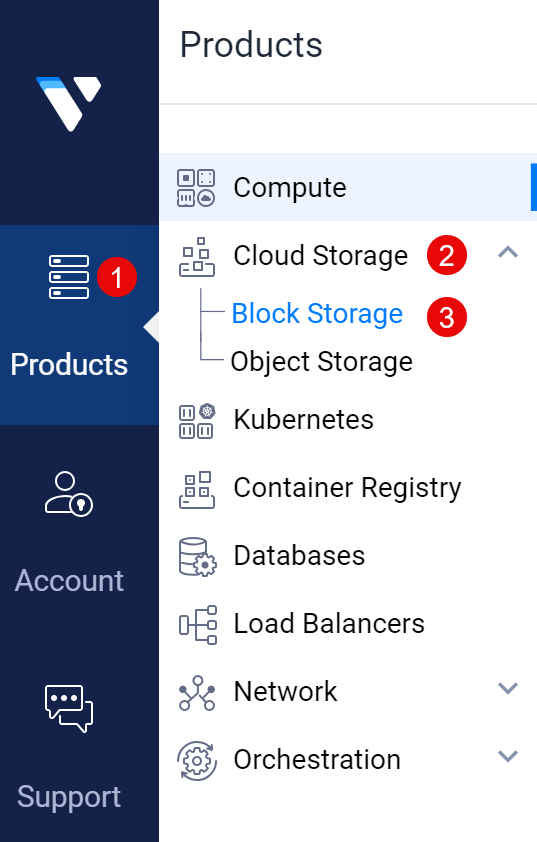
Expand the Cloud Storage group and click Block Storage from the list of options
Verify the available MilvusDB storage volumes with the
pvcnaming scheme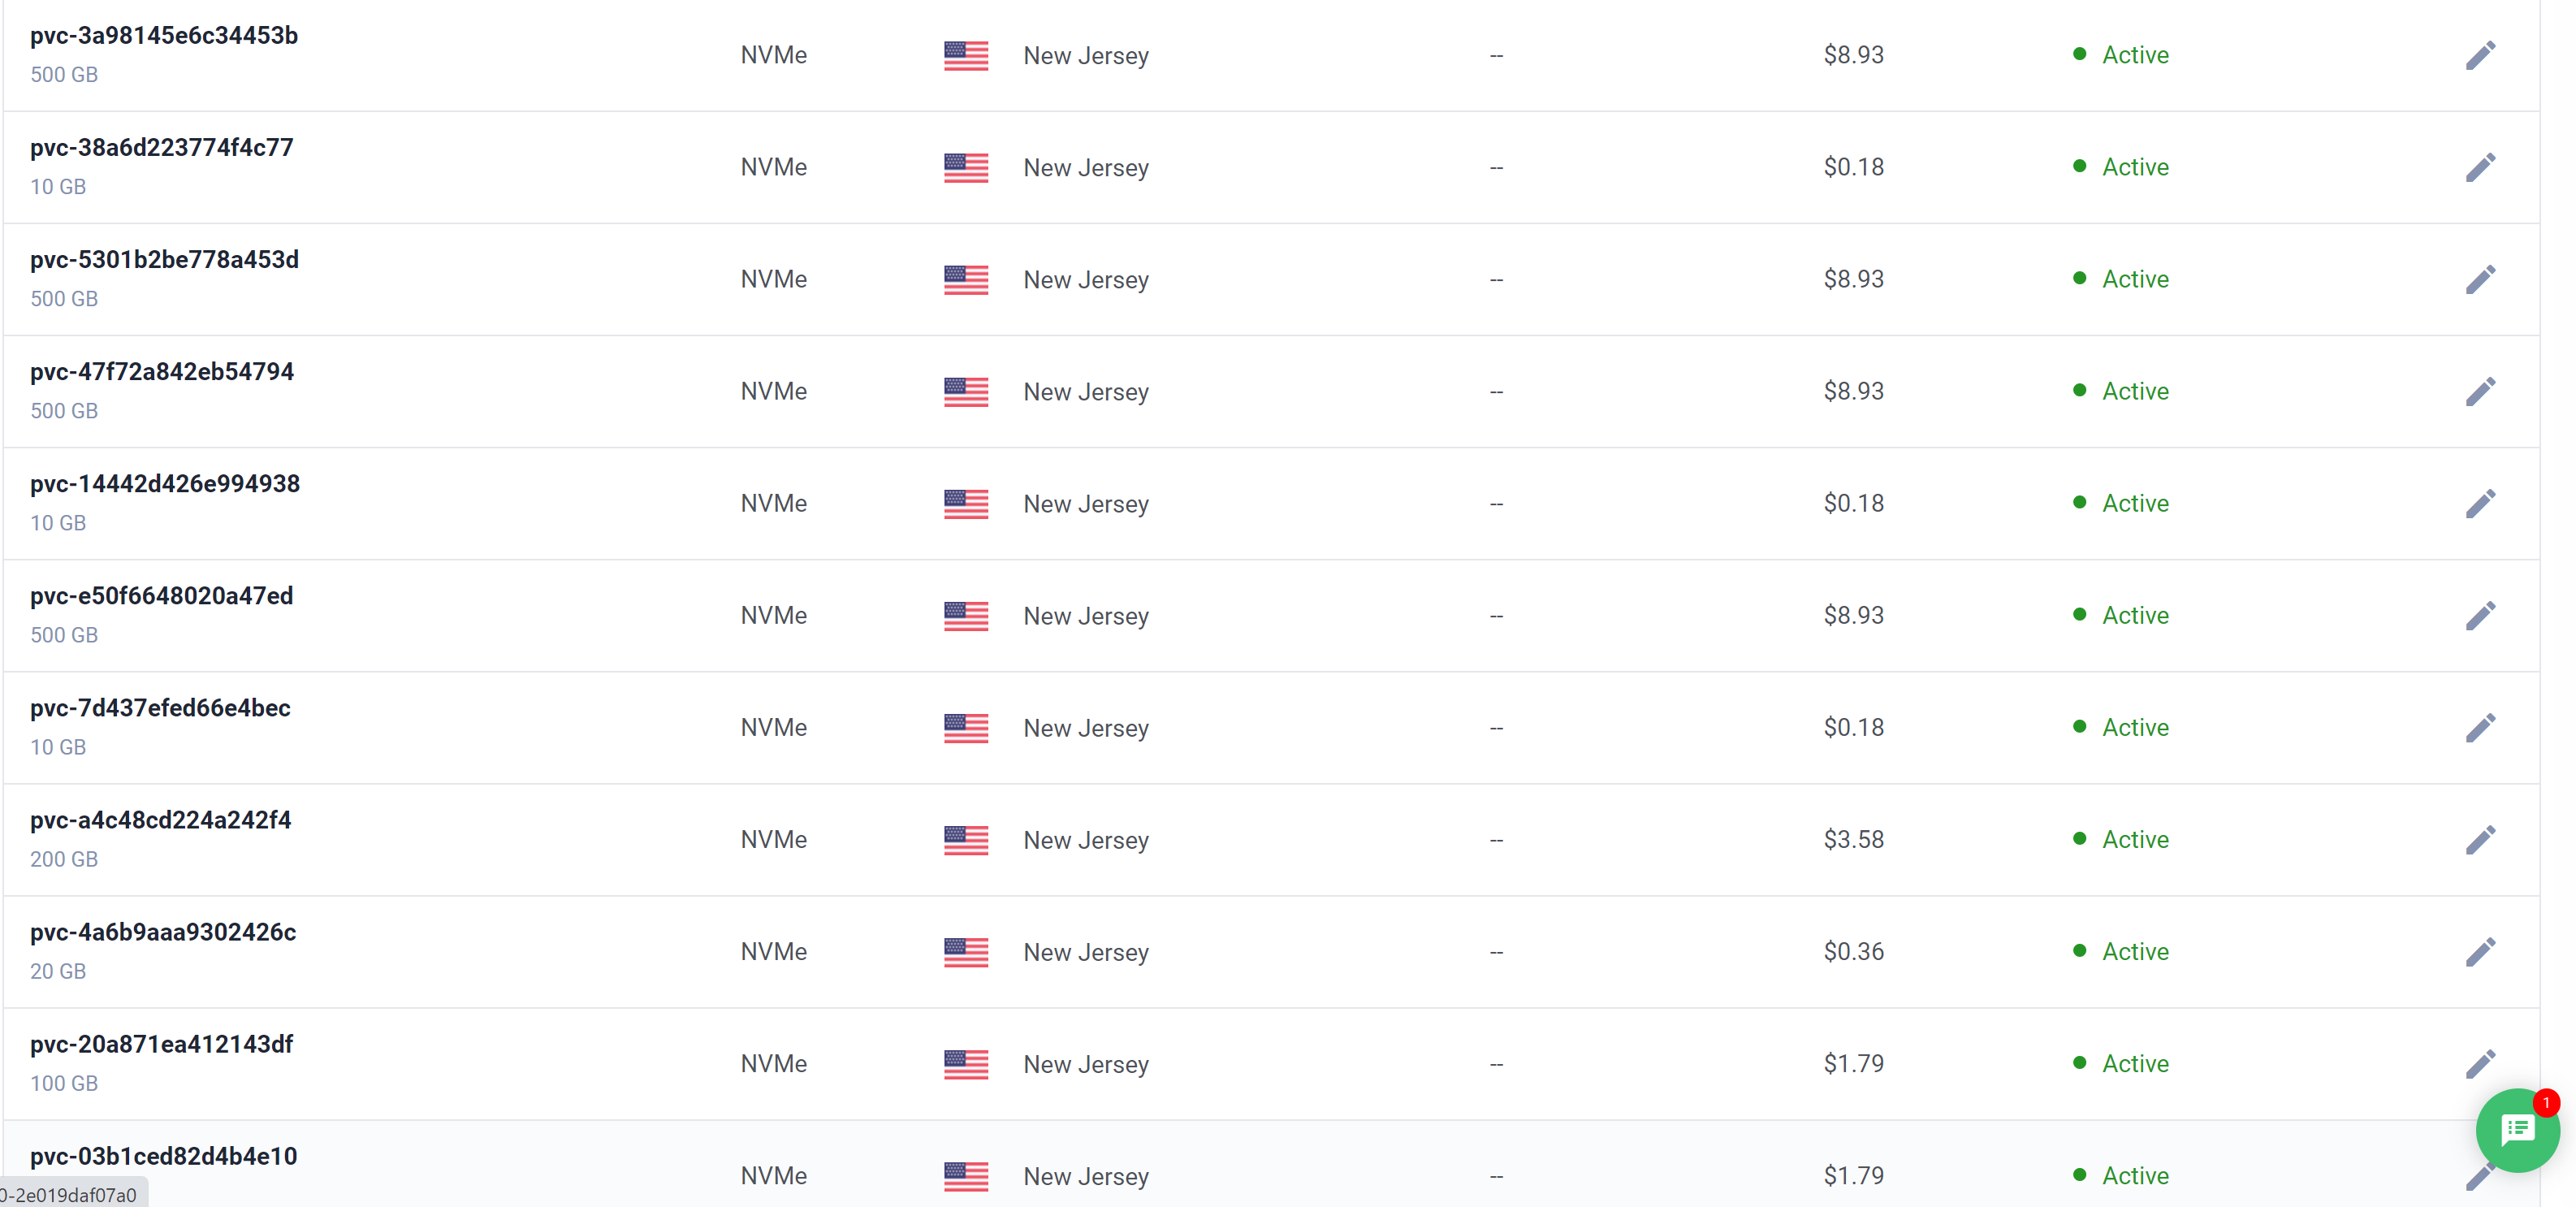
Troubleshooting
Depending on your Milvus Cluster deployment, you may encounter errors based on the following Milvus DB issues:
- Not enough Vultr Block Storage volumes
- Not enough Memory
- Not enough CPU
- Not enough Cluster Nodes
A Milvus Cluster requires at least 20 Vultr Block Storage volumes, verify that enough volumes are attached to your account to avoid any resource limitation errors.
In case your Milvus cluster pods are not not running. Describe the target pod to view any error logs using the command below
$ kubectl describe pod_nameThe above command displays detailed information about a specific pod in your Milvus cluster. The information may include the
status,events,namespace, andIP addressinformation.Verify that the Milvus Cluster storage volumes are healthy and running
$ kubectl describe pvcThe above command displays a summary of the cluster Persistent Volume Claims (PVCs). Verify that all available PVCs are running correctly
If you receive an authentication error while creating a new database, verify the
user,Milvus Address, andpassworddetails in your Python application file.
Conclusion
You have deployed a Milvus Cluster using the Milvus operator on a Vultr Kubernetes Engine (VKE) cluster. Then, you created an external service by exposing the database server outside the cluster and tested access to the service by creating a new database. For more information, visit the Milvus DB documentation.
Next Steps
To install other database systems to your VKE cluster, visit the following resources: