
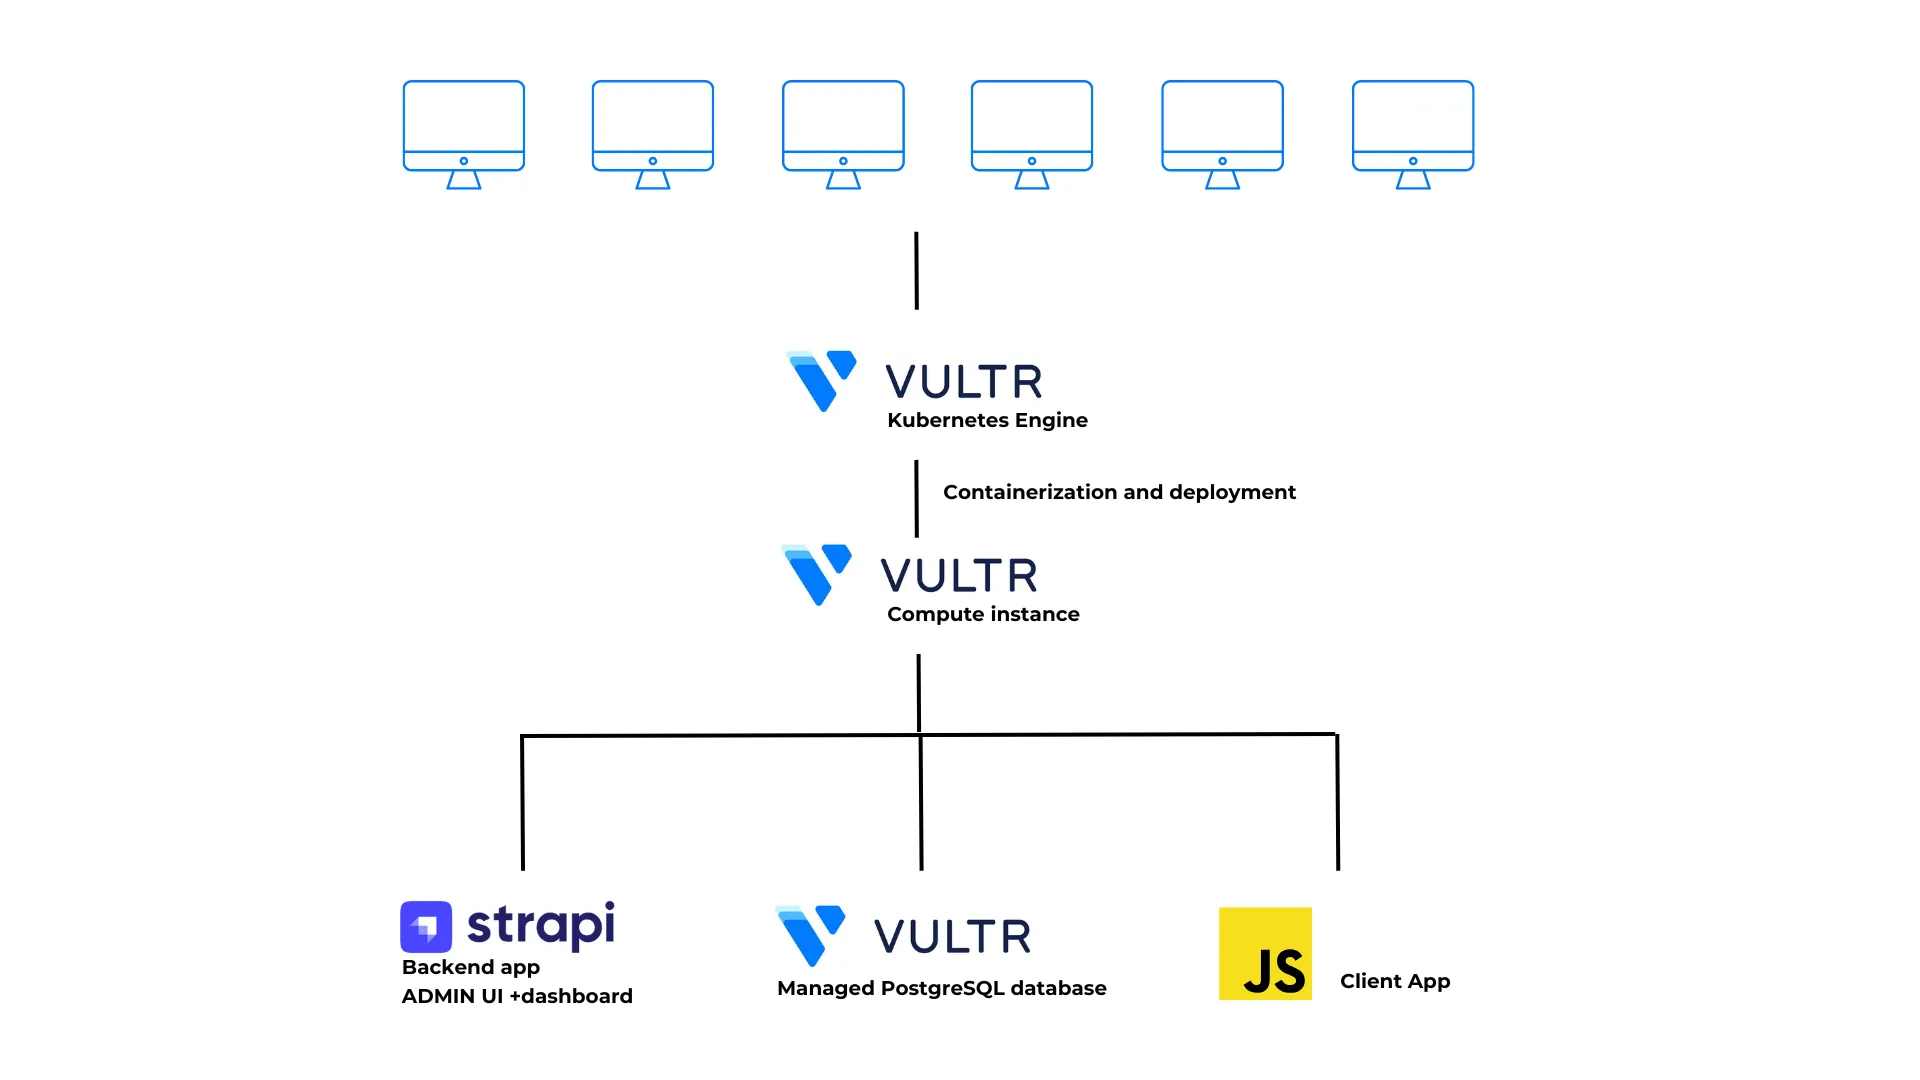
How to Deploy Strapi on a Kubernetes Cluster
Strapi is a headless Content Management System (CMS) that enables users to create and manage content across websites, web apps, and mobile platforms. It features an intuitive admin dashboard, enabling users to add, edit, or delete content without technical expertise. Strapi also allows users to define custom content types and data structures, offering greater flexibility in content organization. With seamless integration capabilities, Strapi integrates with front-end frameworks, databases, and third-party services, making it a versatile choice for modern content management.

Strapi is designed to handle large volumes of content and efficiently serve a growing user base, making it an ideal for deployment on a Kubernetes cluster. Kubernetes enhances Strapi’s scalability and supports deployments across multiple environments. Strapi also includes built-in role-based authentication and user permissions, ensuring that only authorized users can access or modify content — adding a layer of security for cluster-based applications.
Designed to handle high content volumes and scale efficiently, Strapi is well-suited for deployment on a Kubernetes cluster. Kubernetes enhances Strapi’s scalability and multi-environment support. With built-in role-based authentication and user permissions, Strapi also ensures secure content access within cluster-based applications.
This article explains how to containerize, deploy, and scale a Strapi application on a Kubernetes Engine.
Prerequisites
Before you begin, you should:
- Have access to a Kubernetes Engine Cluster.
- Create a new DNS
Arecord pointing to the Ingress Load Balancer IP. This article uses strapi.example.com, replace all occurrences with your actual domain. - Have access to a PostgreSQL Database.
- Have access to an Ubuntu 24.04 instance as a non-root sudo user to use as the management workstation.
- Install Docker on your workstation for containerization.
- Install Kubectl on your management workstation to manage the Kubernetes Cluster.
- Install Helm Package Manager on your workstation.
- Ensure you have your cluster Kube config file and have configured kubectl on your workstation to connect to the cluster.
Build a Strapi Application
Access your management workstation and add the Node.js repository.
console$ curl -sL https://deb.nodesource.com/setup_22.x | sudo -E bash -
Install Node.js.
console$ sudo apt install -y nodejs
Configure Git.
Strapi uses Git for version control. If Git isn't configured, then configure your global username and email.
Set a global username to use with Git.
console$ git config --global user.name "Your Full Name"
Set a global email address to use with Git.
console$ git config --global user.email "email@example.com"
Create a new Strapi project using
npx.console$ npx create-strapi-app@latest strapi-project --quickstart --js
The above command creates a new Strapi application called
strapi-projectusing the Quickstart installation type. It installs the latest version of thecreate-strapi-apppackage, sets up the project structure, and installs all necessary dependencies.Your output should be similar to the one below:
Strapi   v5.11.0 🚀 Let's create your new project
...
...
? Please log in or sign up. Skip

 Strapi   Creating a new application at /home/linuxuser/strapi-project
...
 Actions available

One more thing...
Create your first administrator 💻 by going to the administration panel at:

┌─────────────────────────────┐
│ http://localhost:1337/admin │
└─────────────────────────────┘

[2025-03-08 06:49:51.972] info: Strapi started successfully
After the installation is complete, press Ctrl + C to stop the server and configure additional application settings.
Containerize the Strapi Application
In this section, configure your Strapi application to use a PostgreSQL Database, then set up an environment variable in the app's server file. Build the app's docker container image to deploy it on the Kubernetes cluster as described below.
Navigate to the project directory.
console$ cd strapi-project
Edit the
.envfile.console$ nano .env
Update the following values in the
.envfile.ini... ## DATABASE CREDENTIALS DATABASE_CLIENT=postgres DATABASE_HOST=postgres.vultrdb.com DATABASE_PORT=5432 DATABASE_NAME=strapi_db DATABASE_USERNAME=user DATABASE_PASSWORD=password DATABASE_SSL=true DATABASE_SSL_REJECT_UNAUTHORIZED=false DATABASE_SCHEMA=public DATABASE_CONNECTION_TIMEOUT=60000 ...
Save and close the file.
The above configuration defines the database connection details for the PostgreSQL database. Replace
postgres.vultrdb.com,5432,user,strapi_db, andpasswordwith your actual database credentials.Back up the original
config/server.jsfile.console$ mv config/server.js config/server.ORIG
Re-create the
config/server.jsfile.console$ nano config/server.js
Add the following configurations to the file.
javascriptmodule.exports = ({ env }) => ({ host: env('HOST', '0.0.0.0'), port: env.int('PORT', 1337), url: env('STRAPI_URL'), app: { keys: env.array('APP_KEYS'), }, webhooks: { populateRelations: env.bool('WEBHOOKS_POPULATE_RELATIONS', false), }, });
Save and close the file.
The above code exports a configuration object that sets the
host,port,url, andwebhookssettings for the Strapi application. It retrieves values from environment variables.Define the
STRAPI_URLenvironment variable.console$ export STRAPI_URL="http://127.0.0.1:1337"
This above command sets the
STRAPI_URLenvironment variable to the local Strapi server address and port.Install the PostgreSQL library for Node.js to enable the database connection.
console$ npm install pg --save
Rebuild the application.
console$ npm run build
The above command compiles the application, incorporating all recent changes.
Start the application in the background.
console$ npm run start &
The above command starts the application in production mode. To verify that the Strapi application is running, visit the following address in your web browser and make sure Strapi web page displays. Replace
<SERVER-IP>with your server’s actual IP address:http://<SERVER-IP>:1337The Strapi dashboard should appear, displaying the register-admin screen to create the first administrator account.
Create the Docker Image
Create a Dockerfile in the project directory.
console$ nano Dockerfile
Add the following configurations to the file.
dockerfileFROM node:22-alpine RUN apk update && apk add --no-cache build-base gcc autoconf automake zlib-dev libpng-dev nasm bash vips-dev ARG NODE_ENV=production ENV NODE_ENV=${NODE_ENV} WORKDIR /opt/ COPY package.json package-lock.json ./ RUN npm install ENV PATH=/opt/node_modules/.bin:$PATH WORKDIR /opt/app COPY . . RUN chown -R node:node /opt/app USER node RUN ["npm", "run", "build"] EXPOSE 1337 CMD ["npm", "run", "start"]
Save and close the file.
This Dockerfile:
- Uses Node.js 22 Alpine as the base image.
- Installs necessary dependencies and sets up the working directory.
- Copies project files, builds the app, and exposes port
1337. - Starts the server with
npm run start.
Create a file named
.dockerignore.console$ nano .dockerignore
The
.dockerignorefile declares a list of files and directories to ignore while building the image.Add the following content to the file
ininode_modules/This prevents the local node_modules/ folder from being copied into the image, letting Docker install dependencies fresh.
Build the Docker image.
console$ docker build -t strapi:latest .
Log in to your DockerHub account.
console$ docker login -u <username> -p <password>
Replace
<username>and<password>with your DockerHub username and password. To create a new DockerHub account, visit the DockerHub registry.Your output should be similar to the one below:
...
Login Succeeded
Tag the Docker image with your
<username>.console$ docker tag strapi:latest <username>/strapi:latest
Replace
<username>with your DockerHub username.Push the image to DockerHub.
console$ docker push <username>/strapi:latest
Replace
<username>with your DockerHub username.Your output should be similar to the one below:
The push refers to repository [docker.io/<username>/strapi]
11f5e64c549b: Pushed
cb4435d821bf: Pushed
30eb464a5e79: Pushed
...
Prepare the Kubernetes Cluster
Before deploying the Strapi application, you must configure the Kubernetes cluster by installing the necessary plugins and creating essential resources. This section demonstrates the steps to install the Nginx Ingress Controller, CertManager plugin, and creates a ClusterIssuer resource to issue Let’s Encrypt SSL certificates.
Follow the steps below to set up your cluster.
Install the Nginx Ingress Controller
Add the Nginx Ingress repository.
console$ helm repo add ingress-nginx https://kubernetes.github.io/ingress-nginx
Update Helm chart repositories.
console$ helm repo update
Create a new
ingress-nginxnamespace for Nginx Ingress Controller.console$ kubectl create namespace ingress-nginx
Install the Nginx Ingress Controller.
console$ helm install ingress-nginx ingress-nginx/ingress-nginx --namespace ingress-nginx
After installation, a Load Balancer is provisioned automatically for your cluster. Verify that the assigned External-IP Address matches the Load Balancer IP in the Kubernetes Engine dashboard.
console$ kubectl get services ingress-nginx-controller --namespace ingress-nginx
Your output should be similar to the one below:
NAME TYPE CLUSTER-IP EXTERNAL-IP PORT(S) AGE ingress-nginx-controller LoadBalancer 10.100.115.77 192.0.2.1 80:32070/TCP,443:31590/TCP 6m8sThe Load Balancer may take several minutes to become ready. If theNoteEXTERNAL-IPfield shows as<pending>, wait a few minutes and try again. You can also verify the Load Balancer deployment by opening the cluster page in the Kubernetes portal and checking the linked resources.
Install the CertManager for SSL Certificates
Install CertManager.
console$ kubectl apply -f https://github.com/cert-manager/cert-manager/releases/download/v1.17.2/cert-manager.yaml
Output:
namespace/cert-manager created
customresourcedefinition.apiextensions.k8s.io/certificaterequests.cert-manager.io created
customresourcedefinition.apiextensions.k8s.io/certificates.cert-manager.io created
customresourcedefinition.apiextensions.k8s.io/challenges.acme.cert-manager.io created
...
Visit the official CertManager releases page to get the latest version.
Get the Load Balancer’s External-IP Address.
console$ kubectl get services ingress-nginx-controller --namespace ingress-nginx
Your output should be similar to the one below:
NAME                       TYPE           CLUSTER-IP      EXTERNAL-IP     PORT(S)                      AGE
ingress-nginx-controller   LoadBalancer   10.100.115.77   192.0.2.1       80:32070/TCP,443:31590/TCP   6m8s
Add an A record for your domain
strapi.example.comand point it to the External-IP Address of the Load Balancer.Create a new manifest named
clusterissuer.yaml.console$ nano clusterissuer.yaml
Add the following configurations to the file.
yamlapiVersion: cert-manager.io/v1 kind: ClusterIssuer metadata: name: letsencrypt-prod spec: acme: server: https://acme-v02.api.letsencrypt.org/directory email: "hello@example.com" privateKeySecretRef: name: letsencrypt-prod solvers: - http01: ingress: class: nginx
Save and close the file.
The above configuration creates a
ClusterIssuerresource to issue Let’s Encrypt certificates using the HTTP01 challenge. Replace"hello@example.com"with your actual email address.Apply the ClusterIssuer resource.
console$ kubectl apply -f clusterissuer.yaml
Output:
clusterissuer.cert-manager.io/letsencrypt-prod createdVerify the ClusterIssuer deployment.
console$ kubectl get clusterissuer letsencrypt-prod
Your output should be similar to the one below:
NAME               READY   AGE
letsencrypt-prod   True    57s
A
READYstatus ofTrueconfirms the successful deployment of the ClusterIssuer resource.
Deploy the Strapi Application
Create a new deployment manifest file
strapi-deployment.yaml.console$ nano strapi-deployment.yaml
Add the following configurations to the file.
yamlapiVersion: apps/v1 kind: Deployment metadata: name: strapi-deployment spec: replicas: 2 selector: matchLabels: name: strapi-app template: metadata: labels: name: strapi-app spec: imagePullSecrets: - name: regcred containers: - name: strapi image: <username>/strapi:latest imagePullPolicy: Always command: ["sh", "-c", "npm run build && npm run start"] ports: - containerPort: 1337 env: - name: STRAPI_URL value: "strapi.example.com"
Save and close the file.
The above configuration creates a
Deploymentresource:- It creates 2 initial pods with the container image you built, with the
strapi-applabel. - It fetches the credentials from
regcredsecret resource and authenticate to the DockerHub to pull the container image from private repository. Replace the image<username>/strapi:latestwith your actual repository. - Replace
strapi.example.comwith your actual domain pointing to the cluster load balancer.
- It creates 2 initial pods with the container image you built, with the
Apply the
strapi-deployment.yamldeployment file to deploy the application.console$ kubectl apply -f strapi-deployment.yaml
Output:
deployment.apps/strapi-deployment configuredVerify that the application is deployed.
console$ kubectl get deployment strapi-deployment
Your output should be similar to the one below:
NAME                READY   UP-TO-DATE   AVAILABLE   AGE
strapi-deployment   2/2     2            2           19m
Create a new service manifest to expose the application.
console$ nano strapi-service.yaml
Add the following configurations to the file.
yamlapiVersion: v1 kind: Service metadata: name: strapi-service spec: ports: - name: http port: 80 protocol: TCP targetPort: 1337 selector: name: strapi-app
Apply the Service.
console$ kubectl apply -f strapi-service.yaml
Output:
service/strapi-service createdCreate an Ingress manifest.
console$ nano strapi-ingress.yaml
Add the following configurations to the file.
yamlapiVersion: networking.k8s.io/v1 kind: Ingress metadata: name: strapi-ingress annotations: cert-manager.io/cluster-issuer: letsencrypt-prod spec: ingressClassName: nginx tls: - secretName: strapi-tls hosts: - strapi.example.com rules: - host: strapi.example.com http: paths: - path: / pathType: Prefix backend: service: name: strapi-service port: number: 80
Save and close the file.
The above Ingress resource allows external access to the
strapi-serviceresource. It uses the cluster issuer resourceletsencrypt-prodto issue a new SSL certificate for domainstrapi.example.comand store it as a secret resourcestrapi-tls.Apply the Ingress resource.
console$ kubectl apply -f strapi-ingress.yaml
Output:
ingress.networking.k8s.io/strapi-ingress createdVerify the Ingress resource.
console$ kubectl get ingress
Your output should be similar to the one below:
NAME             CLASS   HOSTS               ADDRESS         PORTS     AGE
strapi-ingress   nginx   strapi.example.com   192.0.2.1       80, 443   62m
In a web browser, visit the below URL and verify that the log in page displays over HTTPS protocol.
https://strapi.example.com
Scale the Strapi Deployment
Scaling the Strapi application makes it efficient to handle high traffic loads without downtime or interruptions In this section, you'll scale the Strapi application adjust the number of running replicas.
Increase the number of running replicas.
console$ kubectl scale deployment/strapi-deployment --replicas=4
The above command scales the deployment to 4 replicas.
Output:
deployment.apps/strapi-deployment scaledVerify the deployment status.
console$ kubectl get deployment strapi-deployment
Your output should be similar to the one below:
NAME                READY   UP-TO-DATE   AVAILABLE   AGE
strapi-deployment   4/4     4            4           67m
View the running pods.
console$ kubectl get pods
Your output should be similar to the one below:
NAME                                 READY   STATUS    RESTARTS   AGE
strapi-deployment-5d5ccdb8b5-gj96w   1/1     Running   0          10m
strapi-deployment-5d5ccdb8b5-l8wv7   1/1     Running   0          9m34s
strapi-deployment-5d5ccdb8b5-wcg2x   1/1     Running   0          100s
strapi-deployment-5d5ccdb8b5-xx8t6   1/1     Running   0          100s
Decrease the number of replicas.
console$ kubectl scale deployment/strapi-deployment --replicas=2
Kubernetes automatically terminates the extra pods and adjusts traffic distribution.
You can test the fault tolerance by manually deleting a pod.
console$ kubectl delete pod <pod-name>
Replace
<pod-name>with an existing pod name.Kubernetes detects the change and automatically creates a new pod. The Ingress resource detects the new pod and starts routing requests without downtime.
Conclusion
You have created an example Strapi application using the Strapi API with a PostgreSQL configuration, then containerized, deployed, and scaled the application on a Kubernetes Engine. You also configured CertManager to issue Let’s Encrypt certificates and set up the Nginx Ingress controller to enable secure external access to the cluster services.
Strapi simplifies content management through an intuitive web interface, eliminating the need for technical expertise. This makes it an good choice for building low-code or no-code backends. For more information, visit the following resources.