
How to Deploy Vendure on Ubuntu 22.04
Introduction
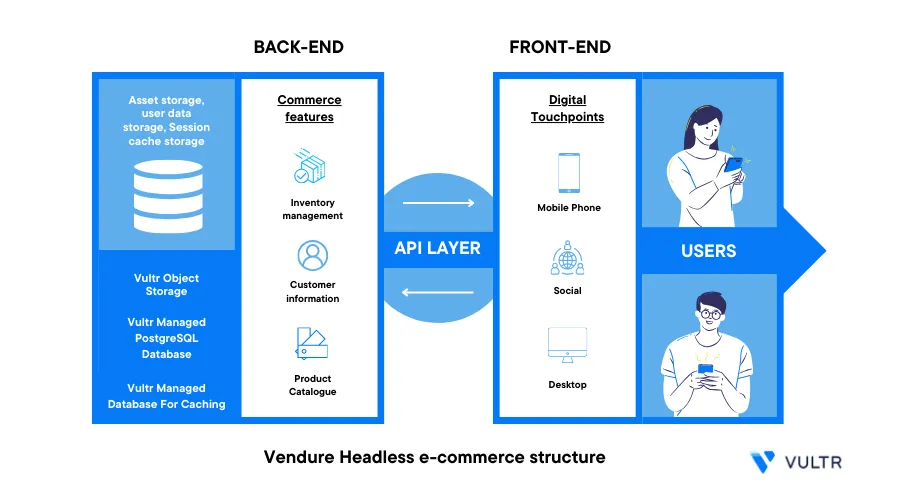
Vendure is an open-source headless commerce framework that allows to build production-ready e-commerce applications powered by Node.js, TypeScript and GraphQL. It works by exposing all application functionality through APIs. Vendure exposes all the shop front-end functionalities on the GraphQL API and doesn't offer a default storefront interface. This improves developer flexibility because it allows you to create your storefront using any front-end technology.
This guide explains how to deploy Vendure on a Ubuntu 22.04 Vultr Server. You are to integrate the framework with Vultr Object Storage, a Managed Database for PostgreSQL, and Valkey to build a production-ready application.
Prerequisites
Before you begin:
Deploy a Vultr Managed Database for Valkey.
Deploy a Vultr Object Storage
Set up a domain A record pointing to the server
Using SSH, log in to the server as root
Create a non-root user with sudo privileges
Switch to the new sudo user account
# su example_userInstall s3cmd on the server:
$ sudo apt install s3cmd
Install Node.js
Vendure required the Node.js version 16.x or above. Install the latest Node.js version as described in the steps below.
Update the server
$ sudo apt updateCreate the
keyringsdirectory$ sudo mkdir -p /etc/apt/keyringsDownload and add the Node source GPG key to your server keys
curl -fsSL https://deb.nodesource.com/gpgkey/nodesource-repo.gpg.key | sudo gpg --dearmor -o /etc/apt/keyrings/nodesource.gpgAdd the Node.js repository to your
aptsources list. Replace20with your desired versionNODE_MAJOR=20 echo "deb [signed-by=/etc/apt/keyrings/nodesource.gpg] https://deb.nodesource.com/node_$NODE_MAJOR.x nodistro main" | sudo tee /etc/apt/sources.list.d/nodesource.listUpdate the server packages
$ sudo apt updateInstall Node.js
$ sudo apt install nodejs -yVerify the installed Node.js version
$ nodejs --versionOutput:
v20.5.1
Set Up the Local PostgreSQL Database Server
To install Vendure on the server, you need to temporarily save the application data on your local PostgreSQL database server. Later, you can migrate the data to a Vultr Managed Database for MySQL before deploying the application to production. Set up the local database as described below.
Enable Password Authentication on PostgreSQL
Verify the installed PostgreSQL version
$ psql --versionOutput:
psql (PostgreSQL) 14.16 (Ubuntu 14.16-0ubuntu0.22.04.1)Depending on your PostgreSQL version, edit the
pg_hba.conffile using a text editor such asnano$ sudo nano /etc/postgresql/14/main/pg_hba.confFind the following configurations line
 # "local" is for Unix domain socket connections only
 local   all             all                                     peer
Change the
peerauthentication method tomd5local all all md5Save and close the file
Restart the PostgreSQL database server
$ sudo systemctl restart postgresql
Create a New PostgreSQL Database
Log in to the PostgreSQL database server
$ sudo -u postgres psqlCreate a new database
postgres=# CREATE DATABASE vendure_db;Output:
CREATE DATABASECreate a new database user with a strong password
postgres=# CREATE USER vendure_user WITH ENCRYPTED PASSWORD 'strong-password';Output:
CREATE ROLEGrant the user full privileges to the Vendure database
postgres=# GRANT ALL PRIVILEGES ON DATABASE vendure_db TO vendure_user;Output:
GRANTQuit the PostgreSQL console
postgres-# \q
Install Vendure
Using the
npxNode.js tool, Install Vendure using the@vendure/createtool.$ npx @vendure/create vendure-appReply to each of the installation prompts as described below
Press Y to install the
@vendure/createpackageNeed to install the following packages: @vendure/create@2.0.2 Ok to proceed? (y) ySelect
Postgresas a database in use◆ Which database are you using? │ ○ MySQL │ ○ MariaDB │ ● Postgres │ ○ SQLite │ ○ SQL.jsPress Enter to set
localhostas the PostgreSQL hostname◆ What's the database host address? │ localhostPress Enter to keep
5432as the PostgreSQL port number◆ What port is the database listening on? │ 5432Enter the PostgreSQL database name you created earlier
 ◆  What's the name of the database?
 │  vendure_db
Press Enter to keep the PostgreSQL schema set to public
    What's the schema name we should use?
 │  public
Enter the PostgreSQL user you created earlier
 ◇  What's the database user name?
 │  vendure_user
Enter the PostgreSQL database user password you created earlier
 ◇  What's the database password?
 │  strong-password
Press Enter to keep
superadminas the default administrator username. Change the username to your desired value◇ What identifier do you want to use for the superadmin user? │ superadmin │Enter your desired super administrator username or press Enter to use the default password
 ◇  What password do you want to use for the superadmin user?
 │  superadmin
 │
Select
yesand press Enter to populate the database with sample product data◆ Populate with some sample product data? │ ● yes │ ○ noWhen successful, the installation process should complete with the following output:
 ◇  Server successfully initialized and populated
 │
 ◇   ──────────────────────────────────────────╮
 │                                             │
 │  Success! Created a new Vendure server at:  │
 │                                             │
 │                                             │
 │  /home/example_user/vendure-app             │
 │                                             │
 │                                             │
 │  We suggest that you start by typing:       │
 │                                             │
 │                                             │
 │  $ cd vendure-app                           │
 │  $ npm run dev                              │
 │                                             │
 ├─────────────────────────────────────────────╯
 │
 └  Happy hacking!
List files in your working directory
$ lsOutput:
vendure-appVerify that a new
vendure-appdirectory is available on the list
Set Up the Vultr Managed Database for PostgreSQL
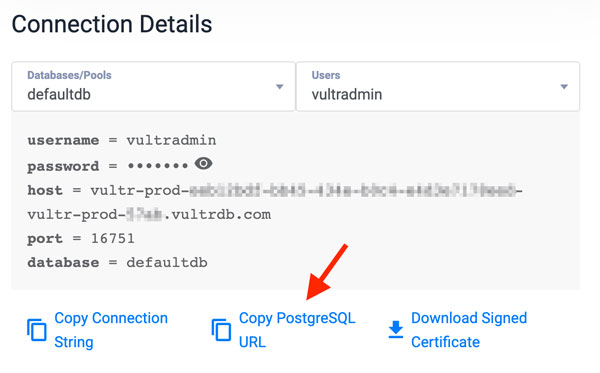
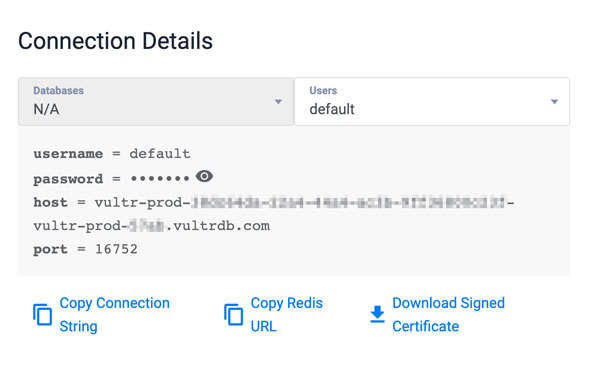
Log in to your Vultr Managed Database for PostgreSQL. Replace
vultradmin,1234,host.vultrdb.comwith your actual values$ psql -h host.vultrdb.com -d postgres -U vultradminOr, copy and use your database connection string from your Vultr Managed Database for PostgreSQL control panel
When logged in, create a new database
defaultdb=> CREATE DATABASE venduredb;Output:
CREATE DATABASEQuit PostgreSQL console
defaultdb=> \q
Migrate Data the local PostgreSQL Database Data to your Vultr PostgreSQL Managed Database
Back up your PostgreSQL database to the
venduredb.sqlfile using the user and database you created earlier$ pg_dump --no-owner -U vendure_user -d vendure_db -W > venduredb.sqlWhen prompted, enter the correct Vendure user database password you set earlier
Using the backup file, restore the database to your Vultr PostgreSQL Managed Database. Replace
host.vultrdb.com,vendure_db,vultradminwith your actual details.$ psql -h host.vultrdb.com -d vendure_db -U vultradmin < venduredb.sqlWhen the restoration is complete, access your Vultr Managed Database for PostgreSQL
$ psql -h host.vultrdb.com -d vendure_db -U vultradminView the Vendure database tables
vendure_db=> \dtOutput:
                           List of relations
  Schema |                    Name                     | Type  | Owner
 --------+---------------------------------------------+-------+-------
  public | address                                     | table | vultradmin
  public | administrator                               | table | vultradmin
  public | asset                                       | table | vultradmin
  public | asset_channels_channel                      | table | vultradmin
  public | asset_tags_tag                              | table | vultradmin
  public | authentication_method                       | table | vultradmin
  public | channel                                     | table | vultradmin
  public | collection                                  | table | vultradmin
  public | collection_asset                            | table | vultradmin
  public | collection_channels_channel                 | table | vultradmin
  public | collection_closure                          | table | vultradmin
  public | collection_product_variants_product_variant | table | vultradmin
  public | collection_translation                      | table | vultradmin
  public | customer                                    | table | vultradmin
  public | customer_channels_channel                   | table | vultradmin
  public | customer_group                              | table | vultradmin
  public | customer_groups_customer_group              | table | vultradmin
  public | facet                                       | table | vultradmin
  public | facet_channels_channel                      | table | vultradmin
 :
Enter Q to exit the PostgreSQL pager
Exit the PostgreSQL console
# \qIn your Vultr Console, download the Vultr Managed Database for PostgreSQL signed certificate file
ca-certificate.crt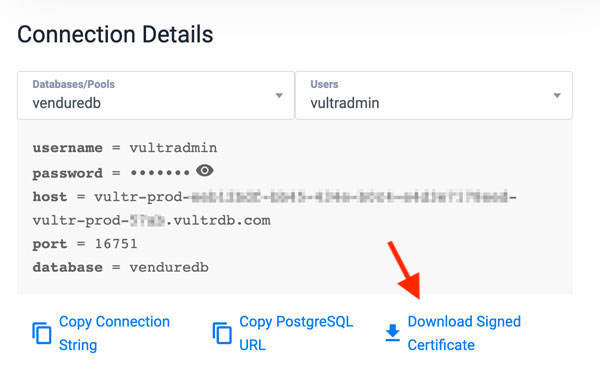
When downloaded, in your terminal session, use
scpand upload the file to your server$ scp ca-certificate.crt example_user@SERVER-IP:/home/example_user/When uploaded, verify that the certificate file is available in your user home directory
$ lsOutput:
ca-certificate.crtMove the certificate file to the
/usr/local/share/ca-certificates/directory.$ sudo mv ca-certificate.crt /usr/local/share/ca-certificates/Edit the
vendure-config.tsfile$ nano src/vendure-config.tsImport the
readFileSyncmethod from thenode:fsat the top of the fileimport { readFileSync } from 'node:fs';Add the following declarations to the
dbConnectionOptionssectionssl: { rejectUnauthorized: true, ca: readFileSync('/usr/local/share/ca-certificates/ca-certificate.crt').toString(), },Your edited
dbConnectionOptionssection should look like the one below:dbConnectionOptions: { type: 'postgres', // See the README.md "Migrations" section for an explanation of // the `synchronize` and `migrations` options. synchronize: false, migrations: [path.join(__dirname, './migrations/*.+(js|ts)')], logging: false, database: process.env.DB_NAME, schema: process.env.DB_SCHEMA, host: process.env.DB_HOST, port: +process.env.DB_PORT, username: process.env.DB_USERNAME, password: process.env.DB_PASSWORD, ssl: { rejectUnauthorized: true, ca: readFileSync('/usr/local/share/ca-certificates/ca-certificate.crt').toString(), }, },Save and close the file.
Switch the Vendure PostgreSQL Database Configuration
Switch to the
vendure-appdirectory$ cd vendure-appEdit the
.envfile$ nano .envUpdate the following existing variables with your Vultr Managed Database for PostgreSQL details
 DB_HOST=host.vultrdb.com
 DB_PORT=1234
 DB_NAME=vendure_db
 DB_USERNAME=vultradmin
 DB_PASSWORD=managed-db-password
Save and close the file.
Store Vendure Assets in Object Storage
Create a New Bucket
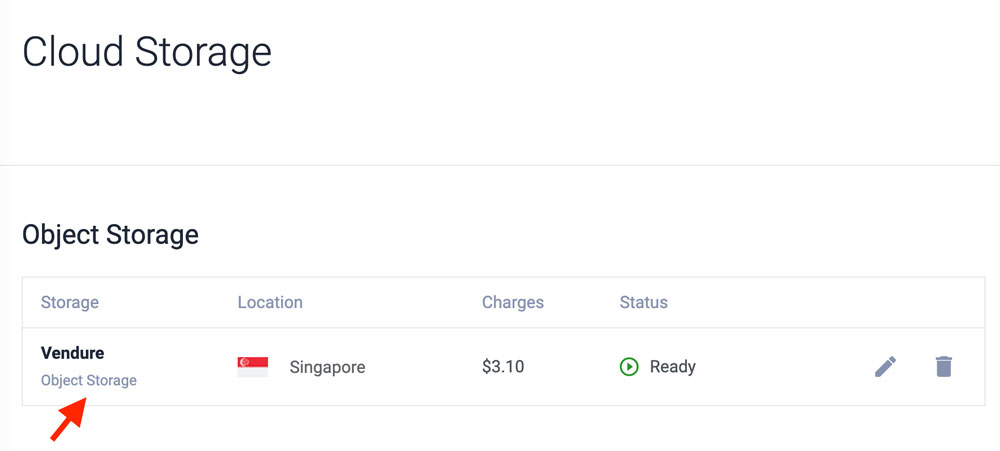
Log in to the Vultr Console
Navigate to Products -> Cloud Storage -> Object Storage.
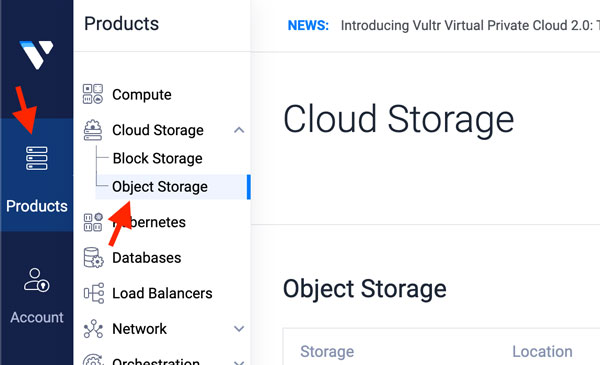
Access your Vultr Object Storage control panel
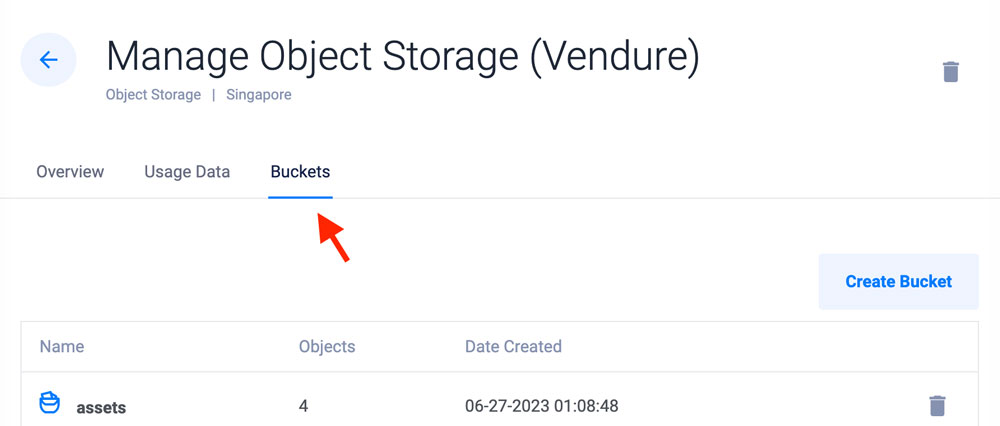
Navigate to Buckets
Click the Create Bucket button, and assign the bucket a name of your choice. For example
vendure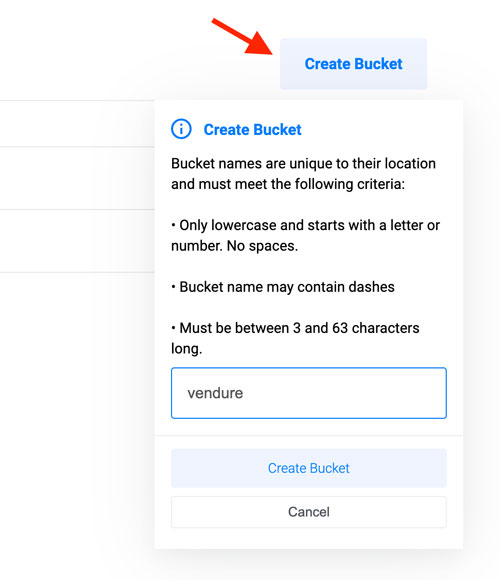
Sync the Assets to Vultr Object Storage
View your working directory
$ pwdVerify that you're operating in the
vendure-appdirectory, or switch to the directory$ cd vendure-appUsing the
s3cmdtool, synchronize the Vendure assets directory to your Vultr Object Storage bucket$ s3cmd sync static/assets/ s3://vendure/Verify that the file transfer completes successfully
Add the Vultr Object Storage Configuration
Using
npm, install the@aws-sdk/client-s3and@aws-sdk/lib-storagepackages$ npm install @aws-sdk/client-s3 @aws-sdk/lib-storage --saveEdit the
environment.d.tsfile$ nano src/environment.d.tsAdd the following configurations within the
ProcessEnvfunctionS3_ENDPOINT: string; S3_ACCESS_KEY_ID: string; S3_SECRET_ACCESS_KEY: string; S3_BUCKET_NAME: string;Save and close the file.
Your edited file should look like the one below:
 namespace NodeJS {
     interface ProcessEnv {
         APP_ENV: string;
         COOKIE_SECRET: string;
         SUPERADMIN_USERNAME: string;
         SUPERADMIN_PASSWORD: string;
         DB_HOST: string;
         DB_PORT: number;
         DB_NAME: string;
         DB_USERNAME: string;
         DB_PASSWORD: string;
         DB_SCHEMA: string;
         S3_ENDPOINT: string;
         S3_ACCESS_KEY_ID: string;
         S3_SECRET_ACCESS_KEY: string;
         S3_BUCKET_NAME: string;
     }
Edit the
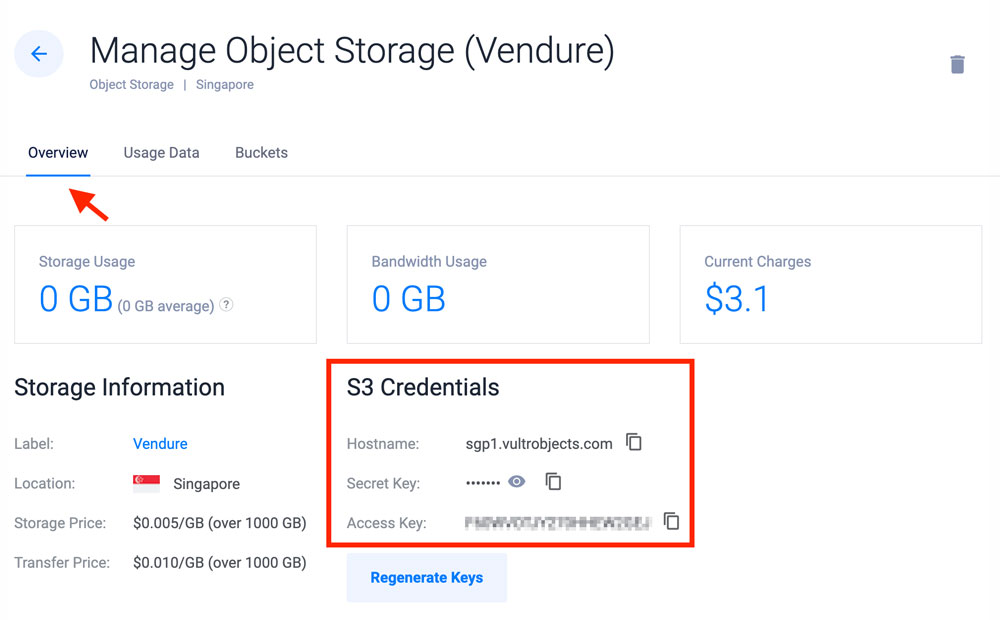
.envfile:$ nano .envAdd the following environment variables to the file. Replace the placeholder values with your actual Vultr Object Storage details
 S3_ENDPOINT=https://YOUR_VULTR_OBJECT_STORAGE_HOST
 S3_ACCESS_KEY_ID=YOUR_VULTR_OBJECT_STORAGE_ACCESS_KEY
 S3_SECRET_ACCESS_KEY=YOUR_VULTR_OBJECT_STORAGE_SECRET_KEY
 S3_BUCKET_NAME=YOUR_VULTR_OBJECT_STORAGE_BUCKET_NAME
Save and close the file.
You can view your Vultr Object Storage details on the instance overview section
Back up the original
vendure-config.tsfile$ mv src/vendure-config.ts src/vendure-config.ORIGCreate the file again
$ nano src/vendure-config.tsAdd the following updated contents to the file. Replace
example.comwith your actual domainimport { dummyPaymentHandler, DefaultJobQueuePlugin, DefaultSearchPlugin, VendureConfig, } from '@vendure/core'; import { AssetServerPlugin, configureS3AssetStorage } from '@vendure/asset-server-plugin'; import { defaultEmailHandlers, EmailPlugin } from '@vendure/email-plugin'; import { AdminUiPlugin } from '@vendure/admin-ui-plugin'; import 'dotenv/config'; import path from 'path'; const IS_DEV = process.env.APP_ENV === 'dev'; export const config: VendureConfig = { apiOptions: { port: 3000, adminApiPath: 'admin-api', shopApiPath: 'shop-api', // The following options are useful in development mode, // but are best turned off for production for security // reasons. ...(IS_DEV ? { adminApiPlayground: { settings: { 'request.credentials': 'include' } as any, }, adminApiDebug: true, shopApiPlayground: { settings: { 'request.credentials': 'include' } as any, }, shopApiDebug: true, } : {}), }, authOptions: { tokenMethod: ['bearer', 'cookie'], superadminCredentials: { identifier: process.env.SUPERADMIN_USERNAME, password: process.env.SUPERADMIN_PASSWORD, }, cookieOptions: { secret: process.env.COOKIE_SECRET, }, }, dbConnectionOptions: { type: 'postgres', // See the README.md "Migrations" section for an explanation of // the `synchronize` and `migrations` options. synchronize: false, migrations: [path.join(__dirname, './migrations/*.+(js|ts)')], logging: false, database: process.env.DB_NAME, schema: process.env.DB_SCHEMA, host: process.env.DB_HOST, port: +process.env.DB_PORT, username: process.env.DB_USERNAME, password: process.env.DB_PASSWORD, }, paymentOptions: { paymentMethodHandlers: [dummyPaymentHandler], }, // When adding or altering custom field definitions, the database will // need to be updated. See the "Migrations" section in README.md. customFields: {}, plugins: [ AssetServerPlugin.init({ route: 'assets', assetUploadDir: path.join(__dirname, '../static/assets'), assetUrlPrefix: IS_DEV ? undefined : 'https://example.com/assets/', storageStrategyFactory: configureS3AssetStorage({ bucket: process.env.S3_BUCKET_NAME, credentials: { accessKeyId: process.env.S3_ACCESS_KEY_ID, secretAccessKey: process.env.S3_SECRET_ACCESS_KEY, }, nativeS3Configuration: { endpoint: process.env.S3_ENDPOINT, forcePathStyle: true, signatureVersion: 'v4', region: 'eu-west-1', }, }), }), DefaultJobQueuePlugin.init({ useDatabaseForBuffer: true }), DefaultSearchPlugin.init({ bufferUpdates: false, indexStockStatus: true }), EmailPlugin.init({ devMode: true, outputPath: path.join(__dirname, '../static/email/test-emails'), route: 'mailbox', handlers: defaultEmailHandlers, templatePath: path.join(__dirname, '../static/email/templates'), globalTemplateVars: { // The following variables will change depending on your storefront implementation. // Here we are assuming a storefront running at http://localhost:8080. fromAddress: '"example" <noreply@example.com>', verifyEmailAddressUrl: 'http://localhost:8080/verify', passwordResetUrl: 'http://localhost:8080/password-reset', changeEmailAddressUrl: 'http://localhost:8080/verify-email-address-change' }, }), AdminUiPlugin.init({ route: 'admin', port: 3002, }), ], };Save and close the file.
The above configuration imports the
configureS3AssetStorageandasset-server-pluginassets to Vendure. Then, it defines the Vendure URLexample.comin theAssetServerPlugin.init({section.
Store the Job Queue and Session Cache in Valkey
Vendure keeps the job queue in the PostgreSQL database by default. To store the jobs in a Vultr Managed Database for Valkey, use the BullMQ job queue plugin as described in the steps below.
Set Up the Job Queue
Install the BullMQ job queue plugin
$ npm install @vendure/job-queue-plugin bullmq@1 --saveEdit the
environment.d.tsfile$ nano src/environment.d.tsAdd the following declarations to the
ProcessEnvinterface after yourS3directivesREDIS_HOST: string; REDIS_PORT: number; REDIS_USERNAME: string; REDIS_PASSWORD: string;Save and close the file.
Edit the
vendure-config.tsfile$ nano src/vendure-config.tsAdd the
BullMQJobQueuePluginimport directive at the top of the fileimport { BullMQJobQueuePlugin } from '@vendure/job-queue-plugin/package/bullmq';In the
plugins:section, find theDefaultJobQueuePlugininitialization directiveDefaultJobQueuePlugin.init({ useDatabaseForBuffer: true }),Replace it with the following
BullMQJobQueuePlugindeclarationsBullMQJobQueuePlugin.init({ connection: { port: process.env.REDIS_PORT, host: process.env.REDIS_HOST, username: process.env.REDIS_USERNAME, password: process.env.REDIS_PASSWORD, tls: {}, } }),Save and close the file.
Edit the
.envfile$ nano .envAdd the following environment variables at the end of the file. Replace the placeholder values with your Vultr Managed Database for Valkey details
 REDIS_HOST=host.vultrd.com
 REDIS_PORT=1234
 REDIS_USERNAME=admin
 REDIS_PASSWORD=strong-password
You can find your Vultr Managed Database for Valkey details on your instance overview section
Configure Session Cache
Vendure stores the session object cache in your system memory. It's fast and suitable for a single-instance deployment. However, for horizontal scaling or multi-instance deployment, you must store the session cache to an external data store such as a Vultr Managed Database for Valkey. To enable Valkey, create a custom session cache strategy as described below.
Create a new
redis-session-cache-strategy.tsfile in thepluginsdirectory$ nano src/plugins/redis-session-cache-strategy.tsAdd the following configurations to the file
 import { CachedSession, Logger, SessionCacheStrategy, VendurePlugin } from '@vendure/core';
 import { Redis, RedisOptions } from 'ioredis';

 export interface RedisSessionCachePluginOptions {
   namespace?: string;
   redisOptions?: RedisOptions;
 }
 const loggerCtx = 'RedisSessionCacheStrategy';
 const DEFAULT_NAMESPACE = 'vendure-session-cache';

 export class RedisSessionCacheStrategy implements SessionCacheStrategy {
   private client: Redis;
   constructor(private options: RedisSessionCachePluginOptions) {}

   init() {
     this.client = new Redis(this.options.redisOptions as RedisOptions);
     this.client.on('error', err => Logger.error(err.message, loggerCtx, err.stack));
   }

   async get(sessionToken: string): Promise<CachedSession | undefined> {
     const retrieved = await this.client.get(this.namespace(sessionToken));
     if (retrieved) {
       try {
         return JSON.parse(retrieved);
       } catch (e: any) {
         Logger.error(`Could not parse cached session data: ${e.message}`, loggerCtx);
       }
     }
   }

   async set(session: CachedSession) {
     await this.client.set(this.namespace(session.token), JSON.stringify(session));
   }

   async delete(sessionToken: string) {
     await this.client.del(this.namespace(sessionToken));
   }

   clear() {
     // not implemented
   }

   private namespace(key: string) {
     return `${this.options.namespace ?? DEFAULT_NAMESPACE}:${key}`;
   }
 }

 @VendurePlugin({
   configuration: config => {
     config.authOptions.sessionCacheStrategy = new RedisSessionCacheStrategy(
       RedisSessionCachePlugin.options,
     );
     return config;
   },
 })
 export class RedisSessionCachePlugin {
   static options: RedisSessionCachePluginOptions;
   static init(options: RedisSessionCachePluginOptions) {
     this.options = options;
     return this;
   }
 }
Save and close the file
Edit the
vendure-config.tsfile$ nano src/vendure-config.tsAdd the
RedisSessionCachePlugindirective to the import sectionimport { RedisSessionCachePlugin } from './plugins/redis-session-cache-strategy';Within the
Plugins: [section, add the following code afterAdminUiPlugin.init(...)to initialize theRedisSessionCachePluginRedisSessionCachePlugin.init({ redisOptions: { port: process.env.REDIS_PORT, host: process.env.REDIS_HOST, username: process.env.REDIS_USERNAME, password: process.env.REDIS_PASSWORD, tls: {}, } }),Save and close the file.
Build for Vendure Production
Edit the
.envfile$ nano .envChange the
APP_ENVvalue fromdevtoproductionAPP_ENV=productionSave and close the file.
Install the Vendure harden plugin that locks down your schema and protects your shop API from malicious queries
$ npm install @vendure/harden-plugin --saveEdit the
vendure-config.tsfile$ nano src/vendure-config.tsAdd the following
harden pluginimport directive to theimportsectionimport { HardenPlugin } from '@vendure/harden-plugin';Within the
Plugins:section, add the following code to initialize the harden pluginHardenPlugin.init({ maxQueryComplexity: 500, apiMode: IS_DEV ? 'dev' : 'prod', }),Save and close the file.
The edited
vendure-config.tsfile should look like the one below:import { dummyPaymentHandler, DefaultJobQueuePlugin, DefaultSearchPlugin, VendureConfig, } from '@vendure/core'; import { defaultEmailHandlers, EmailPlugin } from '@vendure/email-plugin'; import { AssetServerPlugin, configureS3AssetStorage } from '@vendure/asset-server-plugin'; import { AdminUiPlugin } from '@vendure/admin-ui-plugin'; import { BullMQJobQueuePlugin } from '@vendure/job-queue-plugin/package/bullmq'; import { RedisSessionCachePlugin } from './plugins/redis-session-cache-strategy'; import { HardenPlugin } from '@vendure/harden-plugin'; import 'dotenv/config'; import path from 'path'; import { readFileSync } from 'node:fs'; const IS_DEV = process.env.APP_ENV === 'dev'; export const config: VendureConfig = { apiOptions: { port: 3000, adminApiPath: 'admin-api', shopApiPath: 'shop-api', // The following options are useful in development mode, // but are best turned off for production for security // reasons. ...(IS_DEV ? { adminApiPlayground: { settings: { 'request.credentials': 'include' } as any, }, adminApiDebug: true, shopApiPlayground: { settings: { 'request.credentials': 'include' } as any, }, shopApiDebug: true, } : {}), }, authOptions: { tokenMethod: ['bearer', 'cookie'], superadminCredentials: { identifier: process.env.SUPERADMIN_USERNAME, password: process.env.SUPERADMIN_PASSWORD, }, cookieOptions: { secret: process.env.COOKIE_SECRET, }, }, dbConnectionOptions: { type: 'postgres', // See the README.md "Migrations" section for an explanation of // the `synchronize` and `migrations` options. synchronize: false, migrations: [path.join(__dirname, './migrations/*.+(js|ts)')], logging: false, database: process.env.DB_NAME, schema: process.env.DB_SCHEMA, host: process.env.DB_HOST, port: +process.env.DB_PORT, username: process.env.DB_USERNAME, password: process.env.DB_PASSWORD, ssl: { rejectUnauthorized: true, ca: readFileSync('/usr/local/share/ca-certificates/ca-certificate.crt').toString(), }, }, paymentOptions: { paymentMethodHandlers: [dummyPaymentHandler], }, // When adding or altering custom field definitions, the database will // need to be updated. See the "Migrations" section in README.md. customFields: {}, plugins: [ AssetServerPlugin.init({ route: 'assets', assetUploadDir: path.join(__dirname, '../static/assets'), assetUrlPrefix: IS_DEV ? undefined : 'https://example.hisman.org/assets/', storageStrategyFactory: configureS3AssetStorage({ bucket: process.env.S3_BUCKET_NAME, credentials: { accessKeyId: process.env.S3_ACCESS_KEY_ID, secretAccessKey: process.env.S3_SECRET_ACCESS_KEY, }, nativeS3Configuration: { endpoint: process.env.S3_ENDPOINT, forcePathStyle: true, signatureVersion: 'v4', region: 'eu-west-1', }, }), }), RedisSessionCachePlugin.init({ redisOptions: { port: process.env.REDIS_PORT, host: process.env.REDIS_HOST, username: process.env.REDIS_USERNAME, password: process.env.REDIS_PASSWORD, tls: {}, } }), BullMQJobQueuePlugin.init({ connection: { port: process.env.REDIS_PORT, host: process.env.REDIS_HOST, username: process.env.REDIS_USERNAME, password: process.env.REDIS_PASSWORD, tls: {}, } }), HardenPlugin.init({ maxQueryComplexity: 500, apiMode: IS_DEV ? 'dev' : 'prod', }), DefaultSearchPlugin.init({ bufferUpdates: false, indexStockStatus: true }), EmailPlugin.init({ devMode: true, outputPath: path.join(__dirname, '../static/email/test-emails'), route: 'mailbox', handlers: defaultEmailHandlers, templatePath: path.join(__dirname, '../static/email/templates'), globalTemplateVars: { // The following variables will change depending on your storefront implementation. // Here we are assuming a storefront running at http://localhost:8080. fromAddress: '"example" <noreply@example.com>', verifyEmailAddressUrl: 'http://localhost:8080/verify', passwordResetUrl: 'http://localhost:8080/password-reset', changeEmailAddressUrl: 'http://localhost:8080/verify-email-address-change' }, }), AdminUiPlugin.init({ route: 'admin', port: 3002, }), ], };Build the Vendure application
$ npm run buildnpmwrites the build files to thedistdirectory
Run the Production Vendure App
Install the
PM2package$ sudo npm install pm2 -gRun the Vendure app server in cluster mode
$ pm2 start ./dist/index.js -i maxRun the Vendure app worker in cluster mode
$ pm2 start ./dist/index-worker.js -i maxOutput:
 [PM2] Starting /home/user/vendure-app/dist/index-worker.js in cluster_mode (0 instance)
 [PM2] Done.
 ┌────┬─────────────────┬─────────────┬─────────┬─────────┬──────────┬────────┬──────┬───────────┬──────────┬──────────┬──────────┬──────────┐
 │ id │ name            │ namespace   │ version │ mode    │ pid      │ uptime │ ↺    │ status    │ cpu      │ mem      │ user     │ watching │
 ├────┼─────────────────┼─────────────┼─────────┼─────────┼──────────┼────────┼──────┼───────────┼──────────┼──────────┼──────────┼──────────┤
 │ 0  │ index           │ default     │ 0.1.0   │ cluster │ 232015   │ 47s    │ 0    │ online    │ 0%       │ 135.0mb  │ user     │ disabled │
 │ 1  │ index-worker    │ default     │ 0.1.0   │ cluster │ 232052   │ 0s     │ 0    │ online    │ 0%       │ 36.5mb   │ user     │ disabled │
 └────┴─────────────────┴─────────────┴─────────┴─────────┴──────────┴────────┴──────┴───────────┴──────────┴──────────┴──────────┴──────────┘
Generate and run a startup script to start PM2 when the server reboots
$ pm2 startupOutput:
 [PM2] Init System found: systemd
 [PM2] To setup the Startup Script, copy/paste the following command:
 sudo env PATH=$PATH:/usr/bin /usr/lib/node_modules/pm2/bin/pm2 startup systemd -u example_user --hp /home/example_user
Save all the running processes
$ pm2 saveUsing
wget, test that your Vendure app runs on the default port3000$ wget -S http://localhost:3000/admin/Output:
 --2023-08-18 10:30:28--  http://localhost:3000/admin/
 Resolving localhost (localhost)... ::1, 127.0.0.1
 Connecting to localhost (localhost)|::1|:3000... connected.
 HTTP request sent, awaiting response...
   HTTP/1.1 200 OK
   X-Powered-By: Express
   Vary: Origin
   Access-Control-Allow-Credentials: true
   Access-Control-Expose-Headers: vendure-auth-token
   Accept-Ranges: bytes
   Cache-Control: public, max-age=0
   Last-Modified: Fri, 18 Aug 2023 09:34:01 GMT
   ETag: W/"268-18a07fe9b82"
   Content-Type: text/html; charset=UTF-8
   Content-Length: 616
   Date: Fri, 18 Aug 2023 10:30:28 GMT
   Connection: keep-alive
   Keep-Alive: timeout=5
 Length: 616 [text/html]
 Saving to: ‘index.html’
If Vendure fails to run and listen on port
3000. Start it using the following command to view the runtime log and catch any errors$ npm run devOutput:
 [server] info 8/31/23, 8:25 PM - [BullMQJobQueuePlugin] Checking Redis connection...
 [server] info 8/31/23, 8:25 PM - [BullMQJobQueuePlugin] Connected to Redis ✔
 [server] info 8/31/23, 8:25 PM - [NestApplication] Nest application successfully started
 [server] info 8/31/23, 8:25 PM - [Vendure Server] ================================================
 [server] info 8/31/23, 8:25 PM - [Vendure Server] Vendure server (v2.0.6) now running on port 3000
 [server] info 8/31/23, 8:25 PM - [Vendure Server] ------------------------------------------------
 [server] info 8/31/23, 8:25 PM - [Vendure Server] Shop API:     http://localhost:3000/shop-api
 [server] info 8/31/23, 8:25 PM - [Vendure Server] Admin API:    http://localhost:3000/admin-api
 [server] info 8/31/23, 8:25 PM - [Vendure Server] Asset server: http://localhost:3000/assets
 [server] info 8/31/23, 8:25 PM - [Vendure Server] Dev mailbox:  http://localhost:3000/mailbox
 [server] info 8/31/23, 8:25 PM - [Vendure Server] Admin UI:     http://localhost:3000/admin
 [server] info 8/31/23, 8:25 PM - [Vendure Server] ================================================
When successful, verify that Vendure runs on port
3000
Configure Nginx as a Reverse Proxy
To securely access the Vendure app through your domain name, configure Nginx as a reverse proxy to handle connections to the backend port 3000 as described below.
Install Nginx
$ sudo apt install nginxDisable the default Nginx configuration
$ sudo unlink /etc/nginx/sites-enabled/defaultCreate a new Nginx virtual host configuration file
$ sudo nano /etc/nginx/sites-available/vendureAdd the following configurations to the file. Replace
example.comwith your actual domainserver { listen 80; server_name example.com; location / { proxy_pass http://localhost:3000; proxy_http_version 1.1; proxy_set_header Upgrade $http_upgrade; proxy_set_header Connection 'upgrade'; proxy_set_header Host $host; proxy_set_header X-Real-IP $remote_addr; proxy_set_header X-Forwarded-Proto $scheme; proxy_set_header X-Forwarded-For $proxy_add_x_forwarded_for; proxy_cache_bypass $http_upgrade; } }Save and close the file.
Enable the Nginx configuration file
$ sudo ln -s /etc/nginx/sites-available/vendure /etc/nginx/sites-enabled/Test your configurations from syntax errors
$ sudo nginx -tReload Nginx configurations to save changes
$ sudo nginx -s reload
Security
To secure Vendure for production use, allow Nginx to accept incoming connections on HTTP port 80 and the HTTPS port 443. Then, securely redirect all HTTP requests to HTTPS by generating SSL certificates as described in the steps below.
Configure the Firewall
Allow SSH port connection to the server
$ sudo ufw allow 'OpenSSH'Allow the Nginx HTTP and HTTPS ports profile
$ sudo ufw allow 'Nginx Full'Enable the firewall
$ sudo ufw enableVerify the firewall status
$ sudo ufw statusOutput:
 Status: active

 To                         Action      From
 --                         ------      ----
 22/tcp                     ALLOW       Anywhere
 Nginx Full                 ALLOW       Anywhere
 22/tcp (v6)                ALLOW       Anywhere (v6)
 Nginx Full (v6)            ALLOW       Anywhere (v6)
Secure Vendure with Let's Encrypt SSL Certificates
Using
snap, install the Certbot Let's Encrypt client tool$ sudo snap install --classic certbotCreate a symbolic link for the system wide Certbot command to
/usr/bin$ sudo ln -s /snap/bin/certbot /usr/bin/certbotGenerate your Let's Encrypt SSL certificate. Replace
example.com,hello@example.comwith your domain, and email address respectively$ sudo certbot --nginx -d example.com -m hello@example.com --agree-tosVerify that Certbot auto renews the SSL certificate upon expiry
$ sudo certbot renew --dry-run
Test the Application
Using a web browser such as Chrome, access your Vendure shop administrator page
https://example.com/admin
Log in with the
superadmincredentials you set earlier. When successful, the administrator dashboard should display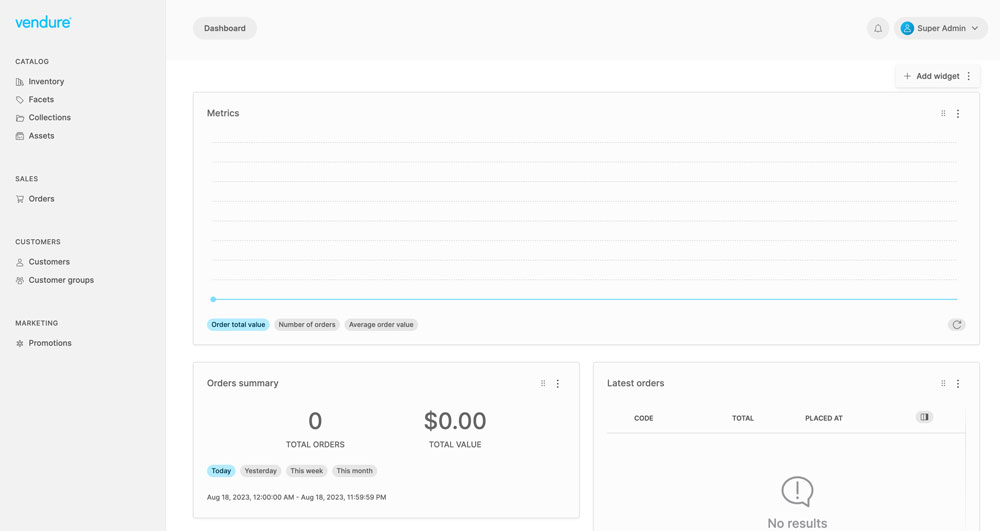
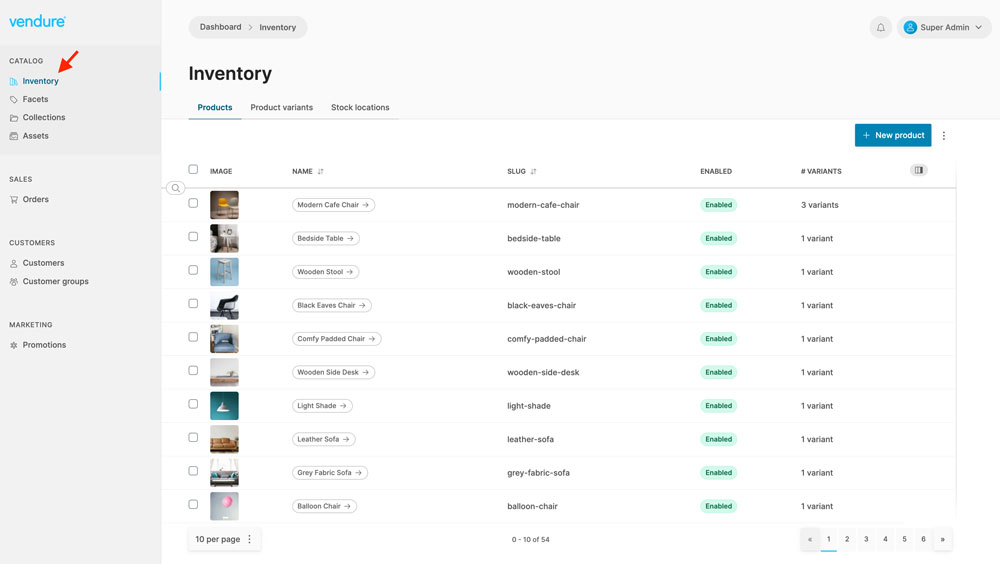
Navigate to the Inventory menu. Verify that all sample products display on the page. Try to update or delete any of them.
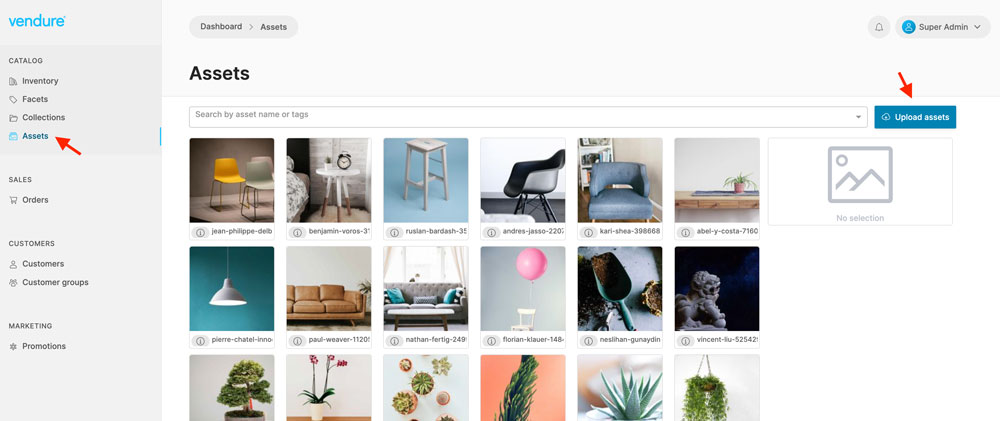
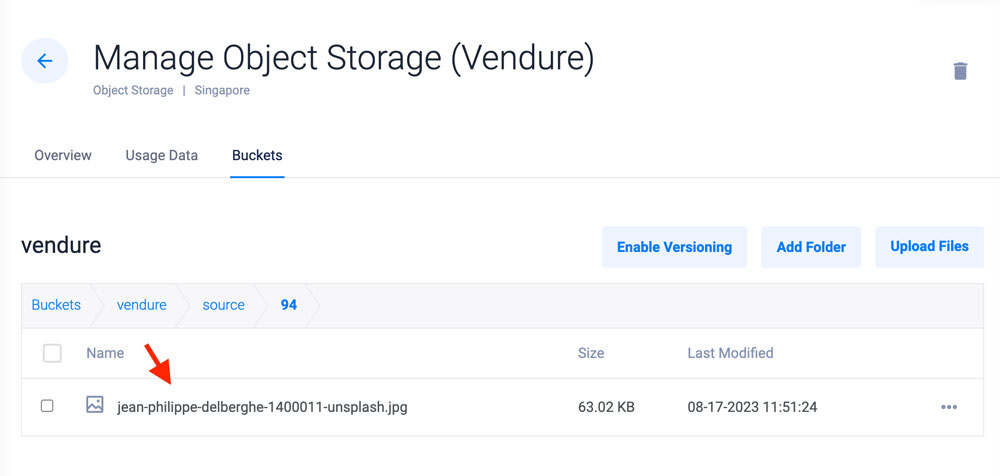
Navigate to the Assets menu and upload a sample image
In your Vultr Console session, view your Vultr Object Storage bucket. Verify that the image is available in your bucket
Besides the Vendure administrator page, access the GraphQL API endpoints below:
- Administrator GraphQL API:
https://example.com/admin-api - Shop GraphQL API:
https://example.com/shop-api
- Administrator GraphQL API:
When you design your Vendure Shop, the frontend interface activates with your products and design.
Conclusion
In this guide, you installed and deployed a Vendure application to a production environment. You also configured Vendure to use Vultr Object Storage, a Vultr Managed Database for PostgreSQL, and Vultr Managed Database for Valkey. For more information about Vendure, visit the official documentation.
More Information
For more information, visit the following resources: