
Jenkins is an open-source continuous-integration (CI) and continuous-delivery (CD) server used for project development, deployment, and automation. Software developers use it to build, test, and deploy their software. It is written in Java and provides hundreds of plugins to automate testing and changes in a larger code base.
This guide shows you how to set up Jenkins on Vultr Kubernetes Engine, which provides many benefits over standalone server-based deployment. Kubernetes-based deployment is a very cost-effective solution and also decreases the time needed for development.
Prerequisites
- Deploy a Vultr Ubuntu 20.04 instance to use as a management workstation.
- Deploy a Kubernetes cluster at Vultr with at least three or more nodes with 2GB RAM and 2 CPUs.
- Install kubectl on Vultr Ubuntu management workstation.
You'll perform the rest of the steps in this guide from your management workstation.
Verify Kubernetes Cluster
Before starting, verify the Vultr Kubernetes Cluster using the following command:
kubectl cluster-infoYou will see the Cluster information in the following output:
Kubernetes control plane is running at https://e4737bcd-3971-4624-b896-0181aae56bae.vultr-k8s.com:6443
CoreDNS is running at https://e4737bcd-3971-4624-b896-0181aae56bae.vultr-k8s.com:6443/api/v1/namespaces/kube-system/services/kube-dns:dns/proxy
To check the active status of all Cluster nodes, run the following command:
kubectl get nodesYou should see that all nodes are in ready status:
NAME                           STATUS   ROLES    AGE     VERSION
jenkins-cluster-136e69da18fb   Ready    <none>   3m21s   v1.25.4
jenkins-cluster-97b1dd155b22   Ready    <none>   3m21s   v1.25.4
jenkins-cluster-a329dcb28ac7   Ready    <none>   3m21s   v1.25.4
Install Jenkins on Kubernetes
First, create the Jenkins namespace:
# kubectl create namespace jenkins-namespaceOutput.
namespace/jenkins-namespace createdNext, create a
serviceAccount.yamlfile.# nano serviceAccount.yamlAdd the following configurations to create a service account called
jenkins-accountand binds theclusterRoleto the service account.--- apiVersion: rbac.authorization.k8s.io/v1 kind: ClusterRole metadata: name: jenkins-account rules: - apiGroups: [""] resources: ["*"] verbs: ["*"] --- apiVersion: v1 kind: ServiceAccount metadata: name: jenkins-account namespace: jenkins-namespace --- apiVersion: rbac.authorization.k8s.io/v1 kind: ClusterRoleBinding metadata: name: jenkins-account roleRef: apiGroup: rbac.authorization.k8s.io kind: ClusterRole name: jenkins-account subjects: - kind: ServiceAccount name: jenkins-account namespace: jenkins-namespaceApply the above configuration to Kubernetes Cluster.
# kubectl apply -f serviceAccount.yamlOutput.
 clusterrole.rbac.authorization.k8s.io/jenkins-account created
 serviceaccount/jenkins-account created
 clusterrolebinding.rbac.authorization.k8s.io/jenkins-account created
Create a volume configuration file.
# nano volume.yamlAdd the following configuration for persistent volume.
 kind: StorageClass
 apiVersion: storage.k8s.io/v1
 metadata:
   name: jenkins-storage
 provisioner: kubernetes.io/no-provisioner
 volumeBindingMode: WaitForFirstConsumer

 ---
 apiVersion: v1
 kind: PersistentVolume
 metadata:
   name: jenkins-pv-volume
   labels:
     type: local
 spec:
   storageClassName: jenkins-storage
   claimRef:
     name: jenkins-pv-claim
     namespace: jenkins-namespace
   capacity:
     storage: 10Gi
   accessModes:
     - ReadWriteOnce
   local:
     path: /opt
   nodeAffinity:
     required:
       nodeSelectorTerms:
       - matchExpressions:
         - key: kubernetes.io/hostname
           operator: In
           values:
           - jenkins-cluster-136e69da18fb

 ---
 apiVersion: v1
 kind: PersistentVolumeClaim
 metadata:
   name: jenkins-pv-claim
   namespace: jenkins-namespace
 spec:
   storageClassName: jenkins-storage
   accessModes:
     - ReadWriteOnce
   resources:
     requests:
       storage: 3Gi
Note: Replace the
jenkins-cluster-136e69da18fbwith any of your cluster nodes.If you need to know the hostname of your worker node, run the following command.
# kubectl get nodesThe above configuration will create a
PersistentVolumevolume in a cluster node inside the/optdirectory. You will also need to properly define the worker node name for the Jenkins pod to get scheduled in the specific node.Create a persistent volume on the Kubernetes cluster using the
kubectlcommand.# kubectl create -f volume.yamlOutput.
 storageclass.storage.k8s.io/jenkins-storage created
 persistentvolume/jenkins-pv-volume created
 persistentvolumeclaim/jenkins-pv-claim created
Create a
deployment.yamlfile.# nano deployment.yamlAdd the following manifest configuration.
 apiVersion: apps/v1
 kind: Deployment
 metadata:
   name: jenkins
   namespace: jenkins-namespace
 spec:
   replicas: 1
   selector:
     matchLabels:
       app: jenkins-server
   template:
     metadata:
       labels:
         app: jenkins-server
     spec:
       securityContext:
             fsGroup: 1000
             runAsUser: 1000
       serviceAccountName: jenkins-account
       containers:
         - name: jenkins
           image: jenkins/jenkins:lts
           resources:
             limits:
               memory: "2Gi"
               cpu: "1000m"
             requests:
               memory: "500Mi"
               cpu: "500m"
           ports:
             - name: httpport
               containerPort: 8080
             - name: jnlpport
               containerPort: 50000
           livenessProbe:
             httpGet:
               path: "/login"
               port: 8080
             initialDelaySeconds: 90
             periodSeconds: 10
             timeoutSeconds: 5
             failureThreshold: 5
           readinessProbe:
             httpGet:
               path: "/login"
               port: 8080
             initialDelaySeconds: 60
             periodSeconds: 10
             timeoutSeconds: 5
             failureThreshold: 3
           volumeMounts:
             - name: jenkins-data
               mountPath: /var/jenkins_home
       volumes:
         - name: jenkins-data
           persistentVolumeClaim:
               claimName: jenkins-pv-claim
The above configuration file will:
- Creates a Jenkins deployment using the latest Jenkins image and opens ports
8080and50000to accept connections from Jenkins workers. - Mounts the persistent volume on the
/var/jenkins_homedirectory to hold Jenkins data. - Define
liveness probesto check the container's health status. - Define
readiness probesto know when a container can start accepting traffic.
- Creates a Jenkins deployment using the latest Jenkins image and opens ports
Apply the above deployment to the Kubernetes cluster.
# kubectl apply -f deployment.yamlOutput.
deployment.apps/jenkins createdWait for some time to pull the Jenkins image and get the Jenkins pod running.
Verify the status of the Jenkins pod.
# kubectl get deployments -n jenkins-namespaceOutput.
 NAME      READY   UP-TO-DATE   AVAILABLE   AGE
 jenkins   1/1     1            1           94s
Get a detail information about Jenkins deployment.
# kubectl describe deployments --namespace=jenkins-namespaceOutput.
 Name:                   jenkins
 Namespace:              jenkins-namespace
 CreationTimestamp:      Tue, 22 Nov 2022 21:03:42 +0530
 Labels:                 <none>
 Annotations:            deployment.kubernetes.io/revision: 1
 Selector:               app=jenkins-server
 Replicas:               1 desired | 1 updated | 1 total | 1 available | 0 unavailable
 StrategyType:           RollingUpdate
 MinReadySeconds:        0
 RollingUpdateStrategy:  25% max unavailable, 25% max surge
 Pod Template:
   Labels:           app=jenkins-server
   Service Account:  jenkins-account
   Containers:
    jenkins:
     Image:       jenkins/jenkins:lts
     Ports:       8080/TCP, 50000/TCP
     Host Ports:  0/TCP, 0/TCP
     Limits:
       cpu:     1
       memory:  2Gi
     Requests:
       cpu:        500m
       memory:     500Mi
     Liveness:     http-get http://:8080/login delay=90s timeout=5s period=10s #success=1 #failure=5
     Readiness:    http-get http://:8080/login delay=60s timeout=5s period=10s #success=1 #failure=3
     Environment:  <none>
     Mounts:
       /var/jenkins_home from jenkins-data (rw)
   Volumes:
    jenkins-data:
     Type:       PersistentVolumeClaim (a reference to a PersistentVolumeClaim in the same namespace)
     ClaimName:  jenkins-pv-claim
     ReadOnly:   false
 Conditions:
   Type           Status  Reason
   ----           ------  ------
   Available      True    MinimumReplicasAvailable
   Progressing    True    NewReplicaSetAvailable
 OldReplicaSets:  <none>
 NewReplicaSet:   jenkins-7b95fb694 (1/1 replicas created)
 Events:
   Type    Reason             Age   From                   Message
   ----    ------             ----  ----                   -------
   Normal  ScalingReplicaSet  19m   deployment-controller  Scaled up replica set jenkins-7b95fb694 to 1
Create Kubernetes Service for External Access
At this point, Jenkins is successfully deployed and running on the Kubernetes cluster. However, you can not access Jenkins from the remote machine. In this case, you will need to create a service and bind it to the Jenkins deployment.
First, create a
service.yamlfile using the following command:# nano service.yamlAdd the following configurations to expose port
8080of the Jenkins pod to port32000.apiVersion: v1 kind: Service metadata: name: jenkins-service namespace: jenkins-namespace annotations: prometheus.io/scrape: 'true' prometheus.io/path: / prometheus.io/port: '8080' spec: selector: app: jenkins-server type: NodePort ports: - port: 8080 targetPort: 8080 nodePort: 32000Next, deploy the service configuration to the Jenkins deployment.
# kubectl apply -f service.yamlOutput.
service/jenkins-service createdVerify the status of the Jenkins service.
# kubectl get services --namespace jenkins-namespaceOutput.
 NAME              TYPE       CLUSTER-IP       EXTERNAL-IP   PORT(S)          AGE
 jenkins-service   NodePort   10.103.86.99   <none>        8080:32000/TCP   6s
Access Jenkins Web Interface
At this point, Jenkins is installed and listens on port 32000 for external access. Now, you will need to retrieve the IP address of the cluster node to access the Jenkins web interface.
First, get a node IP address using the
kubectlcommand.# kubectl get nodes -o wideYou will get the external IP of all nodes in the following output.
 NAME                           STATUS   ROLES    AGE   VERSION   INTERNAL-IP   EXTERNAL-IP    OS-IMAGE                       KERNEL-
 VERSION    CONTAINER-RUNTIME
 jenkins-cluster-7e8eba45f3a6   Ready    <none>   23m   v1.25.4   10.46.96.6    65.20.79.223   Debian GNU/Linux 10 (buster)   4.19.0-22-amd64   containerd://1.6.9
 jenkins-cluster-a45a12e27a63   Ready    <none>   23m   v1.25.4   10.46.96.5    65.20.79.2     Debian GNU/Linux 10 (buster)   4.19.0-22-amd64   containerd://1.6.9
 jenkins-cluster-cfacc64361f5   Ready    <none>   23m   v1.25.4   10.46.96.4    65.20.74.173   Debian GNU/Linux 10 (buster)   4.19.0-22-amd64   containerd://1.6.9
Next, open your web browser and access Jenkins using the URL
http://node-external-ip:32000. You will be asked to provide the initial Admin password.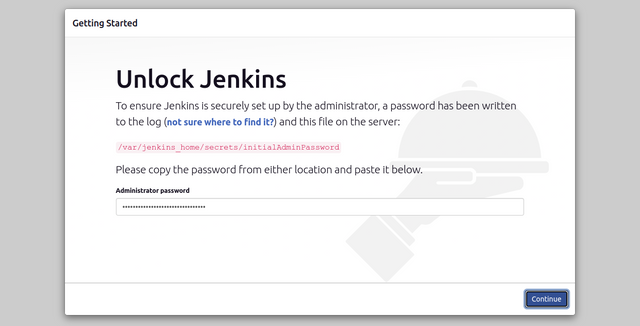
Get Jenkins pod details using the following command.
# kubectl get pods --namespace=jenkins-namespaceOutput.
 NAME                      READY   STATUS    RESTARTS   AGE
 jenkins-7b95fb694-5xqnp   1/1     Running   0          20m
Check the Jenkins pod logs to retrieve the Jenkins Admin password.
# kubectl logs jenkins-7b95fb694-5xqnp --namespace=jenkins-namespaceOutput.
 *************************************************************

 Jenkins initial setup is required. An admin user has been created and a password generated.
 Please use the following password to proceed to installation:

 a1f057cba5f6440f863b6e5a57d880fa

 This may also be found at: /var/jenkins_home/secrets/initialAdminPassword

 *************************************************************
Copy the password from the above output and enter it on the Jenkins initial Admin password screen to proceed with the Jenkins installation.
Conclusion
This guide shows you how to install and configure Jenkins on Vultr Kubernetes Engine. Jenkins is a core component of CI/CD pipelines. It helps you perform very complex operations and increase productivity. For more information, check out the official Jenkins documentation.
No comments yet.