
How to Install Nagios on Ubuntu 24.04
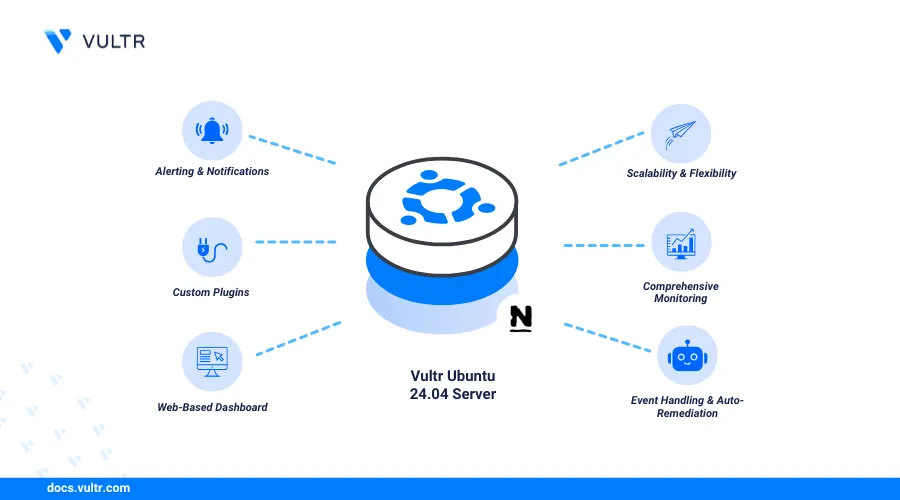
To install Nagios on Ubuntu 24.04, you gain access to Nagios Core, an open-source tool that monitors networks, services, and applications using the Nagios Remote Plugin Executor (NRPE). The NRPE agent utilizes a server/agent architecture to communicate with remote hosts and monitor metrics such as disk usage, CPU load, and network activities. Nagios periodically tracks the resources of remote hosts and displays detailed reports on a web dashboard.
This article explains how to install Nagios on Ubuntu 24.04. You'll also configure Nagios to monitor a remote host.
Prerequisites
Before you begin, you need:
- At least two Ubuntu 24.04 instances to use as the Nagios server, and remote host respectively.
Compile and Install Nagios Core from Source
Nagios is not available in the default package repositories on Ubuntu 24.04. Follow the steps below to compile and install the Nagios Core package on your server.
Ensure you've established an SSH connection on the Nagios server.
Install all required dependency packages.
console$ sudo apt install -y autoconf gcc libc6 make wget unzip apache2 php libapache2-mod-php libgd-dev openssl libssl-dev
Switch to the user's home directory.
console$ cd
Create a new
nagios-coreproject directory to store the Nagios Core files.console$ mkdir nagios-core
Switch to the
nagios-coredirectory.console$ cd nagios-core
Visit the Nagios Core repository and download the latest Nagios Core source code.
console$ wget -O nagioscore.tar.gz https://github.com/NagiosEnterprises/nagioscore/archive/nagios-4.5.7.tar.gz
Extract files from the downloaded archive.
console$ tar xzf nagioscore.tar.gz
List the files in your working directory.
console$ lsEnsure a new
nagioscore-nagios...directory exists.nagioscore.tar.gz nagioscore-nagios-4.5.7Switch to the
nagioscore-nagios...directory depending on your version.console$ cd nagioscore-nagios-4.5.7/
Run the Nagios Core configuration script to create a new Nagios virtual host for Apache.
console$ sudo ./configure --with-httpd-conf=/etc/apache2/sites-enabled
Compile Nagios Core.
console$ sudo make all
Compile and install a new
nagiosgroup and user.console$ sudo make install-groups-users
Add the
www-datauser to the Nagios group to allow Apache to serve the web monitoring dashboard.console$ sudo usermod -a -G nagios www-data
Install Nagios on Ubuntu 24.04
Follow the steps below to install Nagios on the Nagios server with all necessary components including Apache modules and create user credentials for accessing the Nagios web monitoring dashboard.
Install Nagios.
console$ sudo make install
Initialize all required configuration scripts and the Nagios daemon.
console$ sudo make install-daemoninit
Install the Nagios command mode package to allow access to external web-based commands.
console$ sudo make install-commandmode
Install all Nagios configuration files.
console$ sudo make install-config
Install all Apache configuration files.
console$ sudo make install-webconf
Enable the Apache rewrite module.
console$ sudo a2enmod rewrite
Enable the Apache CGI module.
console$ sudo a2enmod cgi
Create a new
nagiosadminbasic authentication user to access the Nagios web monitoring dashboard and set a strong password when prompted.console$ sudo htpasswd -c /usr/local/nagios/etc/htpasswd.users nagiosadmin
Restart Apache to apply the configuration changes.
console$ sudo systemctl restart apache2
Install Nagios Plugins
Follow the steps below to install Nagios plugins to monitor your Nagios server as a localhost.
Install all required dependency packages for Nagios plugins.
console$ sudo apt install -y autoconf gcc libc6 libmcrypt-dev make libssl-dev wget bc gawk dc build-essential snmp libnet-snmp-perl gettext
Switch to the user's home directory.
console$ cd
Visit the Nagios plugins releases page to download the latest Nagios plugins package.
console$ wget --no-check-certificate -O nagios-plugins.tar.gz https://github.com/nagios-plugins/nagios-plugins/archive/release-2.4.12.tar.gz
Extract files from the downloaded archive.
console$ tar zxf nagios-plugins.tar.gz
Switch to the extracted plugins directory.
console$ cd nagios-plugins-release-2.4.12
Run the plugins setup script.
console$ sudo ./tools/setup
Configure the plugins to run on your server.
console$ sudo ./configure
Compile the plugins.
console$ sudo make
Install the compiled plugins.
console$ sudo make install
Test the Nagios configuration for errors.
console$ sudo /usr/local/nagios/bin/nagios -v /usr/local/nagios/etc/nagios.cfg
Output:
Total Warnings: 0
Total Errors:   0

Things look okay - No serious problems were detected during the pre-flight check
Enable Nagios to start at boot.
console$ sudo systemctl enable nagios
Start the Nagios service.
console$ sudo systemctl start nagios
Access the Nagios Web Monitoring dashboard
Follow the steps below to access the Nagios web monitoring dashboard using your Nagios server's public IP address.
View the UFW status and verify that the firewall is active.
console$ sudo ufw status
If the status is
inactive, allow SSH connections to the server and start UFW.console$ sudo ufw allow ssh && sudo ufw enable
Allow the HTTP port
80through the firewall.console$ sudo ufw allow 80/tcp
Reload UFW to apply the changes.
console$ sudo ufw reload
Enter your server's public IP address in a web browser to access the Nagios dashboard.
http://SERVER-IP/nagiosLog in to the Nagios dashboard using the
nagiosadminusername and the password you set earlier when installing Nagios.
Navigate to Hosts on the left navigation menu.
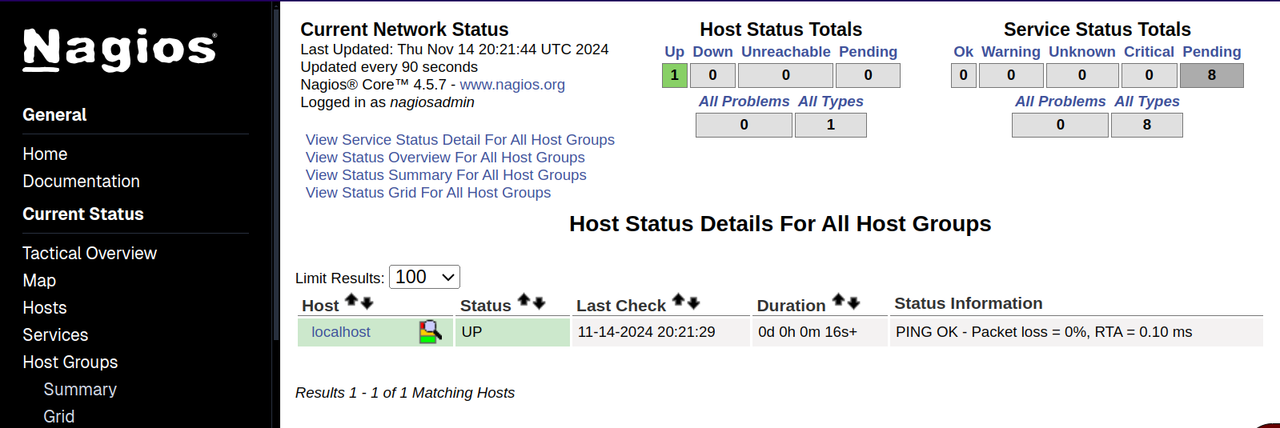
By default, the Nagios dashboard shows status information for the
localhost. In the next sections, you'll install Nagios plugins on a remote host and configure Nagios server to monitor the remote host.
Install Nagios Plugins on a Remote Host
Nagios monitors remote hosts using an NRPE agent. NRPE listens for connection requests from a Nagios server to monitor a remote host. Follow the steps below to install NRPE and the required plugins on a separate Ubuntu 24.04 remote host.
Establish an SSH connection to the remote host.
Install all required Nagios plugins and the NRPE package.
console$ sudo apt install nagios-plugins nagios-nrpe-server -y
Enable the NRPE service.
console$ sudo systemctl enable --now nagios-nrpe-server
Open the main NRPE configuration file to modify the list of allowed hosts and executable plugins.
console$ sudo nano /etc/nagios/nrpe.cfg
Modify the
allowed_hostsdirective and include your Nagios server's public IP address.iniallowed_hosts=127.0.0.1,::1,nagios_server_IP
Restart the NRPE service to apply the configuration changes.
console$ sudo systemctl restart nagios-nrpe-server
The above remote host's settings allow the Nagios server to connect to the remote host and collect metrics.
Configure the Nagios Server to Monitor Remote Hosts
After adding the NRPE service to a remote host, you should also make some changes to the Nagios server to allow the server to communicate to the remote host. Follow the steps below to configure the Nagios server.
Ensure you're connected to the Nagios server through SSH.
Create a new
serversdirectory.console$ sudo mkdir -p /usr/local/nagios/etc/servers/
Create a new
/usr/local/nagios/etc/servers/host.cfgconfiguration file to store remote hosts' information.console$ sudo nano /usr/local/nagios/etc/servers/host.cfg
Add the following configurations to the file. Replace
Vultrwith your remote hostname andremote-host-ipwith the remote host's public IP address.inidefine host { use linux-server host_name Vultr alias First Remote Host address remote-host-ip max_check_attempts 5 check_period 24x7 notification_interval 30 notification_period 24x7 }
Save and close the file.
In the above configuration:
max_check_attempts: Sets the maximum number of retries before marking the host as down.check_period: Sets the period to perform host checks.notification_interval: Sets the interval (in minutes) between consecutive notifications.notification_period: Sets the period to send notifications in the Nagios dashboard.
Open the main Nagios configuration file to enable the remote host configuration.
console$ sudo nano /usr/local/nagios/etc/nagios.cfg
Add the following directive at the end of the file.
inicfg_dir=/usr/local/nagios/etc/servers
Save and close the file.
Restart the Nagios service to apply the configuration changes.
console$ sudo systemctl restart nagios
Test the Nagios configuration for errors.
console$ sudo /usr/local/nagios/bin/nagios -v /usr/local/nagios/etc/nagios.cfg
Output:
Total Warnings: 0
Total Errors:   0

Things look okay - No serious problems were detected during the pre-flight check
Restart Nagios to apply the configuration changes.
console$ sudo systemctl restart nagios
Access the Nagios web monitoring dashboard.
http://SERVER-IP/nagiosNavigate to the Hosts section. You should now see your remote host in the list in addition to the
localhost.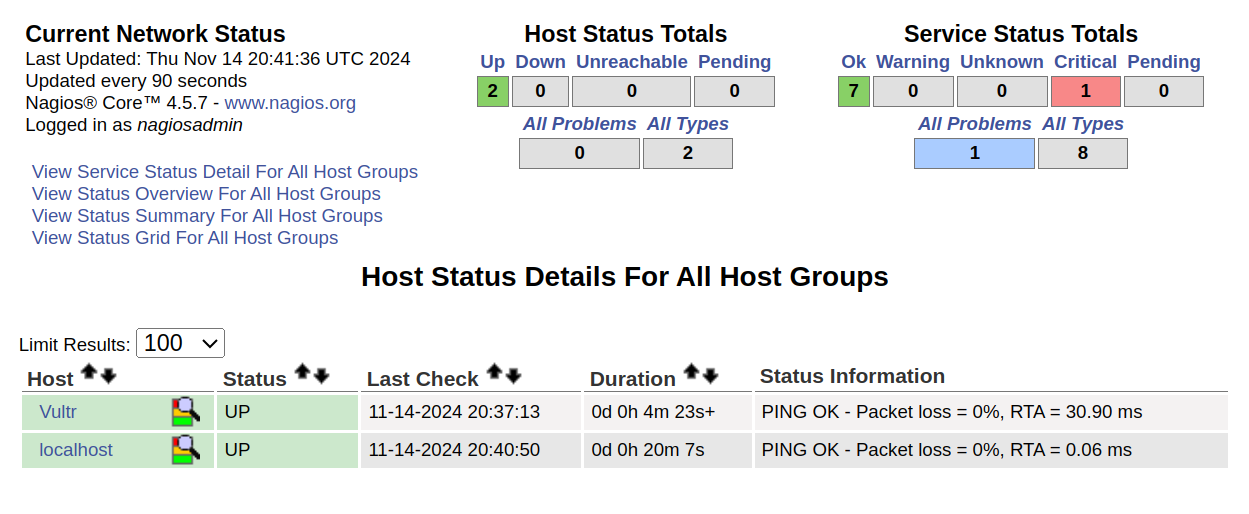
Conclusion
You have successfully completed the process to install Nagios on Ubuntu 24.04. Nagios monitors local and remote hosts, providing detailed insights through a rich web-based dashboard. To monitor additional remote hosts, you can install the Nagios NRPE package on those hosts and configure the necessary settings on the Nagios server. For more information and advanced configuration options, please visit the Nagios documentation.