
Introduction
Nextcloud AIO (All in one) is a complete suite of Nextcloud application features that are easy to deploy and configure on a server. Nextcloud AIO deploys in a Docker container and includes the following features upon installation.
- Nextcloud server
- Imaginary
- Full-text search
- ClamAV anti-virus
- Nextcloud Collabora Office supporting documents, presentations, spreadsheets, and PDF files
- Automatic backups powered by BorgBackup
- High-performance Nextcloud Files
- High performance for Nextcloud Talk
This article explains how you can install NextCloud AIO on a Vultr Cloud Server running Docker.
Prerequisites
- Deploy a OneClick Docker instance from the Vultr Marketplace with at least 2 GB RAM, 1 vCPU, and 50 GB storage. This article uses Docker on Ubuntu 20.04. For CentOS installations, the same steps listed below apply to the server.
- Use SSH to access the server instance.
- Set up a domain pointing to the server.
- Set up a new non-root user with sudo privileges and switch to the account.
- Install Nginx on the server.
Install Nextcloud AIO
Add your sudo user account to the docker group.
$ sudo adduser example-user dockerInstall the Nextcloud AIO master container. Replace
9000with your desired port number.$ sudo docker run -d \ --sig-proxy=false \ --name nextcloud-aio-mastercontainer \ --restart always \ --publish 8080:8080 \ -e APACHE_PORT=9000 \ -e APACHE_IP_BINDING=127.0.0.1 \ --volume nextcloud_aio_mastercontainer:/mnt/docker-aio-config \ --volume /var/run/docker.sock:/var/run/docker.sock:ro \ nextcloud/all-in-one:latestVerify that the Nextcloud container status is up and healthy.
$ sudo docker psOutput:
  CONTAINER ID   IMAGE                              COMMAND                  CREATED          STATUS                    PORTS                                                         NAMES
  67c93b8b004b   nextcloud/all-in-one:latest        "start.sh /usr/bin/s…"   3 minutes ago   Up 3 minutes (healthy)   80/tcp, 8443/tcp, 0.0.0.0:8080->8080/tcp, :::8080->8080/tcp   nextcloud-aio-mastercontainer
Setup Nginx as a Reverse Proxy
Create a new Nginx configuration file.
$ sudo touch /etc/nginx/conf.d/nextcloud.confUsing a text editor of your choice, open and edit the file.
$ sudo nano /etc/nginx/conf.d/nextcloud.confAdd the following configurations to the file. Replace
nextcloudaio.example.comwith your actual domain name.server { listen 80; listen [::]:80; server_name nextcloudaio.example.com; location / { proxy_pass http://localhost:9000; proxy_set_header X-Real-IP $remote_addr; proxy_set_header Host $host; proxy_set_header X-Forwarded-For $proxy_add_x_forwarded_for; client_max_body_size 0; # Websocket proxy_http_version 1.1; proxy_set_header Upgrade $http_upgrade; } }Save and close the file.
Check the Nginx configuration for errors.
$ sudo nginx -tRestart Nginx to save changes.
$ sudo systemctl restart nginx
Security
By default, the Uncomplicated Firewall (UFW) is active on Vultr Ubuntu servers. Configure the firewall to allow the Nextcloud master container port 8080, HTTP, and HTTPS access on the server.
Verify that UFW is up and running.
$ sudo ufw statusThe UFW firewall table should display, if the status is
inactive, allow the SSH port22and start the firewall.$ sudo ufw allow 22/tcp && sudo ufw enableAllow the Nextcloud master container port
8080.$ sudo ufw allow 8080/tcpAllow the Nextcloud Talk container ports.
$ sudo ufw allow 3478/tcp && sudo ufw allow 3478/udpAllow the HTTP port
80.$ sudo ufw allow 80/tcpAllow HTTPS on port
443.$ sudo ufw allow 443/tcpRestart the firewall to save changes.
$ sudo ufw reload
Generate SSL certificates
Nextcloud AIO requires a valid SSL certificate to run on your domain. Generate a free Let's Encrypt certificate using Certbot and add it to your Nginx configuration file as described in the steps below.
Verify that the Snap daemon is up to date.
$ sudo snap install core; sudo snap refresh coreInstall the Certbot Let's Encrypt tool.
$ sudo snap install --classic certbotEnable the system-wide Certbot command.
$ sudo ln -s /snap/bin/certbot /usr/bin/certbotGenerate a new SSL certificate for your domain. Replace
nextcloudaio.example.comwith your active domain name anduser@example.comwith your actual email address.$ sudo certbot --nginx -d nextcloudaio.example.com -m user@example.com --agree-tosTest SSL certificate auto-renewal.
$ sudo certbot renew --dry-runVerify that your Nginx file includes new SSL configurations added by Certbot.
$ cat /etc/nginx/conf.d/nextcloud.confRestart Nginx to save changes.
$ sudo systemctl restart nginx
Configure Nextcloud AIO
Using a web browser such as Google Chrome, visit your direct server IP on port
8080. Replace192.0.2.1with your actual server address.https://192.0.2.1:8080Your browser may display a Your connection is not private prompt, show Advanced, then click Proceed to (unsafe).
If the Proceed to (unsafe) option is missing, click anywhere on the page, and enter
this is unsafeto clear the error.On the Nextcloud AIO setup page, select and copy the 8-word password to your clipboard.
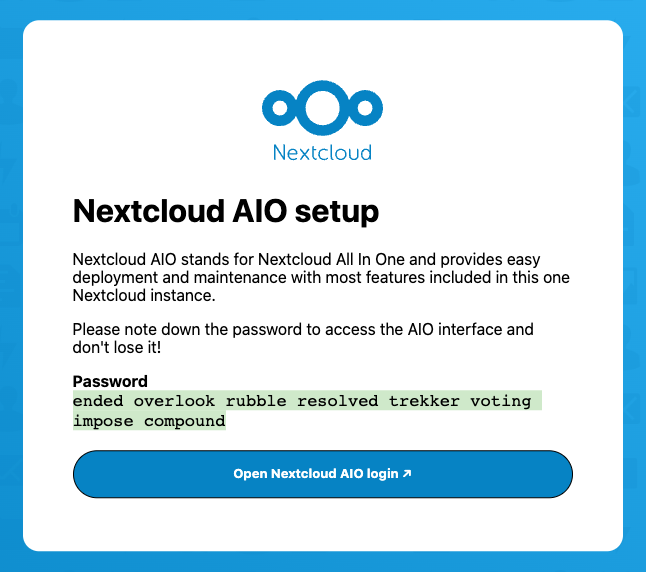
Click Open your Nextcloud AIO login.
Paste your password on the Nextcloud AIO Login page, and click Log in to proceed.
In the New AIO instance field, enter your domain name and click Submit to test your reverse proxy settings.
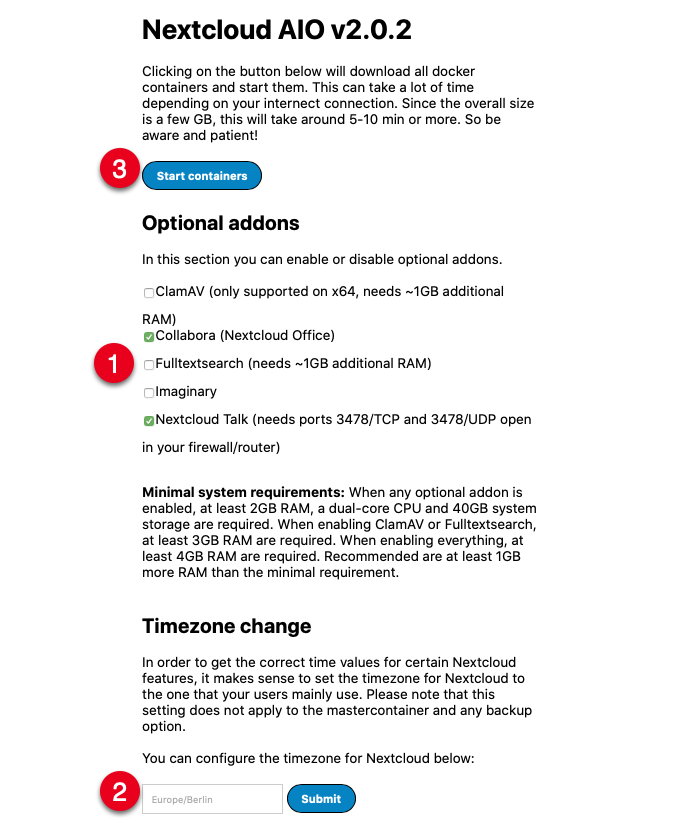
Review the Optional addons list, and select Nextcloud features you wish to enable.
Scroll down to the Timezone change section, enter your server timezone, and click Submit.
Click Start containers to begin installing Nextcloud and all selected addons on the server.
When the installation is complete, copy the generated Initial Nextcloud password to your clipboard, and click Open your Nextcloud, or visit your domain name
nextcloudaio.example.comdirectly.Login to your Nextcloud server with the username
admin, and paste your initial password.Skip through the Nextcloud Hub II tutorial, and access the Nextcloud dashboard.
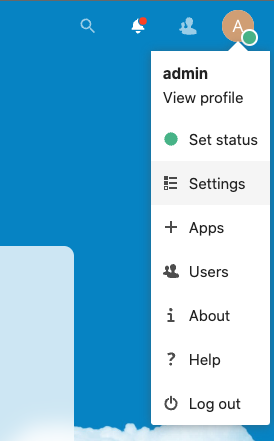
Click your username A icon in the top right corner, and click Settings from the drop-down list.
Click Security on the left navigation menu.
Enter your Current password, and a strong New password in the appropriate field, then click Change Password.
To set up new Users, click your username in the top right corner and select users from the drop-down list.
Click + New user, or + Add group to set up new users and groups as you may prefer.
Click Dashboard on the main navigation bar, and start using all Nextcloud features.
Troubleshooting
While accessing the Nextcloud master container interface, you may receive the following errors upon entering your domain name in the New AIO instance field.
Domain does not point to this server or the reverse proxy is not configured correctly. See the mastercontainer logs for more details. ('sudo docker logs -f nextcloud-aio-mastercontainer')
Verify that Nginx is up and running.
$ sudo systemctl status nginxTest your Nginx configuration for errors.
$ sudo nginx -tOpen your Nginx configuration file and confirm that the
proxy_pass http://localhost:9000;directive matches your Nextcloud apache port, this article uses port9000.$ sudo nano /etc/nginx/conf.d/nextcloud.confThe server is not reachable on Port 443. You can verify this e.g. with 'https://portchecker.co/' by entering your domain there as ip-address and port 443 as port.
Verify that the HTTPS port
443is open on the UFW firewall table.$ sudo ufw statusView your Nginx configuration file and verify that the Certbot SSL configuration directives exist at the end of the file.
$ cat /etc/nginx/conf.d/nextcloud.confYour directives should look like the ones below.
  listen 443 ssl; # managed by Certbot
  ssl_certificate /etc/letsencrypt/live/nextcloudaio.example.com/fullchain.pem; # managed by Certbot
  ssl_certificate_key /etc/letsencrypt/live/nextcloudaio.example.com/privkey.pem; # managed by Certbot
  include /etc/letsencrypt/options-ssl-nginx.conf; # managed by Certbot
  ssl_dhparam /etc/letsencrypt/ssl-dhparams.pem; # managed by Certbot

  }
Restart Nginx to refresh your SSL configurations.
$ sudo systemctl restart nginx
Next Steps
You have installed Nextcloud AIO (All in One) on a Vultr Cloud server. To enable more features on your Nextcloud server, refer to the following articles.
No comments yet.