
How to Install Nginx, MySQL, PHP (FEMP Stack) on FreeBSD 14.0
Introduction
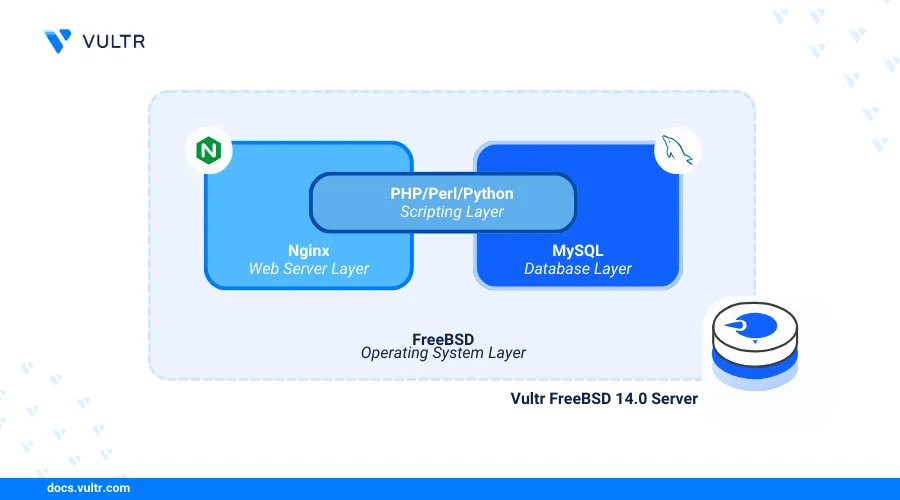
FreeBSD, Nginx, MySQL, and PHP (FEMP stack) is a collection of open-source applications that enable the development, hosting, and delivery of dynamic web applications on a server. FreeBSD works as the deployment operating system, Nginx as the web server, MySQL or MariaDB as the database backend, and PHP as the server-side scripting processor.
This article explains how to install Nginx, MySQL, and PHP (FEMP stack) on FreeBSD 14.0, and configure the packages to enable the delivery of dynamic web applications on your server.
Prerequisites
Before you begin:
- Deploy a FreeBSD 14.0 instance on Vultr.
- Create a new domain A record pointing to the instance IP address. For example,
app.example.com. - Access the server using SSH as a non-root user with sudo privileges.
Install Nginx
Nginx is available in the default package repositories on FreeBSD 14.0 with the latest version information. Follow the steps below to install Nginx and manage the application service to run on your server.
Update the
pkgrepository catalog.console$ sudo pkg update
Install Nginx.
console$ sudo pkg install nginx
Enable Nginx to automatically start at boot time.
console$ sudo sysrc nginx_enable=yes
Start the Nginx service.
console$ sudo service nginx start
View the Nginx service status and verify that it's running.
console$ sudo service nginx status
Output:
consolenginx is running as pid 2273.
Install MySQL
MySQL is available in the default package repositories on FreeBSD 14.0 with multiple package versions. Follow the steps below to install the latest MySQL database server package on your server using the default pkg package manager.
Search all MySQL packages available in the default
pkgrepositories.console$ sudo pkg search MySQL
Output:
...
mysql80-client-8.0.35          Multithreaded SQL database (client)
mysql80-server-8.0.35_1        Multithreaded SQL database (server)
mysql81-client-8.1.0           Multithreaded SQL database (client)
mysql81-server-8.1.0           Multithreaded SQL database (server)
...
Based on the above output, MySQL
8.1is the latest version you can install on your server. Use the FreeBSD ports collection to compile and install any other versions that are unavailable in the default repositories on your server.Install the latest MySQL database server package.
console$ sudo pkg install mysql81-server
Enable the MySQL service to automatically start at boot.
console$ sudo sysrc mysql_enable=yes
Start the MySQL service.
console$ sudo service mysql-server start
View the MySQL service status and verify that it's running.
console$ sudo service mysql-server status
Output:
mysql is running as pid 4044.Start the MySQL secure installation script.
console$ sudo mysql_secure_installation
Reply to the following MySQL prompts with your desired selection to set up authentication and disable insecure defaults on your server.
- VALIDATE PASSWORD component: Enter Y and press Enter to enable password verification on the server.
- Password Validation Policy: Enter 2 to require strong passwords for all database users.
- New password: Enter a new strong password to assign the
rootdatabase user. - Re-enter new password: Repeat the new
rootdatabase user password. - Do you wish to continue with the password provided?: Enter Y to save the new database user password.
- Remove anonymous users?: Enter Y to remove anonymous users on the server.
- Disallow root login remotely?: Enter Y to disable remote access to the
rootdatabase user account. - Remove test database and access to it?: Enter Y to delete all test databases.
- Reload privilege tables now?: Enter Y to refresh the MySQL privileges table.
Restart the MySQL database server to apply your configuration changes.
console$ sudo service mysql-server restart
Install PHP and Configure PHP-FPM
PHP is available in the default repositories on your FreeBSD server and includes the PHP-FPM package that manages connections to the PHP service. Follow the steps below to install the latest PHP version and configure PHP-FPM on your server.
Search all available PHP packages in the FreeBSD
pkgcatalog.console$ sudo pkg search ^php[0-9]
Install the latest PHP version and PHP-FPM. For example, PHP version
8.3.console$ sudo pkg install -y php83
View the installed PHP version on your server.
console$ php -v
Output:
PHP 8.3.8 (cli) (built: Jul  6 2024 01:55:02) (NTS)
Copyright (c) The PHP Group
Zend Engine v4.3.8, Copyright (c) Zend Technologies
Enable PHP-FPM to automatically start at boot time.
console$ sudo sysrc php_fpm_enable=yes
Start the PHP-FPM service.
console$ sudo service php-fpm start
View the PHP-FPM and verify that it's running.
console$ sudo service php-fpm status
Output:
php_fpm is running as pid 8688.Install common PHP modules required by most web applications.
console$ sudo pkg install php83-mysqli php83-curl php83-gd php83-intl php83-mbstring php83-xml php83-zip
Open the default PHP-FPM pool configuration
www.confusing a text editor such asvi.console$ sudo vi /usr/local/etc/php-fpm.d # nano www.conf
Find the following user and group directives.
iniuser = www group = www
Find the following listen directive and verify that it's set to the localhost address
127.0.0.1.inilisten = 127.0.0.1:9000
Modify your PHP-FPM memory configurations to match your FreeBSD server memory needs.
Save and close the file.
Restart the PHP-FPM service to apply your configuration changes.
console$ sudo service php-fpm restart
Configure Nginx with PHP-FPM
Nginx delivers dynamic web applications using the PHP-FPM service that processes PHP requests on your server using the default pool configuration. Follow the steps below to create a new Nginx virtual host and enable the PHP-FPM service to process dynamic web application requests on your server.
Create a new virtual hosts directory on your server. For example,
/usr/local/etc/nginx/vhosts/console$ sudo mkdir -p /usr/local/etc/nginx/vhosts/
Open the main Nginx configuration file.
console$ sudo nano /usr/local/etc/nginx/nginx.conf
Add the following directive at the end of the file before the closing
httpcontext tag}.nginxinclude /usr/local/etc/nginx/vhosts/*.conf;
Save and close the file.
Create a new Nginx virtual host configuration file in the
/usr/local/etc/nginx/vhosts/directory. For example,app.example.com.conf.console$ sudo nano /usr/local/etc/nginx/vhosts/app.example.com.conf
Add the following contents to the file.
nginxserver { listen 80; server_name app.example.com; root /usr/local/www/app.example.com; index index.php index.html index.htm; location / { try_files $uri $uri/ =404; } location ~ \.php$ { include fastcgi_params; fastcgi_pass 127.0.0.1:9000; fastcgi_index index.php; fastcgi_param SCRIPT_FILENAME $document_root$fastcgi_script_name; } error_page 404 /404.html; error_page 500 502 503 504 /50x.html; location = /50x.html { root /usr/local/www/app.example.com; } }
Save and close the file.
The Nginx configuration above listens for incoming HTTP connections using your domain
app.example.comand serves files from the/usr/local/www/app.example.comweb root directory. Thelocation ~ \.php$block matches all PHP file requests on the domain and forwards them to the PHP-FPM port127.0.0.1:9000for processing.Create the virtual host web root directory to deliver your web application files.
console$ sudo mkdir -p /usr/local/www/app.example.com
Test the Nginx configuration for errors.
console$ sudo nginx -t
Output:
nginx: the configuration file /usr/local/etc/nginx/nginx.conf syntax is ok
nginx: configuration file /usr/local/etc/nginx/nginx.conf test is successful
Restart Nginx to apply the configuration changes.
console$ sudo service nginx restart
Test the Installation
Nginx works with PHP-FPM to deliver dynamic web applications on your virtual host domain app.example.com while MySQL works as the database backend that stores the application data. Follow the steps below to test the FEMP stack installation and create a sample PHP application that connects to the MySQL database server and displays a Greetings from Vultr message.
Log in to the MySQL database server as
root.console$ sudo mysql -u root -p
Enter the
rootdatabase user password you set earlier when prompted to access the database console.Create a new MySQL sample database to use with your application. For example,
example_db.sqlmysql> CREATE DATABASE example_db;
View all available databases and verify that the new database is available.
sqlmysql> SHOW DATABASES;
Output:
sql+--------------------+ | Database | +--------------------+ | example_db | | information_schema | | mysql | | performance_schema | | sys | +--------------------+ 5 rows in set (0.00 sec)
Switch to the database.
sqlmysql> use example_db;
Create a new sample database user
test_userwith a strong password. ReplaceStrong)P@ssword123with your desired password.sqlmysql> CREATE USER 'test_user'@'localhost' IDENTIFIED BY 'Strong)P@ssword123';
Create a new sample table
greetingwith two columns,idandmessage.sqlmysql> CREATE TABLE greetings ( id INT AUTO_INCREMENT PRIMARY KEY, message VARCHAR(255) );
Insert a new
Greetings from Vultrrecord into thegreetingstable.sqlmysql> INSERT INTO greetings (message) VALUES ('Hello World. Greetings from Vultr');
Exit the MySQL console.
sqlmysql> \q
Create a new
index.phpfile in your web root directory/usr/local/www/app.example.com.console$ sudo nano /usr/local/www/app.example.com/index.php
Add the following contents to the file.
php<?php $servername = "localhost"; $username = "test_user"; $password = "Strong)P@ssword123"; $dbname = "test_db"; // Create database connection $conn = new mysqli($servername, $username, $password, $dbname); // Check database connection if ($conn->connect_error) { die("Database Connection Failed." . $conn->connect_error); } echo "<h4 align='center'> Below is the message retrieved from the test_db Mysql database on your server</h4>"; // Retrieve the record from greetings Table $sql = "SELECT message FROM greetings"; $result = $conn->query($sql); if ($result->num_rows > 0) { $row = $result->fetch_assoc(); echo "<h1 align='center'>" . $row["message"]. "</h1>"; } else { echo "<h1 align='center'>No message found.</h1>"; } $conn->close(); ?>
Save and close the file.
The above PHP application connects to the MySQL database server using your database user details and retrieves the message
Greetings from Vultrwhen successful. ANo message founderror displays in the web browser when the database table does not return any records.Restart the Nginx web server to apply changes.
console$ sudo service nginx restart
Access your domain using a web browser such as Chrome and verify that a
Greetings from Vultrmessage displays in your browser.http://app.example.com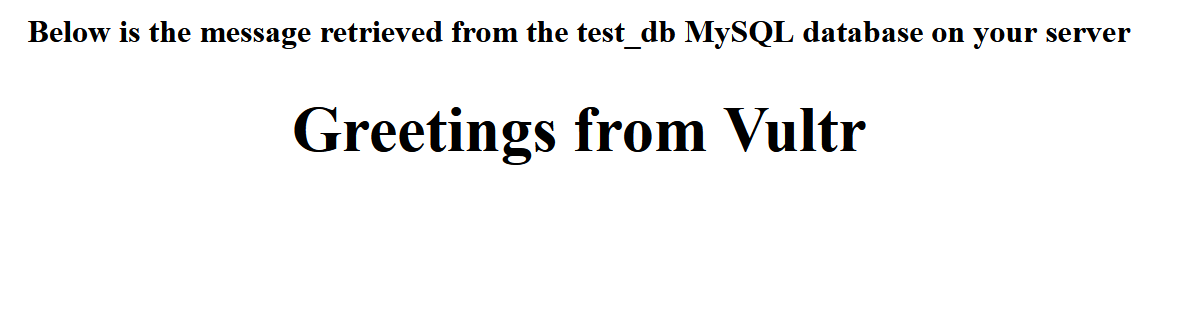
Generate Trusted SSL Certificates
Nginx delivers web applications on your server using the insecure HTTP port 80 by default. SSL certificates enable encryption of network connections between a user's web browser and your web server using HTTPS. Follow the steps below to generate trusted Let's Encrypt SSL certificates and enable encrypted HTTPS connections on your server
Install the Certbot Let's Encrypt client plugin for Nginx.
console$ sudo pkg install py39-certbot py39-certbot-nginx
Generate a new SSL certificate for your domain. Replace
app.example.comwith your actual domain andadmin@example.comwith your active email address.console$ sudo certbot --nginx -d app.example.com -m admin@example.com --agree-tos
Restart the Nginx web server to apply the SSL configuration changes.
console$ sudo service nginx restart
Access your domain using the HTTPS scheme in a new web browser window and verify that your PHP web application loads correctly.
https://app.example.com
Conclusion
You have installed Nginx, MySQL, and PHP (FEMP stack) on your FreeBSD server and set up a sample web application to deliver dynamic web content on your server. You can use the FEMP stack to securely develop and deliver high-performance web applications on your server using virtual host configurations. For more information and configuration options for each application in the stack, please visit the following documentation resources: