
How to Install PHP 7.4 on FreeBSD 14.0
PHP is a widely-used server-side scripting language designed for building dynamic websites and web applications. While PHP 7.4 reached its end-of-life (EOL) on November 28, 2022, some legacy applications may still depend on it for compatibility and stability. FreeBSD no longer offers PHP 7.4 through its latest Ports branches, but you can still install it using a legacy branch.
This article explains how to install PHP 7.4 on FreeBSD 14.0 using the 2022Q4 branch of the FreeBSD Ports Collection. You’ll compile PHP from source, configure PHP-FPM, and set it up with the Apache web server for legacy application support.
Prerequisites
Before you begin, you need to:
- Have access to a FreeBSD 14.0 as a non-root sudo user.
Install FreeBSD Ports
The FreeBSD Ports Collection is a package management framework used to compile and install third-party applications from source. To install legacy versions like PHP 7.4, you must use the older 2022Q4 branch of the Ports Collection.
Update the server's package information index.
console$ sudo pkg update
Install
giton your workstation.console$ sudo pkg install -y git
Clone the legacy Ports Collection using the
2022Q4branch (the last branch to support PHP 7.4).console$ sudo git clone --depth 1 https://git.FreeBSD.org/ports.git -b 2022Q4 /usr/ports
Verify that the
/usr/portsdirectory exists and contains the cloned Ports tree.console$ ls /usr/ports
Your output should be similar to the one below:
CHANGES         Templates       base            devel           german          mail            polish          textproc        x11-servers
CONTRIBUTING.md Tools           benchmarks      distfiles       graphics        math            ports-mgmt      ukrainian       x11-themes
......
Compile and Install PHP 7.4
FreeBSD no longer provides PHP 7.4 through its current Ports tree. However, by using the legacy 2022Q4 Ports Collection, you can still compile PHP 7.4 from source. Follow the steps below to compile and install PHP 7.4 along with its required dependencies and extensions.
Install required build tools and libraries.
console$ sudo pkg install -y curl re2c zip cmake gperf libzip html2text libxml2 gettext-tools
Remove the preinstalled Perl 5 binary to avoid build conflicts.
console$ sudo pkg remove -y perl5
Navigate to the Perl
5.36source directory.console$ cd /usr/ports/lang/perl5.36
Compile and install Perl
5.36.console$ sudo make BATCH=yes install clean
BATCH=yes: Install ports packages and their dependencies without the need for user interaction during the configuration process.clean: Remove build artifacts after installation process is finished, freeing up disk space.
Your output should be similar to the one below:
===>  Installing for perl5.36-5.36.0_2
===>  Checking if perl5.36 is already installed
===>   Registering installation for perl5.36-5.36.0_2
Installing perl5.36-5.36.0_2...
===> SECURITY REPORT:
    This port has installed the following files which may act as network
    servers and may therefore pose a remote security risk to the system.
/usr/local/lib/perl5/5.36/mach/CORE/libperl.so.5.36.0
......
Navigate to the PHP
7.4source directory.console$ cd /usr/ports/lang/php74
Compile and install PHP 7.4.
console$ sudo make BATCH=yes install clean
After your build is complete your output should look like:
Build complete.
......
===> SECURITY REPORT:
    This port has installed the following files which may act as network
    servers and may therefore pose a remote security risk to the system.
/usr/local/bin/php
/usr/local/bin/php-cgi
/usr/local/sbin/php-fpm
/usr/local/lib/libphp7.so
......
https://www.php.net/
===>  Cleaning for pkgconf-1.8.0_1,1
===>  Cleaning for autoconf-2.71
===>  Cleaning for m4-1.4.19,1
===>  Cleaning for libiconv-1.17
===>  Cleaning for texinfo-6.8_3,1
===>  Cleaning for help2man-1.49.2
Verify the installed PHP version.
console$ php -v
Your output should be similar to the one below:
PHP 7.4.32 (cli) (built: Apr 26 2025 06:16:44) ( NTS )
Copyright (c) The PHP Group
Zend Engine v3.4.0, Copyright (c) Zend Technologies
Copy the default production
php.iniconfiguration file.console$ sudo cp /usr/local/etc/php.ini-production /usr/local/etc/php.ini
View the active variables mentioned in the
php.inifile.console$ cat /usr/local/etc/php.ini | egrep -v '^;|^$'
This command will list all the active variables being used on the server.
Your output should be similar to the one below:
[PHP]
engine = On
short_open_tag = Off
...
max_execution_time = 30
max_input_time = 60
memory_limit = 128M
...
file_uploads = On
upload_max_filesize = 2M
max_file_uploads = 20
......
Modify these values as per the needs of your application.
Install PHP 7.4 Extensions
PHP extensions enhance the functionality of PHP by providing additional features like support for various databases, data manipulation, and more. Follow the steps below to compile and build the necessary PHP 7.4 extensions on your server.
Navigate to the PHP
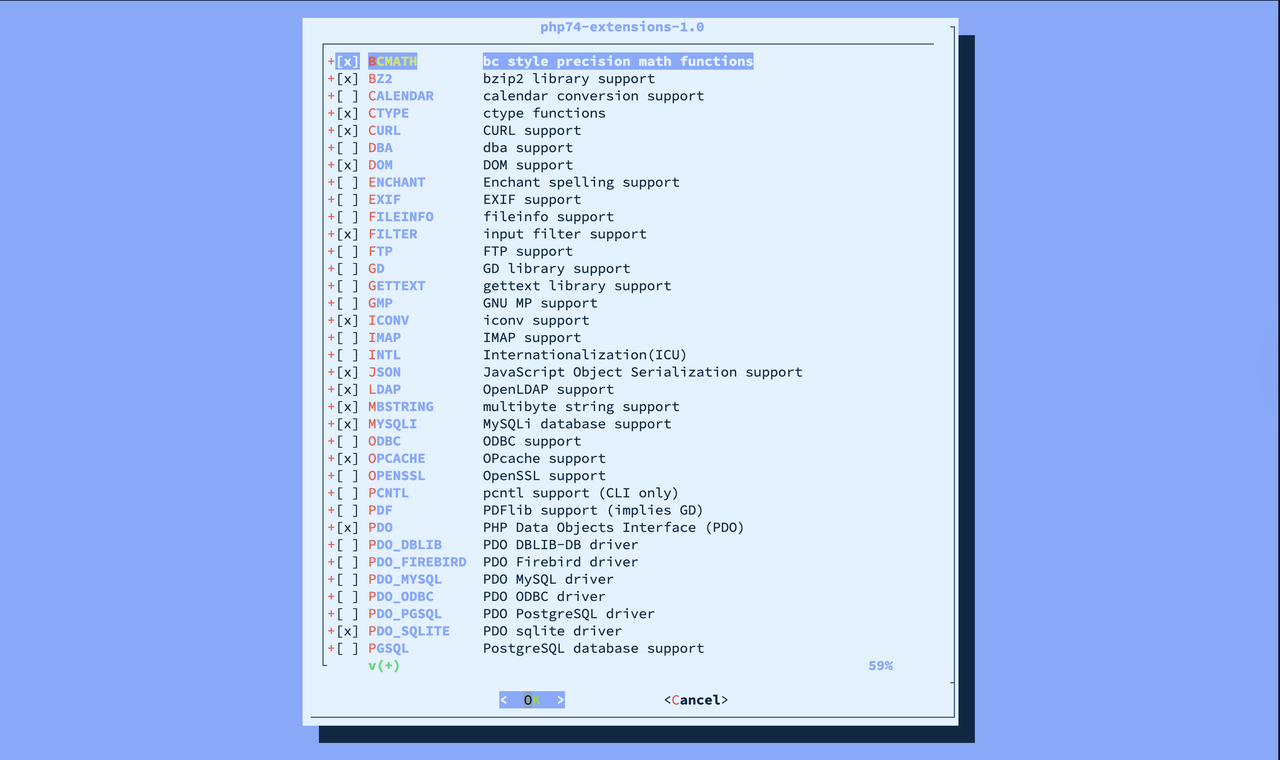
7.4extensions directory.console$ cd /usr/ports/lang/php74-extensions
Create a configuration using the
makecommand.console$ sudo make config
Use the arrow keys to navigate, Space to select the required extensions. After selecting them, press Enter to save and exit the interactive shell.
After completing the configuration, run the following command to compile and install the selected extensions.
console$ sudo make BATCH=yes install
Verify the installed PHP modules by running the following command.
console$ php -m
Your output should be similar to the one below:
[PHP Modules]
bcmath
bz2
Core
date
dom
......
json
libxml
mysqlnd
posix
......
SPL
sqlite3
standard
tokenizer
xml
xmlreader
......
zip
zlib

[Zend Modules]
Zend OPcache
Compile and Install PHP 7.4 FPM
PHP-FPM (FastCGI Process Manager) efficiently handles PHP requests and enhances performance, making it a common choice in production environments. PHP-FPM is automatically installed when you compile PHP 7.4 from the Ports Collection. Follow the steps below to configure and start the PHP-FPM service.
View the installed PHP-FPM version.
console$ php-fpm --version
Your output should be similar to the one below:
PHP 7.4.32 (fpm-fcgi) (built: Apr 25 2025 21:32:08)
Copyright (c) The PHP Group
Zend Engine v3.4.0, Copyright (c) Zend Technologies
    with Zend OPcache v7.4.32, Copyright (c), by Zend Technologies
Enable the PHP-FPM service to start at boot.
console$ sudo sysrc php_fpm_enable=YES
Your output should be similar to the one below:
php_fpm_enable: -> YESStart the PHP-FPM service.
console$ sudo service php-fpm start
Your output should be similar to the one below:
Performing sanity check on php-fpm configuration:
[26-Apr-2025 06:31:42] NOTICE: configuration file /usr/local/etc/php-fpm.conf test is successful

Starting php_fpm.
View the PHP-FPM service status and verify that it's running.
console$ sudo service php-fpm status
Your output should be similar to the one below:
php_fpm is running as pid 93073.
Configure PHP-FPM 7.4
In this section you will configure PHP-FPM 7.4 by adjusting the default pool settings and socket permissions to optimize performance based on your server's available resources. Follow the steps below to configure the PHP-FPM pool configuration.
Navigate to the PHP-FPM configuration directory.
console$ cd /usr/local/etc/php-fpm.d/
List the available files and verify that the
www.conffile exists.console$ lsYour output should be similar to the one below:
www.conf www.conf.defaultOpen the PHP-FPM
www.confconfiguration file using a text editor such asvim.console$ sudo vim www.conf
Locate the
[www]pool configuration and verify that the following parameters are set. Adjust the values as needed to match your server's workload and resource limits.ini[www] user = www group = www ... listen = /var/run/php-fpm.sock listen.owner = www listen.group = www listen.mode = 0660 ... pm = dynamic pm.max_children = 5 pm.start_servers = 2 pm.min_spare_servers = 1 pm.max_spare_servers = 3 ......
Save and exit the configuration file.
In the above configuration:
[www]: Defines a pool namedwww. PHP-FPM can manage multiple pools, each with its own configuration block.user: Defines the system user that PHP-FPM will use to execute PHP scripts securely.group: Sets the system group under which PHP-FPM will run, helping control file and socket access.listen.owner: Ensures the Unix socket is owned by the correct user so that only authorized services can communicate with PHP-FPM.listen.group: Assigns group ownership of the socket to allow shared access with the web server.listen: Determines where PHP-FPM listens for FastCGI requests, typically from the web server, using a Unix socket or TCP address.listen.mode: Controls who can read/write to the socket, securing PHP-FPM communication against unauthorized access.pm: Specifies the strategy for managing worker processes, enabling dynamic adjustment to system load.pm.max_children: Prevents resource exhaustion by limiting the number of concurrent PHP worker processes.pm.start_servers: Reduces latency at startup by preloading a defined number of PHP workers.pm.min_spare_servers: Ensures a baseline number of idle workers is always ready to handle new requests.pm.max_spare_servers: Avoids unnecessary memory usage by limiting excess idle worker processes.
Restart the PHP-FPM service to apply the changes.
console$ sudo service php-fpm restart
Your output should be similar to the one below:
Performing sanity check on php-fpm configuration:
[26-Apr-2025 06:34:55] NOTICE: configuration file /usr/local/etc/php-fpm.conf test is successful

Stopping php_fpm.
Waiting for PIDS: 93073.
Performing sanity check on php-fpm configuration:
[26-Apr-2025 06:34:55] NOTICE: configuration file /usr/local/etc/php-fpm.conf test is successful

Starting php_fpm.
View that the PHP-FPM service is running.
console$ sudo service php-fpm status
Your output should be similar to the one below:
php_fpm is running as pid 52044.
Test and Use PHP 7.4
In this section, you will verify the successful installation of PHP 7.4 by testing the PHP Command Line Interface (CLI), running a simple PHP script, configuring the Apache web server to handle FastCGI requests using a UNIX socket file, and confirming that your system is running the correct PHP version. Follow the sections below to test the PHP installation.
Test PHP CLI
To ensure PHP 7.4 is installed correctly, you can test it via the Command Line Interface (CLI). This section walks you through checking the installed PHP version and running a simple PHP script.
View the installed PHP version.
console$ php -v
Your output should be similar to the one below:
PHP 7.4.32 (cli) (built: Apr 26 2025 06:16:44) ( NTS )
Copyright (c) The PHP Group
Zend Engine v3.4.0, Copyright (c) Zend Technologies
    with Zend OPcache v7.4.32, Copyright (c), by Zend Technologies
Navigate to the user's home directory.
console$ cd ~
Create a test
greet.phpfile to test the PHP CLI.console$ vim greet.php
Add the following PHP content to the file.
php<?php echo "Greetings from Vultr!\n"; echo "Current PHP version: " . phpversion() . "\n"; ?>
Save and close the file.
Run the file using PHP CLI.
console$ php greet.php
Your output should be similar to the one below:
Greetings from Vultr!
Current PHP version: 7.4.32
Configure Apache with PHP-FPM
After confirming that PHP 7.4 is working from the CLI, you can test PHP-FPM (FastCGI Process Manager) with Apache. This section walks you through configuring Apache to communicate with PHP-FPM via a UNIX socket and ensuring PHP scripts work properly on the web server.
Install the Apache web server.
console$ sudo pkg install -y apache24
Enable the Apache web server service to automatically start at boot.
console$ sudo sysrc apache24_enable="YES"
Your output should be similar to the one below:
apache24_enable: -> YESStart the Apache service.
console$ sudo service apache24 start
Your output should be similar to the one below:
Syntax OK
Starting apache24.
View the Apache web server service status.
console$ sudo service apache24 status
Your output should be similar to the one below:
apache24 is running as pid 93337.Open the Apache configuration file.
console$ sudo vim /usr/local/etc/apache24/httpd.conf
Enable the required modules by removing the
#at the beginning of the following lines.iniLoadModule proxy_module libexec/apache24/mod_proxy.so LoadModule proxy_fcgi_module libexec/apache24/mod_proxy_fcgi.so LoadModule rewrite_module libexec/apache24/mod_rewrite.so
In the above configuration:
- mod_proxy: Enables Apache to act as a gateway server, forwarding requests to backend services like PHP-FPM.
- mod_proxy_fcgi: Works in conjunction with mod_proxy to support FastCGI protocols. This allows Apache to communicate with PHP-FPM over a UNIX socket or TCP.
- mod_rewrite: Provides URL rewriting capabilities, typically used for clean URLs and redirections.
These modules are essential for integrating Apache with PHP-FPM over a UNIX socket or TCP.
Create a virtual host configuration.
console$ sudo vim /usr/local/etc/apache24/Includes/php74.conf
Add the following content.
ini<VirtualHost *:80> ServerName localhost DocumentRoot "/usr/local/www/apache24/data" <Directory "/usr/local/www/apache24/data"> Options Indexes FollowSymLinks AllowOverride All Require all granted </Directory> <FilesMatch \.php$> SetHandler "proxy:unix:/var/run/php-fpm.sock|fcgi://localhost/" </FilesMatch> ErrorLog "/var/log/httpd-error.log" CustomLog "/var/log/httpd-access.log" combined </VirtualHost>
Save and exit the file.
Create a test PHP file.
console$ echo '<?php echo "<div style=\"text-align: center;\"> <h1>Greetings from Vultr!</h1> </div>"; ?>' | sudo tee /usr/local/www/apache24/data/test.php > /dev/null
Restart the PHP-FPM service.
console$ sudo service php-fpm restart
View the PHP-FPM service status to verify it is running.
console$ sudo service php-fpm status
Your output should be similar to the one below:
php_fpm is running as pid 33739.Restart the Apache web server.
console$ sudo service apache24 restart
View the Apache web server service status.
console$ sudo service apache24 status
Your output should be similar to the one below:
apache24 is running as pid 33707.Visit the below URL in your browser to confirm the Vultr Greetings page displays.
http://your-server-ip/test.php
Conclusion
You have successfully installed PHP 7.4 on FreeBSD 14.0 using the legacy FreeBSD Ports system, configured PHP-FPM for improved performance, and set up Apache to handle FastCGI requests using a UNIX socket. You tested the PHP installation via the PHP CLI and a simple PHP script, ensuring the correct PHP version was running. This setup is suitable for running legacy applications that require PHP 7.4, with PHP-FPM managing multiple processes to handle high traffic efficiently. However, since PHP 7.4 is deprecated and no longer receives security updates, it is advisable to plan a migration to a supported version, such as PHP 8.x, for better performance, security, and compatibility.