Introduction
PHP (Hypertext Preprocessor) is a popular server-side scripting language that enables the development of dynamic web applications. PHP-FPM (FastCGI Process Manager) provides additional features and improved performance over traditional CGI-based methods to enable PHP connections with other applications such as web servers to process dynamic web application requests.
This article explains how to install PHP and PHP-FPM on Ubuntu 24.04 and set up a working PHP environment to create dynamic web applications on the server.
Prerequisites
Before you begin:
- Deploy an Ubuntu 24.04 instance on Vultr.
- Access the server using SSH.
- Create a non-root user with sudo privileges and switch to the user.
- Update the server.
Install PHP
PHP is available in the default APT repositories on Ubuntu 24.04 with the latest package information. Follow the steps below to update the server packages and install the latest PHP version on your server.
Update the server package index.
console$ sudo apt update
Install PHP.
console$ sudo apt install php -y
View the installed PHP version on your server.
console$ php -v
Your output should be similar to the one below:
PHP 8.3.6 (cli) (built: Apr 15 2024 19:21:47) (NTS)
Copyright (c) The PHP Group
Zend Engine v4.3.6, Copyright (c) Zend Technologies
    with Zend OPcache v8.3.6, Copyright (c), by Zend Technologies
Install PHP Extensions
PHP extensions enable extra PHP functionalities on your server such as database integration, additional file formats, and encryption required by most PHP applications and frameworks. Follow the steps below to install common PHP extensions and enable extra processing functionalities on your server.
Install common PHP extensions.
console$ sudo apt install -y php-mysql php-mbstring php-bcmath php-zip php-gd php-curl php-xml
The above command installs the following PHP extensions:
php-mysql: Enables PHP applications to connect and interact with MySQL databases.
php-mbstring: Enables UTF8 text formats.
php-bcmath: Enables arbitrary precision mathematics functionalities.
php-zip: Enables support for ZIP archives in PHP applications.
php-gd: Enables PHP image processing functionalities.
php-curl: Allows URL transfers and synchronization with PHP applications.
php-xml: Enables XML support in PHP applications.
Run the following command to list all PHP extensions you can install based on your server's PHP version.
console$ sudo apt-cache search php | grep "^php8.3"
View all installed PHP extensions on your server.
console$ php -m
Your output should look like the one below:
[PHP Modules]
bcmath
calendar
Core
ctype
curl
date
dom
exif
FFI
.....

[Zend Modules]
Zend OPcache
Install and Configure PHP-FPM
PHP-FPM is available in the default APT repositories and matches the latest PHP package version installed on your server. Follow the steps below to install PHP-FPM and enable the service to automatically start at boot time.
Install PHP-FPM.
console$ sudo apt install php-fpm -y
View the installed PHP-FPM version on your server depending on your PHP version. For example,
PHP 8.3.console$ php-fpm8.3 -v
Output:
PHP 8.3.6 (fpm-fcgi) (built: Apr 15 2024 19:21:47)
Copyright (c) The PHP Group
Zend Engine v4.3.6, Copyright (c) Zend Technologies
    with Zend OPcache v8.3.6, Copyright (c), by Zend Technologies
List all files in the
/etc/php/8.3directory depending on your installed PHP version. Then, verify that thefpmdirectory is available.console$ ls /etc/php/8.3/
Output:
apache2 cli fpm mods-availableBased on the above output, PHP-FPM
fpmis available and the necessary configurations that control how PHP processes requests on your server.Switch to the PHP-FPM pool configurations directory
/etc/php/8.3/fpm/pool.d/.console$ cd /etc/php/8.3/fpm/pool.d/
Open the default PHP-FPM pool configuration
/etc/php/8.3/fpm/pool.d/www.confusing a text editor such as Nano.console$ sudo nano www.conf
- Find the
[www]option to verify your PHP-FPM pool name.
ini[www]- Find the
userandgroupoptions to verify the user PHP-FPM runs as. When using a web server, verify that PHP-FPM runs as thewww-datauser.
iniuser = www-data group = www-data
- Find the
listendirective and verify the socket path to access the PHP-FPM service on your server.
inilisten = /run/php/php8.3-fpm.sock
- Modify the following configuration to match your PHP-FPM processing needs on your server.
inipm = dynamic pm.max_children = 5 pm.start_servers = 2 pm.min_spare_servers = 1 pm.max_spare_servers = 3
pm: Enables the PHP-FPM process manager with any of the following options:static: Sets a fixed number of worker processes usingpm.max_children.dynamic: Enables a variable number of worker processes based on demand.ondemand: Enables spawning of worker processes only when needed and disables automatic start.
pm.max_children: Sets the maximum number of child processes to create when PHP-FPM starts to control your server memory usage.pm.start_servers: Sets the number of child processes to create when PHP-FPM starts.pm.min_spare_servers: Sets the minimum number of idle processes to allow on the server.pm.max_spare_servers: Sets the maximum number of idle processes to run on the server.pm.process_idle_timeout: Sets the maximum number of seconds after to wait and stop idle processes.access.log: Enables logging of all PHP-FPM pool connection requests.slowlog: Sets the path to log slow requests.request_slowlog_timeout: Sets the maximum time to wait for a request before it's marked as slow.
Save and close the file.
- Find the
Restart PHP-FPM to apply your configuration changes.
console$ sudo systemctl restart php8.3-fpm
Test PHP and PHP-FPM
PHP processes dynamic web application contents while PHP-FPM manages the connection to PHP with the necessary resources to enable fast processing of requests on your server. Follow the steps below to test PHP and PHP-FPM by creating a sample PHP application to deliver using the Nginx web server.
Switch to your user home directory.
console$ cd
Create a new sample PHP application file
sample.php.console$ nano sample.php
Add the following contents to the file.
php<?php echo "Greetings from Vultr! PHP is working correctly on this server"; ?>
Save and close the file.
Run the application using the PHP CLI utility.
console$ php sample.php
Output:
Greetings from Vultr! PHP is working correctly on this serverBased on the above output, PHP processes dynamic web application files on your server correctly.
Install the Nginx web server application to test access to the PHP-FPM service.
console$ sudo apt install nginx -y
Back up the default Nginx virtual host configuration.
console$ sudo mv /etc/nginx/sites-available/default /etc/nginx/sites-available/default.BAK
Create a new
defaultNginx configuration file.console$ sudo nano /etc/nginx/sites-available/default
Add the following configurations to the file.
nginxserver { listen 80 default_server; listen [::]:80 default_server; root /var/www/html/; index index.html index.php index.nginx-debian.html; location ~ \.php$ { try_files $uri =404; fastcgi_pass unix:/run/php/php-fpm.sock; fastcgi_index index.php; include fastcgi.conf; } }
Save and close the file.
The Nginx configuration above listens for connection requests using all server IP addresses on the default HTTP port
80and delivers files from the/var/www/htmlweb root directory. Nginx forwards all requests that match the.phpfile extension to the PHP-FPM socket path/run/php/php-fpm.sockfor processing using FastCGI to connect to the default PHP-FPM version service.Test the Nginx configuration for errors.
console$ sudo nginx -t
Output:
nginx: the configuration file /etc/nginx/nginx.conf syntax is ok
nginx: configuration file /etc/nginx/nginx.conf test is successful
Create a new sample PHP application file
test.phpin the web root directory/var/www/htmlspecified in your Nginx configuration.console$ sudo nano /var/www/html/test.php
Add the following contents to the file.
php<?php phpinfo(); ?>
Save and close the file.
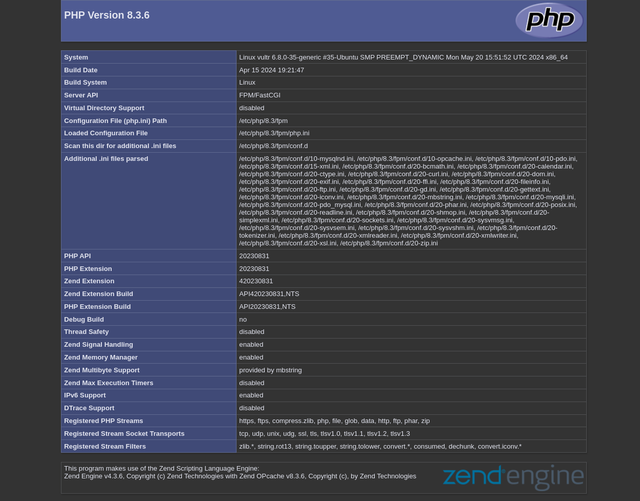
The above PHP application displays the available PHP version information on your server when accessed in a web browser.
Stop the
apache2service that's pre-installed with PHP to unbind the HTTP port80.console$ sudo systemctl stop apache2
Allow connections to the HTTP port
80through the default UFW firewall utility.console$ sudo ufw allow 80
Restart Nginx to apply your configuration changes.
console$ sudo systemctl restart nginx
Access your server IP address using a web browser such as chrome and load the
/test.phpURL path to access your PHP application.http://SERVER-IP/test.php
Install Multiple PHP Versions
Multiple projects require specific PHP versions depending on your needs. PHP supports multiple installed versions you can reference and use with the associated PHP-FPM version. However, the default Ubuntu 24.04 repositories include limited PHP versions. Add a trusted community repository such as ppa:ondrej/php to install older or newer PHP versions on your server such as PHP 7.4 that may not be available in the default repositories. In the following steps, add the ppa:ondrej/php package source to your APT repositories and install multiple PHP versions on your server.
Add the
ppa:ondrej/phpPPA to your APT repositories.console$ sudo add-apt-repository -y ppa:ondrej/php
Install a specific PHP and PHP-FPM version on your server. For example,
PHP 7.4.console$ sudo apt install -y php7.4 php7.4-fpm
View the installed PHP version information on your server.
console$ php7.4 -v
Output:
PHP 7.4.33 (cli) (built: Jun  6 2024 16:49:34) ( NTS )
Copyright (c) The PHP Group
Zend Engine v3.4.0, Copyright (c) Zend Technologies
    with Zend OPcache v7.4.33, Copyright (c), by Zend Technologies
View the PHP version's PHP-FPM service status and verify that it's running. For example,
php7.4-fpm.console$ sudo systemctl status php7.4-fpm
Output:
● php7.4-fpm.service - The PHP 7.4 FastCGI Process Manager
     Loaded: loaded (/usr/lib/systemd/system/php7.4-fpm.service; enabled; preset: enabled)
     Active: active (running) since Sun 2024-06-30 00:20:23 UTC; 11min ago
       Docs: man:php-fpm7.4(8)
    Process: 23012 ExecStartPost=/usr/lib/php/php-fpm-socket-helper install /run/php/php-fpm.sock /etc/php/7.4/fpm/pool.d/www.conf 74 (code=exited, status=0/SUC>
   Main PID: 23008 (php-fpm7.4)
     Status: "Processes active: 0, idle: 2, Requests: 0, slow: 0, Traffic: 0req/sec"
      Tasks: 3 (limit: 2269)
     Memory: 7.0M (peak: 8.0M)
        CPU: 104ms
     CGroup: /system.slice/php7.4-fpm.service
             ├─23008 "php-fpm: master process (/etc/php/7.4/fpm/php-fpm.conf)"
             ├─23009 "php-fpm: pool www"
             └─23011 "php-fpm: pool www"
Create a new web root directory to store different PHP application files. For example,
/var/www/php74-site.console$ sudo mkdir -p /var/www/php74-site
Copy the
test.phpPHP application file you created earlier to the directory asindex.php.console$ sudo cp /var/www/html/test.php /var/www/php74-site/index.php
Create a new Nginx virtual host configuration to test access to your installed PHP-FPM version. For example,
php74-site.conf.console$ sudo nano /etc/nginx/sites-available/php74-site.conf
Add the following configurations to the file.
nginxserver { listen 9000; listen [::]:9000; root /var/www/php74-site; index index.php index.html; location ~ \.php$ { try_files $uri =404; fastcgi_pass unix:/run/php/php7.4-fpm.sock; fastcgi_index index.php; include fastcgi.conf; } }
Save and close the file.
The above Nginx configuration listens for incoming connections on the custom TCP port
9000and delivers files from your web root directory/var/www/php74-site. Theindexdirective specifies the default web application files to serve on all requests by default. Then, Nginx forwards all PHP file requests.phpto your PHP version's PHP-FPM servicephp7.4-fpmusing the default pool socket path/run/php/php7.4-fpm.sockfor processing.Link the Nginx configuration file to the
/etc/nginx/sites-enabledactivate the new virtual host.console$ sudo ln -s /etc/nginx/sites-available/php74-site.conf /etc/nginx/sites-enabled/
Test the Nginx configuration for errors.
console$ sudo nginx -t
Output:
nginx: the configuration file /etc/nginx/nginx.conf syntax is ok
nginx: configuration file /etc/nginx/nginx.conf test is successful
Allow network connections to the virtual host TCP port
9000through the firewall.console$ sudo ufw allow 9000/tcp
Reload the firewall rules to apply changes.
console$ sudo ufw reload
Restart Nginx to apply your configuration changes.
console$ sudo systemctl restart nginx
Access your server IP on port
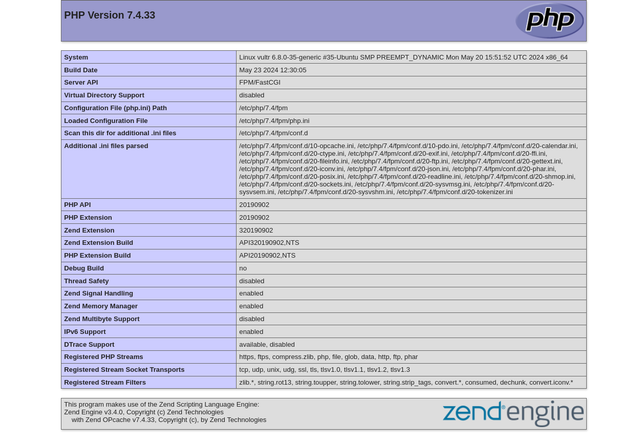
9000in a new web browser window to open yourindex.phpweb application file.http://SERVER-IP:9000Verify that your PHP 7.4 version information and modules display in your web browser.

- Access the
/test.phpURL path using your server IP in a new web browser tab to verify that your default PHP8.3version processes requests separately based on your Nginx configuration.

- Access the
Conclusion
You have installed PHP and PHP-FPM on your Ubuntu 24.04 server. Then, you installed multiple PHP versions to run different web application projects depending on your specific feature and version needs. You can integrate PHP and PHP-FPM with multiple applications such as Nginx to securely process dynamic web application requests on your server. For more information, visit the official PHP documentation.