
How to Install PHP and PHP-FPM on Ubuntu 22.04
PHP is a widely used server-side scripting language for building dynamic web applications. PHP-FPM (FastCGI Process Manager) enhances performance and handles PHP requests efficiently when integrated with web servers.
In this article, you are to install PHP and PHP-FPM on Ubuntu 22.04 and finally set up a working PHP environment to create dynamic web applications on the server.
Prerequisites
Before you begin:
- Have an Ubuntu 22.04 server.
- Access the server using SSH as a non-root user with sudo privileges.
- Update the server.
Install PHP
PHP is included in Ubuntu 22.04’s default APT repositories. Follow the steps below to update your server and install the latest available PHP version.
Update the server package index.
console$ sudo apt update
Install PHP.
console$ sudo apt install php -y
View the installed PHP version on your server.
console$ php -v
Your output should be similar to the one below:
PHP 8.1.2-1ubuntu2.21 (cli) (built: Mar 24 2025 19:04:23) (NTS)
Copyright (c) The PHP Group
Zend Engine v4.1.2, Copyright (c) Zend Technologies
    with Zend OPcache v8.1.2-1ubuntu2.21, Copyright (c), by Zend Technologies
Install PHP Extensions
PHP extensions add functionality to your server, enabling features like database access, encryption, and support for file formats used by many PHP applications and frameworks. Follow the steps below to install common PHP extensions and enhance your server's capabilities.
Install common PHP extensions.
console$ sudo apt install -y php-mysql php-mbstring php-bcmath php-zip php-gd php-curl php-xml
The above command installs the following PHP extensions:
php-mysql – Connects PHP with MySQL databases.
php-mbstring – Supports UTF-8 and multibyte strings.
php-bcmath – Enables high-precision math operations.
php-zip – Adds ZIP archive support.
php-gd – Enables image processing.
php-curl – Allows data transfer via URLs.
php-xml – Provides XML parsing and handling.
Run the following command to list all PHP extensions you can install based on your server's PHP version.
console$ sudo apt-cache search php | grep "^php8.1"
View all installed PHP extensions on your server.
console$ php -m
Your output should look like the one below:
[PHP Modules]
bcmath
calendar
Core
ctype
curl
date
dom
exif
FFI
.....

[Zend Modules]
Zend OPcache
Install and Configure PHP-FPM
PHP-FPM is included in Ubuntu 22.04’s default APT repositories and matches the installed PHP version. Follow the steps below to install PHP-FPM and enable it to start automatically at boot.
Install PHP-FPM.
console$ sudo apt install php-fpm -y
View the installed PHP-FPM version on your server depending on your PHP version. For example,
PHP 8.1.console$ php-fpm8.1 -v
Output:
PHP 8.1.2-1ubuntu2.21 (fpm-fcgi) (built: Mar 24 2025 19:04:23)
Copyright (c) The PHP Group
Zend Engine v4.1.2, Copyright (c) Zend Technologies
    with Zend OPcache v8.1.2-1ubuntu2.21, Copyright (c), by Zend Technologies
List all files in the
/etc/php/8.1directory depending on your installed PHP version. Then, verify that thefpmdirectory is available.console$ ls /etc/php/8.1/
Output:
apache2 cli fpm mods-availableBased on the above output, PHP-FPM
fpmis available and the necessary configurations that control how PHP processes requests on your server.Switch to the PHP-FPM pool configurations directory
/etc/php/8.1/fpm/pool.d/.console$ cd /etc/php/8.1/fpm/pool.d/
Open the default PHP-FPM pool configuration
/etc/php/8.1/fpm/pool.d/www.confusing a text editor such as Nano.console$ sudo nano www.conf
Find the
[www]option to verify your PHP-FPM pool name.ini[www]Find the
userandgroupoptions to verify the user PHP-FPM runs as. When using a web server, verify that PHP-FPM runs as thewww-datauser.iniuser = www-data group = www-data
Find the
listendirective and verify the socket path to access the PHP-FPM service on your server.inilisten = /run/php/php8.1-fpm.sock
Modify the following configuration to match your PHP-FPM processing needs on your server.
inipm = dynamic pm.max_children = 5 pm.start_servers = 2 pm.min_spare_servers = 1 pm.max_spare_servers = 3
pm: Sets the process manager type:static: Fixed number of child processes.dynamic: Adjusts processes based on demand.ondemand: Spawns processes only when needed.
pm.max_children: Max number of child processes.pm.start_servers: Number of processes to start with (dynamic only).pm.min_spare_servers: Minimum idle processes.pm.max_spare_servers: Maximum idle processes.pm.process_idle_timeout: Time before stopping idle processes.access.log: Logs PHP-FPM pool requests.slowlog: Path to log slow requests.request_slowlog_timeout: Timeout to flag slow requests.
Save and close the file.
Restart PHP-FPM to apply your configuration changes.
console$ sudo systemctl restart php8.1-fpm
Test PHP and PHP-FPM
PHP handles dynamic content, while PHP-FPM connects PHP to the web server with optimized resource management. Follow the steps below to test PHP and PHP-FPM by serving a sample PHP app through Nginx.
Switch to your user home directory.
console$ cd
Create a new sample PHP application file
sample.php.console$ nano sample.php
Add the following contents to the file.
php<?php echo "Greetings from Vultr! PHP is working correctly on this server"; ?>
Save and close the file.
Run the application using the PHP CLI utility.
console$ php sample.php
Output:
Greetings from Vultr! PHP is working correctly on this serverBased on the above output, PHP processes dynamic web application files on your server correctly.
Install the Nginx web server application to test access to the PHP-FPM service.
console$ sudo apt install nginx -y
Back up the default Nginx virtual host configuration.
console$ sudo mv /etc/nginx/sites-available/default /etc/nginx/sites-available/default.BAK
Create a new
defaultNginx configuration file.console$ sudo nano /etc/nginx/sites-available/default
Add the following configurations to the file.
iniserver { listen 80 default_server; listen [::]:80 default_server; root /var/www/html/; index index.html index.php index.nginx-debian.html; location ~ \.php$ { try_files $uri =404; fastcgi_pass unix:/run/php/php8.1-fpm.sock; fastcgi_index index.php; include fastcgi.conf; } }
Save and close the file.
The Nginx config listens on port
80, serves files from/var/www/html, and forwards.phprequests to the PHP-FPM socket at/run/php/php8.1-fpm.sockusing FastCGI.Test the Nginx configuration for errors.
console$ sudo nginx -t
Output:
nginx: the configuration file /etc/nginx/nginx.conf syntax is ok
nginx: configuration file /etc/nginx/nginx.conf test is successful
Create a new sample PHP application file
test.phpin the web root directory/var/www/htmlspecified in your Nginx configuration.console$ sudo nano /var/www/html/test.php
Add the following contents to the file.
php<?php phpinfo(); ?>
Save and close the file.
The above PHP application displays the available PHP version information on your server when accessed in a web browser.
Stop the
apache2service that's pre-installed with PHP to unbind the HTTP port80.console$ sudo systemctl stop apache2
Allow connections to the HTTP port
80through the default UFW firewall utility.console$ sudo ufw allow 80
Restart Nginx to apply your configuration changes.
console$ sudo systemctl restart nginx
Access your server IP address using a web browser such as chrome and load the
/test.phpURL path to access your PHP application.http://SERVER-IP/test.php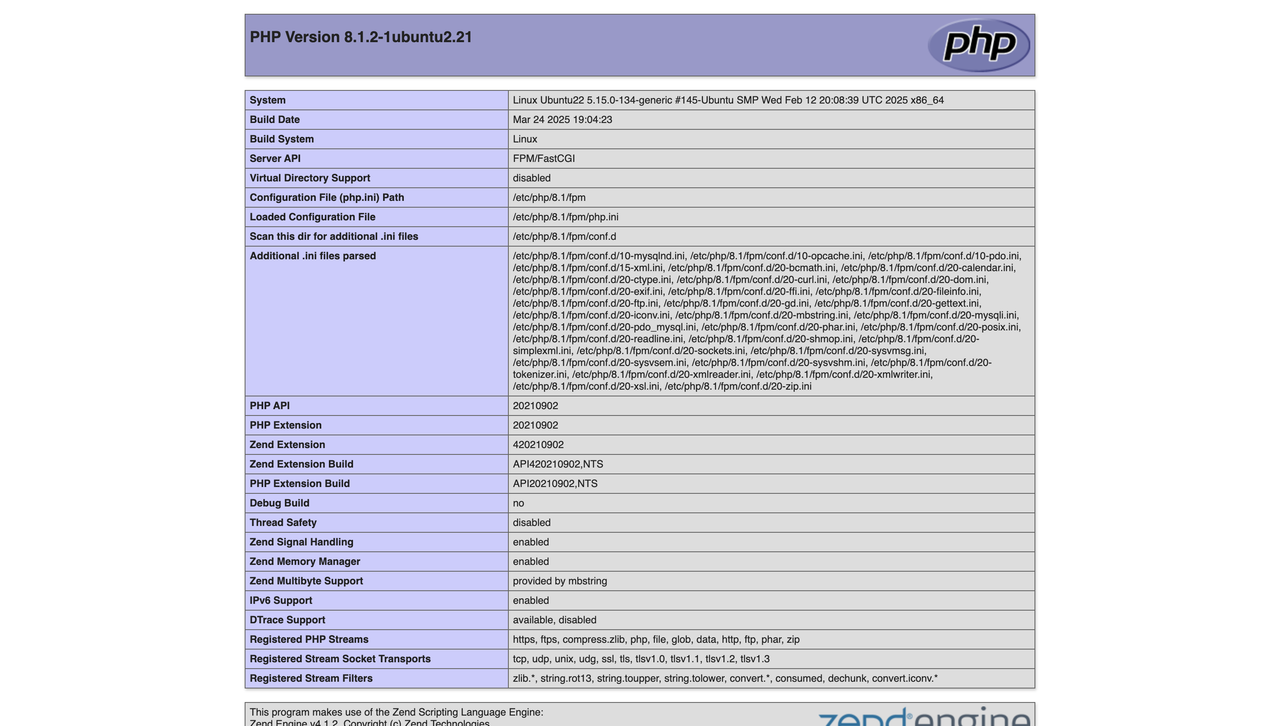
Install Multiple PHP Versions
Multiple projects may need different PHP versions. Ubuntu 22.04's default repositories offer limited PHP versions. To install additional versions like PHP 7.4, add the trusted ppa:ondrej/php repository. Follow the steps below to add the PPA and install multiple PHP versions.
Add the
ppa:ondrej/phpPPA to your APT repositories.console$ sudo add-apt-repository -y ppa:ondrej/php
Install a specific PHP and PHP-FPM version on your server. For example,
PHP 7.4.console$ sudo apt install -y php7.4 php7.4-fpm
View the installed PHP version information on your server.
console$ php7.4 -v
Output:
PHP 7.4.33 (cli) (built: Jun  6 2024 16:49:34) ( NTS )
Copyright (c) The PHP Group
Zend Engine v3.4.0, Copyright (c) Zend Technologies
    with Zend OPcache v7.4.33, Copyright (c), by Zend Technologies
View the PHP version's PHP-FPM service status and verify that it's running. For example,
php7.4-fpm.console$ sudo systemctl status php7.4-fpm
Output:
● php7.4-fpm.service - The PHP 7.4 FastCGI Process Manager
     Loaded: loaded (/lib/systemd/system/php7.4-fpm.service; enabled; vendor preset: enabled)
     Active: active (running) since Sun 2025-04-06 16:24:27 UTC; 33s ago
       Docs: man:php-fpm7.4(8)
    Process: 31052 ExecStartPost=/usr/lib/php/php-fpm-socket-helper install /run/php/php-fpm.sock /etc/php/7.4/fpm/pool.d/www.conf 74 (code=exited, status=0/SUCCESS)
   Main PID: 31049 (php-fpm7.4)
     Status: "Processes active: 0, idle: 2, Requests: 0, slow: 0, Traffic: 0req/sec"
      Tasks: 3 (limit: 9385)
     Memory: 6.9M
        CPU: 42ms
     CGroup: /system.slice/php7.4-fpm.service
             ├─31049 "php-fpm: master process (/etc/php/7.4/fpm/php-fpm.conf)"
             ├─31050 "php-fpm: pool www"
             └─31051 "php-fpm: pool www"
Create a new web root directory to store different PHP application files. For example,
/var/www/php74-site.console$ sudo mkdir -p /var/www/php74-site
Copy the
test.phpPHP application file you created earlier to the directory asindex.php.console$ sudo cp /var/www/html/test.php /var/www/php74-site/index.php
Create a new Nginx virtual host configuration to test access to your installed PHP-FPM version. For example,
php74-site.conf.console$ sudo nano /etc/nginx/sites-available/php74-site.conf
Add the following configurations to the file.
iniserver { listen 9000; listen [::]:9000; root /var/www/php74-site; index index.php index.html; location ~ \.php$ { try_files $uri =404; fastcgi_pass unix:/run/php/php7.4-fpm.sock; fastcgi_index index.php; include fastcgi.conf; } }
Save and close the file.
The Nginx config listens on custom port
9000and serves files from/var/www/php74-site. It uses the index directive for default pages and forwards .php requests to PHP-FPM (php7.4-fp) via the socket at/run/php/php7.4-fpm.sock.Link the Nginx configuration file to the
/etc/nginx/sites-enabledactivate the new virtual host.console$ sudo ln -s /etc/nginx/sites-available/php74-site.conf /etc/nginx/sites-enabled/
Test the Nginx configuration for errors.
console$ sudo nginx -t
Output:
nginx: the configuration file /etc/nginx/nginx.conf syntax is ok
nginx: configuration file /etc/nginx/nginx.conf test is successful
Allow network connections to the virtual host TCP port
9000through the firewall.console$ sudo ufw allow 9000/tcp
Reload the firewall rules to apply changes.
console$ sudo ufw reload
Restart Nginx to apply your configuration changes.
console$ sudo systemctl restart nginx
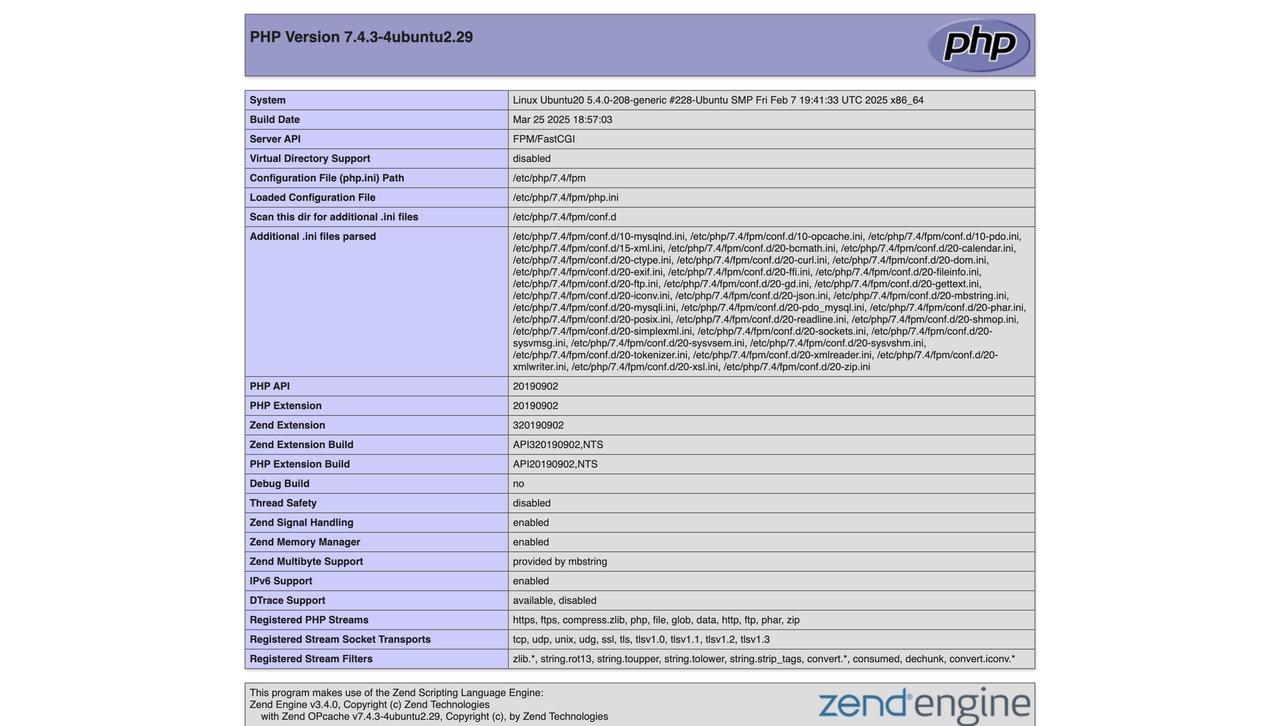
Access your server IP on port
9000in a new web browser window to open yourindex.phpweb application file.http://SERVER-IP:9000Verify that your PHP 7.4 version information and modules display in your web browser.
Access the
/test.phpURL path using your server IP in a new web browser tab to verify that your default PHP8.1version processes requests separately based on your Nginx configuration.
Conclusion
In this article, you’ve installed PHP, PHP-FPM, and multiple PHP versions on your Ubuntu 22.04 server. By integrating PHP and PHP-FPM with applications like Nginx, you can efficiently handle dynamic web requests for various projects. For more information, visit the official PHP documentation.