How to Install Podman on Debian 12

Updated on August 16, 2024
How to Install Podman on Debian 12 header image

Introduction

Podman (Pod Manager) is an open-source, daemonless container engine for developing, managing, and running Open Container Initiative (OCI) containers on Linux systems. Podman does not require a background daemon process and this makes it well-suited for environments such as highly secured systems or CI/CD pipelines, wh## Introduction

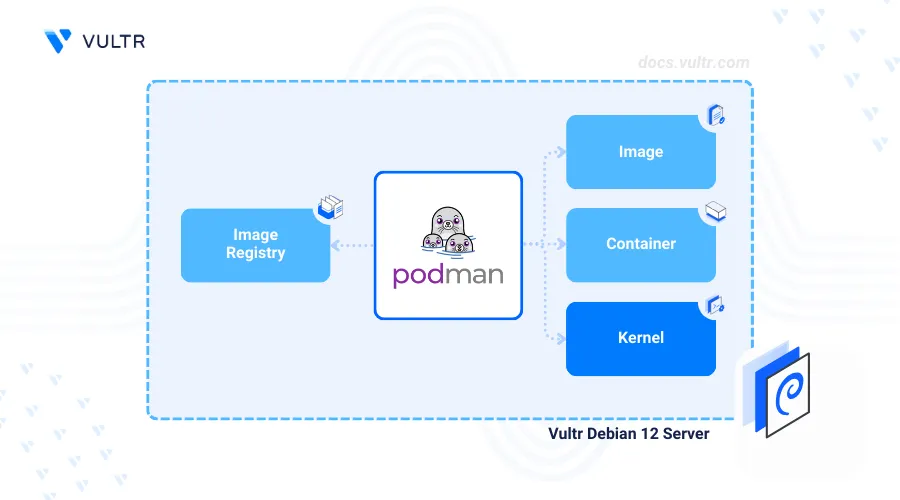
Podman also known as Pod Manager is an open-source, daemonless container engine used to build, manage, and run Open Container Initiative (OCI) containers. Podman does not require background daemon processes making it suitable for environments such as highly secured systems or CI/CD pipelines for improved security and resource usage.

This article explains how to install Podman on a Debian 12 server and perform common container management tasks to build and run containerized applications.

Prerequisites

Before you begin:

Install Podman

Podman is available in the default package repositories on Debian 12. Follow the steps below to install the latest Podman package using the APT package manager.

  1. Update the server's package index.

    console
    $ sudo apt update
    
  2. Install Podman.

    console
    $ sudo apt install podman -y
    
  3. View the installed Podman version on your server.

    console
    $ sudo podman --version
    

    Output:

    podman version 4.3.1

Manage the Podman System Service

Podmans uses two linked service profiles to run on a server, podman.service and podman.socket. podman.service enables access to Podman CLI and interaction with the Podman engine to run container management commands. podman.socket enables remote access to the application API, and integrates Podman with other container development tools. Follow the steps below to manage the Podman system service and enable the application to run on your server.

  1. Enable the Podman system service to automatically start at system boot.

    console
    $ sudo systemctl enable podman
    
  2. Start the Podman service.

    console
    $ sudo systemctl start podman
    
  3. View the podman.socket service status and verify that it's running.

    console
    $ sudo systemctl status podman.socket
    

    Output:

    ● podman.socket - Podman API Socket
         Loaded: loaded (/lib/systemd/system/podman.socket; enabled; preset: enabled)
         Active: active (listening) since Sun 2024-07-28 23:57:33 UTC; 4min 11s ago
       Triggers: ● podman.service
           Docs: man:podman-system-service(1)
         Listen: /run/podman/podman.sock (Stream)
         CGroup: /system.slice/podman.socket
  4. View the podman.service status and verify that it's triggered by the podman.socket service.

    console
    $ sudo systemctl status podman.service
    

    Output:

    ○ podman.service - Podman API Service
         Loaded: loaded (/lib/systemd/system/podman.service; enabled; preset: enabled)
         Active: inactive (dead) since Sun 2024-07-28 23:58:57 UTC; 2min 8s ago
       Duration: 5.037s
    TriggeredBy: ● podman.socket
  5. Stop the Podman service.

    console
    $ sudo systemctl stop podman
    
  6. Restart the Podman service.

    console
    $ sudo systemctl restart podman
    

Deploy Containerized Applications using Podman

Podman supports multiple image sources and registries to pull and run container images on your server. The /etc/containers/registries.conf configuration file includes registry information used by Podman to find container images. Podman uses default registries such as Docker Hub, quay.io, and registry.fedoraproject.org if the configuration file does not include any registry sources. Follow the steps below to deploy a containerized HTTP application using Podman using the default registry sources.

  1. Pull the latest Apache HTTP server container image from Docker Hub using the Podman CLI.

    console
    $ sudo podman pull docker.io/httpd
    

    Your output should be similar to the one below when successful.

    //...
    Writing manifest to image destination
    Storing signatures
    b21577b6946fec9df0eaa3c21748d361bc19742ddb6185a4201baa4200fb35fa
  2. List all Podman images and verify that the new container is available on your server.

    console
    $ sudo podman images
    

    Output:

    REPOSITORY               TAG         IMAGE ID      CREATED       SIZE
    docker.io/library/httpd  latest      b21577b6946f  22 hours ago  152 MB
  3. Deploy a new containerized application using the httpd image and expose it on the localhost port 8080.

    console
    $ sudo podman run -d --name hello-world -p 8080:80 docker.io/httpd
    
  4. List all active Podman container processes and verify that your application is active.

    console
    $ sudo podman ps
    

    Your output should be similar to the one below.

    CONTAINER ID  IMAGE                           COMMAND           CREATED        STATUS            PORTS                 NAMES
    16f7b5fdab05  docker.io/library/httpd:latest  httpd-foreground  9 seconds ago  Up 9 seconds ago  0.0.0.0:8080->80/tcp  hello-world
  5. Access the containerized application using your host port 8080 and verify that ts running.

    console
    $ curl http://localhost:8080
    

    Output:

    <html><body><h1>It works!</h1></body></html>
  6. Stop the container.

    console
    $ sudo podman stop hello-world
    

Login to a Container Registry

Podman supports private and public registries such as the Vultr Container Registry to manage container images. Follow the steps below to create a new Python Flask application, build a container image and store it in your Vultr Container Registry as a new repository image.

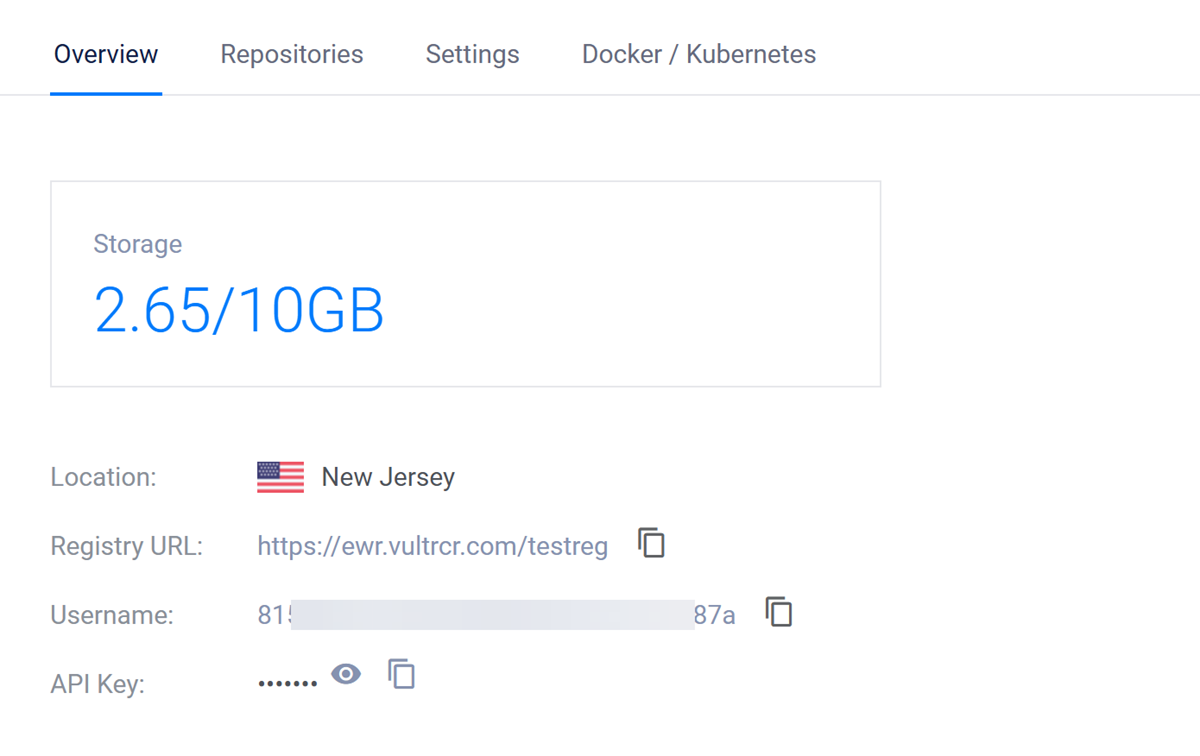
  1. Access your Vultr Container Registry's management page.

  2. Find your registry details within the overview tab, and copy the default username and API key credentials to your clipboard.

    Access the Vultr Container Registry Management Panel

  3. Create a new environment variable to store your Vultr Container Registry URL. For example, https://ewr.vultrcr.com/demo.

    console
    $ export VULTR_CONTAINER_REGISTRY_NAME=https://ewr.vultrcr.com/demo
    
  4. Create another environment variable to store your Vultr container registry username. Replace example-user with your actual username.

    console
    $ export VULTR_CONTAINER_REGISTRY_USERNAME=example-user
    
  5. Create an environment variable to store your Vultr Container Registry API key. Replace registry-key with your actual API key.

    console
    $ export VULTR_CONTAINER_REGISTRY_API_KEY=registry-key
    
  6. Login to the Vultr Container Registry using Podman CLI and the environment variable values.

    console
    $ sudo podman login https://ewr.vultrcr.com/$VULTR_CONTAINER_REGISTRY_NAME -u $VULTR_CONTAINER_REGISTRY_USERNAME -p $VULTR_CONTAINER_REGISTRY_API_KEY
    

    Your output should be similar to the one below when successful.

    Login Succeeded!
  7. Create a new sample Python application file app.py.

    console
    $ sudo nano app.py
    
  8. Add the following contents to the file.

    python
    from flask import Flask
    app = Flask(__name__)
    
    @app.route("/")
    def hello():
        return "Greetings from Vultr"
    
    if __name__ == "__main__":
        app.run(host="0.0.0.0", port=5000)
    

    Save and close the file.

    The above Python application initializes a new Flask web server that displays a Greetings from Vultr prompt when accessed using the application port 5000.

  9. Create a Dockerfile to containerize the Python application.

    console
    $ nano app.py
    
  10. Add the following contents to the file:

    dockerfile
    FROM python:3.9-slim
    WORKDIR /app
    COPY . /app
    RUN pip install flask
    EXPOSE 5000
    CMD ["python", "app.py"]
    

    Save and close the file.

    The above Dockerfile builds a new Python Flask application container image that uses the Python version 3.9, installs Flask, and runs the application on port 5000.

  11. Build the new container image using all files in your working directory.

    console
    $ sudo podman build -t my-python-app .
    

    Your output should be similar to the one below when successful.

    //...
    Successfully tagged localhost/my-python-app:latest
    a49734b0f695c4c171b15b446c3734e43d27354006fa9bd756af1a78e33d5e47
  12. View all container images on your server and verify that the new application image is available.

    console
    $ sudo podman images
    

    Output:

    REPOSITORY                          TAG         IMAGE ID      CREATED        SIZE
    localhost/my-python-app             latest      a49734b0f695  9 minutes ago  765 MB
    docker.io/library/httpd             latest      b21577b6946f  22 hours ago   152 MB
  13. Tag the httpd container image with your desired Vultr Container Registry repository name.

    console
    $ sudo podman tag my-python-app ewr.vultrcr.com/$VULTR_CONTAINER_REGISTRY_NAME/my-python-app:v1
    
  14. List all Podman images again and verify that the tagged image is available.

    console
    $ sudo podman images
    

    Output:

    REPOSITORY                          TAG         IMAGE ID      CREATED        SIZE
    localhost/my-python-app             latest      a49734b0f695  9 minutes ago  765 MB
    ewr.vultrcr.com/demo/my-python-app  v1          a49734b0f695  9 minutes ago  765 MB
    docker.io/library/httpd             latest      b21577b6946f  22 hours ago   152 MB
    docker.io/library/python            3.9-slim    724a8ee22b0c  3 months ago   131 MB
  15. Push the tagged image to your Vultr Container Registry.

    console
    $ sudo podman push ewr.vultrcr.com/$VULTR_CONTAINER_REGISTRY_NAME/my-python-app:v1
    

    Output:

    //...
    Writing manifest to image destination
    Storing signatures
  16. Access your Vultr Container registry's management page and navigate to the Repositories tab to verify that the new container image repository is available.

    View the Vultr Container Registry Container Repositories

  17. Deploy a new application using the container image from your Vultr Container Registry and forward the container port 5000 to your localhost port 5000.

    console
    $ sudo podman run -d --name hello-python -p 5000:5000 ewr.vultrcr.com/$VULTR_CONTAINER_REGISTRY_NAME/my-python-app:v1
    
  18. Access the localhost port 5000 using Curl to verify that your containerized application is running correctly.

    console
    $ curl http://localhost:5000
    

    Output:

    Greetings from Vultr

Conclusion

You have installed Podman on your Debian 12 server and managed the containerized application processes. Podman uses container processes similar to Docker and allows you to pull, run, and manage containers on your server. You can integrate Podman with other container development tools using the application API or use custom registries such as the Vultr Container Registry to store your container images. For more information, visit the official Podman documentation. ere running a daemon is not desirable or possible.

Podman offers several key features that make it a powerful container management tool. Its daemonless architecture improves security and reduces resource consumption by running containers without a daemon. Podman provides native support for pods, allowing users to manage groups of containers that work together. With rootless container capabilities, non-root users can create and manage containers, enabling multi-tenancy. Podman integrates with systemd for better process management, and also includes a native container image build tool (Buildah) eliminating the need for a separate tool.

This guide will walk you through how to install and configure Podman on Debian 12. You will learn how to perform common container tasks using Podman. You will also see an example of how to manage a containerized application with Podman and Vultr Container Registry which is a fully-managed repository to store, distribute and manage container images.

Prerequisites

Please complete the following steps before you begin:

  1. Deploy a Debian 12 server on Vultr.
  2. Configure a non-root user with sudo privileges.

Install Podman

Install Podman from the Debian repository.

  1. Refresh the local package index to get the latest packages and version information:

    console
    $ sudo apt update
    
  2. Install Podman:

    console
    $ sudo apt install podman -y
    
  3. Verify Podman installation:

    console
    $ sudo podman --version
    
  4. The output will show you the installed version:

    podman version 4.3.1

Manage the Podman System Service

Podman provides two key components for container management: the podman CLI and podman.socket. The podman CLI is the primary command-line tool used for direct interaction with Podman, allowing users to execute commands for managing containers, images, pods, and other resources. In contrast, podman.socket is a systemd socket file that enables remote API access to Podman, facilitating remote management and integration with container development tools.

Podman can be run as a system service using podman.socket. You can use systemctl to enable, start, stop, and check the status of the Podman service. The socket is not active by default and requires manual enabling.

  1. Use the following command to enable the Podman service so it starts automatically on boot:

    console
    $ sudo systemctl enable --now podman.socket
    
  2. Start the Podman service:

    console
    $ sudo systemctl start podman.socket
    
  3. Stop the Podman service:

    console
    $ sudo systemctl stop podman.socket
    
  4. Verify Podman service status:

    console
    $ sudo systemctl status podman.socket
    
  5. In the status output, you should see this line:

    Active: inactive (dead)
  6. Start the Podman service again:

    console
    $ sudo systemctl start podman.socket
    
  7. Verify Podman service status:

    console
    $ sudo systemctl status podman.socket
    
  8. In the status output, you should see this line:

    Active: active (listening)

    The Podman service is now up and running.

Deploy Containerized Applications using Podman

By default, Podman uses a variety of image sources to locate and pull container images. It searches for images in the registries defined in the /etc/containers/registries.conf file. If this file is not present or doesn't specify any registries, Podman falls back to a built-in list of default registries. These typically include docker.io (Docker Hub), quay.io, and registry.fedoraproject.org. Users can modify the registries.conf file to add, remove, or reorder registries according to their needs, allowing for customization of image sources to suit specific requirements or to prioritize private registries.

In this section, you will run an HTTP server based containerized application using Podman with a container image from Docker Hub.

  1. Use Podman to pull the Apache HTTP Server container image:

    console
    $ sudo podman pull docker.io/httpd
    
  2. You should see a similar output at the end after the image is pulled:

    //...
    Writing manifest to image destination
    Storing signatures
    b21577b6946fec9df0eaa3c21748d361bc19742ddb6185a4201baa4200fb35fa
  3. List the container images:

    console
    $ sudo podman images
    
  4. You should see a similar output:

    REPOSITORY               TAG         IMAGE ID      CREATED       SIZE
    docker.io/library/httpd  latest      b21577b6946f  22 hours ago  152 MB
  5. Run the image:

    console
    $ sudo podman run -d --name hello-world -p 8080:80 docker.io/httpd
    
  6. List all the running containers:

    console
    $ sudo podman ps
    
  7. You should see a similar output:

    CONTAINER ID  IMAGE                           COMMAND           CREATED        STATUS            PORTS                 NAMES
    16f7b5fdab05  docker.io/library/httpd:latest  httpd-foreground  9 seconds ago  Up 9 seconds ago  0.0.0.0:8080->80/tcp  hello-world
  8. Use curl command to access the Apache HTTP server endpoint running inside the container:

    console
    $ curl http://localhost:8080
    
  9. You should see this output:

    <html><body><h1>It works!</h1></body></html>
  10. Stop the container:

    console
    $ sudo podman stop hello-world
    

Log in to Vultr Container Registry

In this section you will create a new Vultr Container registry, and log into it using Podman. You will also create a Python Flask application along with a Dockerfile, and use Podman to build a container image. Flask is a lightweight and flexible web framework for Python, ideal for creating web applications. The Dockerfile contains instructions for building the Flask application container image. Finally, you will push the containerized Flask application to Vultr Container registry, and run the image locally using Podman.

  1. Create a new Vultr container registry.

  2. Go to Manage Container Registry and get the registry username and API key credentials.

  3. Configure the following environment variable for Vultr container registry name:

    console
    $ export VULTR_CONTAINER_REGISTRY_NAME=<enter the Vultr Container Registry name>
    
  4. Configure the following environment variable for Vultr container registry username:

    console
    $ export VULTR_CONTAINER_REGISTRY_USERNAME=<enter the Vultr Container Registry username>
    
  5. Configure the following environment variable for Vultr container registry API key:

    console
    $ export VULTR_CONTAINER_REGISTRY_API_KEY=<enter the Vultr Container Registry API key>
    
  6. Login to the Vultr Container Registry:

    console
    $ sudo podman login https://sjc.vultrcr.com/$VULTR_CONTAINER_REGISTRY_NAME -u $VULTR_CONTAINER_REGISTRY_USERNAME -p $VULTR_CONTAINER_REGISTRY_API_KEY
    
  7. You should see the following output:

    Login Succeeded
  8. Create a new file named app.py:

    console
    $ sudo nano app.py
    
  9. Add the following contents to the file.

    python
    from flask import Flask
    app = Flask(__name__)
    
    @app.route("/")
    def hello():
        return "Greetings from Vultr"
    
    if __name__ == "__main__":
        app.run(host="0.0.0.0", port=5000)
    

    Save and close the file.

    The application initializes a Flask web server that responds with "Greetings from Vultr" when accessed at the root URL.

  10. Create a new file named Dockerfile.

    console
    $ sudo nano app.py
    
  11. Add the following contents to the file:

    dockerfile
    FROM python:3.9-slim
    WORKDIR /app
    COPY . /app
    RUN pip install flask
    EXPOSE 5000
    CMD ["python", "app.py"]
    

    Save and close the file.

    The Dockerfile sets up a Python 3.9 environment, installs Flask, and runs a Flask application on port 5000.

  12. Build the container image:

    console
    $ sudo podman build -t my-python-app .
    
  13. You should see a similar output at the end after the build completes:

    //...
    Successfully tagged localhost/my-python-app:latest
    a49734b0f695c4c171b15b446c3734e43d27354006fa9bd756af1a78e33d5e47
  14. Tag the container image:

    console
    $ sudo podman tag my-python-app sjc.vultrcr.com/$VULTR_CONTAINER_REGISTRY_NAME/my-python-app:v1
    
  15. List the container images:

    console
    $ sudo podman images
    
  16. You should see a similar output, including the Python application images that were just built and tagged using Podman:

    REPOSITORY                          TAG         IMAGE ID      CREATED        SIZE
    localhost/my-python-app             latest      a49734b0f695  9 minutes ago  765 MB
    sjc.vultrcr.com/demo/my-python-app  v1          a49734b0f695  9 minutes ago  765 MB
    docker.io/library/httpd             latest      b21577b6946f  22 hours ago   152 MB
    docker.io/library/python            3.9-slim    724a8ee22b0c  3 months ago   131 MB
  17. Push image to Vultr Container Registry:

    console
    $ sudo podman push sjc.vultrcr.com/$VULTR_CONTAINER_REGISTRY_NAME/my-python-app:v1
    
  18. You should see a similar output at the end after the process completes:

    //...
    Writing manifest to image destination
    Storing signatures
  19. Navigate to Vultr Container registry. Under Repositories, you should see a new repository with the name <VULTR_CONTAINER_REGISTRY_NAME>/my-python-app. Below is an example:

    Vultr Container registry repositories

  20. Run the image:

    console
    $ sudo podman run -d --name hello-python -p 5000:5000 sjc.vultrcr.com/$VULTR_CONTAINER_REGISTRY_NAME/my-python-app:v1
    
  21. Invoke the application endpoint using curl:

    console
    $ curl http://localhost:5000
    
  22. You should see the following output:

    Greetings from Vultr