
How to Install Podman on Rocky Linux 9
Introduction
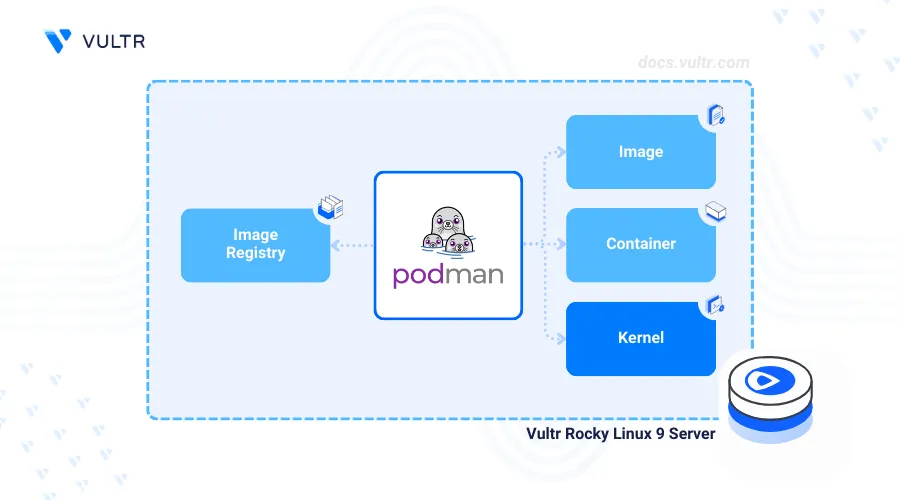
Podman also known as Pod manager is an open-source container management tool used to build and deploy containerized applications, pods and volumes on a server. The Podman daemonless architecture reduces the attack surface for containerized applications and uses add-on tools such as Buildah to enable the secure management of containers on your server.
This article explains how to install Podman on a Rocky Linux 9 server and perform common container management tasks to build and run containerized applications.
Prerequisites
Before you begin:
- Deploy a Rocky Linux 9 instance on Vultr.
- Create a Vultr Container Registry. to store your container images.
- Access the server using SSH as a non-root user with sudo privileges.
Install Podman
Podman is available in the default package repositories on Rocky Linux 9. Follow the steps below to install the latest Podman package using the DNF package manager.
Update the server's package index.
console$ sudo dnf update -y
Install Podman.
console$ sudo dnf install podman -y
View the installed Podman version on your server.
console$ podman --version
Output:
podman version 4.3.1
Manage the Podman System Service
Podmans uses two linked service profiles to run on a server podman.service and podman.socket. podman.service enables access to Podman CLI and interaction with the Podman engine to manage containers, images and Pods. podman.socket enables remote access to the application API, and integrates Podman with other container development tools. Follow the steps below to manage the Podman system service and enable the application to run on your server.
Enable the Podman service to automatically start at system boot.
console$ sudo systemctl enable podman
Output:
Created symlink /etc/systemd/system/default.target.wants/podman.service → /usr/lib/systemd/system/podman.service.Start the Podman service.
console$ sudo systemctl start podman
Stop the Podman service.
console$ sudo systemctl stop podman
View the Podman service status and verify that it's running.
console$ sudo systemctl status podman
Deploy Containerized Applications using Podman
Podman supports multiple image sources and registries to pull and run container images on your server. The /etc/containers/registries.conf configuration file includes registry information used by Podman to find container images. Podman uses default registries such as Docker Hub, quay.io, and registry.fedoraproject.org to find new images if the configuration file does not include any registry sources. Follow the steps below to deploy a containerized HTTP application using Podman using the default registry sources.
Pull the latest
hello-worldcontainer image.console$ podman pull hello-world
Output:
Resolved "hello-world" as an alias (/etc/containers/registries.conf.d/000-shortnames.conf)
Trying to pull quay.io/podman/hello:latest...
Getting image source signatures
Copying blob 81df7ff16254 done   |
Copying config 5dd467fce5 done   |
Writing manifest to image destination
5dd467fce50b56951185da365b5feee75409968cbab5767b9b59e325fb2ecbc0
List all available Podman images on the server.
console$ sudo podman images
Output:
REPOSITORY            TAG         IMAGE ID      CREATED       SIZE
quay.io/podman/hello  latest      5dd467fce50b  2 months ago  787 kB
Run a new container using the
hello-worldimage.console$ podman run hello-world
Output:
!... Hello Podman World ...!

         .--"--.
       / -     - \
      / (O)   (O) \
   ~~~| -=(,Y,)=- |
    .---. /`  \   |~~
 ~/  o  o \~~~~.----. ~~
  | =(X)= |~  / (O (O) \
   ~~~~~~~  ~| =(Y_)=-  |
  ~~~~    ~~~|   U      |~~

Project:   https://github.com/containers/podman
Website:   https://podman.io
Desktop:   https://podman-desktop.io
Documents: https://docs.podman.io
YouTube:   https://youtube.com/@Podman
X/Twitter: @Podman_io
Mastodon:  @Podman_io@fosstodon.org
List all Podman processes and verify that the container is created, but exits after running.
console$ podman ps -a
Output:
CONTAINER ID  IMAGE                           COMMAND               CREATED         STATUS                     PORTS                 NAMES
61d24a875f15  quay.io/podman/hello:latest     /usr/local/bin/po...  31 seconds ago  Exited (0) 32 seconds ago                        goofy_saha
Login to a Container Registry
Podman supports private and public registries such as the Vultr Container Registry to manage container images. Follow the steps below to connect to your Vultr Container Registry, tag and store the hello-world container image in a new repository.
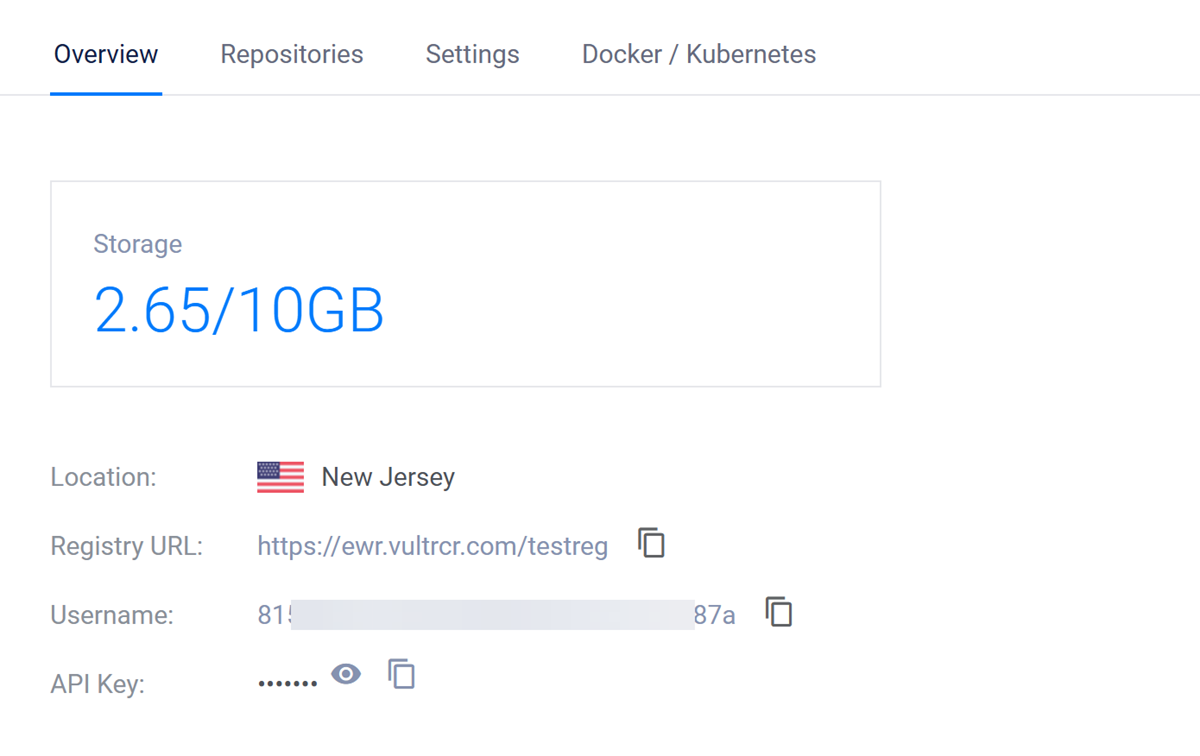
Access your Vultr Container Registry's management page.
Find your registry details within the overview tab, and copy the default username and API key credentials to your clipboard.
Login to your Vultr Container Registry using Podman. Replace
examplereg,example-user, andexample-keywith your actual registry details.console$ podman login https://ewr.vultrcr.com/examplereg -u example-user -p example-key
List all available Podman images.
console$ sudo podman images
Output:
REPOSITORY            TAG         IMAGE ID      CREATED       SIZE
quay.io/podman/hello  latest      5dd467fce50b  2 months ago  787 kB
Tag the
hello-worldimage with your desired Vultr Container Registry repository tag.console$ podman tag hello-world:latest ewr.vultrcr.com/examplereg/hello-world:latest
List all available Podman images again and verify that the tagged image is available.
console$ sudo podman images
Output:
REPOSITORY                              TAG         IMAGE ID      CREATED       SIZE
ewr.vultrcr.com/examplereg/hello-world  latest      5dd467fce50b  2 months ago  787 kB
quay.io/podman/hello                    latest      5dd467fce50b  2 months ago  787 kB
Push the tagged image to your Vultr Container Registry.
console$ podman push ewr.vultrcr.com/examplereg/hello-world:latest
Access your Vultr Container Registry and click the Repositories tab to verify that the new container image is available.

Conclusion
You have installed Podman on a Rocky Linux 9 server, managed the Podman system service, and deployed a containerized application. Podman enables you to build and run containerized applications using container images from multiple registry sources. For more information, visit the Official Podman Documentation.