
How to Install Podman on FreeBSD 14.0
Introduction
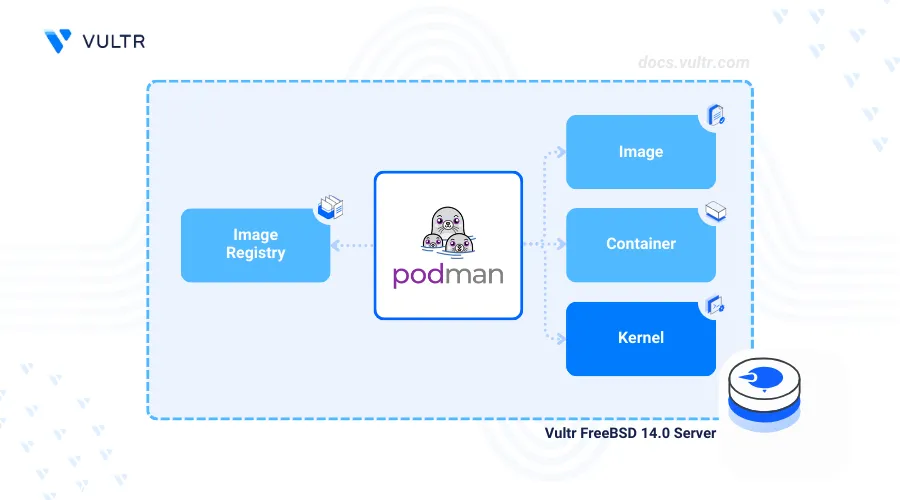
Podman (Pod Manager) is an open-source, daemonless container for building, managing, and deploying Open Container Initiative (OCI) compatible containers and Pods. Podman does not require a background daemon to run, making it a lightweight, fast, and secure Docker alternative. To get started, you can Install Podman on FreeBSD for managing containers efficiently.
This article explains how to install Podman on FreeBSD 14 and run containerized applications on your server.
Prerequisites
Before you begin:
- Deploy a FreeBSD 14 instance on Vultr.
- Access the instance using SSH as a non-root user with sudo privileges.
Install Podman on FreeBSD 14
Podman is available in the default package repositories on FreeBSD 14.0. You can install the basic podman package or the podman-suite meta package that includes additional packages such as buildah and skopeo. Follow the steps below to install the latest Podman package on FreeBSD 14.
Update the server's package information index.
console$ sudo pkg update
Search for all available Podman packages in the default repositories.
console$ sudo pkg search ^podman
Output:
podman-5.1.1_2                 Manage Pods, Containers and Container Images
podman-suite-20240605          Metaport of Podman and Buildah toolkit
Podman
5.1.1_2version is available in the default pkg repositories based on the above output.Install Podman.
console$ sudo pkg install -y podman
View the installed Podman version.
console$ sudo podman --version
Output:
podman version 5.1.1For users running Ubuntu, check out the detailed steps to Install Podman on Ubuntu 24.04 and efficiently manage your container workloads.
Configure Podman on FreeBSD 14
Podman uses multiple files to run on your server with specific networking and storage configurations. Follow the steps below to enable Podman to use the default file system and the default Packet Firewall (pf) template to enable network connections to the Podman service.
Copy the default Podman firewall template to the
/etc/directory.console$ sudo cp /usr/local/etc/containers/pf.conf.sample /etc/pf.conf
List all network interfaces on the server and note the public network interface name.
console$ ifconfigOutput:
vtnet0: flags=1008843<UP,BROADCAST,RUNNING,SIMPLEX,MULTICAST,LOWER_UP> metric 0 lo0: flags=1008049<UP,LOOPBACK,RUNNING,MULTICAST,LOWER_UP> metric 0 mtu 16384 options=680003<RXCSUM,TXCSUM,LINKSTATE,RXCSUM_IPV6,TXCSUM_IPV6> inet 127.0.0.1 netmask 0xff000000vtnet0is the public network interface name based on the above output.Open the
/etc/pf.conffile using a text editor such asvi.console$ sudo vi /etc/pf.conf
Find the
v4egress_ifdirective and change the value to your public interface name.iniv4egress_if = "vtnet0"
Save and close the file.
Enable the
pffirewall service to automatically start at boot.console$ sudo service pf enable
Output:
pf enabled in /etc/rc.confStart the
pffirewall.console$ sudo service pf start
Output:
Enabling pf.Update the Podman
storage.conffile to use thevfsstorage driver.console$ sudo sed -I .bak -e 's/driver = "zfs"/driver = "vfs"/' /usr/local/etc/containers/storage.conf
Remove all files in the
/var/db/containers/storagedirectory to apply thevfsstorage driver changes.console$ sudo rm -r /var/db/containers/storage/*
Manage the Podman System Service
Podman uses the podman system service to manage the application processes on your server. Follow the steps below to manage the service.
Enable the Podman service to start at boot.
console$ sudo service podman enable
Output:
podman enabled in /etc/rc.confStart the Podman service.
console$ sudo service podman start
Stop the Podman service.
console$ sudo service podman stop
Restart Podman.
console$ sudo service podman restart
Mount the
fdescfsvirtual device to/dev/fdto enable the Podman container restart policy.console$ sudo mount -t fdescfs fdesc /dev/fd
Open the
/etc/fstabfile.console$ sudo nano /etc/fstab
Add the following configuration at the end of the file to make the mounting changes permanent.
inifdesc /dev/fd fdescfs rw 0 0
Deploy Containerized Applications Using Podman
Podman discovers new container images from public registries such as Docker Hub by default. Follow the steps below to deploy a sample containerized application using a hello container image.
Deploy a new containerized application using the
hellocontainer image,console$ sudo podman run docker.io/dougrabson/hello
Output:
Trying to pull docker.io/dougrabson/hello:latest...
Getting image source signatures
Copying blob b13a5ec7f3d2 done   |
Copying config f81c971736 done   |
Writing manifest to image destination
!... Hello Podman World ...!

         .--"--.
       / -     - \
      / (O)   (O) \
   ~~~| -=(,Y,)=- |
    .---. /`  \   |~~
 ~/  o  o \~~~~.----. ~~
  | =(X)= |~  / (O (O) \
   ~~~~~~~  ~| =(Y_)=-  |
  ~~~~    ~~~|   U      |~~

Project:   https://github.com/containers/podman
Website:   https://podman.io
Documents: https://docs.podman.io
Twitter:   @Podman_io
The previous command pulls the
dougrabson/hellocontainer image from the Docker registry (docker.io) and deploys a new containerized application using the image.List all active and inactive Podman containers and verify that the
hellocontainer application starts and then exits after a specific duration.console$ sudo podman ps --all
Output:
CONTAINER ID  IMAGE                              COMMAND               CREATED         STATUS                     PORTS       NAMES
1719bb8e5f78  docker.io/dougrabson/hello:latest  /usr/local/bin/po...  26 seconds ago  Exited (0) 25 seconds ago              hopeful_wilbur
List all container images on your server and verify the
helloimage is available.console$ sudo podman images
Output:
REPOSITORY                  TAG         IMAGE ID      CREATED      SIZE
docker.io/dougrabson/hello  latest      f81c971736c6  2 years ago  4.06 MB
Log in to a Container Registry
Podman supports private and public container registries such as the Vultr Container Registry to build, store, and deploy container images. Follow the steps below to use Podman with your Vultr Container Registry to deploy containerized applications on FreeBSD.
Access your Vultr Container Registry's management page and copy the login command in the Example Commands section that contains your registry credentials.

Replace
dockerin the login command withpodman.Run the
podman logincommand in your terminal to log in to the Vultr Container Registry. Replacevultrfreebsdregistry,example-user, andregistry-keywith your actual credentials.console$ sudo podman login https://sjc.vultrcr.com/vultrfreebsdregistry -u example-user -p registry-key
Output:
Login Succeeded!Tag the
docker.io/dougrabson/helloDocker image with your desired Vultr Container Registry repository name.console$ sudo podman tag docker.io/dougrabson/hello sjc.vultrcr.com/vultrfreebsdregistry/dougrabson/hello
List all Docker images and verify the new tagged image is available.
console$ sudo podman images
Output:
REPOSITORY                                             TAG         IMAGE ID      CREATED      SIZE
sjc.vultrcr.com/vultrfreebsdregistry/dougrabson/hello  latest      f81c971736c6  2 years ago  4.06 MB
docker.io/dougrabson/hello                             latest      f81c971736c6  2 years ago  4.06 MB
Push the tagged Docker image to your Vultr Container Registry.
console$ sudo podman push sjc.vultrcr.com/vultrfreebsdregistry/dougrabson/hello
Output.
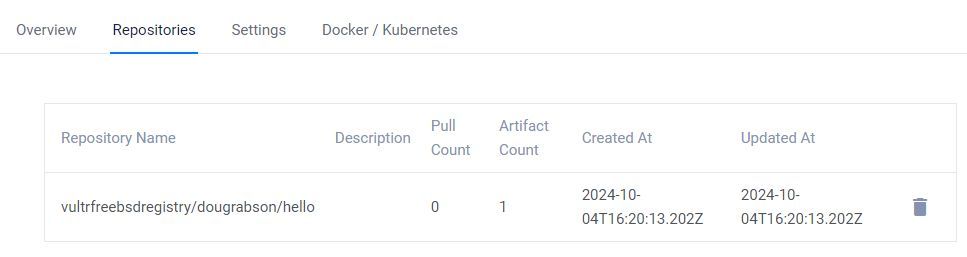
Getting image source signatures
Copying blob c0e5c0479511 done   |
Copying config f81c971736 done   |
Writing manifest to image destination
Access your Vultr Container Registry's management page, navigate to the Repositories tab, and verify that the new Docker image repository is available.
Deploy a new container using the
helloDocker image in your Vultr Container Registry.console$ sudo podman run sjc.vultrcr.com/vultrfreebsdregistry/dougrabson/hello
Output:
!... Hello Podman World ...!

         .--"--.
       / -     - \
      / (O)   (O) \
   ~~~| -=(,Y,)=- |
    .---. /`  \   |~~
 ~/  o  o \~~~~.----. ~~
  | =(X)= |~  / (O (O) \
   ~~~~~~~  ~| =(Y_)=-  |
  ~~~~    ~~~|   U      |~~

Project:   https://github.com/containers/podman
Website:   https://podman.io
Documents: https://docs.podman.io
Twitter:   @Podman_io
Conclusion
You installed Podman on FreeBSD 14 and deployed containerized applications on your server. After you installed Podman on FreeBSD, you logged in to your Vultr Container Registry, tagged a Docker image, and pushed it to a new repository. Podman supports private and public registries when deploying containers on your server. For more information, visit the Podman documentation.