Introduction
TrueNAS is an open-source file storage and sharing system, and the successor to FreeNAS.
- FreeNAS is available in the Vultr ISO library.
- TrueNAS CORE is available as a free download from truenas.com.
This guide explains how to install a TrueNAS server on Vultr's cloud VPS hosting. All references in this guide refer to TrueNAS, but you can also install FreeNAS a Vultr cloud server with these instructions.
Prerequisites
- Create at least four Block Storage volumes in the same location, such as New Jersey or Los Angeles.
- Download the latest TrueNAS Core ISO.
- Follow our guide to upload the ISO to Vultr.
Note: If you prefer to install FreeNAS, you can use the ISO in the Vultr ISO library and skip the ISO upload steps.
Deploy a New VPS
TrueNAS is based on FreeBSD, which needs custom VPS settings at Vultr. The easiest way to get a FreeBSD-compatible VPS is to deploy a FreeBSD 12.2 server, then attach the ISO and reformat the original server.
Deploy a new FreeBSD 12.2 Cloud Compute or High-Frequency Compute cloud VPS server. TrueNAS requires a server with Block Storage, which is unavailable on Dedicated Cloud or Bare Metal instances.
When configuring your server:
- Choose the same Vultr location as your block storage volumes.
- Select Block Storage Compatible in the Additional Features section.
- Select a plan with at least 8 GB of RAM.
Use more RAM for better performance if you have large storage volumes.
Wait for your server to deploy.
Navigate to the Block Storage section of the Customer Portal.
Attach your Block Storage volumes to your new instance.
Navigate to the server information page.
Choose the Setting tab.
Click the Custom ISO menu.
Select an ISO.
If you uploaded a TrueNAS ISO, you'll find it in the Custom ISO section. The FreeNAS ISO is available in the ISO Library section.
Click Attach ISO and Reboot.
Connect to the Vultr web console.

Choose Install/Upgrade.
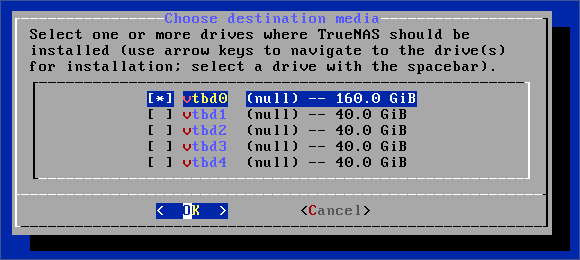
Select the first drive as the installation location.

Choose Yes to proceed with the installation.
Enter a strong root password.
Choose Boot via BIOS.
Choose Create Swap.
Wait for the installation to complete.

Navigate to the Server information page in the customer portal.
Click the Settings tab.
Click the Custom ISO menu.
Click Remove ISO. The server will reboot.
Navigate to your server's IP address in a web browser. For example:
Log in as root with the password you chose during installation.
Navigate to Storage -> Pools.
Click ADD to add a new storage pool.
Choose Create new pool, then click CREATE POOL.
Enter a name for your pool.
Click SUGGEST LAYOUT to use all available disks.
Click CREATE.
Confirm your choice at the warning prompt.
TrueNAS will format your disks and create a storage pool.
More Information
The basic installation is complete. To configure your TrueNAS server for your particular configuration, please see the TrueNAS documentation.
No comments yet.