
How to Provision Cloud Infrastructure on Vultr using Terragrunt
Introduction
Terraform is an open-source Infrastructure as Code (IaC) tool designed to automate the provisioning and management of cloud infrastructure resources. With Terraform, users can define infrastructure resources using a domain-specific language, enabling the creation, modification, and version control of infrastructure components across multiple cloud providers.
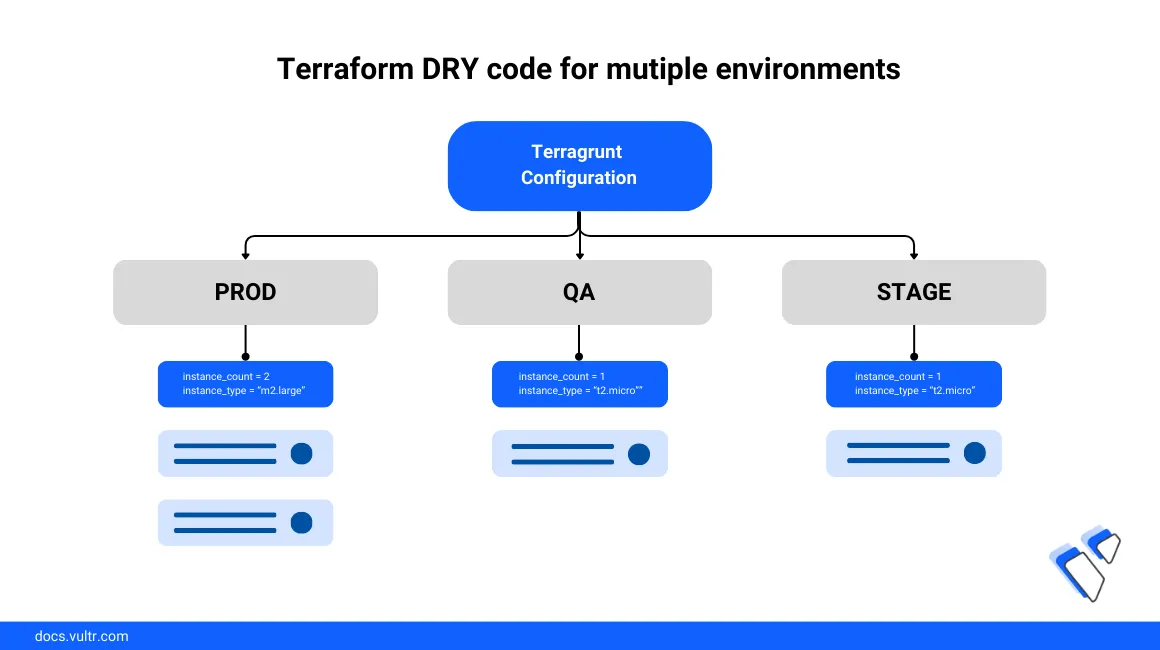
Terragrunt is a thin abstraction layer that runs on top of Terraform as an improved deployment platform with extra tools to deploy multiple infrastructure resources and services with a Don't Repeat Yourself (DRY) file structure. The Vultr Terraform provider is compatible with Terragrunt, and you can define configurations to create infrastructure resources such as databases, storage, compute instances, and VKE clusters.
This article explains how to provision cloud infrastructure resources on Vultr using Terragrunt. You will set up a DRY configuration file structure consisting of a root Terragrunt directory and parent-child directories to deploy resources using your Vultr API key.
Prerequisites
Before you begin:
Deploy a Vultr Ubuntu server to use as the management workstation.
Enable your Vultr API Key and allow the workstation public IP address within the Access Control section to access your Vultr account with the API key.
Access the server using SSH as a non-root user with sudo privileges.
Install Terraform:
console$ sudo snap install terraform --classic
Install Terragrunt
Install the JSON processor
jqutility to extract the latest Terragrunt version.console$ sudo snap install jq
Extract the latest Terragrunt version using
jqand store it in a newVERSIONenvironment variable.console$ export VERSION=$(curl -sL https://api.github.com/repos/gruntwork-io/terragrunt/releases/latest | jq -r '.tag_name | ltrimstr("v")')
Download the latest Terragrunt release package using the
wgetutility and theVERSIONvariable value.console$ sudo wget -O terragrunt https://github.com/gruntwork-io/terragrunt/releases/download/v$VERSION/terragrunt_linux_amd64
Enable execute privileges on the
terragruntbinary.console$ sudo chmod a+x terragrunt
Move the Terragrunt binary to a system-wide directory within your user
$PATH. For example,/usr/local/binto activate Terragrunt as a system-wide command.console$ sudo mv terragrunt /usr/local/bin/
View the Terragrunt version to verify that the command runs correctly
console$ terragrunt --version
Output:
terragrunt version v0.54.22
Set up the Terragrunt Modules Directory
Terragrunt uses a hierarchical directory structure to access and execute your configuration files. To deploy resources on your Vultr account, Terragrunt uses the Terraform provider and resource definition configurations in your project directory with a parent-child module structure similar to the one below:
.
└── vultr-terragrunt
  ├── Compute
      ├── vultr_instance.tf
  │   ├── terragrunt.hcl
  │   ├── regular
  │   │   └── terragrunt.hcl
  │   ├── optimized
  │   │   └── terragrunt.hcl
  │   └── baremetal
  │       └── terragrunt.hcl
  ├── Databases
      ├── vultr_database.tf
  │   ├── terragrunt.hcl
  │   ├── valkey
  │   │   └── terragrunt.hcl
  │   ├── mysql
  │   │   └── terragrunt.hcl
  │   └── postgresql
  │       └── terragrunt.hcl
  └── VKE
      ├── vke.tf
      ├── terragrunt.hcl
      ├── dev
      │   └── terragrunt.hcl
      ├── prod
      │   └── terragrunt.hcl
      └── stage
          └── terragrunt.hcl
Follow the steps below to set up a root Terragrunt project structure to replicate with multiple parent-child modules and deploy cloud resources to your Vultr account.
Switch to your user home directory.
console$ cd
Create a new directory to store your Terragrunt configurations.
console$ mkdir vultr-terragrunt
Switch to the new project directory.
console$ cd vultr-terragrunt
Create a new Terraform configuration file
provider.tfto define your provider settings.console$ nano provider.tf
Add the following contents to the file.
hclterraform { required_providers { vultr = { source = "vultr/vultr" version = "2.18.0" } } } provider "vultr" { api_key = var.VULTR_API_KEY } variable "VULTR_API_KEY" {}
Save and close the file.
The above Terraform provider configuration enables the Vultr Terraform provider version
2.18.0as the default infrastructure source. Theproviderblock authenticates using your Vultr API key stored in theVULTR_API_KEYvariable to access the provider and deploy resources to your Vultr account.Create a new Terragrunt-specific configuration file
terragrunt.hclto store your Vultr API key.console$ nano terragrunt.hcl
Add the following contents to the file. Replace
example-api-keywith your actual Vultr API key.hclinputs = { VULTR_API_KEY = "example-api-key" }
Save and close the file.
The above configuration references the
VULTR_API_KEYvariable in yourprovider.tfconfiguration with an API key value to connect to your Vultr account.List the Terragrunt directory files to verify that all necessary parent configurations are available.
console$ ls /home/user/vultr-terragrunt/
Output:
provider.tf terragrunt.hclThe above Terragrunt file structure uses the
provider.tfconfiguration to invoke the Vultr API and execute the defined operations on your Vultr account. To deploy resources using Terragrunt, you should create child modules to storeterragrunt.hc1configurations that include your infrastructure specifications.
Create Vultr Cloud Compute Instances using Terragrunt
To create Vultr Cloud Compute instances using Terragrunt, set up a new standalone parent directory structure to create child modules that match your target environment or instance type. Depending on your desired instance specifications, Vultr supports the following cloud compute tags:
vc2: Regular Cloud Computevdc: Dedicated Cloudvhf: High-Frequency Computevhp: High Performancevoc: Optimized Cloud Computevcg: Cloud GPUvbm: Bare Metal
For more information, run the following requests using the Curl utility to verify all supported values:
List available plans:
console$ curl "https://api.vultr.com/v2/plans" \ -X GET \ -H "Authorization: Bearer ${VULTR_API_KEY}"
List Vultr regions:
console$ curl "https://api.vultr.com/v2/regions" \ -X GET \ -H "Authorization: Bearer ${VULTR_API_KEY}"
List operating system IDs:
console$ curl "https://api.vultr.com/v2/os" \ -X GET \ -H "Authorization: Bearer ${VULTR_API_KEY}"
In this section, create a regular Cloud Compute
vc2instance with thevc2-1c-1gbplan which includes1 vCPUcore and1 GBRAM in the SingaporesgpVultr location as described in the steps below.
Create a new
computedirectory to use as a parent directory with underlying child modules.console$ mkdir compute
Copy the parent configuration files
provider.tf,terragrunt.hc1files to thecomputedirectory.console$ cp provider.tf terragrunt.hcl compute/
Terragrunt uses the DRY configuration file scheme, but requires parent configurations at the root of each directory. The above command copies root configurations to enable the
computedirectory as a standalone parent directory referenced by child modules.Switch to the
computedirectory.console$ cd compute
Create a new Terraform configuration file
vultr_instance.tfto use as the base cloud compute instance definition file.console$ nano vultr_instance.tf
Add the following contents to the file.
hclresource "vultr_instance" "vultr_compute_instance" { label = var.LABEL plan = var.PLAN region = var.REGION os_id = var.OS } variable "LABEL" {} variable "PLAN" {} variable "REGION" {} variable "OS" {}
Save and close the file.
The above instance definition file creates the necessary variables to use with configuration files in the child modules for deployment to your Vultr account. Within the file:
vultr_instance: Defines a Vultr instance resource with the custom labelvultr_compute_instance.label: Sets the compute instance using yourLABELvariable as the descriptive value.plan: Specifies the compute instance specification using thePLANvariable value.regionSpecifies the compute instance region using yourREGIONvariable to deploy the instance.os_idSets the operating system to deploy with the compute instance using yourOSvariable value.
Create a new child directory
regularto set up a test regular Cloud Compute instance.console$ mkdir regular
Switch to the directory.
console$ cd regular
Create a new resource definition file
terragrunt.hcl.console$ nano terragrunt.hcl
Add the following contents to the file.
hclinclude { path = find_in_parent_folders() } terraform { source = "../" } inputs = { LABEL = "dev-server" PLAN = "vc2-1c-1gb" REGION = "sgp" OS = "387" }
Save and close the file.
The above configuration creates a new Vultr Cloud Compute instance with the following specifications:
- TYPE: Vultr Regular Cloud Compute
vc2 - vCPUS: 1 vCPU
1c - Memory: 1 GB
1gb - Location: Singapore
sgp - OS: 387 -
Ubuntu 20.04
Replace the above instance values to match your desired specifications. Within the configuration:
path = find_in_parent_folders(): Scans the parent directory for configurations referenced by theinputs={}values within the file.source = "../": Defines the parentcomputedirectory to use the necessary Terraform provider configuration.../defines one step back from the configuration's working directory.inputs ={: Sets the Vultr Cloud Compute instance specifications to match and activate with thevultr_instance.tffile variables.
- TYPE: Vultr Regular Cloud Compute
View your
computedirectory structure to verify the available configuration files.console$ ls -F -R /home/user/vultr-terragrunt/compute/
Output:
/home/linuxuser/vultr-terragrunt/compute/:
provider.tf  regular/  terragrunt.hcl  vultr_instance.tf

/home/linuxuser/vultr-terragrunt/compute/regular:
terragrunt.hcl
Within the above output, Terragrunt runs the
regularchild module specifications as variable values to the parent directorycomputeinstance configuration. Then, it authenticates and deploys the defined Cloud Compute resource to your Vultr account using the parent Terraform provider configuration.Test the Terragrunt configuration for errors.
console$ terragrunt validate
Output:
Success! The configuration is valid.Initialize the Terragrunt configuration.
console$ terragrunt init
When successful, your output should be similar to the one below:
Initializing the backend...

Initializing provider plugins...

- Finding vultr/vultr versions matching "2.18.0"...
- Installing vultr/vultr v2.18.0...
- Installed vultr/vultr v2.18.0 (signed by a HashiCorp partner, key ID 853B1ED644084048)

.....

Terraform has been successfully initialized!
View the Terragrunt project summary to verify your configuration changes.
console$ terragrunt plan
Your output should be similar to the one below:
Terraform will perform the following actions:

# vultr_instance.vultr_compute_instance will be created

+ resource "vultr_instance" "vultr_compute_instance" {
  + allowed_bandwidth   = (known after apply)
  + app_id              = (known after apply)
  + backups             = "disabled"
  + date_created        = (known after apply)
  + ddos_protection     = false
  + default_password    = (sensitive value)
  + disk                = (known after apply)
  + enable_ipv6         = true
  + features            = (known after apply)
  + firewall_group_id   = (known after apply)
  + gateway_v4          = (known after apply)
  + hostname            = (known after apply)
  + id                  = (known after apply)
  + image_id            = (known after apply)
  + internal_ip         = (known after apply)
  + kvm                 = (known after apply)
  + label               = "dev-server"
  + main_ip             = (known after apply)
  + netmask_v4          = (known after apply)
  + os                  = (known after apply)
  + os_id               = 387
  + plan                = "vc2-1c-1gb"
  + power_status        = (known after apply)
  + private_network_ids = (known after apply)
  + ram                 = (known after apply)
  + region              = "sgp"
  + reserved_ip_id      = (known after apply)
  + script_id           = (known after apply)
  + server_status       = (known after apply)
  + snapshot_id         = (known after apply)
  + status              = (known after apply)
  + user_data           = (known after apply)
  + v6_main_ip          = (known after apply)
  + v6_network          = (known after apply)
  + v6_network_size     = (known after apply)
  + vcpu_count          = (known after apply)
  + vpc_ids             = (known after apply)
    }

Plan: 1 to add, 0 to change, 0 to destroy.
Apply your Terragrunt configurations to your Vultr account.
console$ terragrunt apply
When prompted, enter yes and press Enter to approve the Terraform actions.
Do you want to perform these actions?
Terraform will perform the actions described above.
Only 'yes' will be accepted to approve.

Enter a value:
When the deployment is successful, your output should be similar to the one below:
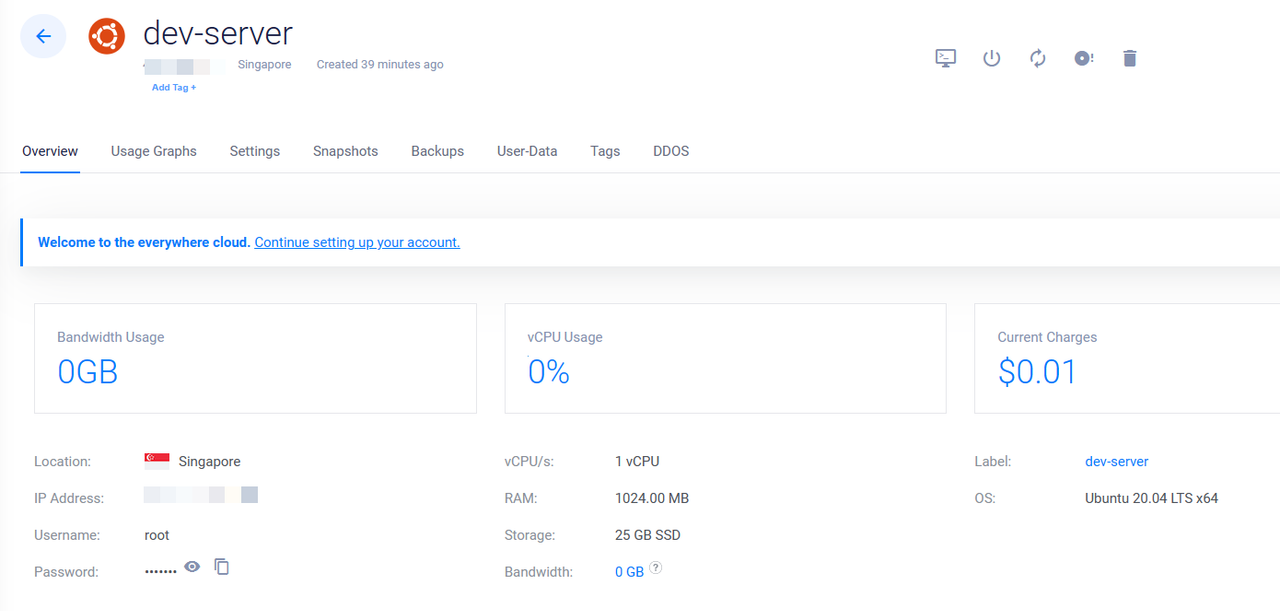
vultr_instance.vultr_compute_instance: Creating...
Apply complete! Resources: 1 added, 0 changed, 0 destroyed.
Open the Vultr Console.
Navigate to Products -> Compute and verify that the new Cloud Compute instance is available.
Create Vultr Managed Databases with Terragrunt
To create Vultr Managed Databases with Terragrunt, set up a new parent directory to use with your provider configurations and specify your database resource configurations to deploy on your Vultr account. Depending on your target database engine and plan, Vultr supports the following values:
Database Engines:
MySQL,PostgreSQL,ValkeyView the list of available plans per Vultr location:
console$ curl "https://api.vultr.com/v2/databases/plans" -X GET -H "Authorization: Bearer ${VULTR_API_KEY}" | jq
Follow the steps below to create a sample Vultr Managed Database for Caching using the
vultr-dbaas-hobbyist-cc-hp-intel-1-11-1,1 GBRAM and1 vCPUplan in the SingaporesgpVultr location. When deploying a different database engine, replace thevalkeyconfiguration values with your target Vultr Managed Database specifications.
Switch to the root Terragrunt project directory.
console$ cd /home/user/vultr-terragrunt/
Create a new parent directory
Databasesto store your resource configurations.console$ mkdir Databases
Copy the
provider.tfandterragrunt.hc1files to the new parent directory.console$ cp provider.tf terragrunt.hcl Databases/
Switch to the
Databasesdirectory.console$ cd Databases
Create a new configuration file
vultr_valkey.tfto define the database specification values.console$ nano vultr_database.tf
Add the following contents to the file.
hclresource "vultr_database" "vultr_db" { database_engine = var.DB_ENGINE database_engine_version = var.DB_VERSION region = var.DB_LOCATION plan = var.DB_PLAN label = var.DB_LABEL } variable "DB_PLAN" {} variable "DB_LABEL" {} variable "DB_ENGINE" {} variable "DB_VERSION" {} variable "DB_LOCATION" {}
Save and close the file.
The above configuration creates a new database resource that uses variable values from the child directory
Terragrunt.hc1file. Within the configuration:resource "vultr_database": Sets Vultr Managed Database as the resource type with a custom descriptive labelvultr_db.database_engine: Specifies the Vultr Managed Database engine using theDB_Enginevariable value.database_engine_version: Sets the target Vultr Managed Database version using theDB_VERSIONvariable value.region: Sets the target Vultr location to deploy a Vultr Managed Database using theDB_LOCATIONvariable value.plan: Sets the Vultr Managed Database plan to use as the backend infrastructure.label: Assigns a descriptive label to the Vultr Managed Database using theDB_LABELvariable value.variable: Declares the configuration variables for use within the child specification values.
Create a new child directory to store the Vultr Managed Database resource values. For example,
valkey.console$ mkdir valkey
Switch to the directory.
console$ cd valkey
Create a new resource configuration file
terragrunt.hcl.console$ nano terragrunt.hcl
Add the following contents to the file.
hclinclude { path = find_in_parent_folders() } terraform { source = "../" } inputs = { DB_ENGINE = "valkey" DB_VERSION = "7" DB_LOCATION = "sgp" DB_LABEL = "prod-valkey-db" DB_PLAN = "vultr-dbaas-hobbyist-cc-hp-intel-1-11-1" }
Save and close the file.
The above configuration creates a new Vultr Managed Database for Caching with the following values:
Database Type: valkeyVultr location: SingaporesgpDatabase Label: prod-valkey-dbDatabase infrastructure plan: 1 vCPU, 1 GB RAM, HP Intel-powered backend server
Within the configuration:
path = find_in_parent_folders(): Scans the specified source path for all Terragrunt configurations referenced from the file.source = "../": Sets the location of the Terraform provider and other configurations.input = {: Sets all variable values to match the Terragrunt instance configuration defined in the parent directory.
Test the Terragrunt configuration for errors.
console$ terragrunt validate
Output:
Success! The configuration is valid.View the Terragrunt plan to verify all changes to apply.
console$ terragrunt plan
Output:
Terraform will perform the following actions:

# vultr_database.vultr_valkey will be created
+ resource "vultr_database" "vultr_valkey" {
    + cluster_time_zone       = (known after apply)
    + database_engine         = "valkey"
    + database_engine_version = "7"
    + date_created            = (known after apply)
    + dbname                  = (known after apply)
    + credentials    = (known after apply)
    + host                    = (known after apply)
    + id                      = (known after apply)
    + label                   = "dev-valkey"
    + latest_backup           = (known after apply)
    + maintenance_dow         = (known after apply)
    + maintenance_time        = (known after apply)
    + password                = (known after apply)
    + plan                    = "vultr-dbaas-hobbyist-cc-hp-intel-1-11-1"
    + plan_disk               = (known after apply)
    + plan_ram                = (known after apply)
    + plan_replicas           = (known after apply)
    + plan_vcpus              = (known after apply)
    + port                    = (known after apply)
    + public_host             = (known after apply)
    + valkey_eviction_policy   = (known after apply)
    + region                  = "sgp"
    + status                  = (known after apply)
    + user                    = (known after apply)
    }

Plan: 1 to add, 0 to change, 0 to destroy.
Apply your Terragrunt configurations.
console$ terragrunt apply
When prompted, enter
yesand press Enter to approve the changes to your Vultr account.Do you want to perform these actions? Terraform will perform the actions described above. Only 'yes' will be accepted to approve. Enter a value:Wait for a few minutes for the database creation process to complete, when successful, your output should be similar to the one below:
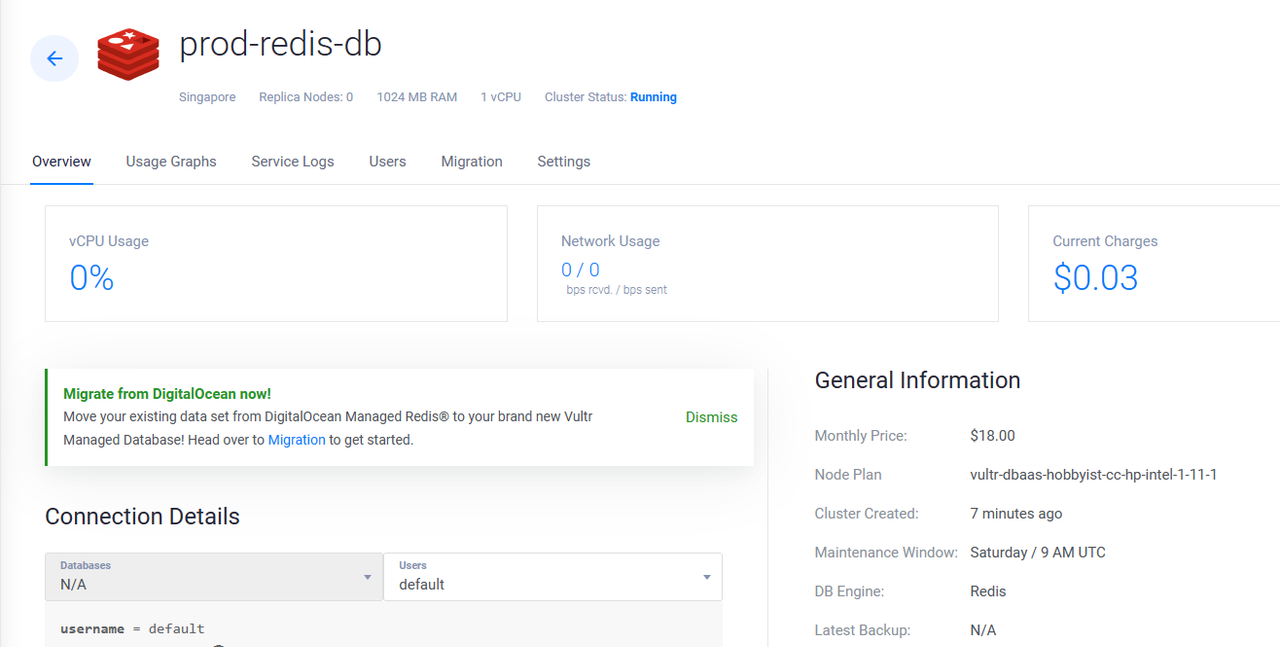
vultr_database.vultr_db: Still creating... [4m30s elapsed]
vultr_database.vultr_db: Still creating... [4m40s elapsed]
vultr_database.vultr_db: Still creating... [4m50s elapsed]
vultr_database.vultr_db: Creation complete after 5m0s [id=87example88fd]

Apply complete! Resources: 1 added, 0 changed, 0 destroyed.
Access the Vultr Console and verify that your new Vultr Managed Database for Caching is available.
 To create additional Vultr Managed Databases using Terragrunt, create new child directories with your target database specifications to apply to your Vultr account. To destroy a resource, runNote
terragrunt destroywithin the target directory and verify the changes to apply to your Vultr account.
Create Vultr Kubernetes Engine (VKE) Clusters with Terragrunt
To create a Vultr Kubernetes Engine (VKE) cluster with Terragrunt, set up a new child directory to store the cluster configurations. Depending on your cluster specification, each resource configuration file includes a node pools section that specifies your backend VKE cluster structure. Follow the steps below to create a 3-node Vultr Kubernetes Engine (VKE) cluster using the regular Cloud Compute vc2, 2 vCPUs, 4 GB RAM plan per node.
Navigate to your root Terragrunt project directory.
console$ cd /home/user/vultr-terragrunt/
Create a new parent directory
vketo store your cluster definition files.console$ mkdir vke
Copy the
provider.tfandterragrunt.hc1files to the parent directory.console$ cp provider.tf terragrunt.hcl vke/
Switch to the directory.
console$ cd vke
Create a new Terraform configuration file
vke.tfto define the cluster specifications.console$ nano vke.tf
Add the following contents to the file.
hclresource "vultr_kubernetes" "vke_cluster" { region = var.REGION label = var.NAME version = var.VERSION node_pools { node_quantity = var.NODES plan = var.PLAN label = var.LABEL auto_scaler = var.SCALING min_nodes = var.MIN-NODES max_nodes = var.MAXNODES } } variable "REGION" {} variable "NAME" {} variable "VERSION" {} variable "NODES" {} variable "PLAN" {} variable "SCALING" {} variable "MIN-NODES" {} variable "MAXNODES" {}
Save and close the file.
The above configuration defines a new Vultr Kubernetes Engine (VKE) cluster configuration with the following specifications:
region: Sets the Vultr location to deploy the VKE cluster using theREGIONvariable value.label: Specifies the VKE cluster descriptive label using theNAMEvariable value.version: Sets the target Kubernetes version to deploy with the cluster using theVERSIONvariable value.node_pools: Defines the VKE worker node specifications. Within the section:node_quantity: Sets the number of nodes to attach to the VKE cluster.plan: Defines the compute plan to deploy with the cluster nodes. To view the list of available Vultr Cloud Compute plans, visit the API plans list.label: Sets a descriptive label for all VKE nodes.auto-scaler = true: Enables auto-scaling of VKE cluster nodes.min_nodes: Sets the minimum number of nodes to support in the VKE node pool.max_nodesSets the maximum number of nodes the VKE node pool can scale to when auto-scaling is enabled.
Create a new directory
prodto store the cluster configuration values.console$ mkdir prod
Switch to the directory.
console$ cd prod
Create a new configuration file
terragrunt.hclto set the VKE cluster values.console$ nano terragrunt.hcl
Add the following contents to the file.
hclinclude { path = find_in_parent_folders() } terraform { source = "../" } inputs = { REGION = "ewr" NAME = "prod-vke-cluster" VERSION = "v1.29.1+1" NODES = "3" PLAN = "vc2-2c-4gb" SCALING = "true" MIN-NODES = "3" MAXNODES = "6" }
Save and close the file.
The above configuration defines a VKE cluster with the following values:
- Deployment location: New Jersey (
ewr) - Cluster Label: prod-vke-cluster
- Kubernetes Version: v1.29.1+1
- Worker Nodes: 3
- Nodes compute plan: Vultr regular cloud compute
vc2,2 vCPUs,4 GBmemory (vc2-2c-4gb) per node - Auto scaling: yes
- Minimum number of nodes: 3
- Maximum number of scaling nodes: 6
Within the configuration:
path = find_in_parent_folders(): Scans the parent directory to use the referenced configuration values.source = "../": Sets the parent directory to use the defined provider configuration. The value../instructs Terragrunt to scan up one level in the directory tree. In the configuration,../points to the previous directoryvkeas the parent directory to scan for all required configurations.inputs = {: Defines the values to match each variable referenced in the parent directory resource specification file.
- Deployment location: New Jersey (
Test the Terragrunt configuration for errors.
console$ terragrunt validate
Output:
Success! The configuration is valid.View the Terragrrunt plan to verify the changes to apply to your Vultr account.
console$ terragrunt plan
Output:
Terraform will perform the following actions:

# vultr_kubernetes.vke_cluster will be created
+ resource "vultr_kubernetes" "vke_cluster" {
+ client_certificate     = (sensitive value)
+ client_key             = (sensitive value)
+ cluster_ca_certificate = (sensitive value)
+ cluster_subnet         = (known after apply)
+ date_created           = (known after apply)
+ enable_firewall        = false
+ endpoint               = (known after apply)
+ firewall_group_id      = (known after apply)
+ ha_controlplanes       = false
+ id                     = (known after apply)
+ ip                     = (known after apply)
+ kube_config            = (sensitive value)
+ label                  = "app1-prod-vke"
+ region                 = "ewr"
+ service_subnet         = (known after apply)
+ status                 = (known after apply)
+ version                = "v1.27.7+2"

+ node_pools {
        + auto_scaler   = true
        + date_created  = (known after apply)
        + date_updated  = (known after apply)
        + id            = (known after apply)
        + label         = "prod-cluster-nodes"
        + max_nodes     = 3
        + min_nodes     = 1
        + node_quantity = 2
        + nodes         = (known after apply)
        + plan          = "vc2-2c-4gb"
        + status        = (known after apply)
        + tag           = (known after apply)
        }
}

Plan: 1 to add, 0 to change, 0 to destroy.
Apply the Terragrunt configurations to your Vultr account.
console$ terragrunt apply
When prompted, enter
yesand press Enter to approve the deployment actions.Do you want to perform these actions? Terraform will perform the actions described above. Only 'yes' will be accepted to approve. Enter a value:Wait for at least
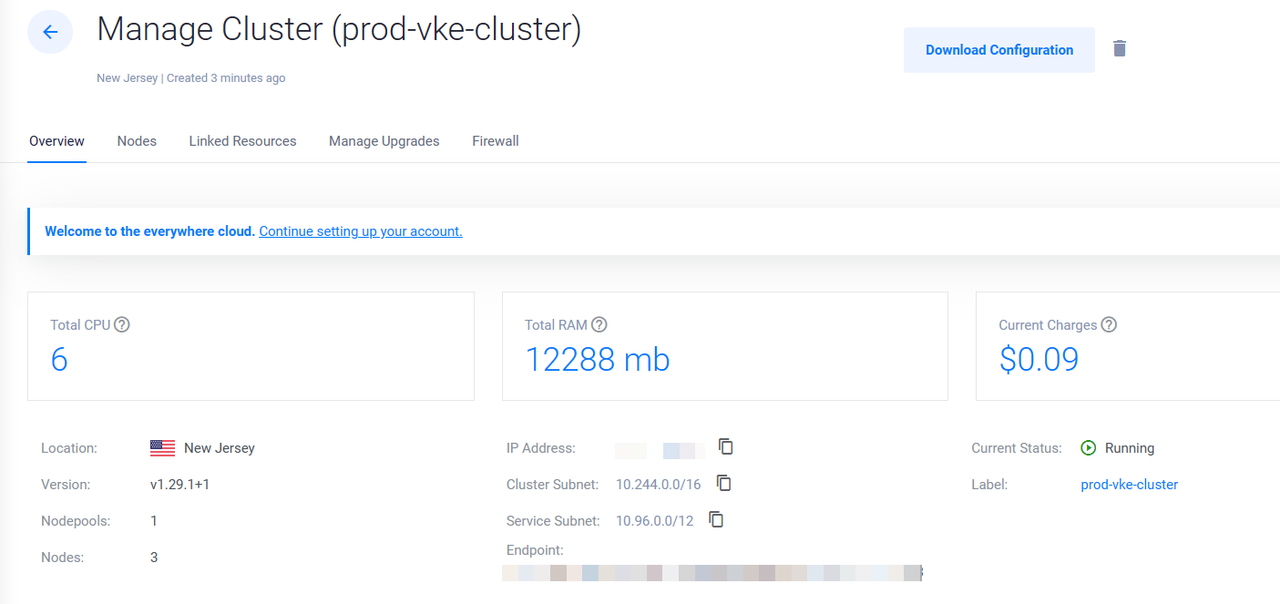
3minutes for the cluster creation process to complete, when successful, your output should be similar to the one below:vultr_kubernetes.vke_cluster: Still creating... [1m50s elapsed] vultr_kubernetes.vke_cluster: Still creating... [2m0s elapsed] vultr_kubernetes.vke_cluster: Still creating... [2m10s elapsed] vultr_kubernetes.vke_cluster: Creation complete after 2m16s [id=f3bb-example88-d72] Apply complete! Resources: 1 added, 0 changed, 0 destroyed.Access the Vultr Console and verify that your VKE cluster is available.
Conclusion
You have set up Terragrunt and deployed resources on your Vultr account. Depending on your cloud infrastructure needs, create a standardized parent-child directory structure to correctly use Terragrunt with a DRY (Don't Repeat Yourself) format to organize and deploy resources using your Vultr API Key. To destroy any resources with Terragrunt, run terragrunt destroy within the target child directory. For more information, visit the official Terragrunt documentation.