
How to Switch Branches in Git
Branch switching in Git is changing your working directory to reflect the state of a specific branch. When you switch branches, Git updates the files in your working directory to match the snapshot of the target branch. It tracks these changes by moving the "HEAD" pointer, which indicates the current branch you're working on. This mechanism allows you to seamlessly transition between different development contexts without losing work. This article explains the git switch command to switch between your git local and remote branches.
The Short Answer Version
If you're already familiar with Git and need quick reference commands for branch switching, they include:
# Switch to an existing local branch
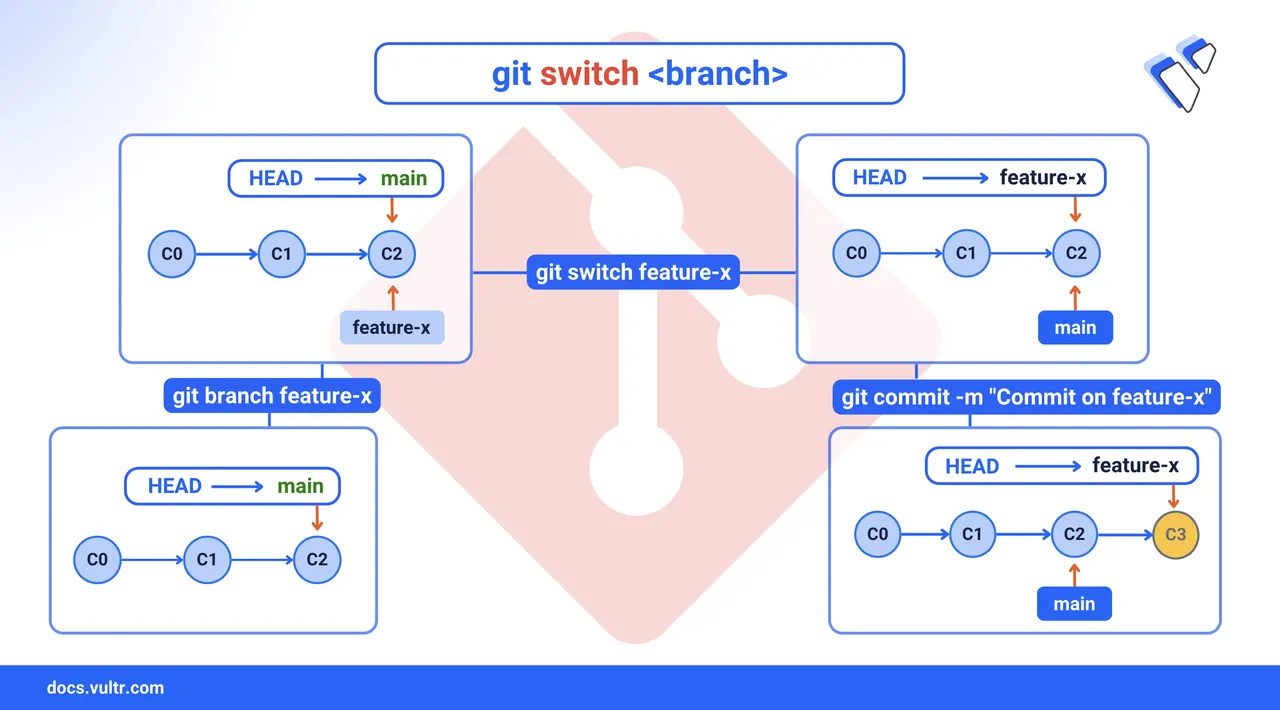
$ git switch <branch_name>
# Create and switch to a new branch
$ git switch -c new_branch_name
# Switch to a remote branch
$ git switch -c branch_name origin/branch_nameContinue reading for detailed explanations and examples of each command.
Switch Branches In Git
This section covers the git switch command in detail.
Command Explanation
The git switch command (available in Git version 2.23 and later) updates your working directory to reflect the state of the target branch.
Command Syntax With Breakdown And Explanation
The syntax for switching to the main branch is:
git switch <branch-name>Breaking down the components:
git switch: The base command that changes your working directory.<branch-name>: The name of an existing target branch.
Command Flags Explanation
You don't need additional flags when switching to an existing branch like main. However, some useful flags you can include:
-for--force: Forces the switch by discarding the uncommitted changes (use with caution as it can cause data loss).--merge: Tries to merge the current branch changes into the new branch.--detach: Switches to the target commit in "detached HEAD" state.
Command Demonstration
Consider switching to a main branch.
Check your current branch.
console$ git branch
Sample output:
  feature-login
* hotfix-header
  main
In this output, you're currently on the
hotfix-headerbranch (indicated by the asterisk).Switch to the main branch.
console$ git switch main
Output:
Switched to branch 'main'
Your branch is up to date with 'origin/main'.
Verify you are on the main branch.
console$ git branch
Output:
  feature-login
  hotfix-header
* main
The asterisk has moved, showing you're on the main branch.
Switch To a New Branch
To create a new branch and switch to it in one command, use:
$ git switch -c <new_branch_name>
Where -c (or --create) flag creates a new branch and switches to it.
Other flags that you can use in this case:
-Cor--force-create: Creates a new branch or resets it if it already exists.--track: Sets up tracking information for the branch.--no-track: Explicitly does not set up tracking information.
Switch To A Remote Branch
Remote branches exist on remote repositories and may need to be brought into your local repository before you can work on them. This is common when collaborating with other developers or working across multiple machines. To switch to a remote branch that doesn't exist locally, you need to create a local tracking branch corresponding to the remote branch. This creates a local copy of the branch that tracks the remote version.
Ensure your local repository knows about all remote branches.
console$ git fetch
Create a local tracking branch and switch to it.
console$ git switch -c <branch_name> origin/<branch_name>
Breaking down the components:
git switch: The base command for changing branches.-c: Flag to create a new local branch.<branch_name>: The name for your local branch (typically the same as the remote).origin/<branch_name>: The reference to the remote branch.
For Git 2.23+ there's also a convenient shorthand.
console$ git switch --track origin/<branch_name>
Which will automatically use the remote branch name for the local branch name.
Other flags that you can use in this case:
--trackor-t: Sets up tracking information for the branch.--no-track: Explicitly does not set up tracking information.-c: Forces creation of the branch even if it exists.
Conclusion
You learned how to switch between different Git branches using the git switch command. You can now navigate to any branch, switch between existing branches, create and switch to new branches, and switch to remote branches for local work. These skills are fundamental to maintaining a smooth Git workflow and enable you to work efficiently across multiple features or fixes simultaneously. Visit the Git Documentation for more information and configuration options.