
How to Use SonarQube on Ubuntu 22.04 LTS

Introduction
SonarQube is a open-source platform designed to continuously inspect and analyze code quality. Supporting over 30 programming languages, it helps developers identify bugs, code smells, and security vulnerabilities early in the development cycle. With detailed reports and actionable insights, SonarQube promotes clean, maintainable code and enhances overall software quality. Running SonarQube on Ubuntu 22.04 LTS, a stable, secure and long-term support release, provides a reliable and efficient environment for maintaining high standards of code quality in both individual and team-based projects.
SonarQube has two parts: a scanner application on the local machine to scan the code and a server application for keeping records.
In this guide, you'll learn how to install, configure, and use SonarQube on Ubuntu 22.04 LTS to efficiently analyze and improve your codebase. If you're using a different version of Ubuntu, you may also find these articles helpful: How to Install SonarQube on Ubuntu 24.04 and Install SonarQube on Ubuntu 20.04 LTS.
Prerequisites
- Deploy a Ubuntu 22.04 server with at least 2GB of RAM and one vCPU core.
- Create a non-root user with sudo privileges.
- Update the server.
- A fully-qualified domain name (sonarqube.example.com) pointing to your server.
1. Configure Firewall
When installing SonarQube on Ubuntu, make sure to configure the firewall to allow access to port 9000. If you're using a reverse proxy, also open ports 80 and 443 for HTTP and HTTPS traffic.
Open them using the Uncomplicated Firewall (UFW).
$ sudo ufw allow http
$ sudo ufw allow https
Check the firewall status.
$ sudo ufw status2. Install OpenJDK
Install OpenJDK 11.
$ sudo apt install openjdk-11-jdk3. Install PostgreSQL
Import the PostgreSQL repository key.
$ curl https://www.postgresql.org/media/keys/ACCC4CF8.asc | gpg --dearmor | sudo tee /etc/apt/trusted.gpg.d/apt.postgresql.org.gpg >/dev/nullAdd the PostgreSQL repository.
$ sudo sh -c 'echo "deb http://apt.postgresql.org/pub/repos/apt $(lsb_release -cs)-pgdg main" > /etc/apt/sources.list.d/pgdg.list'Update the system repository list.
$ sudo apt updateInstall PostgreSQL 14.
$ sudo apt install postgresql postgresql-contribCheck the status of the PostgreSQL service.
$ sudo systemctl status postgresql4. Configure PostgreSQL
Log in to the PostgreSQL shell.
$ sudo -u postgres psqlCreate the sonaruser role.
postgres=# CREATE ROLE sonaruser WITH LOGIN ENCRYPTED PASSWORD 'your_password';Create the sonarqube database.
postgres=# CREATE DATABASE sonarqube;Grant all privileges on the sonarqube database to the sonaruser role.
postgres=# GRANT ALL PRIVILEGES ON DATABASE sonarqube to sonaruser;Exit the shell.
postgres=# \qReturn to your default user account.
$ exit5. Install Sonarqube on Ubuntu 22.04
Copy the URL of the latest version of the community edition from the SonarQube downloads page.
Download SonarQube for Ubuntu 22.04 using the URL copied above.
$ wget https://binaries.sonarsource.com/Distribution/sonarqube/sonarqube-9.6.1.59531.zipUnzip the downloaded archive.
$ unzip -q sonarqube-9.6.1.59531.zipMove the files to the /opt/sonarqube directory.
$ sudo mv sonarqube-9.6.1.59531 /opt/sonarqubeDelete the downloaded archive.
$ rm sonarqube-9.6.1.59531.zip6. Create SonarQube User
Create a system user along with the group for SonarQube.
$ sudo adduser --system --no-create-home --group --disabled-login sonarqubeGive Sonar user permissions to the /opt/sonarqube directory.
$ sudo chown sonarqube:sonarqube /opt/sonarqube -R7. Configure SonarQube Server
Open the SonarQube configuration file for editing.
$ sudo nano /opt/sonarqube/conf/sonar.propertiesFind the following lines.
#sonar.jdbc.username=
#sonar.jdbc.password=
Uncomment them by removing the hash in front of them and adding the database credentials created in step 4.
sonar.jdbc.username=sonaruser
sonar.jdbc.password=your_password
Find the following line.
#sonar.jdbc.url=jdbc:postgresql://localhost/sonarqube?currentSchema=my_schemaUncomment it and replace the existing value with the following.
sonar.jdbc.url=jdbc:postgresql://localhost:5432/sonarqubeFind the following lines.
#sonar.web.javaAdditionalOpts=-server
#sonar.web.host=0.0.0.0
Configure the following settings, so SonarQube listens to localhost only because Nginx handles the external connections.
sonar.web.javaAdditionalOpts=-server
sonar.web.host=127.0.0.1
Save the file by pressing Ctrl+X, then Y.
Increase the virtual memory on the system for Elasticsearch to function. Open the sysctl.conf file for editing.
$ sudo nano /etc/sysctl.confPaste the following lines at the end of the file.
vm.max_map_count=524288
fs.file-max=131072
Save the file by pressing Ctrl+X, then Y.
Create the file /etc/security/limits.d/99-sonarqube.conf and open it for editing.
$ sudo nano /etc/security/limits.d/99-sonarqube.confPaste the following lines to increase the file descriptors and threads that the sonarqube user can open.
sonarqube   -   nofile   131072
sonarqube   -   nproc    8192
Save the file by pressing Ctrl+X, then Y.
Reboot the system to apply the changes.
$ sudo reboot8. Setup Sonar Service
Create the systemd service file for Sonar and open it for editing.
$ sudo nano /etc/systemd/system/sonarqube.servicePaste the following code in it.
[Unit]
Description=SonarQube service
After=syslog.target network.target

[Service]
Type=forking

ExecStart=/opt/sonarqube/bin/linux-x86-64/sonar.sh start
ExecStop=/opt/sonarqube/bin/linux-x86-64/sonar.sh stop

User=sonarqube
Group=sonarqube
PermissionsStartOnly=true
Restart=always

StandardOutput=syslog
LimitNOFILE=131072
LimitNPROC=8192
TimeoutStartSec=5
SuccessExitStatus=143

[Install]
WantedBy=multi-user.target
Save the file by pressing Ctrl+X, then Y.
Start the SonarQube service.
$ sudo systemctl start sonarqubeCheck the status of the service.
$ sudo systemctl status sonarqubeEnable the service to start automatically at boot.
$ sudo systemctl enable sonarqubeVerify if the Sonarqube server is functioning properly.
$ curl http://127.0.0.1:9000Look for the following text in the HTML response.
<script>
    window.baseUrl = '';
    window.serverStatus = 'UP';
    window.instance = 'SonarQube';
    window.official = true;
</script>
This confirms everything is working fine.
9. Install Nginx
Install dependencies required to install Nginx.
$ sudo apt install curl gnupg2 ca-certificates lsb-release ubuntu-keyring -yImport Nginx's GPG signing key.
$ curl https://nginx.org/keys/nginx_signing.key | gpg --dearmor \
| sudo tee /usr/share/keyrings/nginx-archive-keyring.gpg >/dev/null
Add a repository for Nginx's stable version.
$ echo "deb [signed-by=/usr/share/keyrings/nginx-archive-keyring.gpg arch=amd64] \
http://nginx.org/packages/ubuntu `lsb_release -cs` nginx" \
| sudo tee /etc/apt/sources.list.d/nginx.list
Update the system repository list.
$ sudo apt updateInstall Nginx.
$ sudo apt install nginxStart the Nginx server.
$ sudo systemctl start nginx10. Install SSL
Issue the following commands to ensure that you have the latest version of snapd required to install Certbot.
$ sudo snap install core
$ sudo snap refresh core
Install Certbot.
$ sudo snap install --classic certbotCreate a symlink for Certbot to the /usr/bin directory.
$ sudo ln -s /snap/bin/certbot /usr/bin/certbotIssue the SSL Certificate.
$ sudo certbot certonly --nginx --agree-tos --no-eff-email --staple-ocsp --preferred-challenges http -m name@example.com -d sonarqube.example.comGenerate a Diffie-Hellman group certificate.
$ sudo openssl dhparam -dsaparam -out /etc/ssl/certs/dhparam.pem 4096Do a dry run of the SSL renewal process to ensure it works.
$ sudo certbot renew --dry-run11. Configure Nginx
Open the file nginx.conf for editing.
$ sudo nano /etc/nginx/nginx.confFind the line include /etc/nginx/conf.d/*.conf; and paste the following code below it.
server_names_hash_bucket_size 64;Save the file by pressing Ctrl+X, then Y.
Create the Sonar configuration file for Nginx and open it for editing.
$ sudo nano /etc/nginx/conf.d/sonar.confPaste the following code in it.
# Redirect HTTP to HTTPS
server {
    listen 80 default_server;
    server_name sonarqube.example.com;
    return 301 https://$server_name$request_uri;
}

server {
    listen 443 ssl http2;
    server_name sonarqube.example.com;

    http2_push_preload on; # Enable HTTP/2 Server Push

    ssl_certificate /etc/letsencrypt/live/sonarqube.example.com/fullchain.pem;
    ssl_certificate_key /etc/letsencrypt/live/sonarqube.example.com/privkey.pem;
    ssl_trusted_certificate /etc/letsencrypt/live/sonarqube.example.com/chain.pem;
    ssl_session_timeout 1d;
    ssl_protocols TLSv1.2 TLSv1.3;

    ssl_ciphers 'ECDHE-ECDSA-AES256-GCM-SHA384:ECDHE-RSA-AES256-GCM-SHA384:ECDHE-ECDSA-CHACHA20-POLY1305:ECDHE-RSA-CHACHA20-POLY1305:ECDHE-ECDSA-AES256-SHA384:ECDHE-RSA-AES256-SHA384';
    ssl_prefer_server_ciphers on;
    ssl_session_cache shared:SSL:50m;
    ssl_stapling on;
    ssl_stapling_verify on;
    ssl_dhparam /etc/ssl/certs/dhparam.pem;

    access_log /var/log/nginx/sonarqube.access.log main;
    error_log  /var/log/nginx/sonarqube.error.log;

    location / {
        proxy_set_header Connection "";
        proxy_set_header Host $http_host;
        proxy_set_header X-Real-IP $remote_addr;
        proxy_set_header X-Forwarded-For $proxy_add_x_forwarded_for;
        proxy_set_header X-Forwarded-Proto $scheme;
        proxy_http_version 1.1;
        proxy_pass http://127.0.0.1:9000;
    }
}
Save the file by pressing Ctrl+X, then Y.
Verify Nginx configuration syntax.
$ sudo nginx -tRestart the Nginx service.
$ sudo systemctl restart nginx12. Secure SonarQube
Visit the URL https://sonarqube.example.com and log in using the username and password admin.
Change your password on the next page.
Click the Administration tab, select Security from the list, and click the Users drop-down option.
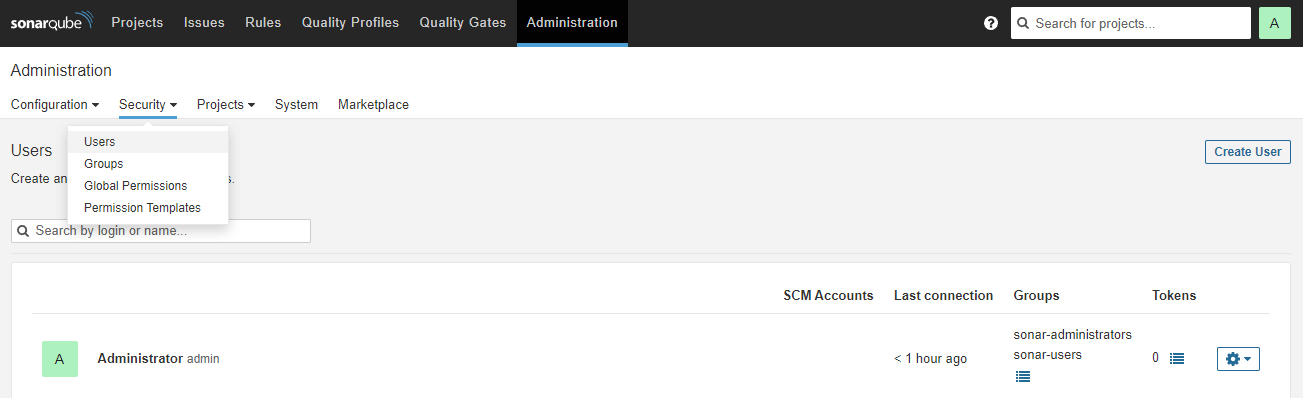
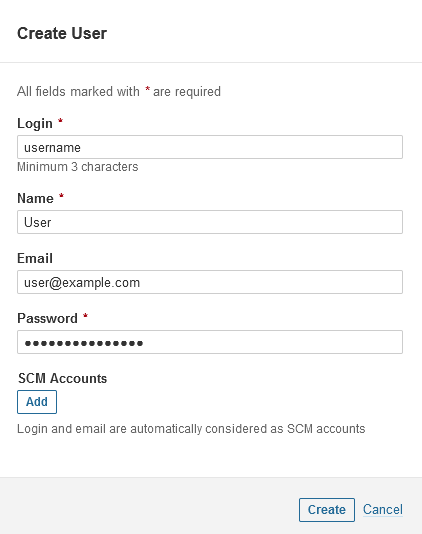
To improve security, create another user to use for scanning code by clicking the Create User button.
Click the button in the Tokens column against the newly created user.
Click the Update Tokens button, enter the token name, and click the Generate button to create a new token for the user. Copy and save the token.

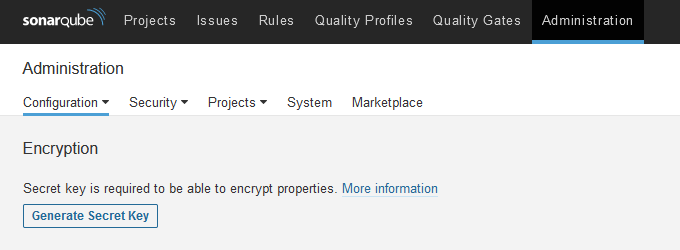
SonarQube comes with the ability to encrypt settings and passwords. Visit Administration >> Configuration >> Encryption and click the Generate Secret Key button to generate a unique secret key. Copy the saved key to use later.
Open the Sonar configuration file for editing.
$ sudo /opt/sonarqube/conf/sonar.propertiesEnter the following line at the end of the file.
sonar.secretKeyPath=/opt/sonarqube/conf/sonar-secret.txtSave the file by pressing Ctrl+X, then Y.
Create the Sonar secret key file and open it for editing.
$ sudo nano /opt/sonarqube/conf/sonar-secret.txtPaste your secret key into it. Save the file by pressing Ctrl+X, then Y.
Restrict the secret file to the sonarqube user.
$ sudo chown sonarqube:sonarqube /opt/sonarqube/conf/sonar-secret.txtRestart the SonarQube server.
$ sudo systemctl restart sonarqubeVisit the Administration >> Configuration >> Encryption section again and fill in your database password. Press the Encrypt button to generate the encrypted password.
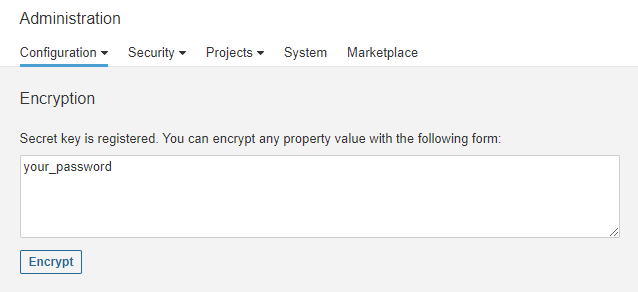
Replace the actual password in the sonar.properties file with the encrypted version, and restart the server. Repeat the process with any other property you want to encrypt.
13. Install SonarQube's Code Scanner
SonarQube provides various scanners depending on the programming language. Install the Command line version of the Sonarscanner.
Download the scanner.
$ wget https://binaries.sonarsource.com/Distribution/sonar-scanner-cli/sonar-scanner-cli-4.7.0.2747-linux.zipExtract the archive.
$ sudo unzip sonar-scanner-cli-4.7.0.2747-linux.zipMove the directory to /opt/sonarscanner.
$ sudo mv sonar-scanner-4.7.0.2747-linux /opt/sonarscannerSwitch to the directory.
$ cd /opt/sonarscannerOpen the sonar-scanner.properties file for editing.
$ sudo nano conf/sonar-scanner.propertiesFind the following line and un-comment it.
#sonar.host.url=http://localhost:9000Change its value and replace it with the server URL.
sonar.host.url=https://sonarqube.example.comSave the file by pressing Ctrl+X, then Y.
Make the scanner binary file executable.
$ sudo chmod +x bin/sonar-scannerCreate a symbolic link to the binary to make it accessible from anywhere.
$ sudo ln -s /opt/sonarscanner/bin/sonar-scanner /usr/local/bin/sonar-scanner14. Scan SonarQube Example Projects
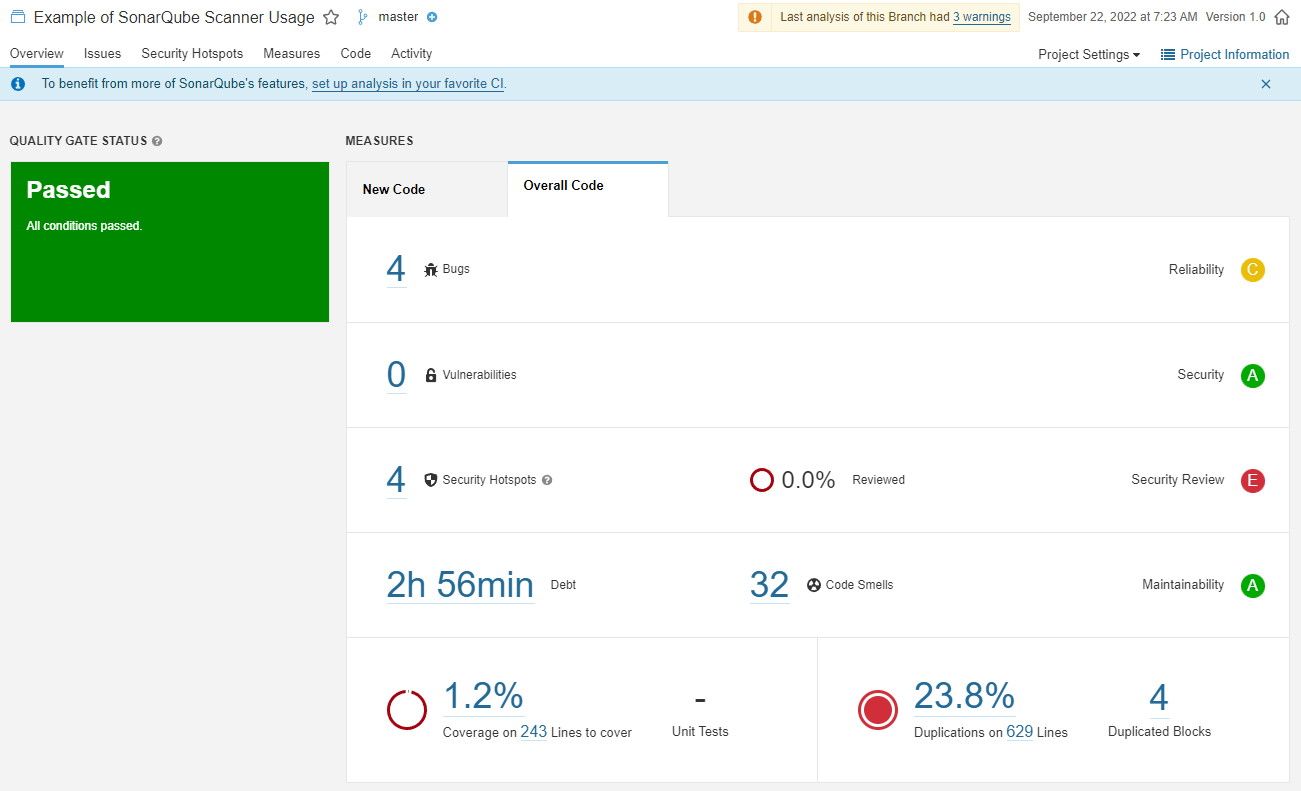
You can test the scanner by running it on SonarQube example projects.
Create a new directory for project testing and switch to it.
$ mkdir ~/sonar-example-test && cd ~/sonar-example-testDownload the example project.
$ wget https://github.com/SonarSource/sonar-scanning-examples/archive/master.zipExtract the project files.
$ unzip master.zipSwitch to the example project directory.
$ cd sonar-scanning-examples-master/sonarqube-scannerRun the scanner on the code. Pass the token you created before.
$ sonar-scanner -D sonar.login=<YourLoginToken>You get the following output after the scan is complete.
INFO: Analysis total time: 20.621 s
INFO: ------------------------------------------------------------------------
INFO: EXECUTION SUCCESS
INFO: ------------------------------------------------------------------------
INFO: Total time: 39.678s
INFO: Final Memory: 27M/94M
INFO: ------------------------------------------------------------------------
Visit the SonarQube dashboard to view the project report.
15. Scan Your Code
Transfer the project to your server.
Switch to your project's root directory.
$ cd ~/myprojectCreate and open the SonarQube configuration file.
$ nano sonar-project.propertiesDefine a project key for your project. The chosen key should be unique for your SonarQube instance.
# Unique ID for the project
sonar.projectKey=MyProject:Key1
Enter the project name and version to show up in the SonarQube dashboard.
sonar.projectName=First Project
sonar.projectVersion=1.0
sonar.projectDescription=My First Project
Enter the location of the project files. The location is relative to the directory in which the configuration file is present.
sonar.sources=srcEnter the location of the files you don't want to scan.
sonar.tests=testsSet the level of logs produced by the scanner. You can skip the property if you want to use the default INFO log level.
sonar.log.level=DEBUGIf you are hosting the project on your server, paste the following line to disable checking for a Source Code Management (SCM) provider.
sonar.scm.disabled=trueSave the file by pressing Ctrl+X, then Y.
Run the code scanner by passing your login token.
$ sonar-scanner -D sonar.login=<YourLoginToken>Conclusion
You have successfully installed and used SonarQube on your Ubuntu 22.04 server. For details, you can check out the following resources.