How to Use the nc Command in Linux

Introduction
The nc (Netcat) command in Linux is a versatile networking utility for reading and writing data between networks. The nc command is also referred to as the "Swiss army knife" of networking because it performs various tasks. These networking tasks include transferring files, scanning ports, encrypting data, opening shells, and more.
This article explains how to use the nc command in Linux to administer a system network.
Prerequisites
Before you begin:
- Deploy two Ubuntu instances on Vultr to use as the
mainandclientservers respectively. - Access the instances using SSH.
The nc Command Syntax
The following is a basic nc command syntax:
nc [options] [hostname] [port]In the above nc command:
[options]: Includes optional flags that modify the command's behavior[hostname]: Specifies the target host.[port]: Specifies the target port to connect.
The nc command in Linux works in two modes:
- Connect mode: Netcat works as a client in connect mode and requires the
hostandportparameters. - Listen mode: Netcat works as a server in listen mode. Netcat listens on all available addresses and the specified port when you omit the
hostoption.
Explore the egrep command in Linux to efficiently search for specific text patterns in files.
Use Common nc Command Options
You can use the following command options when working with the nc command:
| Option | Description |
|---|---|
-l |
Listen mode. Sets up a listening socket. |
-p |
Local port. Specifies the target port number to connect to. |
-u |
UDP mode. Enables UDP instead of TCP. |
-z |
Zero-I/O mode. Scans and detects open ports on the target host. |
-v |
Verbose mode. Provides detailed command output. |
-w |
Timeout. Sets a timeout value for connections. |
-e |
Execute. Runs a specified command after establishing a connection. |
-n |
Numeric-only mode. Disables DNS resolution. |
-k |
Keep open. Keeps the connection open when the client disconnects. |
-c |
Shell command. Executes a command as a single argument to the shell. |
Use the nc Command to Perform Tasks in Linux
Follow the steps below to use the nc command to perform basic tasks in Linux, such as creating a chat server, transferring files, and scanning open network ports.
Allow network connection on the custom
12345TCP port through the default firewall.console$ sudo ufw allow 12345
Reload the firewall to apply changes.
console$ sudo ufw reload
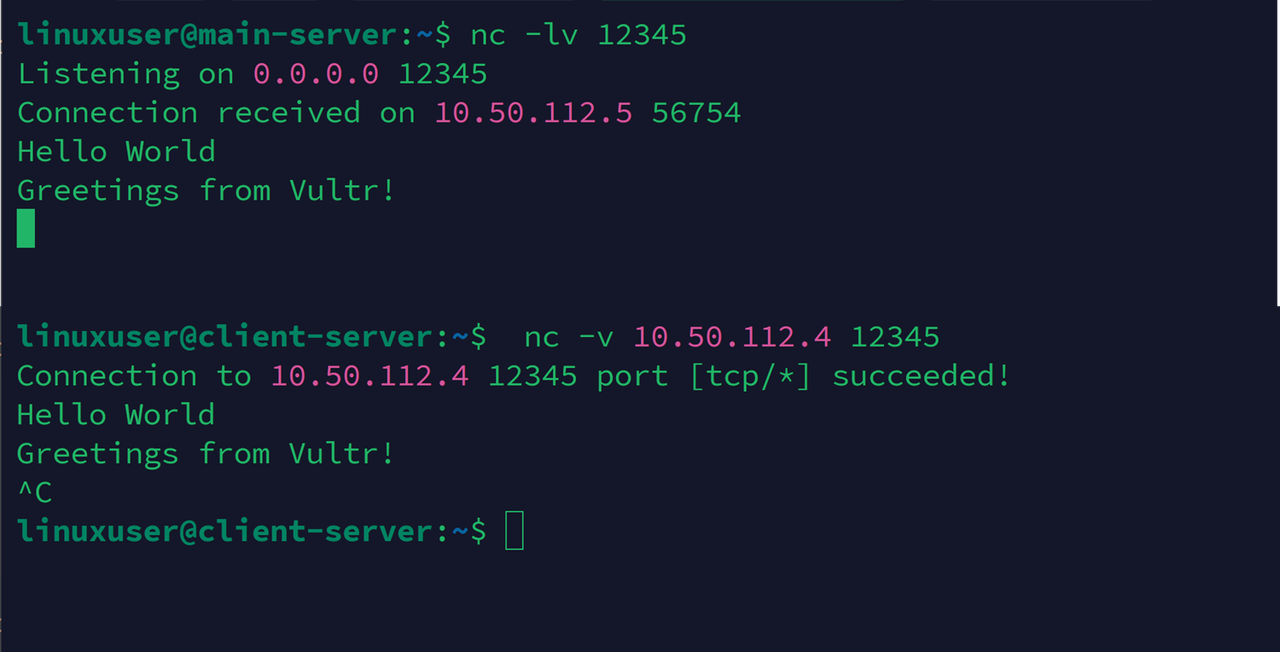
Create a new chat server using the
nccommand on the main server which listens for connections on port12345.console$ nc -lv 12345
The above command runs the
nccommand in listen mode using the-loption on the TCP port12345. The-voption enables verbose mode to display detailed output.Establish an SSH connection in the client server and connect to the chat server. Replace
Server-IPwith the main server's public IP address.console$ nc -v Server-IP 12345
Output:
Connection to 10.50.112.4 12345 port [tcp/*] succeeded!Enter
Hello Worldin thenccommand prompt to send a message to the main server.Hello WorldVerify that the
Hello Worldmessage displays on the main server, and enterGreetings from Vultr!as a reply.Greetings from Vultr!Press Ctrl + C to exit the
nccommand prompt.Output:

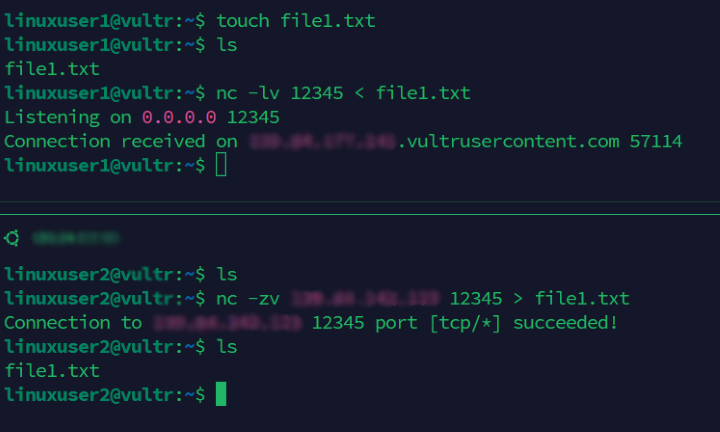
Create a new
file1.txtfile on the main server.console$ touch file1.txt
Redirect the file to the
nccommand to transfer it to any connecting client.console$ nc -lv 12345 < file1.txt
Download the file using the
nccommand on the client server.console$ nc -zv Server-IP 12345 > file1.txt
Output:
Connection to 10.50.112.4 12345 port [tcp/*] succeeded!List files in the working directory on the client server and verify that
file1.txtfile is available.console$ lsOutput:
file1.txt
Scan all open ports between
20and25using thezoption without sending data to the main server.console$ nc -zvw 1 Server-IP 20-25
Output:

Filter the port results using the
grepcommand to display only open ports.console$ nc -zvw 1 [target_host] 20-25 2>&1 | grep 'succeeded'
Output:

Create a new
index.htmlfile using a file editor such asnanoto set up a basic web application on the main server.console$ nano index.html
Add the following contents to the file.
htmlHTTP/1.1 200 OK Content-Type: text/html <html> <head> <title>Test Page</title> </head> <body> <h1>Greetings from Vultr!</h1> </body> </html>
Save and close the file.
Serve the web application file using a loop and the
nccommand.console$ while : ; do cat index.html | nc -l -p 12345; done
The above command starts an infinite
whileloop that listens for connections on the TCP port12345and serves theindex.htmlweb application file when you access the application using the server's public IP address.Output:

Run the web application by accessing the main server's IP address on port
12345using a web browser such as Chrome.http://SERVER_IP:12345Output:

Test access to a specific port on a domain or server IP using the
nccommand. For example, test access to the HTTPS port443ongoogle.comand specify thezoption to disable persistence.console$ nc -zv google.com 443
Output:

Send an HTTP request to a domain using the
nccommand. For example, use theprintcommand to send a request togoogle.comon the HTTP port80.console$ printf "GET / HTTP/1.0\r\n\r\n" | nc -v google.com 80
Output:

Explore how the top command in Linux provides real-time monitoring for system performance.
Use the nc Command with Compression
You can use the nc command with compression tools to speed up remote file transfers. Follow the steps below to use the nc command with compression to transfer files.
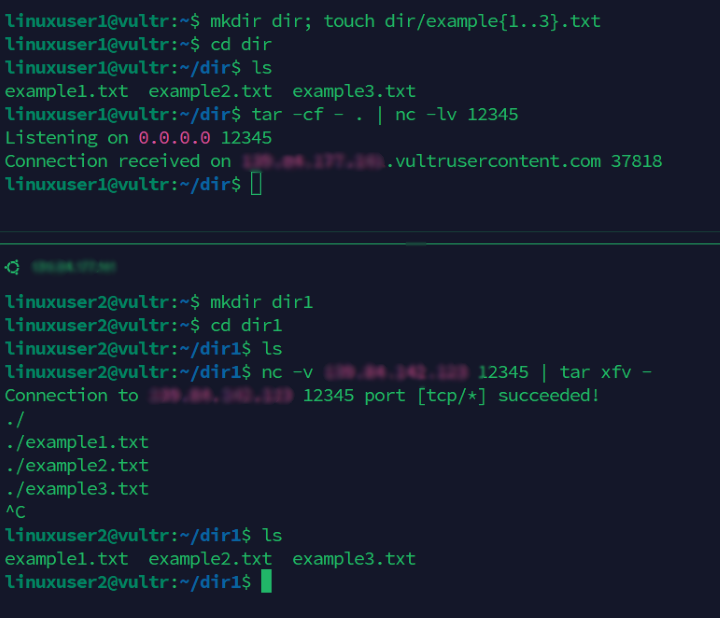
Create a new
dirdirectory on the main server.console$ mkdir dir
Add new files to the
dirdirectory.console$ touch dir/example{1..3}.txt
Switch to the
dirdirectory.console$ cd dir
Compress the directory files using
tarand send the contents to thenccommand.console$ tar -cf - . | nc -lv 12345
Run the following command on the client server to receive and decompress the files from the main server.
console$ nc -v Server-IP 12345 | tar xfv -
Output:
Connection to 10.50.112.3 12345 port [tcp/*] succeeded!
./
./example2.txt
./example3.txt
./example1.txt
Conclusion
You have used the nc command in Linux to perform basic networking tasks, such as transferring files, scanning open ports, and running application files. You can use the nc command to manage and troubleshoot network connections between two or more Linux hosts. For more information and options, run the man nc command to view the nc command's manual page.