
Introduction
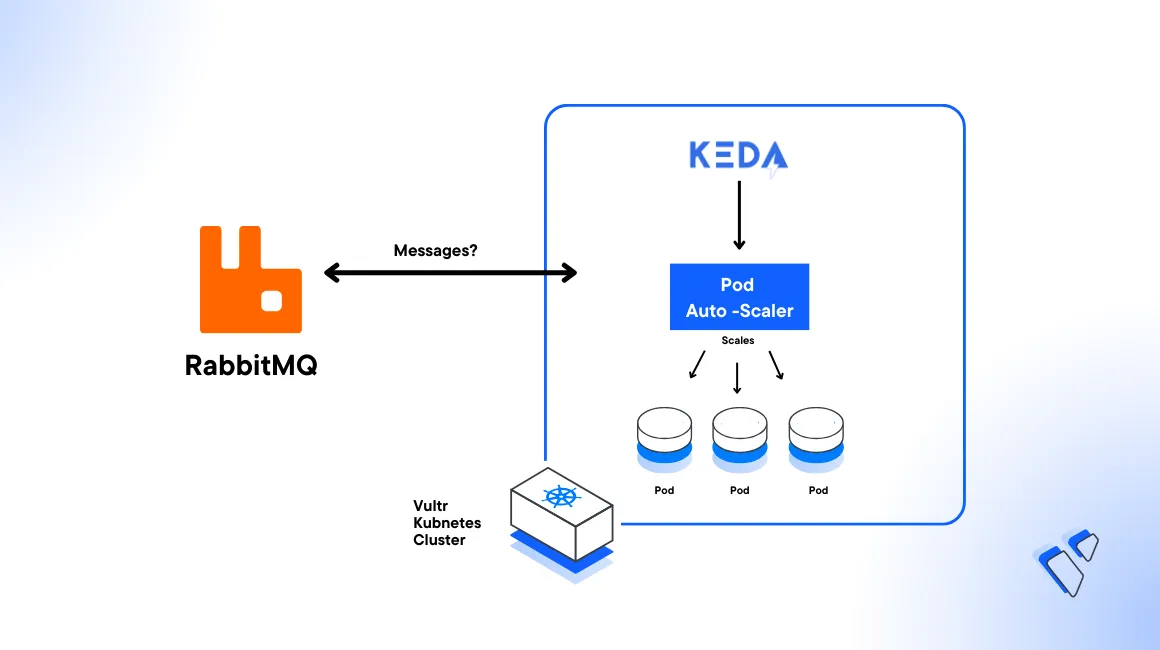
KEDA is a Kubernetes-based Event Driven Autoscaler that handles scaling operations of any container workload in a cluster based on the number of events that need to be processed. It works with standard Kubernetes components such as Horizontal Pod Autoscaler (HPA) that allow you to map the applications you want to scale in an event-driven format. KEDA scalers are components that monitor external systems to generate metrics and drive the scaling of Kubernetes workloads.
A KEDA RabbitMQ scaler can scale workloads based on the length of a RabbitMQ queue. This article demonstrates how to use the RabbitMQ scaler on a Vultr Kubernetes Engine (VKE) cluster to allow RabbitMQ consumer application Pods to scale up and down based on the number of unprocessed items in the queue.
Prerequisites
Before you begin:
Deploy a One-Click Docker instance using the Vultr Marketplace Application to use as your management system.
Deploy a Vultr Kubernetes Engine (VKE) cluster with at least
3nodes.Access the Docker server using SSH as a non-root sudo user.
Install Kubectl to access the VKE cluster.
console$ sudo snap install kubectl --classic
Set your cluster manifest as the
KUBECONFIGenvironment variable to use with Kubectl.console$ export KUBECONFIG=<enter path to VKE kubeconfig file>
Install the Helm CLI.
console$ sudo snap install helm --classic
Install Golang
console$ sudo snap install go --classic
2 vCPUs and 4096 MB memory each.
Verify that your VKE deployment region supports Vultr Block Storage.
Install the KEDA Operator
Create a new project files directory.
console$ mkdir vke-keda-rabbitmq
Switch to the directory.
console$ cd vke-keda-rabbitmq
Deploy the latest KEDA operator version to your cluster using Kubectl.
console$ kubectl apply --server-side -f https://github.com/kedacore/keda/releases/download/v2.12.1/keda-2.12.1-core.yaml
The above command installs the operator version
2.12.1to your cluster. To use the latest version, visit the KEDA releases page.Output:
customresourcedefinition.apiextensions.k8s.io/clustertriggerauthentications.keda.sh serverside-applied
customresourcedefinition.apiextensions.k8s.io/scaledjobs.keda.sh serverside-applied
customresourcedefinition.apiextensions.k8s.io/scaledobjects.keda.sh serverside-applied
customresourcedefinition.apiextensions.k8s.io/triggerauthentications.keda.sh serverside-applied
...
Wait for at least
1minute, then, view all deployments in the newkedanamespace to verify that the operator is installed in your cluster.console$ kubectl get deployment -n keda
Output:
NAME                     READY   UP-TO-DATE   AVAILABLE   AGE
keda-metrics-apiserver   1/1     1            1           30s
keda-operator            1/1     1            1           40s
Install RabbitMQ
Add the Bitnami chart to your local Helm repositories.
console$ helm repo add bitnami https://charts.bitnami.com/bitnami
Update your Helm repositories.
console$ helm repo update
Deploy RabbitMQ to your cluster.
console$ helm install rabbitmq --set auth.username=user --set auth.password=s3cr3t --set persistence.storageClass=vultr-block-storage --set persistence.size=10Gi bitnami/rabbitmq
RabbitMQ installs to your cluster as a Kubernetes
StatefulSet. The above command above usesvultr-block-storageas the storage class to use with RabbitMQ for data persistence. When successful, navigate to your VKE Cluster Linked Resources tab and verify the attached block storage volumes.Wait for at least
3minutes for the installation to complete, then, verify that all RabbitMQ Pods are available and running in your cluster.console$ kubectl get pods -l=app.kubernetes.io/instance=rabbitmq
Output:
NAME         READY   STATUS    RESTARTS   AGE
rabbitmq-0   1/1     Running   0          2m28s
Create the RabbitMQ Producer Application
Initialize a new Go module to create a
go.modfile.console$ go mod init rabbitmq-app
Using a text editor such as Nano, create a new file
producer.go.console$ nano producer.go
Add the following contents to the file.
gopackage main import ( "context" "fmt" "log" "os" "strconv" "time" amqp "github.com/rabbitmq/amqp091-go" ) var conn *amqp.Connection var queueName string func init() { url := os.Getenv("RABBITMQ_URI") if url == "" { log.Fatal("missing environment variable RABBITMQ_URI") } queueName = os.Getenv("RABBITMQ_QUEUE_NAME") if queueName == "" { log.Fatal("missing environment variable RABBITMQ_QUEUE_NAME") } var err error conn, err = amqp.Dial(url) if err != nil { log.Fatal("dial failed ", err) } } func main() { defer conn.Close() ch, err := conn.Channel() if err != nil { log.Fatalf("Failed to create channel: %v", err) } defer ch.Close() q, err := ch.QueueDeclare( queueName, true, false, false, false, nil, ) if err != nil { log.Fatalf("Failed to declare queue: %v", err) } for i := 0; i <= 1000000; i++ { _i := strconv.Itoa(i) msg := "message-" + _i err = ch.PublishWithContext( context.Background(), "", q.Name, false, false, amqp.Publishing{ ContentType: "text/plain", Body: []byte(msg), }, ) if err != nil { log.Fatalf("failed to publish message: %v", err) } fmt.Println("message", msg, "sent to queue", q.Name) time.Sleep(1 * time.Second) } }
Save and close the file.
The above configuration uses the RabbitMQ connection string and queue name from the available environment variables to establish a connection to RabbitMQ. Then, it uses a
forloop to send messages to the queue with a wait duration of1second between each message.
Containerize the Producer Application
Create a new file
Dockerfile.producer.console$ nano Dockerfile.producer
Add the following contents to the file.
dockerfileFROM golang AS build WORKDIR /app COPY go.mod ./ COPY go.sum ./ RUN go mod download COPY producer.go ./ RUN CGO_ENABLED=1 go build -o /rabbitmq-go-app FROM cgr.dev/chainguard/glibc-dynamic WORKDIR / COPY --from=build /rabbitmq-go-app /rabbitmq-go-app EXPOSE 8080 USER nonroot:nonroot ENTRYPOINT ["/rabbitmq-go-app"]
Save and close the file.
The above Dockerfile uses
golangas the base image for the first stage and builds the producer program binary. The file usescgr.dev/chainguard/glibc-dynamicas the base image for the second stage to copy the binary produced by the first stage.
Deploy the RabbitMQ Producer Application
Fetch the application Go module dependencies to create
go.sumfile.console$ go mod tidy
Login to your Docker Hub account.
console$ docker login
When prompted, enter your Docker Hub username and password to use it as your default registry. However, you can also use the Vultr Container Registry to build and push images for deployment in your cluster.
Build the application image. Replace
exampleuserwith your actual DockerHub username.console$ docker build -t exampleuser/rabbitmq-producer-app -f Dockerfile.producer .
Push the image to your DockerHub profile.
console$ docker push exampleuser/rabbitmq-producer-app
Create a new file
producer.yaml.console$ nano producer.yaml
Add the following contents to the file. Replace
exampleuserwith your Docker Hub username.yamlapiVersion: apps/v1 kind: Deployment metadata: name: rabbitmq-producer spec: replicas: 1 selector: matchLabels: app: rabbitmq-producer template: metadata: labels: app: rabbitmq-producer spec: containers: - name: rabbitmq-producer image: exampleuser/rabbitmq-producer-app imagePullPolicy: Always env: - name: RABBITMQ_QUEUE_NAME value: demo-queue - name: RABBITMQ_URI value: amqp://user:s3cr3t@rabbitmq.default.svc.cluster.local:5672
Save and close the file.
Deploy the producer application to your cluster.
console$ kubectl apply -f producer.yaml
Output:
deployment.apps/rabbitmq-producer createdWait for at least
20seconds and view therabbitmq-producerpods to verify that the new applicationPodisRunning.console$ kubectl get pods -l=app=rabbitmq-producer
Your output should look like the one below:
NAME                                 READY   STATUS              RESTARTS   AGE
rabbitmq-producer-847f6866c5-tpxdx   1/1     Running             0          10s
View the producer application logs to verify the queue messages progress.
console$ kubectl logs -f $(kubectl get pod -l=app=rabbitmq-producer -o jsonpath='{.items[0].metadata.name}')
Output:
message message-0 sent to queue demo-queue
message message-1 sent to queue demo-queue
message message-2 sent to queue demo-queue
message message-3 sent to queue demo-queue
....
The above logs show that the messages are successfully sent to the
demo-queueRabbitMQ queue.
Create the RabbitMQ Consumer Application
Create a new file
consumer.go.console$ nano consumer.go
Add the following contents to the file.
gopackage main import ( "fmt" "log" "os" "time" "github.com/google/uuid" amqp "github.com/rabbitmq/amqp091-go" ) var conn *amqp.Connection var queueName string var instanceName string func init() { url := os.Getenv("RABBITMQ_URI") if url == "" { log.Fatal("missing environment variable RABBITMQ_URI") } queueName = os.Getenv("RABBITMQ_QUEUE_NAME") if queueName == "" { log.Fatal("missing environment variable RABBITMQ_QUEUE_NAME") } var err error conn, err = amqp.Dial(url) if err != nil { log.Fatal(err) } instanceName = os.Getenv("INSTANCE_NAME") if instanceName == "" { instanceName = "rabbitmq-consumer-" + uuid.NewString() } } func main() { defer conn.Close() ch, err := conn.Channel() if err != nil { log.Fatalf("Failed to create channel: %v", err) } defer ch.Close() q, err := ch.QueueDeclare( queueName, true, false, false, false, nil, ) if err != nil { log.Fatalf("Failed to declare queue: %v", err) } err = ch.Qos( 1, 0, false, ) msgs, err := ch.Consume( q.Name, "", false, false, false, false, nil, ) if err != nil { log.Fatalf("failed to consume messages from queue: %v", err) } fmt.Println("consumer instance", instanceName, "waiting for messages.....") for msg := range msgs { fmt.Println("Instance", instanceName, "received message", string(msg.Body), "from queue", q.Name) msg.Ack(false) time.Sleep(3 * time.Second) } }
Save and close the file.
The above configuration uses the RabbitMQ connection string and queue name environment variables to establish a connection to RabbitMQ. It detects the Pod instance name using the
INSTANCE_NAMEenvironment variable. Then, it declares a queue and uses aforloop to receive messages. In addition, all messages are logged to the console and acknowledged.To containerize the application for deployment, create a new Dockerfile
Dockerfile.consumer.console$ nano Dockerfile.consumer
Add the following contents to the file.
dockerfileFROM golang AS build WORKDIR /app COPY go.mod ./ COPY go.sum ./ RUN go mod download COPY consumer.go ./ RUN CGO_ENABLED=1 go build -o /rabbitmq-go-app FROM cgr.dev/chainguard/glibc-dynamic WORKDIR / COPY --from=build /rabbitmq-go-app /rabbitmq-go-app EXPOSE 8080 USER nonroot:nonroot ENTRYPOINT ["/rabbitmq-go-app"]
Save and close the file.
The above Dockerfile uses two-stage build process which includes
golangthat works as a base image for the first stage and builds the consumer program binary. Then,cgr.dev/chainguard/glibc-dynamicis the base image for the second stage that copies the binary produced by the first stage.
Deploy the RabbitMQ Consumer Application
Fetch the application Go module dependencies.
console$ go mod tidy
Build the application image. Replace
exampleuserwith your actual Docker Hub username.console$ docker build -t exampleuser/rabbitmq-consumer-app -f Dockerfile.consumer .
Push the application image to your new Docker Hub profile.
console$ docker push exampleuser/rabbitmq-consumer-app
Create a new file
consumer.yaml.console$ nano consumer.yaml
Add the following contents to the file. Replace
exampleuserwith your Docker Hub username.yamlapiVersion: apps/v1 kind: Deployment metadata: name: rabbitmq-consumer spec: replicas: 1 selector: matchLabels: app: rabbitmq-consumer template: metadata: labels: app: rabbitmq-consumer spec: containers: - name: rabbitmq-consumer image: exampleuser/rabbitmq-consumer-app imagePullPolicy: Always env: - name: RABBITMQ_QUEUE_NAME value: demo-queue - name: RABBITMQ_URI value: amqp://user:s3cr3t@rabbitmq.default.svc.cluster.local:5672 - name: INSTANCE_NAME valueFrom: fieldRef: fieldPath: metadata.name
Save and close the file.
Deploy the consumer application to your cluster.
console$ kubectl apply -f consumer.yaml
Output:
deployment.apps/rabbitmq-consumer createdWait for at least
20seconds and verify the status of runningrabbitmq-consumerapplication pods.console$ kubectl get pods -l=app=rabbitmq-consumer
Your output should look like the one below:
NAME                                 READY   STATUS              RESTARTS   AGE
rabbitmq-consumer-5b8884c78b-2sjds   1/1     Running             0          10s
Create the KEDA Scaler
Create a new YAML manifest
scaler.yaml.console$ nano scaler.yaml
Add the following contents to the file.
yamlapiVersion: keda.sh/v1alpha1 kind: ScaledObject metadata: name: rabbitmq-scaledobject namespace: default spec: scaleTargetRef: name: rabbitmq-consumer minReplicaCount: 1 maxReplicaCount: 5 triggers: - type: rabbitmq metadata: protocol: amqp queueName: demo-queue mode: QueueLength value: "10" hostFromEnv: RABBITMQ_URI
Save and close the file.
Install the Scaler to your cluster.
console$ kubectl apply -f scaler.yaml
Output:
scaledobject.keda.sh/rabbitmq-scaledobject created
Verify the Application Autoscaling
View the RabbitMQ consumer application deployment status and verify that READY field includes an upscaled number of pods.
console$ kubectl get deployment/rabbitmq-consumer
Your output should look like the one below:
NAME                READY   UP-TO-DATE   AVAILABLE   AGE
rabbitmq-consumer   5/5     5            5           53s
View the consumer application Pods and verify the number of available resources.
console$ kubectl get pods -l=app=rabbitmq-consumer
Output:
NAME                                 READY   STATUS    RESTARTS   AGE
rabbitmq-consumer-5b8884c78b-7mhg7   1/1     Running   0          98s
rabbitmq-consumer-5b8884c78b-ktjf9   1/1     Running   0          83s
rabbitmq-consumer-5b8884c78b-vx7wv   1/1     Running   0          98s
rabbitmq-consumer-5b8884c78b-xc2rh   1/1     Running   0          3m25s
rabbitmq-consumer-5b8884c78b-xfqhr   1/1     Running   0          98s
The RabbitMQ queue
demo-queueis monitored by theKEDAscaler. When the unprocessed message count exceeds10, therabbitmq-consumerdeployment automatically scales out. In the above output, only five Pods are available because themaxReplicaCountattribute in theScaledObjectconfiguration is set to5. When the consumer pods stop processing messages from the RabbitMQ queue,KEDAscales the deployment back to a single pod.View the consumer application logs using a RabbitMQ Pod of your choice. For example:
rabbitmq-consumer-5b8884c78b-xfqhr.console$ kubectl logs -f rabbitmq-consumer-5b8884c78b-xfqhr
Output:
Instance rabbitmq-consumer-5b8884c78b-7mhg7 received message message-120 from queue demo-queue
Instance rabbitmq-consumer-5b8884c78b-7mhg7 received message message-125 from queue demo-queue
Instance rabbitmq-consumer-5b8884c78b-7mhg7 received message message-130 from queue demo-queue
Instance rabbitmq-consumer-5b8884c78b-7mhg7 received message message-135 from queue demo-queue
Instance rabbitmq-consumer-5b8884c78b-7mhg7 received message message-140 from queue demo-queue
....
As displayed in the above pod output, the consumer application has five replicas, and the message processing is load balanced amongst them. This is evident in the log message which logs the pod name and the message processed by it. If you view other pod logs, they include different processing information since a different set of messages is sent by the producer. This enables horizontal scalability of the consumer application.
Conclusion
You have configured KEDA to scale RabbitMQ consumer application deployed in your VKE cluster. In addition, you set up KEDA and RabbitMQ using client applications (producer and consumer) to verify the auto-scaling behavior. You can apply auto scaling with different applications in your cluster using KEDA. For more information, please visit the official documentation.
No comments yet.