
Self Hosted Serverless Functions with OpenFaaS and Kubernetes
Introduction
Serverless computing is a cloud application development model that allows developers to build and run code without managing the underlying infrastructure. It allows developers to focus solely on code and application development while server management tasks are effectively handled by applying tools such as OpenFaas.
OpenFaaS is an open-source framework that allows developers to write code in the form of functions and deploy it as Docker containers in a Kubernetes cluster. It offers a web interface and a command line interface (faas-cli) to deploy, manage and monitor functions. OpenFaas leverages Kubernetes capabilities to manage containerized functions and handle tasks such as scaling, load balancing, and high availability.
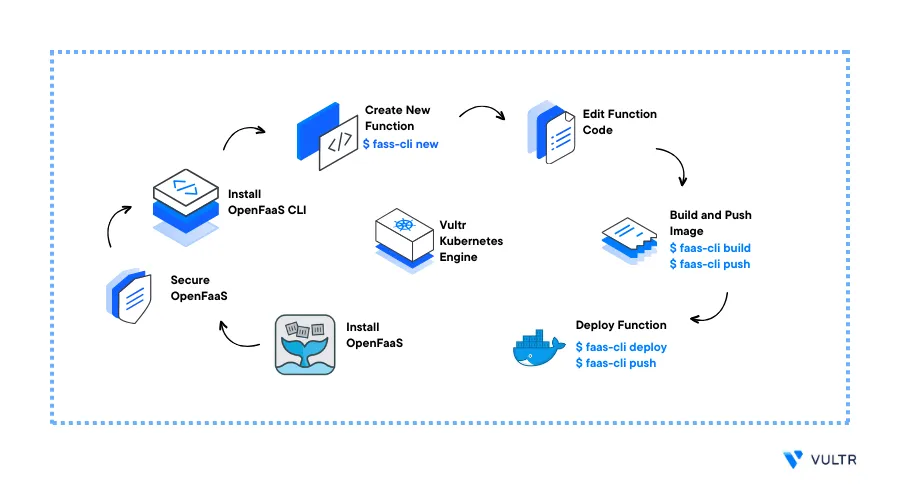
This article explains how you can run self-hosted serverless functions with OpenFaas in a Vultr Kubernetes Engine (VKE) cluster.
Prerequisites
Before you begin:
- Deploy a Vultr Kubernetes Engine (VKE) cluster with at least three nodes
- Deploy a Ubuntu server to use as the management machine
On the management server:
Using SSH, access the server as a non-root user with sudo privileges
Install Kubectl to access the cluster
Install the Helm Package Manager
Set up a Domain A recordpointing to the Ingress Controller Load Balancer IP Address
This article uses
openfaas.example.com. Replace it with your actual domain name.
Install OpenFaaS
To install OpenFaas on your Kubernetes Cluster. Create a new namespace, and use the helm package manager to install OpenFaas in the cluster as described in the steps below.
Create a new
namespaces.ymlfile to define the OpenFaas namespaces$ nano namespaces.ymlAdd the following contents to the file
 apiVersion: v1
 kind: Namespace
 metadata:
   name: openfaas-kube
   annotations:
     linkerd.io/inject: enabled
     config.linkerd.io/skip-inbound-ports: "4222"
     config.linkerd.io/skip-outbound-ports: "4222"
   labels:
     role: openfaas-system
     access: openfaas-system
     istio-injection: enabled
 ---
 apiVersion: v1
 kind: Namespace
 metadata:
   name: openfaas-func
   annotations:
     linkerd.io/inject: enabled
     config.linkerd.io/skip-inbound-ports: "4222"
     config.linkerd.io/skip-outbound-ports: "4222"
   labels:
     istio-injection: enabled
     role: openfaas-func
Save and close the file
Apply the namespaces to your cluster
$ kubectl apply -f namespaces.ymlVerify that the namespaces are active and available
$ kubectl get namespacesOutput:
 openfaas-func     Active   58m
 openfaas-kube     Active   58m
Using
helm, add the OpenFaaS repository to your local repositories$ helm repo add openfaas https://openfaas.github.io/faas-netes/Update your Helm repositories
$ helm repo updateCreate a
values.yamlfile to customize the OpenFaashelmchart parameters$ nano values.yamlAdd the following contents to the file. Replace
openfass.example.comwith your actual domainfunctionNamespace: openfaas-func generateBasicAuth: true ingress: enabled: true annotations: kubernetes.io/ingress.class: "nginx" hosts: - host: openfaas.example.com serviceName: gateway servicePort: 8080 path: /Install OpenFaaS to the
openfaas-kubenamespace$ helm upgrade openfaas --install openfaas/openfaas --namespace openfaas-kube -f values.yamlWhen the deployment is successful, your output should look like the one below:
 NAME: openfaas
 LAST DEPLOYED: Fri Sep  1 11:52:18 2023
 NAMESPACE: openfaas-kube
 STATUS: deployed
 REVISION: 1
 TEST SUITE: None
 NOTES:
 To verify that openfaas has started, run:

   kubectl -n openfaas-kube get deployments -l "release=openfaas, app=openfaas"

 To retrieve the admin password, run:

   echo $(kubectl -n openfaas-kube get secret basic-auth -o jsonpath="{.data.basic-auth-password}" | base64 --decode)
View the OpenFaaS administrator account password
$ echo $(kubectl -n openfaas-kube get secret basic-auth -o jsonpath="{.data.basic-auth-password}" | base64 --decode)Your password should display in a plain format like the one below
vusipdumobCTVerify the OpenFaaS deployment status
$ kubectl -n openfaas-kube get deployments -l "release=openfaas, app=openfaas"Output:
 NAME           READY   UP-TO-DATE   AVAILABLE   AGE
 alertmanager   1/1     1            1           62s
 gateway        1/1     1            1           62s
 nats           1/1     1            1           62s
 prometheus     1/1     1            1           62s
 queue-worker   1/1     1            1           62s
Verify that all OpenFaas deployments are ready and available
Using a web browser of your choice such as Microsoft Edge, visit your OpenFaas domain name to access the web interface
http://openfaas.example.comWhen prompted, enter the following administrator details:
USERNAME:
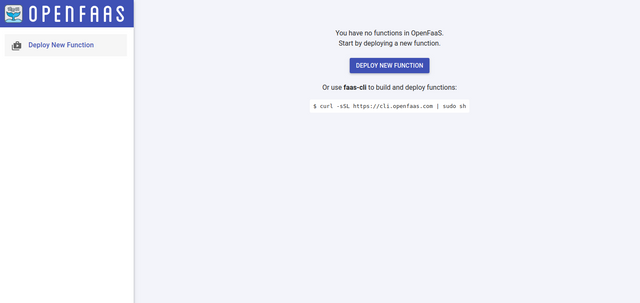
adminPASSWORD:Generated-Password-You-Copied-EarlierWhen logged in, the OpenFaas dashboard should display
Secure OpenFaaS
To secure and serve incoming OpenFaas requests using HTTPS, generate a Let's Encrypt SSL certificate using CertManager as described below.
Create a new Cluster Issuer file
openfaas-issuer.yaml$ nano openfaas_issuer.yamlAdd the following contents to the file
 apiVersion: cert-manager.io/v1
 kind: ClusterIssuer
 metadata:
   name: letsencrypt-prod
 spec:
   acme:
     # Email address used for ACME registration
     email: hello@example.com
     server: https://acme-v02.api.letsencrypt.org/directory
     privateKeySecretRef:
       # Name of a secret used to store the ACME account private key
       name: openfaas-crt
     # Add a single challenge solver, HTTP01 using nginx
     solvers:
     - http01:
         ingress:
           class: nginx
Save and close the file
Apply the issuer resource
$ kubectl apply -f openfaas_issuer.yamlRename and back up the
values.yamlfile$ mv values.yaml orig-values.yamlRecreate the file
$ nano values.yamlAdd the following contents to the file. Replace
openfaas.example.comwith your actual domainfunctionNamespace: openfaas-func generateBasicAuth: true ingress: enabled: true annotations: kubernetes.io/ingress.class: "nginx" cert-manager.io/cluster-issuer: letsencrypt-prod tls: - hosts: - openfaas.example.com secretName: openfaas-crt hosts: - host: openfaas.example.com serviceName: gateway servicePort: 8080 path: /Save and close the file
Using
helm, apply the configuration changes to your cluster$ helm upgrade openfaas --install openfaas/openfaas --namespace openfaas-kube -f values.yamlVerify the SSL certificate status
$ kubectl get certificates -n openfaas-kubeOutput:
 NAME           READY   SECRET         AGE
 openfaas-crt   True    openfaas-crt   22h
Verify that the certificate status is Ready. If False, describe the certificate to view the issuance process.
$ kubectl describe certificate openfaas-crt -n openfaas-kubeOutput:
 Normal  Generated  2m13s  cert-manager-certificates-key-manager      Stored new private key in temporary Secret resource "openfaas-crt-4htkh"
 Normal  Requested  2m13s  cert-manager-certificates-request-manager  Created new CertificateRequest resource "openfaas-crt-2thsw"
 Normal  Issuing    109s   cert-manager-certificates-issuing          The certificate has been successfully issued
In a new web browser window, verify that you can securely access your OpenFaas web interface using HTTPS
https://openfaas.example.com
Install OpenFaaS CLI
faas-cli is a command-line tool that provides a convenient way to interact with the OpenFaaS application in your cluster. It allows you to create, deploy, manage, and invoke serverless functions in your terminal session instead of the web interface. Install the CLI tool to create and manage functions as described below.
Export the
OPENFAAS_URLenvironment variable with your OpenFaas HTTPS URLexport OPENFAAS_URL=https://openfaas.example.comTo permanently save the environment variable. Edit the
.bash_profilefile in your user home directory, and add theexportdirective at the end of the file. Then, run thesource /home/example_user/.bash_profilecommand to load the environment variable.Install the
faas-clitool$ curl -sSL https://cli.openfaas.com | sudo shOutput:
 CLI:
  commit:  869d236be5bf71cc32231a4317ccfcd950de35ef
  version: 0.16.13
Log in to OpenFaaS using the
faas-cli logincommand. ReplacevusipdumobCTwith the actual administrator password you generated earlier$ faas-cli login --username admin --password vusipdumobCTOutput:
 Calling the OpenFaaS server to validate the credentials...
 credentials saved for admin https://openfaas.example.com
Create and Manage serverless Functions
In this section, use the faas-cli tool to create a new Node.js function, and deploy it to your DockerHub repository and Kubernetes cluster as described below.
Verify that Docker is available on your server
$ docker --versionOutput:
Docker version 24.0.5, build 24.0.5-0ubuntu1~22.04.1If the command fails returns an error, add your user account to the Docker group
$ sudo usermod -aG docker example_userActivate the new Docker group membership
$ newgrp dockerLog in to your DockerHub account
$ docker loginWhen prompted, enter your DockerHub credentials to build and push new images
 Login with your Docker ID to push and pull images from Docker Hub. If you don't have a Docker ID, head over to https://hub.docker.com to create one.
 Username: YOUR_DOCKER_HUB_ID
 Password: YOUR_DOCKER_HUB_PASSWORD
Create a new function directory
$ mkdir new-functionSwitch to the function directory
$ cd new-functionPopulate the directory with the Node.js template function
$ faas new function-js --lang nodeThe above command creates a new
function-js.ymlconfiguration file, afunction-jsdirectory with thehandler.jsandpackage.jsonfiles. When successful, your output should look like the one below:Folder: function-js created. Function created in folder: function-js Stack file written: function-js.ymlEdit the
handler.jsfile$ nano function-js/handler.jsChange the
doneplaceholder value to your desired status code such as<h1>Hello Good Morning!</h1>"use strict" module.exports = async (context, callback) => { return {status: "<h1>Hello Good Morning!</h1>"} }The above function returns a
Hello Good Morning!response each time the function runsEdit the
function-js.ymlfile$ nano function-js.ymlChange the
gatewaydirective to match your OpenFaas domain URL and include your DockerHub before thefunction-js:latestdeclaration to set up a new repositoryversion: 1.0 provider: name: openfaas gateway: https://openfaas.example.com functions: function-js: lang: node handler: ./function-js image: example_user/function-js:latestSave and close the file
Using the
faas upcommand, build the Docker image, push it to Docker Hub, and deploy it to your Kubernetes cluster$ faas up -f function-js.ymlWhen successful, your output should look like the one below:
 [0] < Pushing function-js [example_user/function-js:latest] done.
 [0] Worker done.
 Deploying: function-js.

 Deployed. 202 Accepted.
 URL: https://openfaas.onlustech.com/function/function-js
In your web browser, load your new function using the OpenFaas URL
https://openfaas.example.com/function/function-jsWhen successful, your
Hello, Good Morningstatus code should display on the page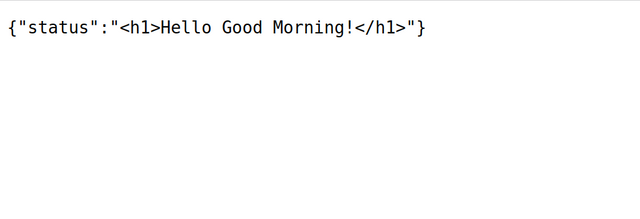
Or, use the
faas invokecommand to verify the deployed function$ faas invoke function-jsOutput:
 Reading from STDIN - hit (Control + D) to stop.
 {"status":"<h1>Hello Good Morning!</h1>"}
Press Ctrl + D to close the output
To list all deployed functions, run the
faas listcommand$ faas listOutput:
 Function                      Invocations    Replicas
 function-js                     3              1
To view information about your function, run the
faas describecommand$ faas describe function-jsOutput:
 Name:               function-js
 Status:             Ready
 Replicas:           1
 Available Replicas: 1
 Invocations:        2
 Image:              example_user/function-js:latest
 Function Process:   node index.js
 URL:                https://openfaas.example.com/function/function-js
 Async URL:          https://openfaas.example.com/async-function/function-js
 Labels:
  faas_function: function-js
 Annotations:
  prometheus.io.scrape: false
To delete a function, use the
faas removecommand$ faas remove function-js
Conclusion
In this article, you installed OpenFaaS on a Vultr Kubernetes Engine (VKE) cluster and created serverless functions using the faas-cli tool. You can use the tool to create and deploy new functions using different programming languages to your Kubernetes cluster for access through the OpenFaas web interface. For more information, visit the OpenFaaS documentation.