
How to Deploy Cal.com – Open-Source Calendly Alternative
Cal.com is an open-source scheduling platform for creating and sharing booking links for meetings, appointments, and events. It serves as a self-hosted alternative to Calendly, giving full control over user data and customization. Cal.com supports individual scheduling, team workflows, and organization-level management.
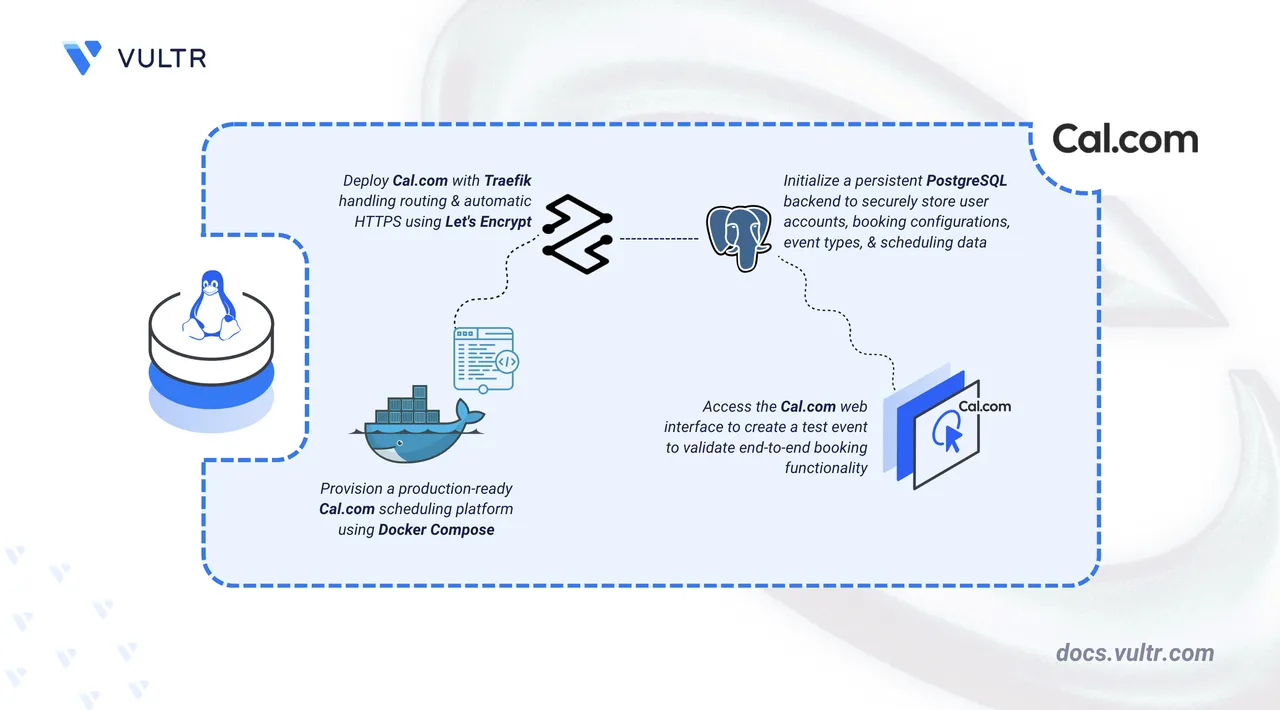
This article explains how to deploy Cal.com using Docker Compose with PostgreSQL for persistent data storage and Traefik as a reverse proxy. It covers Hypertext Transfer Protocol Secure (HTTPS) configuration with automatic certificate provisioning through Let's Encrypt using a custom domain.
Prerequisites
Before you begin, you need to:
- Have access to a Linux-based server as a non-root user with sudo privileges.
- Install Docker and Docker Compose.
- Create a DNS A record pointing to your server's IP address (for example,
cal.example.com).
Set Up the Directory Structure, Configuration, and Environment Variables
Cal.com runs as a web application container connected to a PostgreSQL database for persistent storage. Traefik operates as the reverse proxy, handling Transport Layer Security (TLS) termination and automatic certificate provisioning through Let's Encrypt.
Create a project directory for Cal.com.
console$ mkdir calcom
Navigate into the directory.
console$ cd calcom
Navigate into the directory. It stores the Docker Compose configuration, environment variables, and application data.
Generate a random secret for authentication.
console$ openssl rand -base64 32
Generate a second random secret for data encryption.
console$ openssl rand -base64 32
Use the first output for
NEXTAUTH_SECRETand the second forCALENDSO_ENCRYPTION_KEYwhen creating the.envfile in the next step.Create a
.envfile to store environment variables.console$ nano .env
Add the following configuration:
iniNODE_ENV=production DOMAIN=cal.example.com LETSENCRYPT_EMAIL=admin@example.com NEXT_PUBLIC_WEBAPP_URL=https://cal.example.com NEXTAUTH_URL=https://cal.example.com ALLOWED_HOSTNAMES=["cal.example.com"] NEXTAUTH_URL_INTERNAL=http://calcom:3000 AUTH_TRUST_HOST=true NEXTAUTH_SECRET=REPLACE_WITH_GENERATED_SECRET CALENDSO_ENCRYPTION_KEY=REPLACE_WITH_GENERATED_ENCRYPTION_KEY DATABASE_URL=postgresql://calcom:calcompass@postgres:5432/calcom DATABASE_DIRECT_URL=postgresql://calcom:calcompass@postgres:5432/calcom CALCOM_TELEMETRY_DISABLED=1 CAL_SIGNATURE_TOKEN=self-hosted
Replace:
cal.example.comwith your registered domain name (in bothDOMAINand the URL variables)admin@example.comwith your email address for Let's Encrypt certificate notificationsREPLACE_WITH_GENERATED_SECRETwith the first generated secretREPLACE_WITH_GENERATED_ENCRYPTION_KEYwith the second generated secret
NoteNEXT_PUBLIC_WEBAPP_URLis a build-time variable. It is baked into the Next.js build when the container starts for the first time. If you change it later, recreate the container withdocker compose up -d --force-recreaterather than restarting it, otherwise the change has no effect.Save and close the file.
(Optional) Configure SMTP variables for outgoing email. Cal.com starts and runs without email configured, but booking confirmations, password resets, and team invitations are disabled. Refer to the
.env.examplefile in the Cal.com repository and add the required SMTP variables to the.envfile before starting the containers.
Deploy with Docker Compose
Docker Compose coordinates the application, database, and reverse proxy layers. Traefik discovers the Cal.com container via Docker labels, applies domain-based routing rules, and manages TLS termination using certificates provisioned automatically through Let's Encrypt.
Add your user to the Docker group so that Docker commands run without sudo.
console$ sudo usermod -aG docker $USER
Apply the new group membership to the current shell session.
console$ newgrp docker
Create the Docker Compose file.
console$ nano docker-compose.yaml
Add the following manifest:
yamlservices: traefik: image: traefik:v3.6 container_name: traefik restart: unless-stopped command: - "--providers.docker=true" - "--providers.docker.exposedbydefault=false" - "--entrypoints.web.address=:80" - "--entrypoints.websecure.address=:443" - "--entrypoints.web.http.redirections.entrypoint.to=websecure" - "--entrypoints.web.http.redirections.entrypoint.scheme=https" - "--certificatesresolvers.le.acme.httpchallenge=true" - "--certificatesresolvers.le.acme.httpchallenge.entrypoint=web" - "--certificatesresolvers.le.acme.email=${LETSENCRYPT_EMAIL}" - "--certificatesresolvers.le.acme.storage=/letsencrypt/acme.json" ports: - "80:80" - "443:443" volumes: - /var/run/docker.sock:/var/run/docker.sock:ro - ./letsencrypt:/letsencrypt postgres: image: postgres:15 container_name: postgres restart: unless-stopped environment: POSTGRES_USER: calcom POSTGRES_PASSWORD: calcompass POSTGRES_DB: calcom volumes: - ./postgres-data:/var/lib/postgresql/data calcom: image: calcom/cal.com:v6.2.0 container_name: calcom env_file: - .env depends_on: - postgres expose: - "3000" labels: - "traefik.enable=true" - "traefik.http.routers.calcom.rule=Host(`${DOMAIN}`)" - "traefik.http.routers.calcom.entrypoints=websecure" - "traefik.http.routers.calcom.tls=true" - "traefik.http.routers.calcom.tls.certresolver=le" - "traefik.http.services.calcom.loadbalancer.server.port=3000" volumes: - ./calcom-data:/data/app/.data restart: unless-stopped
Save and close the file.
In the above manifest:
services: Defines three containers managed by Docker Compose.traefik: Functions as the reverse proxy and TLS termination point, handling incoming HTTP and HTTPS traffic and forwarding requests to the Cal.com container.postgres: Provides the PostgreSQL database for storing user accounts, scheduling configurations, and application metadata.calcom: Hosts the Cal.com web application and connects to the PostgreSQL service.
image: Specifies the container image for each service.container_name: Assigns predictable names to containers, simplifying log inspection and service management.command(Traefik): Configures Traefik with Docker provider integration, HTTP and HTTPS entry points, automatic HTTP-to-HTTPS redirection, and Let's Encrypt certificate acquisition.ports(Traefik): Maps host ports 80 and 443 to Traefik to receive incoming web traffic.env_file(Cal.com): Loads environment variables from the.envfile, including authentication secrets, encryption keys, application URLs, and database connection strings.expose(Cal.com): Exposes port 3000 to other containers on the shared Docker network without publishing it to the host, allowing Traefik to reach Cal.com internally.labels(Cal.com): Instructs Traefik to route HTTPS requests matching the configured domain to the Cal.com container on port 3000.volumes:- The
./postgres-databind mount stores PostgreSQL data on the host between container restarts. - The
./calcom-databind mount stores application-level configuration and state for Cal.com on the host. - The Docker socket mount (
/var/run/docker.sock) enables Traefik to detect and configure routes for running containers automatically. - The
./letsencryptbind mount stores TLS certificates across container restarts.
- The
restart: unless-stopped: Configures all containers to restart automatically after crashes or server reboots, unless explicitly stopped.
Start the containers in detached mode.
console$ docker compose up -d
Verify that all containers are running.
console$ docker compose ps
The output displays three running containers with Traefik listening on ports 80 and 443.
View the Cal.com logs to confirm the application started successfully.
console$ docker compose logs calcom
The output shows Next.js startup messages including a line starting with
Ready infollowed by a startup duration, confirming the application is serving traffic on port 3000.For more information on managing Docker Compose stacks, see the How to Use Docker Compose article.
Access Cal.com
Open your web browser and navigate to
https://cal.example.com/auth/setup, replacingcal.example.comwith your configured domain name.Complete the administrator setup wizard. Enter a username, full name, email address, and password, then click Next.
Choose a license. Select AGPLv3 license for the free open-source license, or enter a commercial license key if you have one. Click Skip step to proceed with the AGPLv3 license.
Enable apps. Toggle the integrations you want to make available to users, organized by category such as Calendar, Conferencing, and Payment. Click Finish.
Cal.com redirects you to the user onboarding wizard.
Set up your profile. Confirm your username and full name, and select your timezone. Click Connect your calendar.
Connect a calendar. Select a calendar provider such as Apple Calendar or CalDav and follow the prompts to connect it. Click I'll connect my calendar later to skip.
Connect a video app. Select a video conferencing app such as Campfire or Discord and follow the prompts. Click Set up later to skip.
Set your availability. Adjust your available hours for each day of the week. The default is Monday through Friday, 9:00 a.m. to 5:00 p.m. Click Complete your profile.
Complete your profile. Upload a profile photo and add a short bio. Click Finish setup and get started to access the dashboard.
Create and Schedule a Test Booking
A Cal.com deployment is fully functional when it accepts bookings, persists them to PostgreSQL, and surfaces them in the dashboard. Create a test booking to confirm that the scheduler, database, and UI are operating correctly.
From the sidebar, navigate to Event Types and click + New.
In the Add a new event type modal, enter a title, an optional description, and a duration in minutes. The URL slug is filled in automatically from the title. Click Continue.
Review the event type settings in the editor and click Save.
Copy the booking URL by clicking the link icon in the top-right toolbar of the event type editor.
Open the booking URL in an incognito window or a different browser to simulate a visitor.
Select an available date, choose a time slot, enter a name and email address, and confirm the booking.
Return to the Cal.com dashboard and refresh it. Verify that the booking appears under Bookings.
Conclusion
You have successfully deployed Cal.com on your Linux server using Docker Compose with PostgreSQL for persistent data storage and Traefik providing automatic HTTPS through Let's Encrypt. Traefik handles all inbound traffic on ports 80 and 443 and forwards requests to the Cal.com container over the shared Docker network. For more information, refer to the official Cal.com documentation.