
How to Deploy HAProxy on Ubuntu 22.04
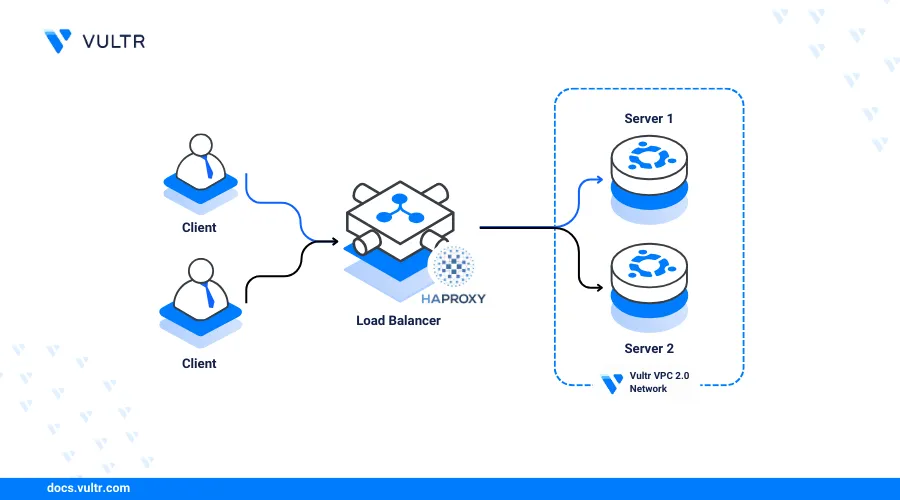
HAProxy (High Availability Proxy) is an open-source proxying application that serves as a reverse or forward proxy for TCP and HTTP-based applications. It examines incoming client connections and forwards each request to a backend server based on configurable routing rules, distributing the traffic load across the destination servers.
This article explains how to deploy HAProxy on an Ubuntu 22.04 server and distribute traffic to multiple servers running similar services in a single Virtual Private Cloud (VPC) network, forming a load-balanced cluster. You configure HAProxy as a load balancer that forwards external requests to backend servers to improve your web application's performance.
Prerequisites
Before you begin, you need to:
- Deploy an Ubuntu 22.04 server instance as a non-root user with sudo privileges to use as the HAProxy server.
- Deploy at least two additional Ubuntu 22.04 server instances as non-root users with sudo privileges to use as backend servers, in the same location as the HAProxy server.
- Attach all servers to the same VPC network.
- Set up a new domain A record that points to your HAProxy server IP address. For example,
haproxy.example.com. See Introduction to Vultr DNS to create the record.
Sample HAProxy Load Balancing Topology
This article uses the following example topology to configure HAProxy as a load balancer that distributes traffic to multiple backend servers running the Apache web server application. HAProxy forwards connection requests to a backend server based on its health status and your chosen load balancing method.
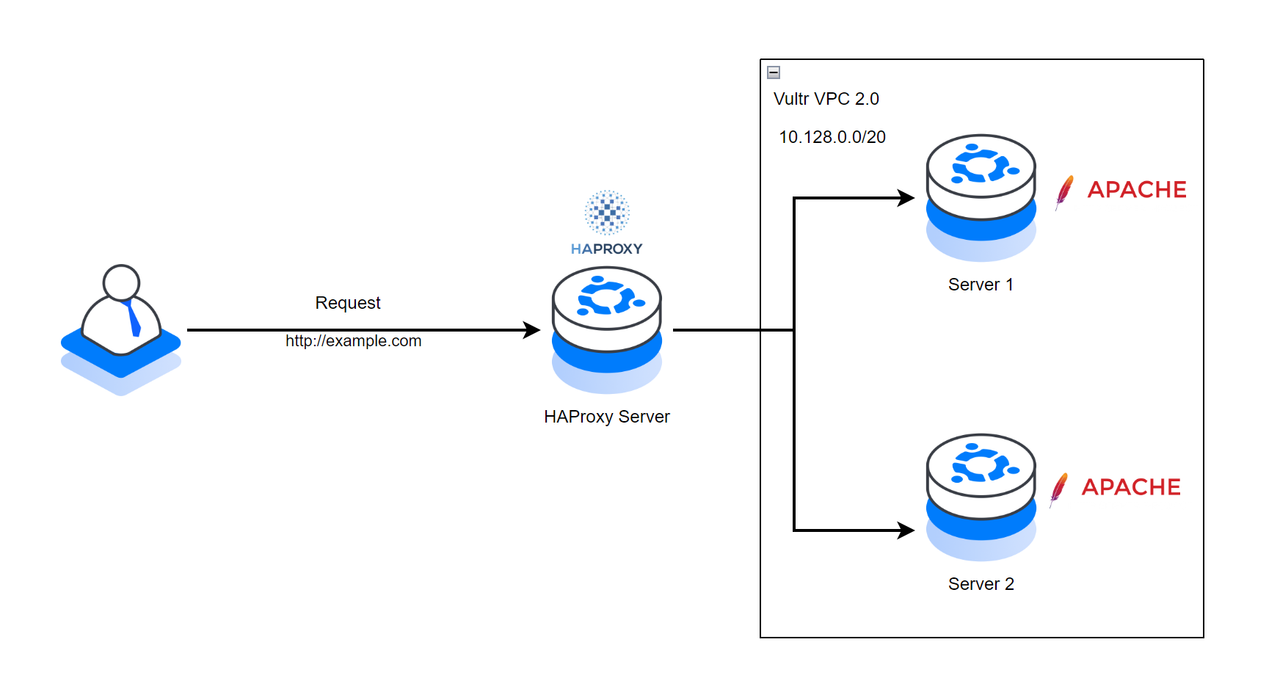
Below are the respective IP address details for each server in the VPC network.
- HA-Proxy Server:
- Public Hostname:
haproxy.example.com - VPC IP:
10.128.0.2
- Public Hostname:
- Server 1:
- VPC IP:
10.128.0.3
- VPC IP:
- Server 2:
- VPC IP:
10.128.0.4
- VPC IP:
Install HAProxy on Ubuntu 22.04
This section installs a recent stable release of HAProxy on the HAProxy server and enables it to start automatically on boot.
Access the HAProxy server using SSH with agent forwarding enabled.
console$ ssh -A USERNAME@SERVER-IP
Replace
USERNAMEwith your non-root sudo user, andSERVER-IPwith the public IP address of your HAProxy server. The-Aflag forwards your local SSH key through this session, which you need later to connect from the HAProxy server to each backend server over its private VPC address.Create a new non-root user with sudo privileges. For example,
haproxyadmin.console$ sudo adduser haproxyadmin && sudo adduser haproxyadmin sudo
Switch to the new sudo user account.
console$ sudo su - haproxyadmin
Add the
vbernatPPA repository to install a newer stable HAProxy release than the version available in the default Ubuntu repositories.console$ sudo add-apt-repository ppa:vbernat/haproxy-2.8 -y
Update the package index.
console$ sudo apt update
Install HAProxy.
console$ sudo apt install haproxy -y
Enable HAProxy to start at boot time.
console$ sudo systemctl enable haproxy
View the HAProxy system service status to verify that the application is installed on your server.
console$ sudo systemctl status haproxy
Output:
...
Active: active (running)
Configure the HAProxy Server
The HAProxy main configuration file /etc/haproxy/haproxy.cfg controls how the application runs and listens for incoming connections on the server. The configuration file includes the following sections by default:
global: Contains settings that define how HAProxy runs on the server. Available options include logging, user/group, system service mode, and SSL configurations.defaults: Includes the default HAProxy parameters that define the application performance on your server. Available options include timeouts and the application mode. The default valuehttpinstructs HAProxy to treat all incoming traffic as HTTP while a value such astcptreats traffic as raw TCP connections on the server.
Follow the steps below to modify the configuration file with new sections that define how HAProxy accepts and distributes traffic as a load balancer to backend servers in the VPC network.
Back up the original HAProxy configuration file.
console$ sudo cp /etc/haproxy/haproxy.cfg /etc/haproxy/haproxy.cfg.backup
Open the HAProxy main configuration file using a text editor like
nano.console$ sudo nano /etc/haproxy/haproxy.cfg
Add the following configurations at the end of the file:
inifrontend website-frontend bind *:80,*:443 option httpchk GET /healthcheck default_backend servers backend servers balance roundrobin server server-1 10.128.0.3:80 weight 1 check server server-2 10.128.0.4:80 weight 1 check
Save and close the file.
The above configuration creates two new sections,
frontendandbackend, with custom labels for identification purposes. The frontend sectionwebsite-frontenddefines how HAProxy listens for incoming requests on the server. Within the section:bind: Instructs HAProxy to listen for incoming connections on the HTTP port80and the HTTPS port443.option httpchk: Sets the URL path and request type to use with HAProxy when running health checks on the backend servers.default_backend: Defines the backend policy and hosts to use with HAProxy. Theserversvalue enables the backend group to load balance.
The backend section with the custom label
serverssets the target hosts to forward traffic and use with HAProxy. Within the section:balance: Sets the HAProxy load balancing algorithm to use with the backend servers. The valueroundrobinselects servers in turns where traffic is evenly distributed to all available servers. Other supported modes includeleastconnandsourcethat define how HAProxy load balances traffic between the defined servers.server: Defines the backend servers to use with HAProxy. For example, the valueserver-1 10.128.0.3:80 weight 1 checkcreates a new backend server connection with the labelserver-1on the VPC address10.128.0.3and the target port80. The server has a weight of1, which defines its share of the traffic load for uneven distribution, while the same weight on other servers such asserver-2creates an even distribution of traffic. Thecheckoption enables health checking to stop forwarding traffic to a server in case it's unable to handle requests.
Add a new
listensection at the end of the file with the following configurations to enable monitoring:inilisten stats bind *:8404 mode http stats enable stats uri /stats stats auth admin:YOUR_PASSWORD stats refresh 10s
Replace
YOUR_PASSWORDwith a strong password of your choice.TheNotestats authdirective stores this password in plaintext in the configuration file. Restrict read access to/etc/haproxy/haproxy.cfgto trusted users.Save and close the file.
The above configuration enables access to the HAProxy web dashboard that provides real-time traffic monitoring and statistics about the active server processes. The stats page offers insights into various metrics such as the number of connections, session rates, request rates, response times, and errors. Within the above
listenconfiguration:stats: Sets the listener label tostatsfor identification purposes.bind: Sets the target host port to listen for incoming connections to the HAProxy statistics page.mode: Specifies the HAProxy connection mode. The valuehttpenables HTTP requests and optimizations on the specified port.stats enable: Enables the HAProxy statistics page.stats uri: Specifies the URL path to access the HAProxy stats page.stats auth: Sets the username and password for accessing the HAProxy statistics page.stats refresh: Sets the HAProxy statistics refresh interval. The value10sspecifies a refresh rate of 10 seconds.
Restart the HAProxy service to apply your configuration changes.
console$ sudo systemctl restart haproxy
Uncomplicated Firewall (UFW) is active on Ubuntu servers by default and blocks connection requests. Allow the HAProxy port
80through the firewall to enable HTTP connections on the server.console$ sudo ufw allow 80/tcp
Allow the HAProxy statistics port
8404to enable access to the statistics page.console$ sudo ufw allow 8404/tcp
Restart the firewall to apply the connection rules.
console$ sudo ufw reload
Test connectivity to your backend server VPC addresses using the ping utility.
Server 1
console$ ping 10.128.0.3
Output:
PING 10.128.0.3 (10.128.0.3) 56(84) bytes of data.
64 bytes from 10.128.0.3: icmp_seq=1 ttl=64 time=0.022 ms
64 bytes from 10.128.0.3: icmp_seq=2 ttl=64 time=0.041 ms

--- 10.128.0.3 ping statistics ---
2 packets transmitted, 2 received, 0% packet loss, time 1021ms
rtt min/avg/max/mdev = 0.022/0.031/0.041/0.009 ms
Server 2
console$ ping 10.128.0.4
Output:
PING 10.128.0.4 (10.128.0.4) 56(84) bytes of data.
64 bytes from 10.128.0.4: icmp_seq=1 ttl=64 time=0.022 ms
64 bytes from 10.128.0.4: icmp_seq=2 ttl=64 time=0.041 ms

--- 10.128.0.4 ping statistics ---
2 packets transmitted, 2 received, 0% packet loss, time 1021ms
rtt min/avg/max/mdev = 0.022/0.031/0.041/0.009 ms
Configure the Backend Servers
HAProxy sends health check requests to the backend servers to verify connectivity and handle connection requests. When a server is unavailable, HAProxy does not forward traffic until it passes the health check process again. Follow the steps below to configure each backend server and allow connections to the target port 80 to process HAProxy requests.
Access each of your backend servers using the HAProxy server and the associated VPC address. For example, access
server-1.console$ ssh USERNAME@10.128.0.3
Replace
USERNAMEwith your non-root sudo user on the backend server. This requires the same SSH key you used to connect to the HAProxy server to also be authorized on the backend server, forwarded through the-Asession from the previous step.Create a new non-root user with sudo privileges. For example,
sysadmin.console$ sudo adduser sysadmin && sudo adduser sysadmin sudo
Switch to the non-root user account.
console$ sudo su - sysadmin
Update the package index.
console$ sudo apt update
Install the Apache web server package.
console$ sudo apt install apache2 -y
Enable Apache to start at boot time.
console$ sudo systemctl enable apache2
Navigate to the Apache web root directory
/var/www/html/.console$ cd /var/www/html/
Back up the default Apache
index.htmlfile asindex.BAK.console$ sudo mv index.html index.BAK
Create a new
index.htmlfile.console$ sudo nano index.html
Add the following HTML content to the file on each server:
- Server-1:
html<!DOCTYPE html> <html> <head> <title>Server 1</title> </head> <body> <h1>Hello</h1> <p>This content is served by Server 1.</p> </body> </html>
- Server-2:
html<!DOCTYPE html> <html> <head> <title>Server 2</title> </head> <body> <h1>Hello</h1> <p>This content is served by Server 2.</p> </body> </html>
Save and close the file.
The above web page configuration displays a
This content is served by Server [number]message in response to a user request. HAProxy distributes traffic to each of the servers using the round-robin algorithm. In a production environment, all servers should run similar web applications to ensure the same content is served to all clients.Grant the Apache web server ownership privileges to the file.
console$ sudo chown -R www-data:www-data /var/www/html/index.html
Restart Apache to save the changes on each server.
console$ sudo systemctl restart apache2
View your server IP information to verify the VPC network interface name.
console$ ip a
Your output should be similar to the one below:
...
2: enp1s0: <BROADCAST,MULTICAST,UP,LOWER_UP> mtu 1500 qdisc mq state UP group default qlen 1000
    link/ether 56:00:04:ef:40:23 brd ff:ff:ff:ff:ff:ff
    inet 192.168.0.21/23 brd 192.168.0.255 scope global dynamic enp1s0
       valid_lft 86266sec preferred_lft 86266sec
    inet6 2a05:f000000:3/64 scope global dynamic mngtmpaddr noprefixroute
       valid_lft 2591872sec preferred_lft 604672sec
    inet6 fe80::5400:4ff:feef:4023/64 scope link
       valid_lft forever preferred_lft forever
3: enp8s0: <BROADCAST,MULTICAST,UP,LOWER_UP> mtu 1450 qdisc mq state UP group default qlen 1000
    link/ether 5a:00:04:ef:40:23 brd ff:ff:ff:ff:ff:ff
    inet 10.128.0.3/20 brd 10.128.15.255 scope global enp8s0
       valid_lft forever preferred_lft forever
    inet6 fe80::5800:4ff:feef:4023/64 scope link
       valid_lft forever preferred_lft forever
Based on the above output, the VPC interface name is
enp8s0.Allow connection requests to the HTTP port
80from your VPC network interface on each server.console$ sudo ufw allow in on enp8s0 to any port 80
Restart UFW to apply your firewall changes.
console$ sudo ufw reload
The HAProxy server listens for external web application requests and distributes traffic evenly to the backend servers. Each server returns its default web page content as a response to the user request.
Access the HAProxy Accelerated Web Application
HAProxy distributes traffic in rounds to the backend servers within the VPC network. Depending on the backend server health, a single server cannot process multiple requests at a time based on the round-robin algorithm that distributes the traffic evenly to all servers. Follow the steps below to access the HAProxy server and verify that your backend servers respond to all user requests.
Enter your HAProxy server's domain URL in a web browser such as Chrome.
http://haproxy.example.comVerify that your web application displays in your browser window. The first request may be forwarded to
Server 1and the next request to another server in the backend pool depending on the number of backend servers.
Refresh your web browser window and verify that
Server 2responds to the request.
Refresh the web page again and verify that
Server 1responds to your HTTP request again due to theround-robinalgorithm.Access the HAProxy statistics interface on the monitoring port
8404to view your HAProxy connection requests and performance.http://haproxy.example.com:8404Enter the administrative user login details you created with the
stats authdirective in yourlisten statsconfiguration.Verify that the HAProxy statistics interface displays in your web browser with information about your frontend and backend performance.
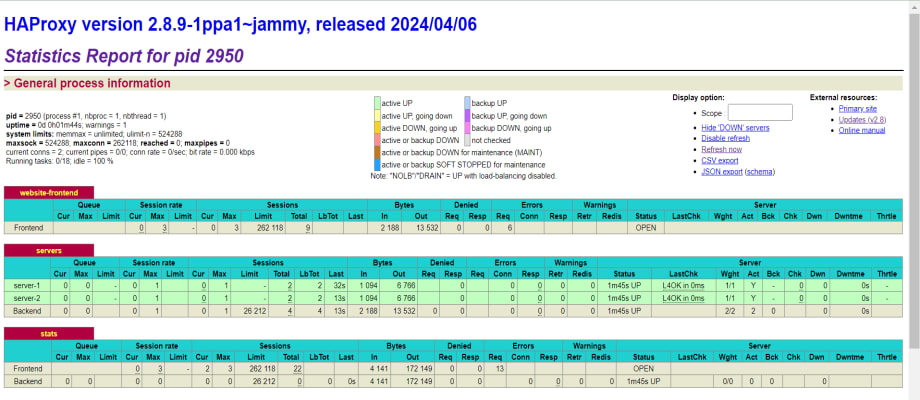
Within the HAProxy statistics interface, you can monitor real-time traffic, track connection rates, and identify potential bottlenecks to troubleshoot your web application performance.
Conclusion
You have deployed and configured HAProxy on your Ubuntu 22.04 servers to distribute traffic across multiple backend servers in a VPC network. HAProxy improves your application reliability and resilience by managing connection requests to your backend servers. Depending on your web application needs, you can scale your backend servers and experiment with multiple load balancing algorithms to improve your application's overall performance.
For more information, visit the official HAProxy documentation.