
How to Deploy MLflow – Open-Source Machine Learning Experiment Tracking
MLflow is an open-source platform for tracking machine learning experiments, managing models, and storing artifacts across the machine learning lifecycle. It enables teams to centralize experiment metadata, compare results, and reproduce experiments reliably. MLflow integrates with S3-compatible object storage, allowing trained models, datasets, and experiment outputs to be stored in a durable and scalable location.
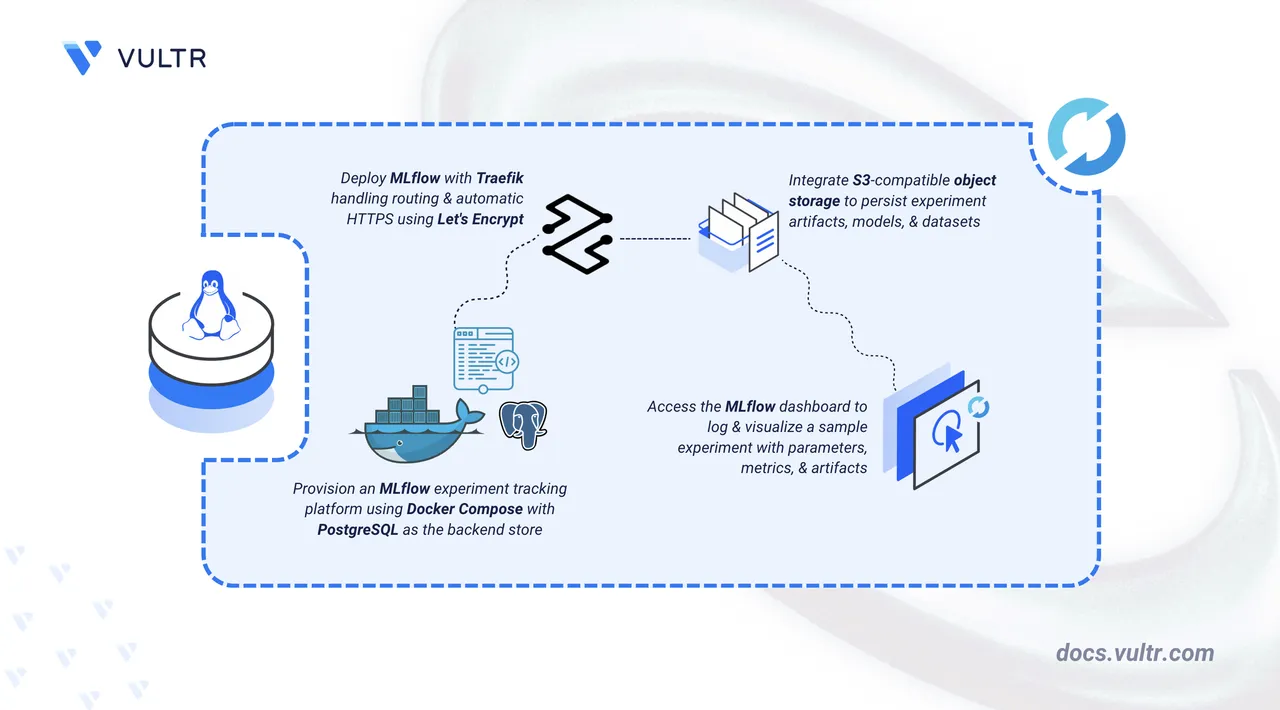
This article explains how to deploy MLflow on a Linux server using Docker Compose, configure Traefik for automatic HTTPS with Let's Encrypt, enable basic authentication for secure access, integrate S3-compatible object storage for artifact storage, and demonstrate logging a sample machine learning experiment.
Prerequisites
Before you begin, you need to:
- Have access to a Linux-based server (with at least 2 CPU cores and 4 GB of RAM) as a non-root user with sudo privileges.
- Install Docker and Docker Compose.
- Create an Object Storage subscription and a bucket for storing MLflow artifacts.
- Create a DNS A record pointing to your server's IP address (for example,
mlflow.example.com).
Set Up the Directory Structure, Configuration, and Environment Variables
MLflow requires configuration for database storage, artifact storage, domain routing, and HTTPS certificates. These settings are defined using environment variables and consumed by Docker Compose during deployment. Storing them in a .env file keeps sensitive credentials separate from the compose manifest and simplifies configuration management.
Create the project directory.
console$ mkdir -p ~/mlflow
Navigate to the project directory.
console$ cd ~/mlflow
Create the environment file.
console$ nano .env
Add the following environment variables:
ini# Domain and HTTPS configuration DOMAIN=mlflow.example.com LETSENCRYPT_EMAIL=admin@example.com # PostgreSQL credentials POSTGRES_USER=mlflow POSTGRES_PASSWORD=StrongDatabasePassword123 # MLflow authentication MLFLOW_AUTH_CONFIG_PATH=/app/basic_auth.ini MLFLOW_FLASK_SERVER_SECRET_KEY=GENERATED_SECRET_KEY # Object Storage (S3-compatible) credentials S3_BUCKET=mlflow-artifacts S3_ACCESS_KEY=YOUR_ACCESS_KEY S3_SECRET_KEY=YOUR_SECRET_KEY S3_REGION=YOUR_REGION S3_ENDPOINT=https://YOUR_OBJECT_STORAGE_ENDPOINT
Replace:
mlflow.example.comwith your domain name that points to your server IP address.admin@example.comwith your email address for Let's Encrypt notifications.StrongDatabasePassword123with a secure password for PostgreSQL.GENERATED_SECRET_KEYwith a random string generated usingopenssl rand -hex 32.mlflow-artifactswith your Object Storage bucket name.YOUR_ACCESS_KEYwith your S3 access key.YOUR_SECRET_KEYwith your S3 secret key.YOUR_REGIONwith the storage region (for example,ewr1).YOUR_OBJECT_STORAGE_ENDPOINTwith the S3-compatible endpoint provided by your cloud provider (for example,ewr1.providername.com).
Save and close the file.
Deploy with Docker Compose
This deployment uses Docker Compose to run PostgreSQL as the backend for MLflow metadata and the MLflow server for experiment tracking. Traefik acts as a reverse proxy for HTTPS and domain routing. MLflow's built-in basic authentication secures access to the web interface and API.
Create the authentication configuration file.
console$ nano basic_auth.ini
Add the following configuration:
ini[mlflow] default_permission = READ database_uri = sqlite:///basic_auth.db admin_username = admin admin_password = ADMIN_PASSWORD authorization_function = mlflow.server.auth:authenticate_request_basic_auth
Replace
ADMIN_PASSWORDwith a strong password for the admin account (must be longer than 12 characters), then save and close the file.Create the MLflow Dockerfile. The base MLflow image requires additional dependencies for PostgreSQL, S3 storage, and authentication.
console$ nano Dockerfile
Add the following configuration:
dockerfileFROM ghcr.io/mlflow/mlflow:v3.10.1 RUN pip install --no-cache-dir psycopg2-binary boto3 'mlflow[auth]'
Save and close the file.
Create the Docker Compose configuration file.
console$ nano docker-compose.yml
Add the following configuration:
yamlservices: traefik: image: traefik:v3.6 container_name: traefik command: - "--providers.docker=true" - "--providers.docker.exposedbydefault=false" - "--entrypoints.web.address=:80" - "--entrypoints.websecure.address=:443" - "--entrypoints.web.http.redirections.entrypoint.to=websecure" - "--entrypoints.web.http.redirections.entrypoint.scheme=https" - "--certificatesresolvers.letsencrypt.acme.httpchallenge=true" - "--certificatesresolvers.letsencrypt.acme.httpchallenge.entrypoint=web" - "--certificatesresolvers.letsencrypt.acme.email=${LETSENCRYPT_EMAIL}" - "--certificatesresolvers.letsencrypt.acme.storage=/letsencrypt/acme.json" ports: - "80:80" - "443:443" volumes: - "/var/run/docker.sock:/var/run/docker.sock:ro" - "./letsencrypt:/letsencrypt" restart: unless-stopped postgres: image: postgres:15 container_name: mlflow-postgres environment: POSTGRES_USER: ${POSTGRES_USER} POSTGRES_PASSWORD: ${POSTGRES_PASSWORD} POSTGRES_DB: mlflow volumes: - ./postgres_data:/var/lib/postgresql/data healthcheck: test: ["CMD-SHELL", "pg_isready -U ${POSTGRES_USER}"] interval: 10s retries: 5 restart: unless-stopped mlflow: build: . container_name: mlflow expose: - "5000" environment: AWS_ACCESS_KEY_ID: ${S3_ACCESS_KEY} AWS_SECRET_ACCESS_KEY: ${S3_SECRET_KEY} AWS_DEFAULT_REGION: ${S3_REGION} AWS_S3_FORCE_PATH_STYLE: "true" MLFLOW_S3_ENDPOINT_URL: ${S3_ENDPOINT} MLFLOW_AUTH_CONFIG_PATH: ${MLFLOW_AUTH_CONFIG_PATH} MLFLOW_FLASK_SERVER_SECRET_KEY: ${MLFLOW_FLASK_SERVER_SECRET_KEY} volumes: - ./basic_auth.ini:/app/basic_auth.ini:ro - ./mlflow_auth:/app command: > mlflow server --backend-store-uri "postgresql://${POSTGRES_USER}:${POSTGRES_PASSWORD}@postgres:5432/mlflow" --default-artifact-root "s3://${S3_BUCKET}/" --serve-artifacts --host 0.0.0.0 --port 5000 --allowed-hosts "${DOMAIN},https://${DOMAIN}" --app-name basic-auth depends_on: postgres: condition: service_healthy labels: - "traefik.enable=true" - "traefik.http.routers.mlflow.rule=Host(`${DOMAIN}`)" - "traefik.http.routers.mlflow.entrypoints=websecure" - "traefik.http.routers.mlflow.tls.certresolver=letsencrypt" restart: unless-stopped
Save and close the file.
In the above manifest:
- services: Launches three containers managed by Docker Compose:
- traefik: Serves as the reverse proxy and TLS termination point.
- postgres: Stores MLflow metadata in a persistent database.
- mlflow: Runs the MLflow server with authentication, PostgreSQL backend, and S3-compatible object storage.
- build (mlflow): Builds the MLflow image from the local Dockerfile with PostgreSQL, S3, and authentication dependencies.
- environment (mlflow): Configures S3-compatible object storage credentials and authentication settings.
MLFLOW_AUTH_CONFIG_PATHpoints to the authentication configuration file, andMLFLOW_FLASK_SERVER_SECRET_KEYsecures session cookies. - command (mlflow): Starts the MLflow server with
--app-name basic-authto enable username/password authentication. The--serve-artifactsflag enables artifact proxying, and--allowed-hostsrestricts access to the configured domain. - volumes (mlflow): Mounts the authentication configuration file and persists the authentication database.
- expose: Makes port
5000available internally for Traefik routing without exposing it to the host network. - labels: Registers the MLflow container with Traefik for HTTPS routing on the configured domain.
- depends_on: Ensures MLflow starts only after PostgreSQL becomes healthy.
- volumes: The
./letsencryptbind mount stores TLS certificates,./postgres_datapersists PostgreSQL data, and./mlflow_authpersists the authentication database across container restarts. - restart: unless-stopped: Enables automatic recovery after failures or server reboots.
- services: Launches three containers managed by Docker Compose:
Build and start the containers in detached mode.
console$ docker compose up -d --build
Verify all services are running.
console$ docker compose ps
The output displays three running containers: Traefik, PostgreSQL, and MLflow with Traefik listening on ports 80 and 443.
View the logs for any errors.
console$ docker compose logs
For more information on managing Docker Compose stacks, see the How to Use Docker Compose article.
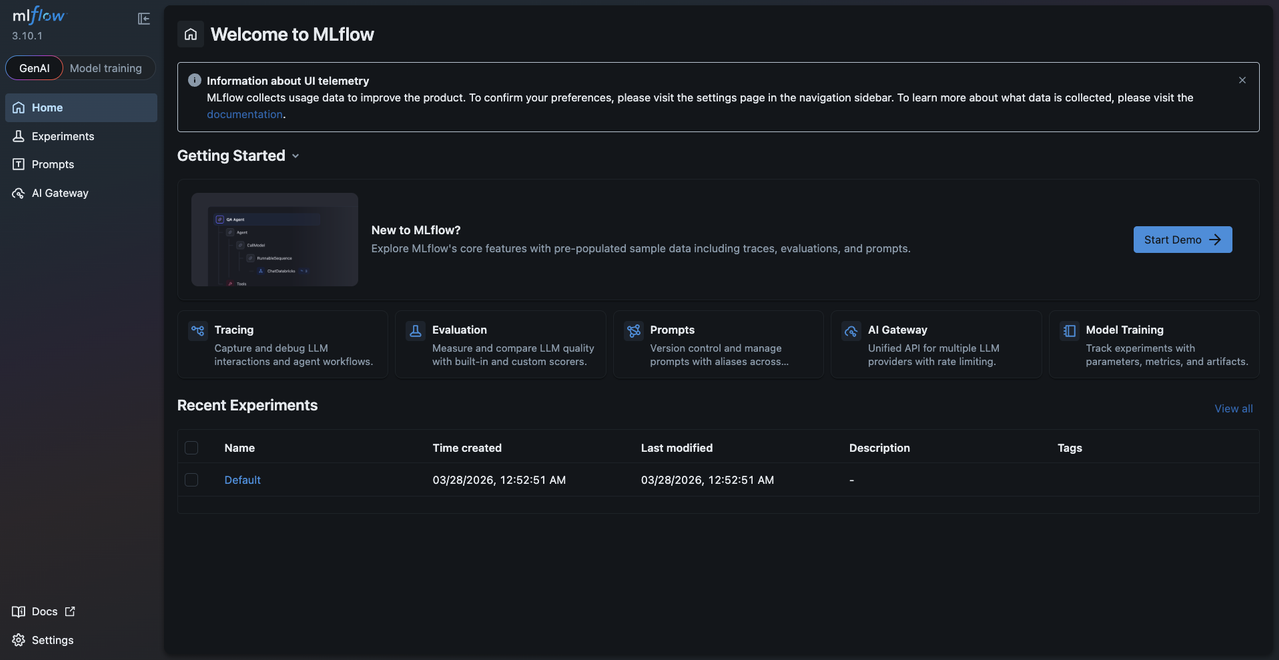
Access MLflow
After deploying MLflow with Docker Compose, access the web interface to verify the deployment and authentication are working correctly.
Open your web browser and navigate to
https://mlflow.example.com. Replacemlflow.example.comwith your configured domain.Enter the admin username and password configured in
basic_auth.iniwhen prompted.Verify that the MLflow dashboard loads. The interface displays a Welcome page with Getting Started options, navigation sidebar with Home, Experiments, Prompts, and AI Gateway, and a Recent Experiments section showing the Default experiment.
Log a Sample Experiment
MLflow tracks experiments by logging parameters, metrics, and artifacts to the server. The following example trains an ElasticNet regression model on the Diabetes dataset and records the results.
Install the Python virtual environment package.
console$ sudo apt install python3-venv -y
Create and activate a virtual environment.
console$ python3 -m venv mlflow-env $ source mlflow-env/bin/activate
Install the required Python packages.
console$ pip install mlflow scikit-learn pandas numpy boto3
This command installs the Python packages required for running ML experiments:
- mlflow: Tracks experiments, logs metrics, parameters, and artifacts.
- scikit-learn: Provides tools for building and evaluating machine learning models.
- pandas: Handles data manipulation using DataFrame structures.
- numpy: Supports numerical computations and array operations.
- boto3: Enables MLflow to store artifacts in S3-compatible storage.
Create a Python script for the experiment.
console$ nano mlflow_demo.py
Add the following code, adapted from the official MLflow example. Replace
mlflow.example.comin the code with your actual domain.pythonimport mlflow import mlflow.sklearn from sklearn.model_selection import train_test_split from sklearn.linear_model import ElasticNet from sklearn.metrics import mean_squared_error, r2_score from sklearn.datasets import load_diabetes import pandas as pd import numpy as np # Load dataset diabetes = load_diabetes() X = pd.DataFrame(diabetes.data, columns=diabetes.feature_names) y = pd.Series(diabetes.target) X_train, X_test, y_train, y_test = train_test_split(X, y, test_size=0.2, random_state=42) # Set tracking URI (MLflow server) mlflow.set_tracking_uri("https://mlflow.example.com") mlflow.set_experiment("official_demo_experiment") with mlflow.start_run(): # Model parameters alpha = 0.5 l1_ratio = 0.5 mlflow.log_param("alpha", alpha) mlflow.log_param("l1_ratio", l1_ratio) # Train model model = ElasticNet(alpha=alpha, l1_ratio=l1_ratio, random_state=42) model.fit(X_train, y_train) # Predict and evaluate y_pred = model.predict(X_test) rmse = np.sqrt(mean_squared_error(y_test, y_pred)) r2 = r2_score(y_test, y_pred) mlflow.log_metric("rmse", rmse) mlflow.log_metric("r2", r2) # Save model artifact mlflow.sklearn.log_model(model, "model")
Save and close the file.
Set environment variables for MLflow authentication and S3 storage.
console$ export MLFLOW_TRACKING_USERNAME=admin $ export MLFLOW_TRACKING_PASSWORD=ADMIN_PASSWORD $ export AWS_ACCESS_KEY_ID=YOUR_ACCESS_KEY $ export AWS_SECRET_ACCESS_KEY=YOUR_SECRET_KEY $ export MLFLOW_S3_ENDPOINT_URL=https://YOUR_OBJECT_STORAGE_ENDPOINT
Replace:
ADMIN_PASSWORDwith the password configured inbasic_auth.ini.YOUR_ACCESS_KEYwith your S3 access key.YOUR_SECRET_KEYwith your S3 secret key.YOUR_OBJECT_STORAGE_ENDPOINTwith your S3-compatible endpoint.
Run the experiment.
console$ python3 mlflow_demo.py
Open the MLflow UI in your browser at
https://mlflow.example.com. Theofficial_demo_experimentappears in the Experiments list.Click the experiment to view the run details. The run displays:
- Parameters:
alphaandl1_ratiovalues used for training. - Metrics:
rmseandr2evaluation scores. - Artifacts: The saved ElasticNet model files.
- Parameters:
Verify that artifacts are stored in your Object Storage bucket by checking the bucket contents in your cloud provider's dashboard.
Conclusion
You have deployed MLflow with Docker Compose using Traefik for automatic HTTPS and basic authentication for secure access. The setup provides a fully functional experiment tracking platform with a PostgreSQL backend, Object Storage artifact management, and a protected web interface accessible via your domain. You can log experiments, track parameters and metrics, and store artifacts in a centralized location. For advanced usage, user management, or further customization, visit the official MLflow documentation.