
How to Deploy NocoDB – Open-Source Airtable Alternative
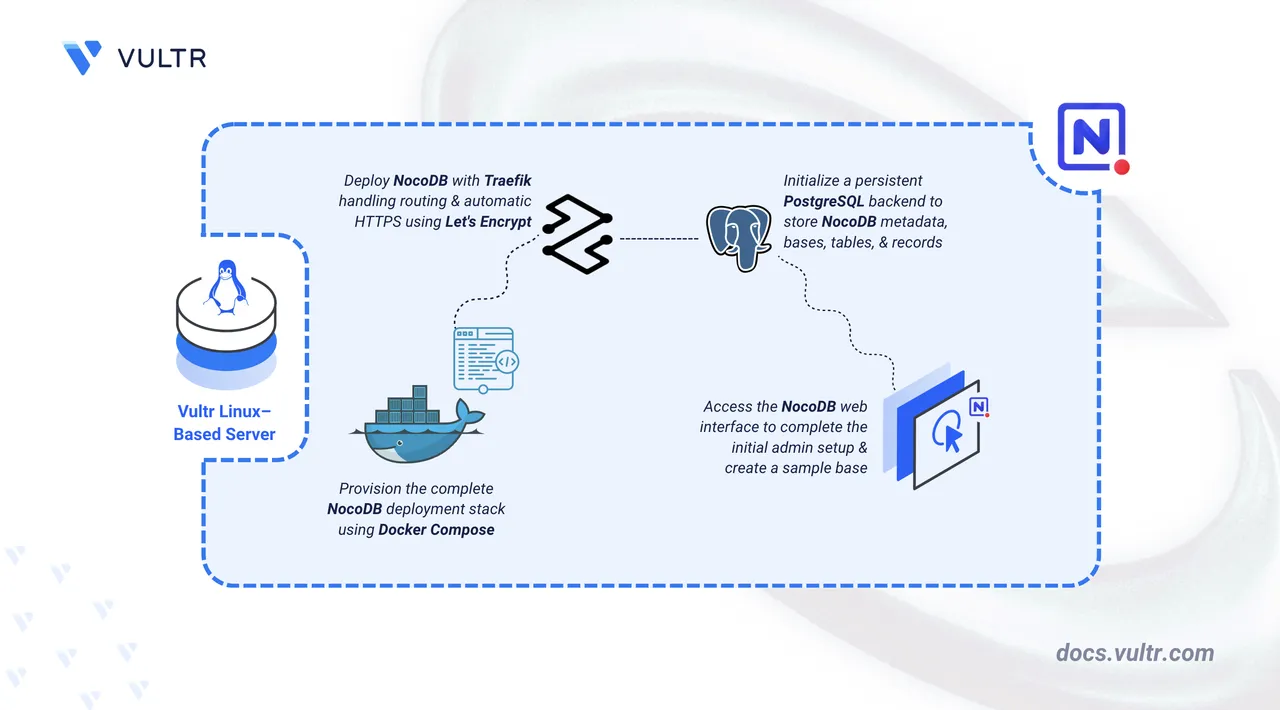
NocoDB is an open-source no-code platform that adds a spreadsheet-style interface on top of a relational database. It lets teams create bases, views, and relationships through a web UI while keeping the data stored in a database you control. It provides a lightweight platform for building internal tools and collaborative data workflows without migrating data to a hosted Software-as-a-Service (SaaS) platform.
This article explains how to deploy NocoDB on a Linux server using Docker Compose, configure persistent storage with PostgreSQL, secure the application with HTTPS using Traefik, and verify functionality by creating a sample base.
Prerequisites
Before you begin, you need to:
- Have access to a Linux-based server (with at least 2 CPU cores and 4 GB of RAM) as a non-root user with sudo privileges.
- Install Docker and Docker Compose.
- Configure a domain A record pointing to your server's IP address (for example,
nocodb.example.com).
Set Up the Directory Structure, Configuration, and Environment Variables
NocoDB requires persistent directories for application data, database files, and TLS certificates. Environment variables configure domain routing and database credentials.
Create the project directory.
console$ mkdir -p ~/nocodb/{data,pgdata,letsencrypt}
This command creates the following directories:
data: Stores NocoDB configuration, metadata, and internal files.pgdata: Persists PostgreSQL database files.letsencrypt: Stores Traefik ACME certificates for HTTPS renewal.
Navigate to the project directory.
console$ cd ~/nocodb
Create a
.envfile to store environment variables.console$ nano .env
Add the following environment variables:
iniDOMAIN=nocodb.example.com LETSENCRYPT_EMAIL=admin@example.com POSTGRES_DB=postgres POSTGRES_PASSWORD=strong_password POSTGRES_USER=postgres
Replace:
nocodb.example.comwith your domain name.admin@example.comwith your email address.strong_passwordwith a strong database password.
Save and close the file.
Deploy with Docker Compose
The Docker Compose stack runs NocoDB with PostgreSQL as the backend database. This configuration is based on the official NocoDB Docker Compose example, adapted to use environment variables and persistent storage.
Create a new Docker Compose file.
console$ nano docker-compose.yaml
Add the following manifest:
yamlservices: traefik: image: traefik:v3.6 container_name: traefik command: - "--providers.docker=true" - "--providers.docker.exposedbydefault=false" - "--entrypoints.web.address=:80" - "--entrypoints.websecure.address=:443" - "--entrypoints.web.http.redirections.entrypoint.to=websecure" - "--entrypoints.web.http.redirections.entrypoint.scheme=https" - "--certificatesresolvers.letsencrypt.acme.httpchallenge=true" - "--certificatesresolvers.letsencrypt.acme.httpchallenge.entrypoint=web" - "--certificatesresolvers.letsencrypt.acme.email=${LETSENCRYPT_EMAIL}" - "--certificatesresolvers.letsencrypt.acme.storage=/letsencrypt/acme.json" ports: - "80:80" - "443:443" volumes: - "./letsencrypt:/letsencrypt" - "/var/run/docker.sock:/var/run/docker.sock:ro" restart: unless-stopped db: image: postgres:16 container_name: nocodb-db hostname: root_db environment: POSTGRES_DB: ${POSTGRES_DB} POSTGRES_USER: ${POSTGRES_USER} POSTGRES_PASSWORD: ${POSTGRES_PASSWORD} volumes: - "./pgdata:/var/lib/postgresql/data" healthcheck: test: ["CMD", "pg_isready", "-U", "${POSTGRES_USER}", "-d", "${POSTGRES_DB}"] interval: 10s timeout: 5s retries: 5 restart: unless-stopped nocodb: image: nocodb/nocodb:0.301.2 container_name: nocodb depends_on: db: condition: service_healthy environment: NC_DB: "pg://db:5432?u=${POSTGRES_USER}&p=${POSTGRES_PASSWORD}&d=${POSTGRES_DB}" volumes: - "./data:/usr/app/data" expose: - "8080" labels: - "traefik.enable=true" - "traefik.http.routers.nocodb.rule=Host(`${DOMAIN}`)" - "traefik.http.routers.nocodb.entrypoints=websecure" - "traefik.http.routers.nocodb.tls.certresolver=letsencrypt" - "traefik.http.services.nocodb.loadbalancer.server.port=8080" restart: unless-stopped
Save and close the file.
In the above manifest:
- services: Defines three containers that Docker Compose manages:
- traefik: Acts as the reverse proxy, router, and TLS termination layer.
- db: Hosts the PostgreSQL database backend for NocoDB.
- nocodb: Runs the NocoDB application server.
- image: Specifies the container image for each service.
- container_name: Assigns a fixed name to each container, making it easier to reference when checking logs or managing containers.
- command (Traefik): Configures Traefik's core behavior, including Docker discovery, entry points for HTTP/HTTPS traffic, automatic HTTP-to-HTTPS redirection, and Let's Encrypt certificate generation.
- ports (Traefik): Exposes ports
80(HTTP) and443(HTTPS) on the host so Traefik can route external traffic to your services. - environment (db): Passes PostgreSQL database name, username, and password from the
.envfile. - environment (nocodb): Configures the
NC_DBconnection string to connect NocoDB to the PostgreSQL database. - healthcheck (db): Verifies PostgreSQL is ready to accept connections before NocoDB starts.
- depends_on (nocodb): Ensures the database container is healthy before starting NocoDB.
- expose (nocodb): Makes the internal container port (
8080) visible to Traefik without publishing the port directly to the host. - volumes:
- Host bind mounts (
./data,./pgdata,./letsencrypt) persist application data, database files, and TLS certificates. - The Docker socket (
/var/run/docker.sock) allows Traefik to automatically detect running services.
- Host bind mounts (
- labels (nocodb): Registers the NocoDB container with Traefik and configures how Traefik routes HTTPS traffic based on the domain name.
- restart: unless-stopped: Ensures all services restart automatically unless you stop them manually.
- services: Defines three containers that Docker Compose manages:
Create and start the services.
console$ docker compose up -d
Verify that the services are running.
console$ docker compose ps
Output:
NAME        IMAGE                  COMMAND                  SERVICE   CREATED          STATUS                    PORTS
nocodb      nocodb/nocodb:0.301.2  "/usr/bin/dumb-init …"   nocodb    16 seconds ago   Up 4 seconds              8080/tcp
nocodb-db   postgres:16            "docker-entrypoint.s…"   db        16 seconds ago   Up 15 seconds (healthy)   5432/tcp
traefik     traefik:v3.6           "/entrypoint.sh --pr…"   traefik   16 seconds ago   Up 15 seconds             0.0.0.0:80->80/tcp, [::]:80->80/tcp, 0.0.0.0:443->443/tcp, [::]:443->443/tcp
View the logs for the services.
console$ docker compose logs
For more information on managing Docker Compose stack, see the How To Use Docker Compose article.
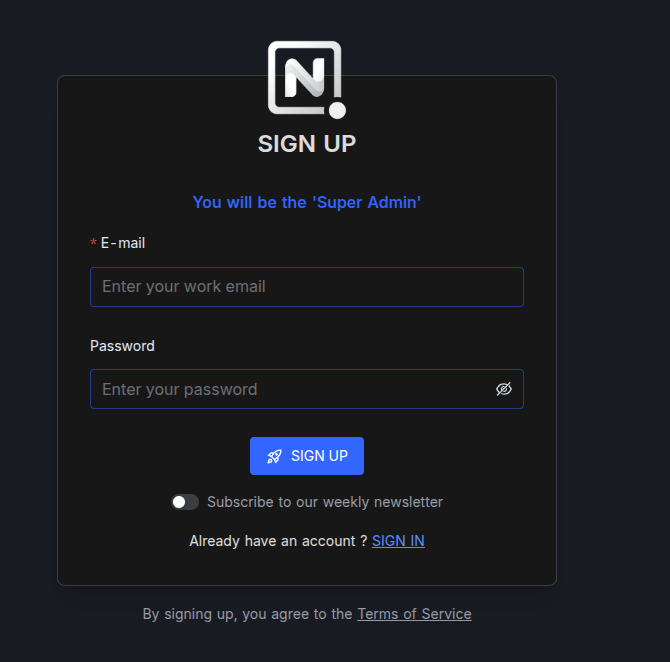
Access and Configure NocoDB
The NocoDB web interface requires an initial administrator account setup. The first registered user becomes the Super Admin with full access to all workspaces and settings.
Open
https://nocodb.example.comin a web browser. Replacenocodb.example.comwith your configured domain.On the Sign Up screen, enter your email and a strong password to create the Super Admin account.
After creating the account, NocoDB launches the onboarding wizard. Select your role, configure workspace preferences, and complete the personalization steps based on your requirements.
Click Next to proceed through each screen until the dashboard loads.
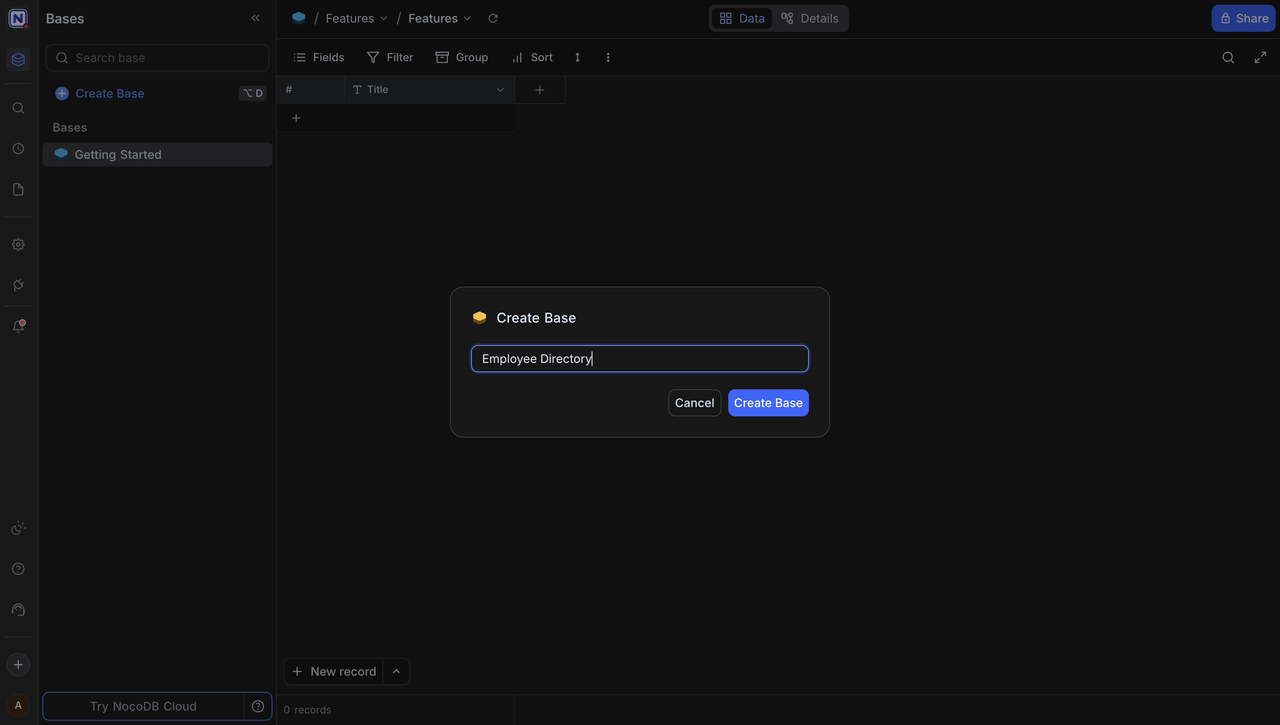
Create a Base and Test the API
NocoDB organizes data into bases (similar to databases) containing tables with customizable fields. Each table automatically generates REST API endpoints for CRUD operations.
From the dashboard, click + Create Base and enter
Employee Directoryas the name.Click Create Base.
Inside the new base, click Create New Table (or + Create Table in the sidebar).
Enter
Employeesas the table name and click Create Table.Add fields to the table by clicking the + button in the header row:
- Field name:
Name, Type: Single line text - Field name:
Email, Type: Email - Field name:
Department, Type: Single line text
- Field name:
Add a sample record by clicking + New record or the empty row. Fill in:
Name:Jane SmithEmail:jane@example.comDepartment:Engineering
Generate an API token. Click your profile icon in the bottom-left corner, select API Tokens. Click Create new token, enter a name (for example,
test-token), and copy the generated token.Find the table ID. In the sidebar under Tables, right-click the
Employeestable (not the view underneath it) and copy the table ID.
Test the API endpoint using
curl. Replacenocodb.example.comwith your domain,YOUR_API_TOKENwith the token you generated, andTABLE_IDwith your table ID.console$ curl -s -H "xc-token: YOUR_API_TOKEN" "https://nocodb.example.com/api/v2/tables/TABLE_ID/records" | jq
Output:
{
  "list": [
    {
      "Id": 1,
      "CreatedAt": "2026-02-02 22:52:09+00:00",
      "UpdatedAt": "2026-02-02 22:52:52+00:00",
      "Title": "Name",
      "Text": "Jane Smith"
    },
    {
      "Id": 2,
      "CreatedAt": "2026-02-02 22:52:27+00:00",
      "UpdatedAt": "2026-02-02 22:52:57+00:00",
      "Title": "Email",
      "Text": "jane@example.com"
    },
    {
      "Id": 3,
      "CreatedAt": "2026-02-02 22:52:29+00:00",
      "UpdatedAt": "2026-02-02 22:53:00+00:00",
      "Title": "Department",
      "Text": "Engineering"
    }
  ],
  "pageInfo": {
    "totalRows": 3,
    "page": 1,
    "pageSize": 25,
    "isFirstPage": true,
    "isLastPage": true
  }
}
The API returns the employee record in JSON format, confirming the deployment works correctly.
Conclusion
You have successfully deployed NocoDB on your server using Docker Compose, Traefik for HTTPS, and PostgreSQL for persistent storage. The instance is accessible through your configured domain and supports role-based permissions, API access, and multiple view types, including grid, form, Kanban, and gallery. The persistent volumes (./data and ./pgdata) retain application data and database files across container restarts and updates. For additional configuration details and advanced features, refer to the official NocoDB documentation.