
How to Establish a Private Connection Between Vultr and AWS Using Direct Connect via Megaport
Vultr Direct Connect allows you to establish a dedicated, private network connection between your Vultr infrastructure and your on-premises environment or other cloud providers. This connection bypasses the public internet to deliver a more reliable, secure, and low-latency network experience. It provides predictable performance, committed network throughput, enhanced security, and reduced data transfer costs, making it ideal for hybrid cloud architectures, high-volume workloads, and latency-sensitive applications.
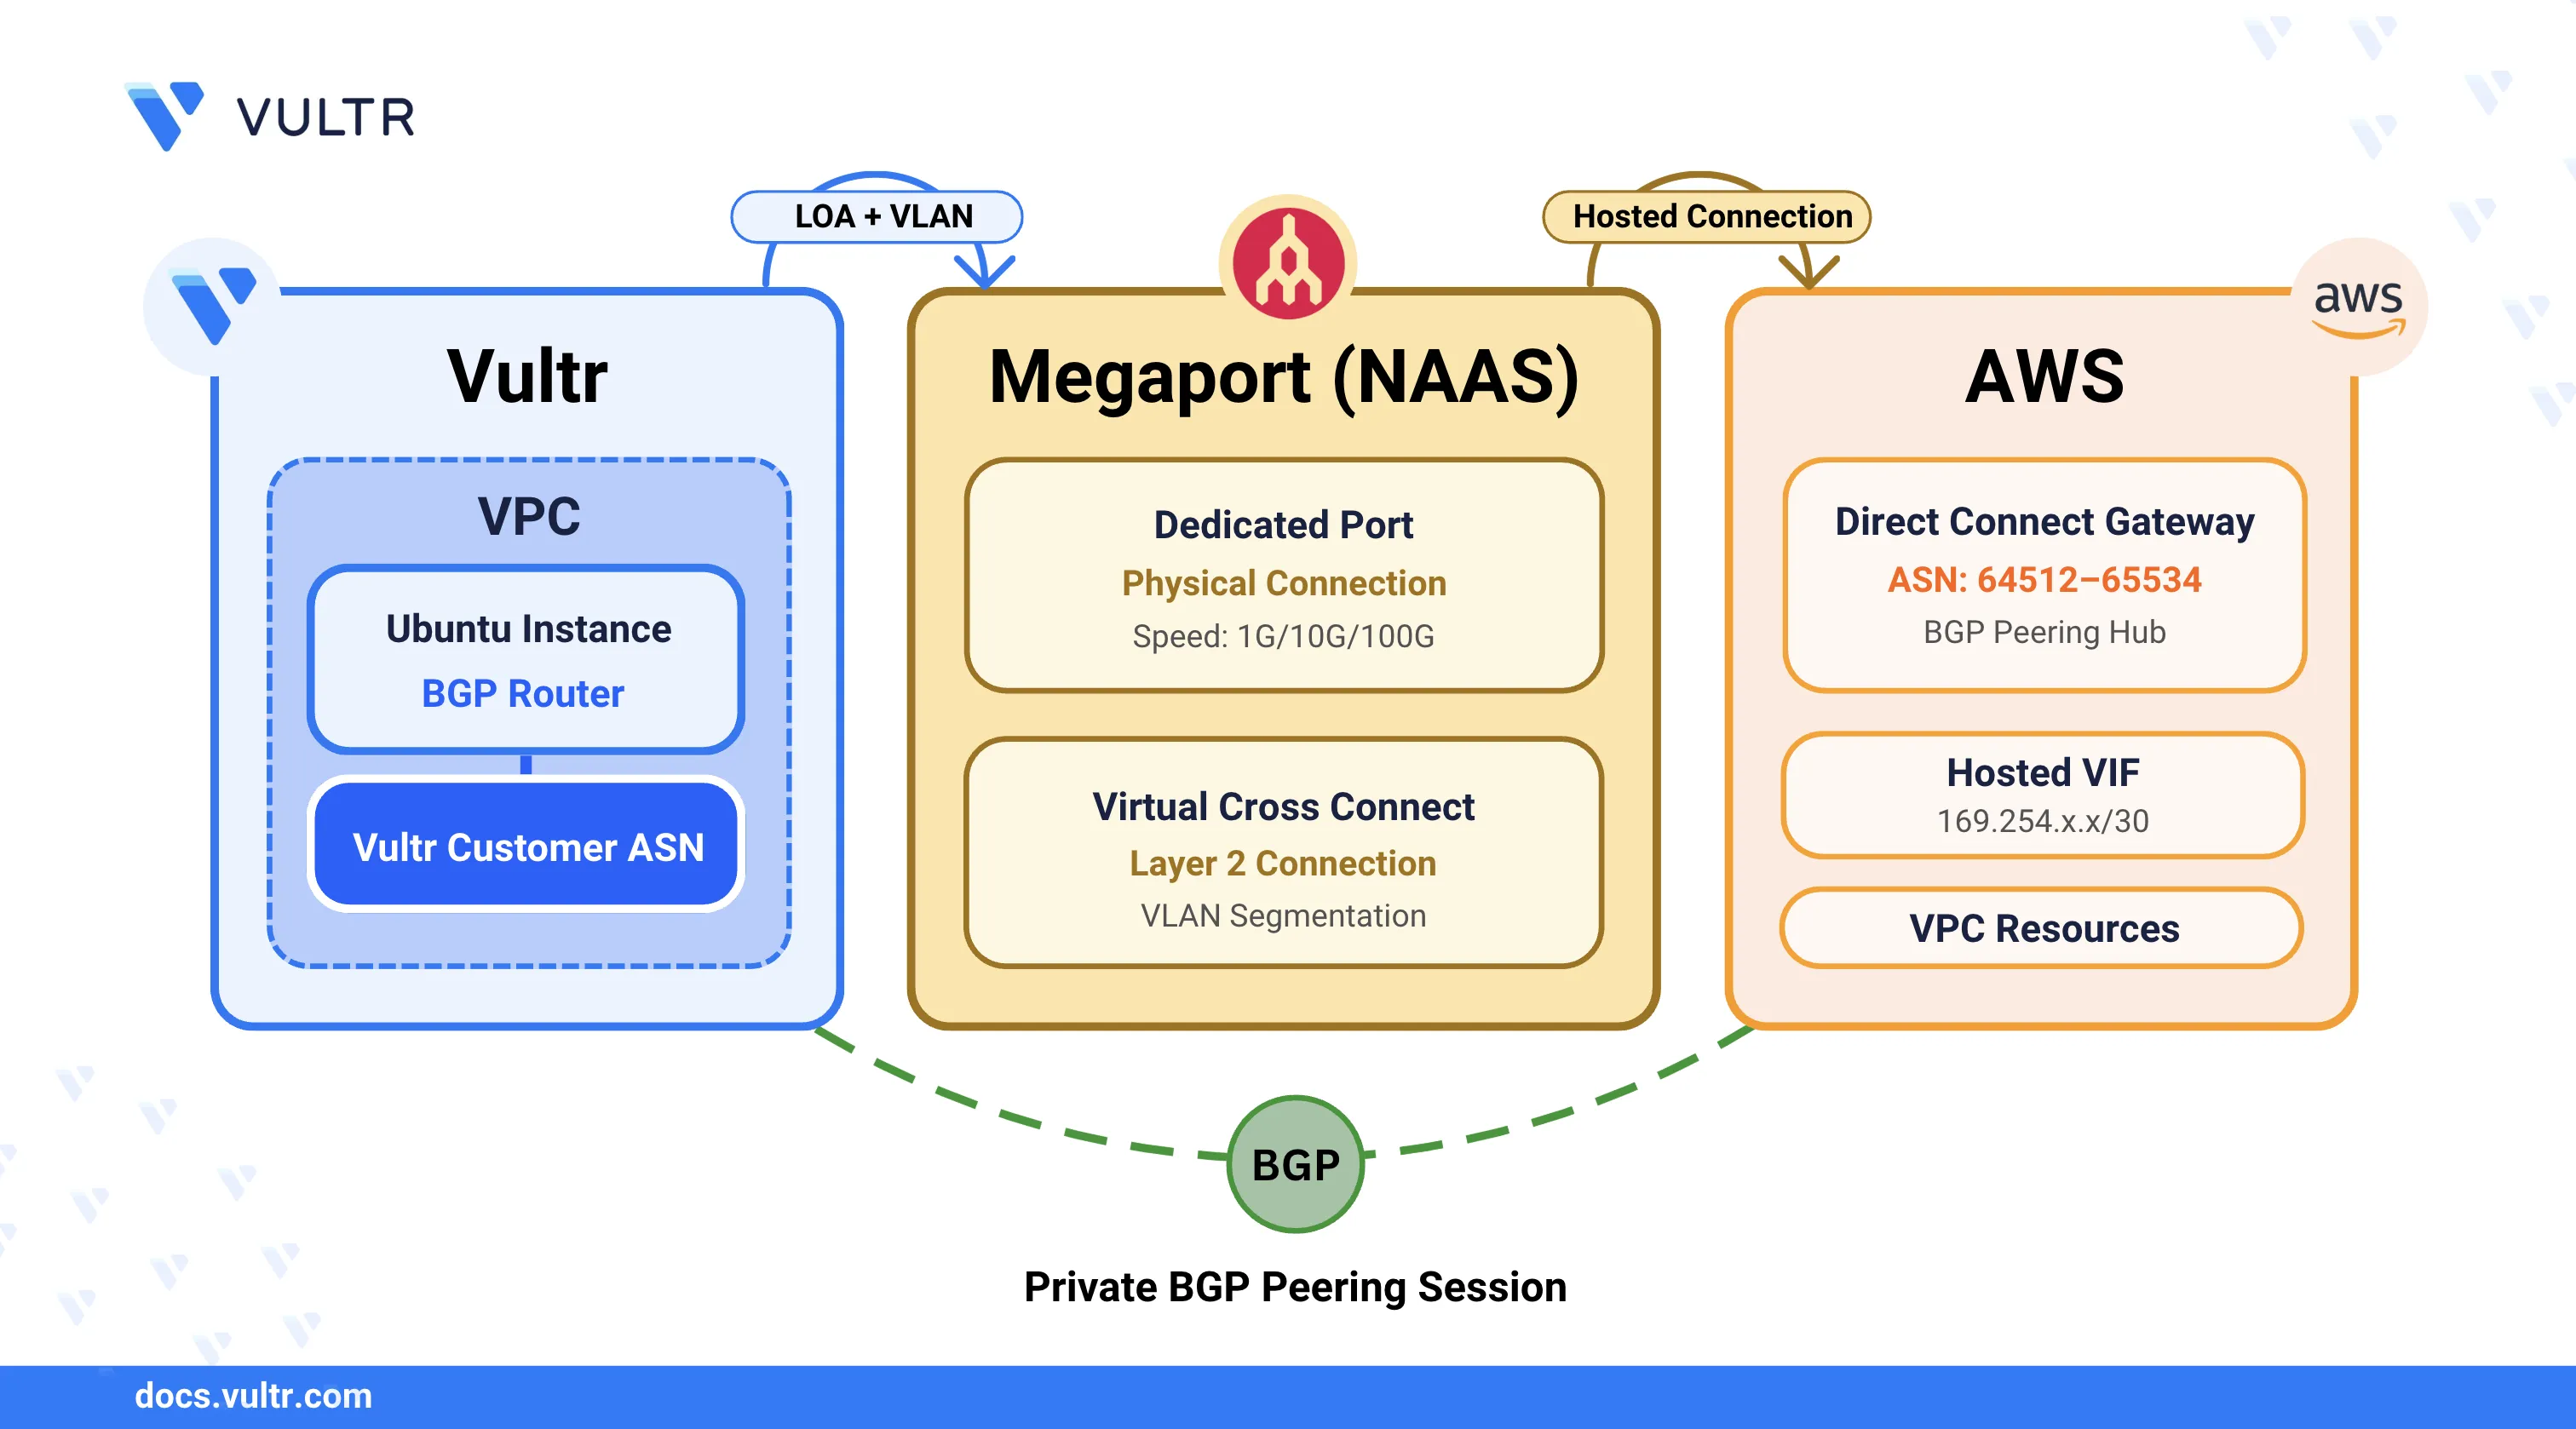
In this guide, you will create a private, low-latency connection between Vultr and AWS using Direct Connect hosted through Megaport. You will provision a dedicated port, order a Virtual Cross Connect (VXC) using Megaport, configure the connection on both Vultr and AWS, and verify the setup by testing BGP route advertisements and end-to-end connectivity between your Vultr and AWS resources.
Prerequisites
Before you begin, ensure you:
- Have access to the Megaport Portal with sufficient permissions to create a port and a Virtual Cross Connect (VXC).
- Have access to the AWS Management Console with permissions to create and manage AWS Direct Connect connections and Virtual Interfaces.
- Have access to the Vultr Console to create and manage Direct Connect and supporting resources.
- Have BGP enabled on your Vultr account.
- Understand VLAN IDs and basic BGP configuration concepts.
Gather Information About the Vultr Datacenter
Vultr operates multiple datacenters worldwide that you can use to establish a private connection to AWS. In this section, you gather the required information about the Vultr datacenter you want to connect to AWS.
Log in to the Vultr Console.
Select Support from the left navigation menu.
Click Open Ticket to create a new support request.
From the available options, toggle the last option to display all fields.
Under Category, select General Support.
Use the below template to open a support ticket to request the Vultr Direct Connect set up.
textSubject: Request to Setup Vultr Direct Connect Hosted via Megaport Partner ([REGION] Region) Hello Vultr Team, I wanted to set up a Hosted via Partner Direct Connect connection using Megaport, I will be connecting X-REGION of Vultr to Y-REGION of AWS. Please share the necessary details required to create a port to that location in Megaport and the details you require to proceed with the connection and complete the setup. Thank you for your assistance. Best regards, [Your Name]
Vultr Support Team generally responds within 24 business hours.NoteVultr Support provides you with the availability details, supported datacenter locations, and the requirements to create a Megaport port. They also request additional information such as VLAN configuration, primary contact details, required bandwidth, and other port-related parameters after you provision the port.
Request a Dedicated Port from MegaPort
After you receive the Vultr datacenter details for the region where you plan to establish the connection, you request a dedicated port from Megaport. This port serves as the physical entry point for your private connection between Vultr and AWS.
Log in to your Megaport Portal.
Navigate to Services and click Create Port.
Search for the Vultr datacenter location provided by Vultr Support.
Select the required port speed (1G, 10G, or 100G) based on your bandwidth needs.
Enter a Port Name and select a Minimum Term.
(Optional) Configure Port Diversity to achieve high availability and redundancy.
Configuring Port Diversity creates two ports in the datacenter generally RED and BLUE diversities which use completely different infrastructure behind the scenes. If an issue occurs in one diversity zone, the other remains unaffected, providing high availability (HA).NoteClick Add Tags to assign a tag to the resource, then click Next.
Click Add Port, review the order under Configured Services in the left navigation pane, click Review Order, and then submit the order.
Port provisioning typically takes 12 to 48 hours to complete.NoteAfter Megaport provisions the port and marks it active, download the Letter of Authorization (LOA) for the port and share it with the Vultr Support team so they can complete the physical connection between the Megaport port and the Vultr rack. Also provide the following details:
- The VPC UUID or Instance UUID where Vultr will attach the Direct Connect.
- The VLAN ID configured on the Megaport port.
Ensure that at least one instance is running in the VPC whose UUID you share. Vultr assigns a VXLAN ID only when an active instance exists. Keep at least one instance running in the VPC at all times to preserve the VXLAN ID. If you delete all instances in the VPC, the VXLAN ID is released, the Direct Connect stops working, and Vultr must reconfigure the connection for new instances.Note
Configure and Connect the Megaport Port to AWS
In this section, you configure the provisioned Megaport port to establish a Layer 2 connection with AWS Direct Connect. Megaport operates as a Network-as-a-Service (NaaS) provider and delivers the private connection between your Vultr datacenter and AWS.
In the Megaport Portal, navigate to Services and select the port you created in the previous section.
Click + Connection and choose Cloud as the connection type.
From the list of providers, select Amazon Web Services.
Under Connection Type, select Hosted VIF.
Select the AWS Region where you want to terminate the Direct Connect connection.
Enter a descriptive Connection Name for identification.
Select the appropriate Rate Limit (bandwidth) based on your throughput requirements.
Configure the VLAN ID to segment and manage the connection traffic.
Select a Minimum Term. Longer terms typically reduce the overall cost.
Click Next to proceed to the AWS connection configuration.
Enter an AWS Connection Name and your AWS Account ID to associate the VIF with your AWS account.
Under Customer ASN, enter the Vultr Customer ASN assigned to your account by Vultr Support.
Click Next, review the configuration and pricing, and then click Add VXC to create the Virtual Cross Connect.
Review the order under the Configured Services section in the left navigation pane and submit the order.
Megaport typically completes VXC provisioning within 10-30 mins. After Megaport finishes the setup, the new connection appears under Virtual Interfaces in the AWS Direct Connect console.Note
Accept the Virtual Interface Connection in AWS
In this section, you accept the Virtual Interface (VIF) connection in AWS and attach it to your Direct Connect Gateway. This step completes the Megaport‑to‑AWS connection and allows private routing between Vultr and AWS.
Log in to the AWS Management Console.
Search for Direct Connect and open the service.
From the left navigation menu, select Direct Connect Gateways.
Click Create Direct Connect Gateway.
Enter a descriptive Gateway Name.
Enter the Amazon-side ASN (Autonomous System Number).
The Amazon-side ASN must be a valid private ASN in one of the following ranges:Note64512–65534(16‑bit private ASN range)4200000000–4294967294(32‑bit private ASN range)
(Optional) Add tags to organize the gateway.
Click Create Direct Connect Gateway to complete the creation.
The Direct Connect Gateway serves as a hub that connects your Virtual Interfaces (VIFs) to one or more AWS VPCs.NoteNavigate to Virtual Interfaces and locate the hosted VIF created by Megaport. The status displays Confirming.
Select the VIF and click Accept Connection.
Under Gateway type, select Direct Connect Gateway.
Choose the newly created Direct Connect Gateway from the dropdown list.
Click Accept Virtual Interface to finalize the connection.
Configure BGP Routing Between Vultr and AWS
In this section, you configure BGP routing on both AWS and Vultr to enable private traffic flow between the two environments.
After you confirm that the connection is active on both ends, configure the routing settings on AWS and Vultr.
In the AWS Management Console, open Direct Connect and navigate to Virtual Interfaces.
Select your virtual interface.
If you did not define an IP range during Megaport configuration, AWS automatically assigns BGP peer IPs from theNote169.254.x.xrange. You can use these IPs directly. If required, you can remove them and define a custom range.Under the Peerings section, note the following values:
- Your router peer IP: Assign this IP to the Vultr-side router interface.
- Amazon router peer IP: AWS assigns this IP to its router.
(Optional) Enable IPv6 for dual-stack routing.
- Click Add Peering under the Peerings tab.
- Select IPv6 as the address family.
- Enter a BGP ASN (for example,
65000) and leave the BGP password blank. - Click Add BGP Peering.
- Wait 5–10 minutes for the IPv6 peer to become available.
On Vultr, deploy an Ubuntu-based instance inside the VPC attached to Direct Connect.
After the instance is in running state, connect to it using SSH.
console$ ssh USERNAME@SERVER-IP
Replace
USERNAMEwith the username andSERVER-IPwith the public IP address of the server.List the network interfaces and identify the one connected to the VPC.
console$ ip addr
Output:
...
3: enp8s0: <BROADCAST,MULTICAST,UP,LOWER_UP> mtu 1450 qdisc mq state UP group default qlen 1000
    link/ether 5a:00:05:cd:25:89 brd ff:ff:ff:ff:ff:ff
    inet 10.7.112.4/20 brd 10.7.127.255 scope global enp8s0
       valid_lft forever preferred_lft forever
    inet6 fe80::5800:5ff:fecd:2597/64 scope link
...
From the output, identify the interface that contains an IP address from your VPC subnet range.
Assign the Vultr router peer IP to the identified VPC interface.
console$ sudo ip addr add 169.254.x.x/24 dev enp8s0
Replace:
enp8s0with your actual interface name.169.254.x.x/24with your Vultr router peer IP.
Repeat this step for IPv6 if you created an IPv6 BGP peer.
If you manually configure the BGP peer and assign an IP address that falls within your Vultr VPC subnet range, you do not need to configure a separate router. All instances in the VPC can communicate directly with the AWS router without additional setup.NoteVerify that the IP address is added successfully.
console$ ip addr show enp8s0
Confirm that it displays the peer IP under the VPC defined network interface.
Test connectivity to AWS.
console$ ping AWS_PEER_IP
Replace
AWS_PEER_IPwith the Amazon router peer IP.Output:
64 bytes from AWS_PEER_IP: icmp_seq=1 ttl=64 time=8.21 ms
64 bytes from AWS_PEER_IP: icmp_seq=2 ttl=64 time=6.95 ms
64 bytes from AWS_PEER_IP: icmp_seq=3 ttl=64 time=9.35 ms
64 bytes from AWS_PEER_IP: icmp_seq=4 ttl=64 time=8.01 ms
Successful replies confirm that the Vultr instance can exchange traffic with AWS.
This IP assignment is temporary and resets after a reboot. To make it persistent, update the corresponding Netplan file inNote/etc/netplanand add the IP under the interfaceaddresseslist. Refer to this guide for detailed instructions on assigning multiple IPs to a network interface.
Conclusion
You successfully established a private Direct Connect connection between Vultr and AWS using Megaport. You provisioned a dedicated port, created and accepted a hosted Virtual Interface, configured BGP routing, and verified end-to-end connectivity between both environments.