
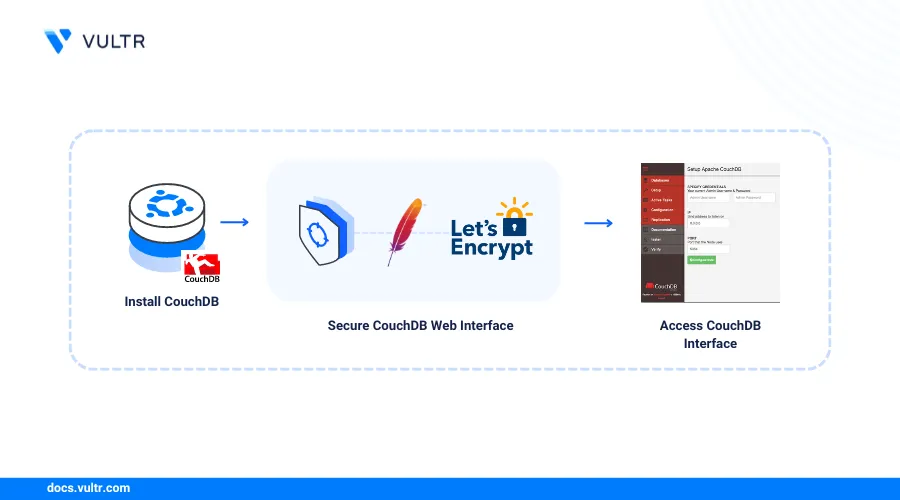
How to Install Apache CouchDB on Ubuntu 22.04
Introduction
Apache CouchDB is an open-source NoSQL document-oriented database that supports multiple formats and protocols. It uses JSON to store data with an HTTP API endpoint for interacting with the databases. In addition, CouchDB also includes the Fauxton web interface to interactively manage databases on the server with either a single-node or multi-node cluster setup.
This article explains how to install CouchDB on a Ubuntu 22.04 server with a single-node cluster. You will also use the Fauxton Web interface and HTTP API to perform basic database tasks such as document creation, query data, and use views.
Prerequisites
Before you begin:
- Deploy a Ubuntu 22.04 server on Vultr to use as the Apache CouchDB database server.
- Create a new domain record pointing to the server IP address.
- Access the server using SSH as a non-root user with sudo privileges.
- Update the server.
- Install Nginx.
Install CouchDB
Install required Ubuntu dependency packages.
console$ sudo apt install -y curl apt-transport-https gnupg
Download and add the Apache CouchDB repository GPG key to your server keyrings.
console$ curl https://couchdb.apache.org/repo/keys.asc | gpg --dearmor | sudo tee /usr/share/keyrings/couchdb-archive-keyring.gpg >/dev/null 2>&1
Add the CouchDB repository to your server sources.
console$ echo "deb [signed-by=/usr/share/keyrings/couchdb-archive-keyring.gpg] https://apache.jfrog.io/artifactory/couchdb-deb/ jammy main" | sudo tee /etc/apt/sources.list.d/couchdb.list >/dev/null
Update the server to synchronize all repository packages.
console$ sudo apt update
Install CouchDB on the server.
console$ sudo apt install -y couchdb
Reply to the installation prompts with the following information.
- Installation Type:
standalone - Magic cookie value: Enter a random strong password to secure the server magic cookie.
- Bind Address:
127.0.0.1 - Admin Password: Enter a strong password to assign the
adminuser profile.
Press Enter to save your CouchDB configurations and apply them on your server.
- Installation Type:
Send an HTTP request to the CouchDB port
5984to verify that the installation is successful.console$ curl http://127.0.0.1:5984/
Your output should look like the one below.
{"couchdb":"Welcome","version":"3.3.3","git_sha":"40afbcfc7","uuid":"f688c35373a63ff4388e1b23ef01810c","features":["access-ready","partitioned","pluggable-storage-engines","reshard","scheduler"],"vendor":{"name":"The Apache Software Foundation"}}
Configure Nginx as a Reverse Proxy To Access CouchDB
Set Up Nginx as a reverse proxy to securely access the CouchDB Fauxton web interface using a domain on your server. Follow the steps below to configure Nginx as a reverse proxy to securely access CouchDB.
Create a new Nginx virtual host configuration to use with CouchDB. For example,
couchdb.conf.console$ sudo nano /etc/nginx/sites-available/couchdb.conf
Add the following contents to the file. Replace
couchdb.example.comwith your actual domain.nginxserver { listen 80; server_name couchdb.example.com; location / { proxy_pass http://localhost:5984; proxy_redirect off; proxy_set_header Host $host; proxy_set_header X-Forwarded-For $proxy_add_x_forwarded_for; proxy_set_header X-Forwarded-Proto $scheme; } }
Save and close the file.
The above Nginx configuration creates a new virtual host profile that forwards requests from your domain HTTP port
80to the backend CouchDB port5984on your server.Link the configuration to the
/sites-enableddirectory to activate the virtual host profile.console$ sudo ln -s /etc/nginx/sites-available/couchdb.conf /etc/nginx/sites-enabled/
Test the Nginx configuration for errors.
console$ sudo nginx -t
Restart Nginx to apply the configuration changes.
console$ sudo systemctl restart nginx
Secure the CouchDB Web Interface
Uncomplicated Firewall (UFW) is active on Ubuntu servers by default, configure the application to allow connection requests to the HTTP port 80. In addition, secure the CouchDB web interface with trusted SSL certificates to allow HTTPS connections on the server port 443 as described in the steps below.
View the firewall status and verify that it's active.
console$ sudo ufw status
Allow connections to the HTTP port
80.console$ sudo ufw allow 80/tcp
Allow the HTTPS port
443.console$ sudo ufw allow 443/tcp
Restart UFW to save the firewall table changes.
console$ sudo ufw reload
Install the Certbot Let's Encrypt client to generate SSL certificates.
console$ sudo snap install certbot --classic
Generate a new SSL certificate for your domain
couchdb.example.com. Replacehello@example.comwith your actual email.console$ sudo certbot --nginx -d couchdb.example.com -m hello@example.com --agree-tos
Test the Certbot auto-renewal process to verify that the certificate is automatically renewed upon expiry.
console$ sudo certbot renew --dry-run
Access the CouchDB Web Interface
Access your CouchDB domain
_utils/path using a web browser such as Chrome.https://couchdb.example.com/_utils/Verify that the CouchDB login page displays in your browser. Log in to the server using the following information:
- USERNAME:
admin - PASSWORD:
Your admin user password you created during installation
- USERNAME:
Create a new Document
Click Create Database on the top right navigation bar within your Fauxton CouchDB Interface.
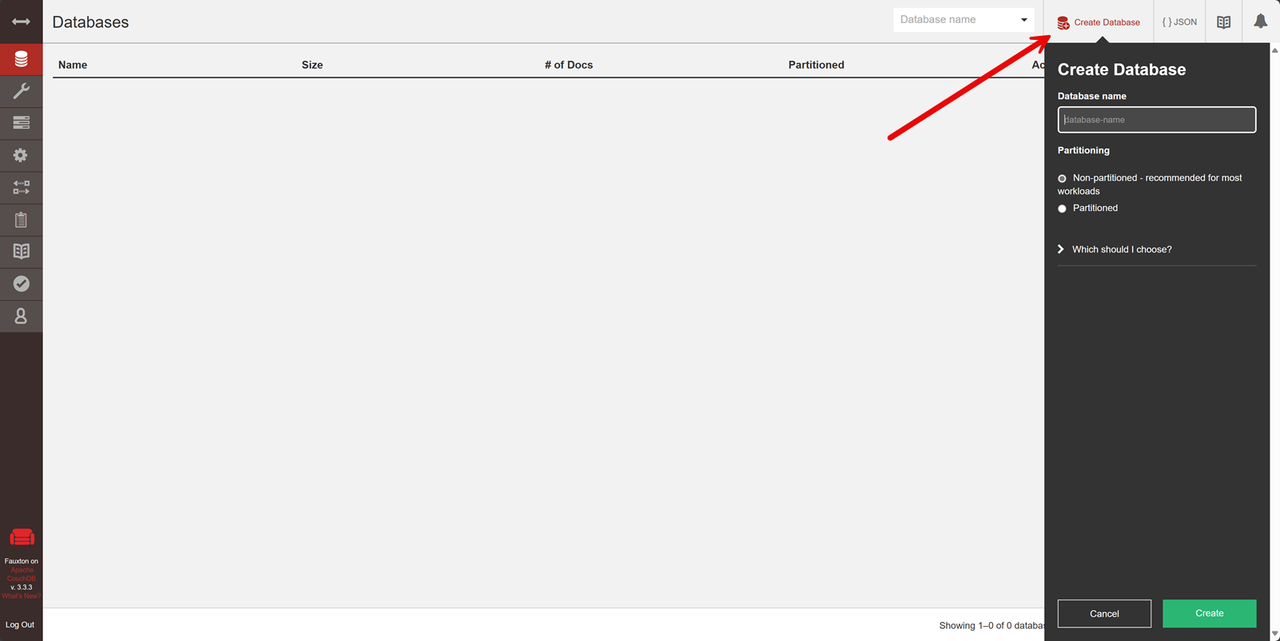
Enter a new database name in the Database name field and click Create to apply and open the new database on your server.
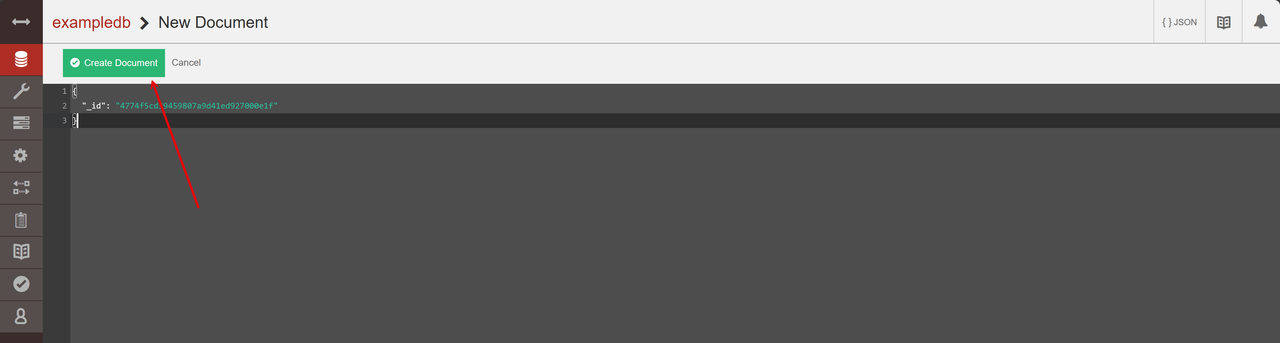
Click Create Document within the database interface to open the JSON editor.
Add a comma at the end of the
"_id"value and apply a new document value. For example,"test":"hello world".json{ "_id": "76ca238ae15974746eeafe5c0b025cb6", "test":"hello world" }
Click Create Document to apply the new document.
Query CouchDB Documents
You can query CouchDB documents after creation using functions such as Mango Query. A Mango query consists of two parts, the index and the selector. An index specifies the fields to perform a query while the selector defines the actual query parameters. Follow the steps below to create additional sample documents with information about cars and run example queries to retrieve data.
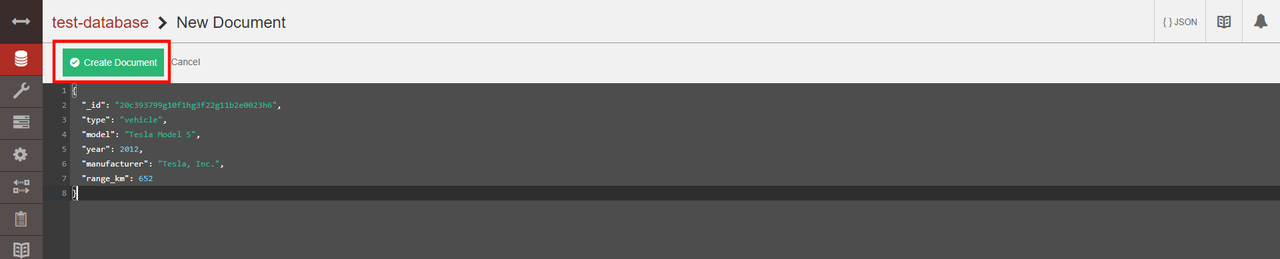
Click Create Document within your database interface to open the JSON editor again.
Replace all default values and paste the following document information about cars.
json{ "_id": "20c393799g10f1hg3f22g11b2e0023h6", "type": "vehicle", "model": "Tesla Model S", "year": 2012, "manufacturer": "Tesla, Inc.", "range_km": 1000 }
Click Create Document to apply the new resource on your server.
Repeat the process and create 3 additional documents with the following JSON data.
-
json
{
  "_id": "20c393799g10f1hg3f22g11b2e0025j8",
  "type": "vehicle",
  "model": "Ford Mustang Mach-E",
  "year": 2018,
  "manufacturer": "Ford Motor Company",
  "range_km": 491
}
-
json
{
     "_id": "20c393799g10f1hg3f22g11b2e0026k9",
     "type": "vehicle",
     "model": "Rivian R1T",
     "year": 2021,
     "manufacturer": "Rivian",
     "range_km": 502
 }
-
json
{
     "_id": "56251ebbcc3ff74b6dc2d6cf3200a888",
     "type": "vehicle",
     "model": "Tesla Model 3",
     "year": 2018,
     "manufacturer": "Tesla, Inc.",
     "range_km": 500
 }
-
Click Run A Query with Mango on the left database navigation menu to create a new Mango index and perform a new document query.
Click manage indexes below the JSON editor to create a new Mango query.
Replace the Index JSON editor contents with the following values.
json{ "index": { "fields": [ "manufacturer" ] }, "name": "manufacturer-json-index", "type": "json" }
Click Create Index to create a new Mango index to improve the query performance.
Click edit query to modify the Mango query.
Replace all JSON editor contents with the following data query data that selects all documents with the field
manufacturerset to the valueTesla, Inc..json{ "selector": { "manufacturer": "Tesla, Inc." } }
Click Run Query to perform the new Mango query.
Verify that a new JSON data section is available with the query result that contains 2 documents with the manufacturer set to
Tesla, Inc..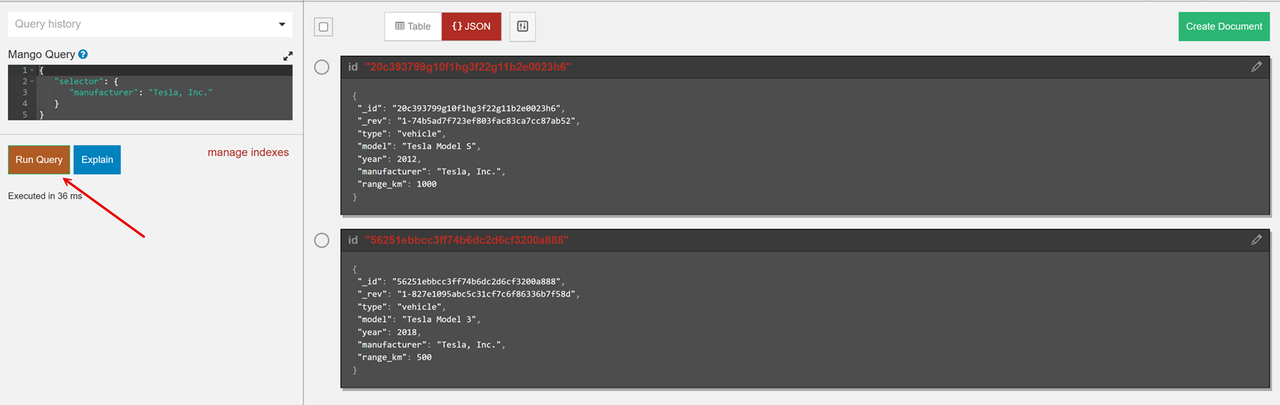
Click manage indexes again and replace the JSON editor contents with the following values.
json{ "index": { "fields": [ "year" ] }, "name": "year-json-index", "type": "json" }
Click Create index to save the new Mango index.
Click edit query and replace the JSON editor contents with the following values to run a query that selects all documents that have
yearfield values between 2015 and 2025.json{ "selector": { "year": { "$gte": 2015, "$lte": 2025 } } }
The above query selects all cars manufactured between the years 2015 and 2025. The variable $gte means "greater than or equal to" while $lte means "less than or equal to”.
Click Run query to start the query and verify that the response includes three cars with
2015and2025range values.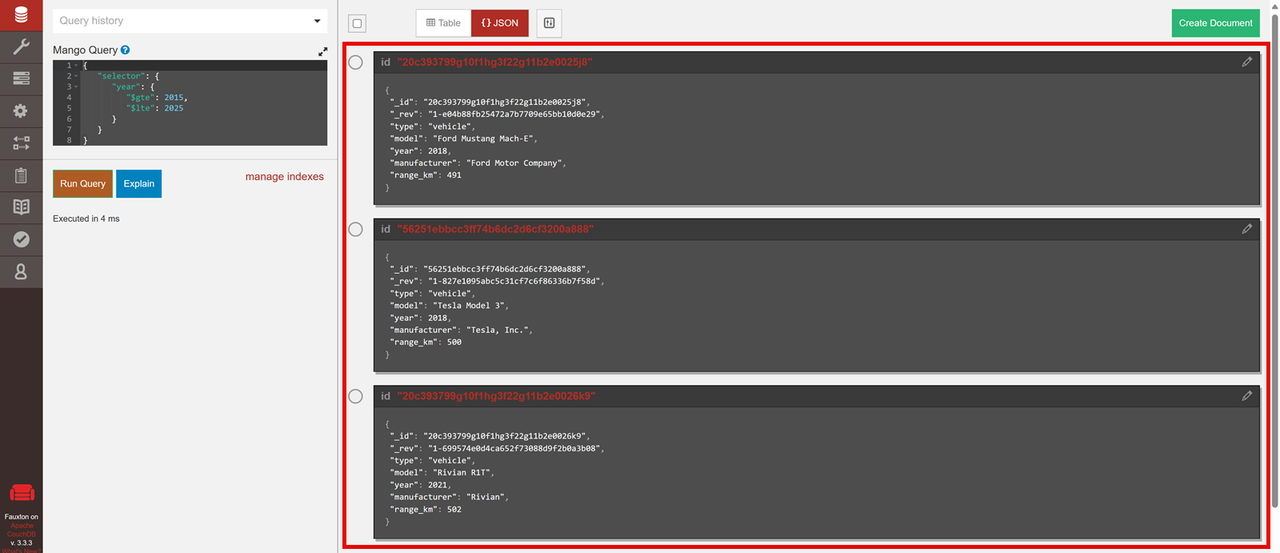
Apply Map and Reduce Functions
Click Databases on the main navigation bar to open your CouchDB databases.
Select your example database that includes your documents about cars.
Click the
+symbol next to the Design Documents and select New View from the list of options.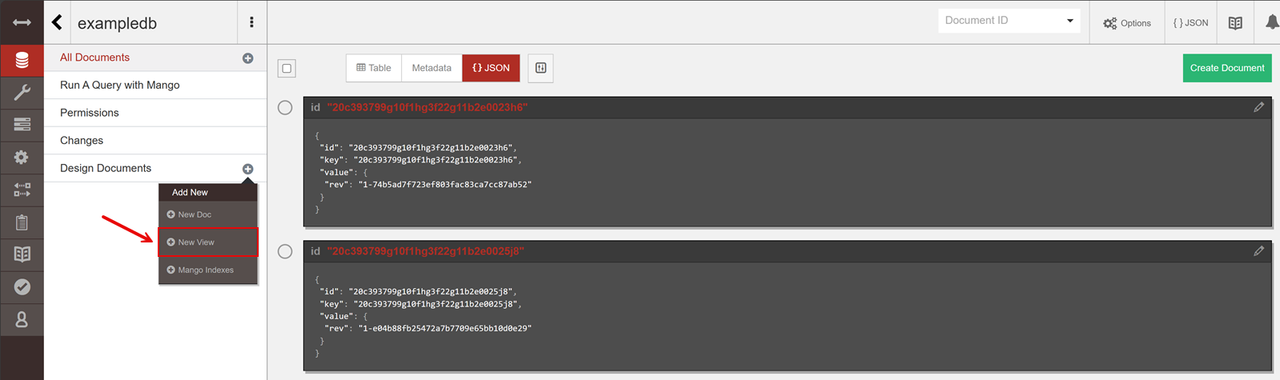
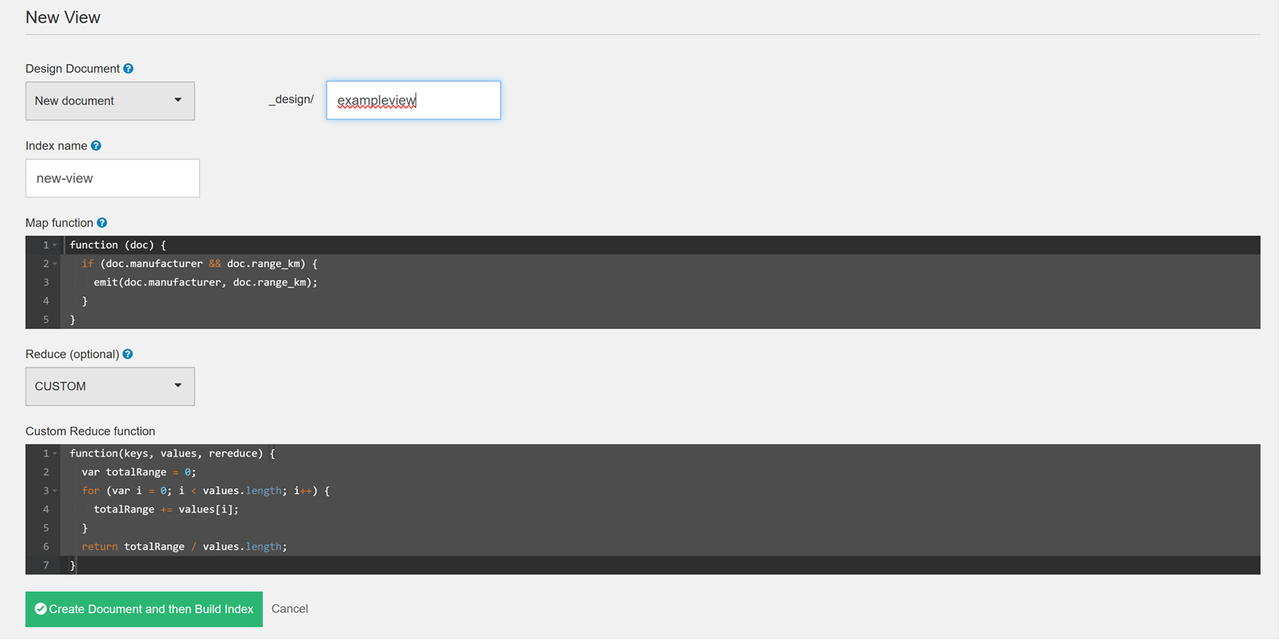
Enter your new document name and index name in the respective fields. For example,
example-docandexample-test-view, then add the following code in the Map function field.javascriptfunction (doc) { if (doc.manufacturer && doc.range_km) { emit(doc.manufacturer, doc.range_km); } }
The above function checks if the document contains the
manufacturerandrangefields. Then, it outputs the manufacturer as the key and the vehicle's range as the value.Click the Reduce drop-down and select CUSTOM from the list of options to open a new function field.
Add the following function to the Custom Reduce function field to calculate and return the average range for each car manufacturer.
javascriptfunction(keys, values, rereduce) { var totalRange = 0; for (var i = 0; i < values.length; i++) { totalRange += values[i]; } return totalRange / values.length; }
Click Create Document and then Build Index to apply the new view.
Click Table on the top navigation menu to modify the document view with a table format.
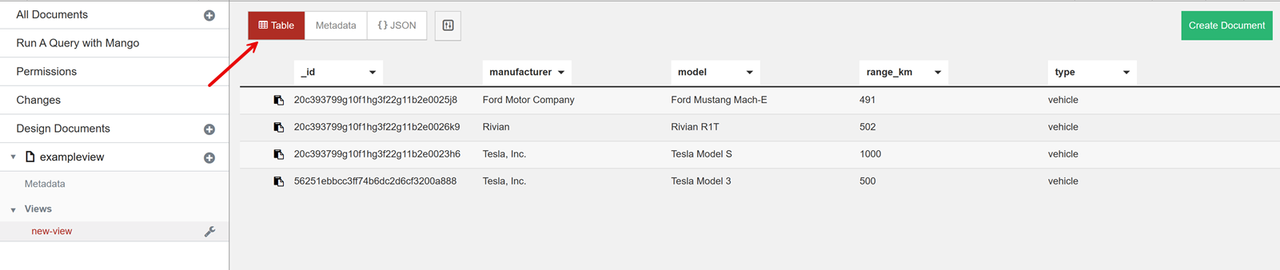
Verify that the view returns all cars with the key set to the respective name and the value to their range because the view is executed without the reduce function enabled.
Click Options on the top right bar, select the
Reduceoption and click Run Query to modify the view results.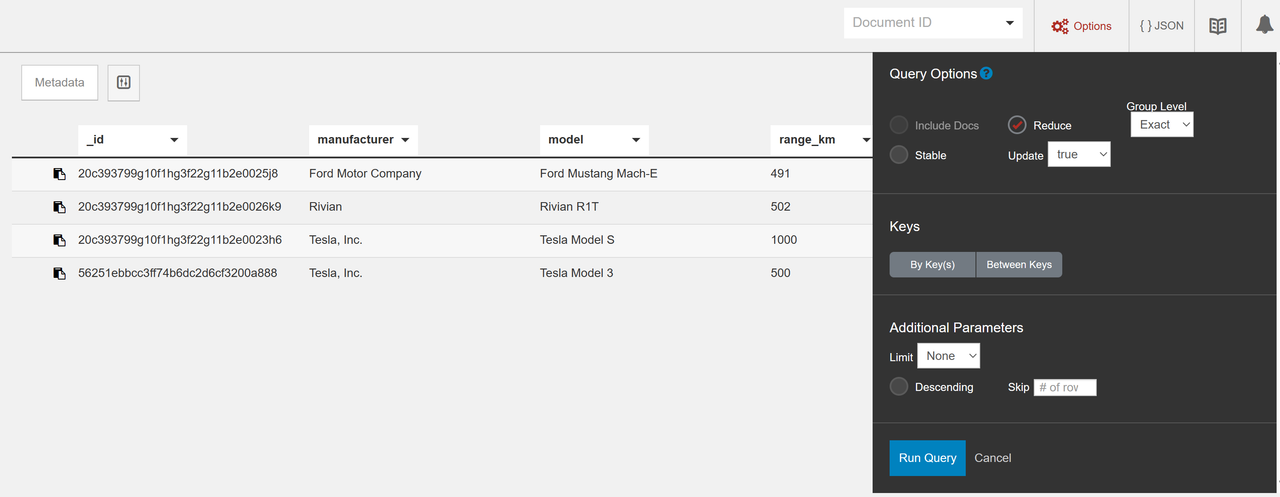
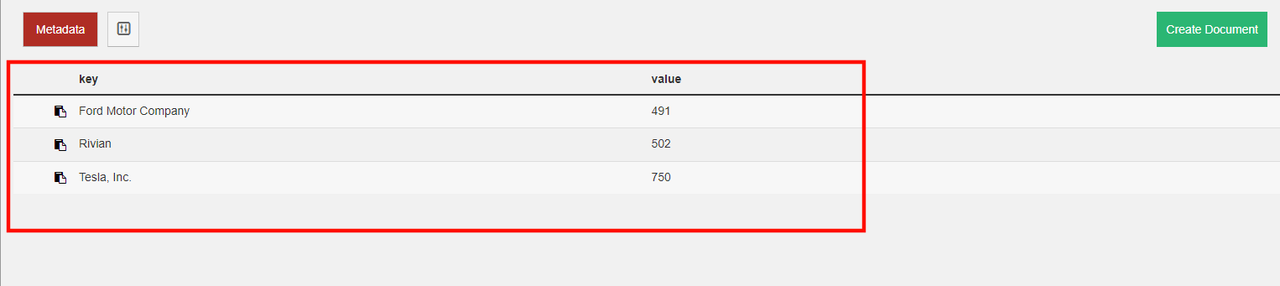
Verify that the view displays all car manufacturers and average range values calculated with the reduce function.
Access CouchDB Using HTTP API Endpoints
You can access CouchDB using the HTTP API to send database requests to the backend server. Follow the steps below to use the Curl utility with the -u option to prompt you for the administrator password for every API request to the CouchDB localhost port 5984.
Get a list of all databases.
console$ curl -u admin -X GET http://127.0.0.1:5984/_all_dbs
Output:
["exampledb"]Create a new database such as
test_database.console$ curl -u admin -X PUT http://127.0.0.1:5984/test_database
Output:
{"ok":true}Delete a database. For example,
test_database.console$ curl -u admin -X DELETE http://127.0.0.1:5984/test_database
Retrieve database information.
console$ curl -u admin http://127.0.0.1:5984/test_database
Create a new document in a database. Replace the
-doption value with your JSON document data.console$ curl -u admin -X POST -H "Content-Type: application/json" -d '{"name": "John Doe"}' http://127.0.0.1:5984/test_database
Get a document's JSON data stored. Replace
test_database,76ca238ae15974746eeafe5c0b0302c1with your database and document ID values respectively.console$ curl -u admin http://127.0.0.1:5984/test_database/76ca238ae15974746eeafe5c0b0302c1
Delete a document. Replace
76ca238ae15974746eeafe5c0b0302c1with your document ID and1-b9a5713ff0a5b6eee4347d4040a7f6bfwith your actual revision number.console$ curl -u admin -X DELETE http://127.0.0.1:5984/test_database/76ca238ae15974746eeafe5c0b0302c1?rev=1-b9a5713ff0a5b6eee4347d4040a7f6bf
Get all documents in a database such as
test_database.console$ curl -u admin http://127.0.0.1:5984/test_database/_all_docs
Compact a database.
console$ curl -u admin -X POST -H "Content-Type: application/json" http://127.0.0.1:5984/test_database/_compact
Get active tasks.
console$ curl -u admin http://127.0.0.1:5984/_active_tasks
Conclusion
You have deployed Apache CouchDB on a Ubuntu 22.04 server and managed database resources. You accessed the Fauxton web interface and used the CouchDB HTTP API endpoints to perform database operations such as document creation, and data queries, and used views with map and reduce functions. For more information, visit the CouchDB documentation.