
How to Install Apache, MySQL, PHP (LAMP Stack) on Ubuntu 20.04
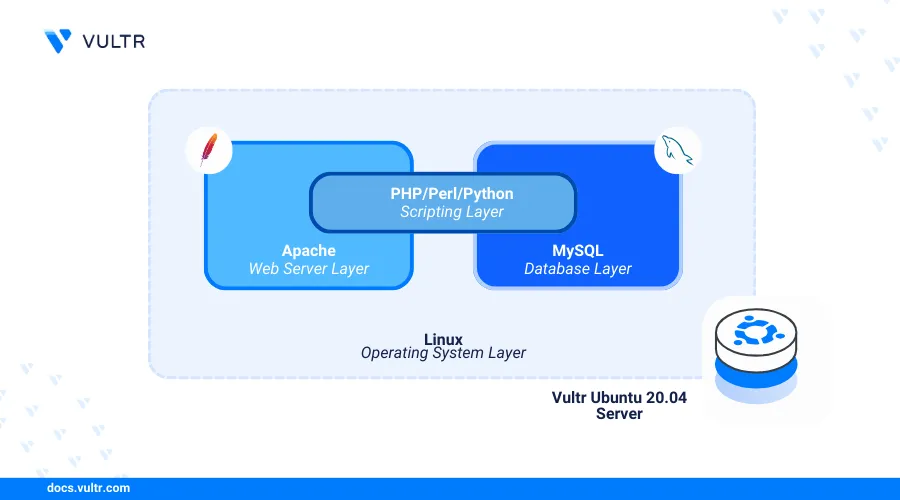
The LAMP stack—Linux, Apache, MySQL, and PHP—is a collection of open-source tools used to develop and serve dynamic web applications. In this setup:
- Linux acts as the operating system,
- Apache serves web content,
- MySQL manages databases, and
- PHP handles dynamic content processing.
This article explains how to install and configure the LAMP stack on Ubuntu 20.04 to host web applications on your server.
Prerequisites
Before you begin:
Have an Ubuntu 20.04 server.
Access the server using SSH as a non-root user with sudo privileges.
Set up a new A record for your domain that points to the server IP address.
Install Apache
The latest version of Apache is available in Ubuntu 20.04’s default APT repositories. Follow the steps below to update the package index and install Apache.
Update the server's package index.
console$ sudo apt update
Install Apache.
console$ sudo apt install apache2 -y
Start the Apache service.
console$ sudo systemctl start apache2
Enable the Apache service to start automatically at boot time.
console$ sudo systemctl enable apache2
Verify that the Apache server service is running.
console$ sudo systemctl status apache2
Output:
● apache2.service - The Apache HTTP Server
     Loaded: loaded (/lib/systemd/system/apache2.service; enabled; vendor preset: enabled)
     Active: active (running) since Sun 2025-04-06 10:56:28 UTC; 20s ago
       Docs: https://httpd.apache.org/docs/2.4/
   Main PID: 2622 (apache2)
      Tasks: 55 (limit: 9415)
     Memory: 6.9M
     CGroup: /system.slice/apache2.service
             ├─2622 /usr/sbin/apache2 -k start
             ├─2623 /usr/sbin/apache2 -k start
             └─2624 /usr/sbin/apache2 -k start
Allow connections to the HTTP port
80through the default firewall configuration.console$ sudo ufw allow 80/tcp
Access your domain or server IP using a web browser such as Chrome and verify that the default Apache web page displays.
http://SERVER-IP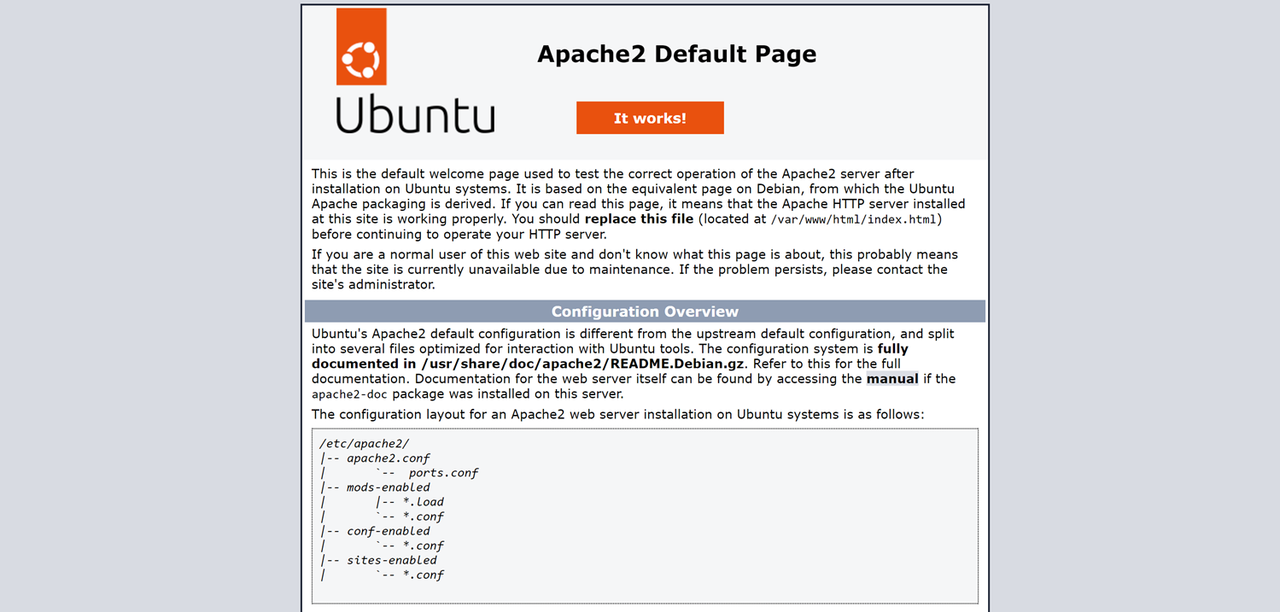
Install MySQL
MySQL serves as the database backend in the LAMP stack, but you can also substitute it with MariaDB if needed. The latest MySQL package is available in Ubuntu 20.04’s default repositories. Follow the steps below to install MySQL using the APT package manager.
Install the MySQL database server package.
console$ sudo apt install -y mysql-server
Enable the MySQL service to start automatically at boot time.
console$ sudo systemctl enable mysql
Start the MySQL service.
console$ sudo systemctl start mysql
View the MySQL service status and verify that it's running.
console$ sudo systemctl status mysql
Output:
● mysql.service - MySQL Community Server
     Loaded: loaded (/lib/systemd/system/mysql.service; enabled; vendor preset: enabled)
     Active: active (running) since Sun 2025-04-06 10:58:51 UTC; 41s ago
   Main PID: 17189 (mysqld)
     Status: "Server is operational"
     Tasks: 38 (limit: 9415)
     Memory: 364.8M
     CGroup: /system.slice/mysql.service
             └─17189 /usr/sbin/mysqld
Based on the
active (running)result in the above output, the MySQL database server is active and running on your server.Run the MySQL secure installation script to disable insecure defaults and enable authentication on your database server.
console$ sudo mysql_secure_installation
During the MySQL installation, you’ll be prompted with several options. Respond as follows to configure your server:
- VALIDATE PASSWORD: Enter
yto enable password strength checks. - Password strength policy: Enter
2to enforce multi-character passwords. - Remove anonymous users: Enter
yto remove anonymous users. - Disallow root login remotely: Enter
yto disable remote access for therootuser. - Remove test database: Enter
yto delete the default MySQL test database. - Reload privileges tables now: Enter
yto reload the MySQL privilege tables and apply your changes.
Your output should look like the one below when successful:
Success. All done!- VALIDATE PASSWORD: Enter
Log in to the MySQL console as the
rootuser.console$ sudo mysql
Alter the
rootdatabase user to use a new strong password. ReplaceStrong@@password123with your desired password.sqlmysql> ALTER USER 'root'@'localhost' IDENTIFIED WITH mysql_native_password BY 'Strong@@password123';
Replace
passwordwith a strong password.Flush the MySQL privileges table to apply the new user changes.
sqlmysql> FLUSH PRIVILEGES;
Exit the MySQL console.
sqlmysql> EXIT;
Log in to the MySQL console again as the
rootuser and enter the password you set earlier when prompted.console$ mysql -u root -p
Create a new sample database
content_database.sqlmysql> CREATE database content_database;
View all databases and verify that the new database is available.
sqlmysql> SHOW DATABASES;
Output:
+--------------------+
| Database           |
+--------------------+
| information_schema |
| content_database   |
| mysql              |
| performance_schema |
| sys                |
+--------------------+
5 rows in set (0.01 sec)
Create a new MySQL user such as
dbadminwith a strong password. ReplaceStrong@@password123with your desired password.sqlmysql> CREATE USER 'dbadmin'@'localhost' IDENTIFIED BY 'Strong@@password123';
Grant the user full privileges to your sample database
content_database.sqlmysql> GRANT ALL PRIVILEGES ON content_database.* TO 'dbadmin'@'localhost';
Flush the MySQL privileges table to apply changes.
sqlmysql> FLUSH PRIVILEGES;
Exit the MySQL shell.
sqlmysql> EXIT;
Install PHP and Configure PHP-FPM
PHP is a key component of the LAMP stack, responsible for processing dynamic content and interacting with the MySQL database. PHP-FPM (FastCGI Process Manager) optimizes performance by managing connections to PHP using pools of worker processes.
Install PHP and the PHP-FPM module.
console$ sudo apt install -y php php-fpm
Install common PHP extensions on your server.
console$ sudo apt install -y php-mysql php-opcache php-cli libapache2-mod-php
The above command installs the following PHP modules:
- php-mysql: Allows PHP to connect and interact with the MySQL database server.
- libapache2-mod-php: Enables Apache to process and run PHP scripts.
- php-opcache: Caches precompiled PHP scripts in memory for faster execution.
- php-cli: Allows access to PHP via the command line on your server.
View the installed PHP version on your server.
console$ php -v
Output:
PHP 7.4.3-4ubuntu2.29 (cli) (built: Mar 25 2025 18:57:03) ( NTS )
Copyright (c) The PHP Group
Zend Engine v3.4.0, Copyright (c) Zend Technologies
    with Zend OPcache v7.4.3-4ubuntu2.29, Copyright (c), by Zend Technologies
Start the PHP-FPM service based on the installed PHP version on your server. For example,
PHP 7.4.console$ sudo systemctl start php7.4-fpm
Enable PHP-FPM to start at boot time.
console$ sudo systemctl enable php7.4-fpm
View the PHP-FPM service status and verify that it's running.
console$ sudo systemctl status php7.4-fpm
Output:
● php7.4-fpm.service - The PHP 7.4 FastCGI Process Manager
     Loaded: loaded (/lib/systemd/system/php7.4-fpm.service; enabled; vendor preset: enabled)
     Active: active (running) since Sun 2025-04-06 11:11:45 UTC; 10min ago
       Docs: man:php-fpm7.4(8)
    Process: 27868 ExecStartPost=/usr/lib/php/php-fpm-socket-helper install /run/php/php-fpm.sock /etc/php/7.4/fpm/pool.d/www.conf 74 (code=exited, status=0/SUCCESS)
   Main PID: 27851 (php-fpm7.4)
     Status: "Processes active: 0, idle: 2, Requests: 0, slow: 0, Traffic: 0req/sec"
      Tasks: 3 (limit: 9415)
     Memory: 7.3M
     CGroup: /system.slice/php7.4-fpm.service
             ├─27851 php-fpm: master process (/etc/php/7.4/fpm/php-fpm.conf)
             ├─27866 php-fpm: pool www
             └─27867 php-fpm: pool www
Configure PHP-FPM
PHP-FPM optimizes PHP application performance by managing pools of worker processes, depending on your server’s memory. Follow the steps below to configure PHP-FPM to work with the Apache web server and adjust the default pool settings for better resource management.
Enable the required Apache modules.
console$ sudo a2enmod proxy_fcgi setenvif
The above command enables the following modules on your web server:
proxy_fcgi: Enables Apache to work as a proxy with PHP-FPM.setenvif: Sets the necessary environment variables to enable connections between Apache and PHP-FPM.
Enable the default PHP-FPM configuration.
console$ sudo a2enconf php7.4-fpm
Restart the Apache web server to apply the changes.
console$ sudo systemctl restart apache2
Switch to the PHP-FPM pool configurations directory.
console$ cd /etc/php/7.4/fpm/pool.d/
Open the default
www.confPHP-FPM pool configuration.console$ sudo nano /etc/php/7.4/fpm/pool.d/www.conf
Verify that the default PHP-FPM pool name
www.ini[www]Find and verify the following directives are set to
www-datato enable PHP-FPM to use the default web server user profile.iniuser = www-data group = www-data listen.owner = www-data listen.group = www-data
- Find the following pool configurations and modify them to suite your desired server needs:
pm: Defines the process manager. Set todynamicto allow PHP child processes to adjust based on server demand.pm.start_servers: Sets the number of PHP child processes to create at startup. Default value:2.pm.max_children: Defines the maximum number of PHP child processes that can run simultaneously. Default value:5.pm.min_spare_servers: Specifies the minimum number of idle PHP child processes. Default value:1.pm.max_spare_servers: Specifies the maximum number of idle PHP child processes. Default value:3.pm.max_requests: Limits the number of requests a PHP child process can handle before being recycled to ensure optimal performance.
Save and close the file.
Restart the PHP-FPM service to apply your configuration changes.
console$ sudo systemctl restart php7.4-fpm
Configure Apache with PHP-FPM
Apache communicates with PHP-FPM through the mod_proxy_fcgi module, either using a UNIX socket or the default TCP port 9000, depending on your PHP-FPM pool configuration. Follow these steps to set up a new Apache virtual host and connect it to PHP-FPM using the UNIX socket.
Remove the default Apache virtual host configuration files.
console$ sudo rm -rf /etc/apache2/sites-enabled/000-default.conf && sudo rm -rf /etc/apache2/sites-available/000-default.conf
Create a new Apache virtual host configuration file. For example,
app.example.com.conf.console$ sudo nano /etc/apache2/sites-available/app.example.com.conf
Add the following configurations to the file. Replace
app.example.comwith your actual domain.ini<VirtualHost *:80> ServerAdmin webmaster@app.example.com ServerName app.example.com DocumentRoot /var/www/html/app.example.com <Directory /var/www/html/app.example.com> Options Indexes FollowSymLinks AllowOverride All Require all granted </Directory> <FilesMatch \.php$> SetHandler "proxy:unix:/var/run/php/php7.4-fpm.sock|fcgi://localhost/" </FilesMatch> ErrorLog ${APACHE_LOG_DIR}/app.example.com_error.log CustomLog ${APACHE_LOG_DIR}/app.example.com_access.log combined </VirtualHost>
Save and close the file.
The above sets up a new Apache virtual host that listens for incoming traffic on port
80and serves content for theapp.example.comdomain. PHP file requests are forwarded to the PHP-FPM process via the/var/run/php/php7.4-fpm.sockUNIX socket. The key components of this configuration include:<VirtualHost *:80>: Configures the virtual host to listen on port80.<Directory /var/www/html/app.example.com>: Sets the root directory for web application files.<FilesMatch \.php$>: Forwards PHP file requests to the PHP-FPM socket using the FastCGI protocol.ErrorLog,CustomLog: Defines custom paths for the virtual host's error and access logs.
Enable the new Apache virtual host configuration.
console$ sudo a2ensite app.example.com.conf
Test the Apache configuration for syntax errors.
console$ sudo apache2ctl configtest
Output:
Syntax OKCreate the virtual host web root directory
/var/www/html/app.example.comdefined in your configuration.console$ sudo mkdir -p /var/www/html/app.example.com
Create a new sample PHP file
info.php.console$ sudo nano /var/www/html/app.example.com/info.php
Add the following contents to the file.
php<?php phpinfo(); ?>
Save and close the file.
The above application code displays information about the PHP version and installed modules on your server when accessed in a web browser.
Restart Apache to apply your configuration changes.
console$ sudo systemctl restart apache2
Access your domain using a web browser such as Chrome and append the
/info.phppath to verify that your PHP application information displays.http://app.example.com/info.php
Secure the server
Uncomplicated Firewall (UFW) is enabled by default on Vultr Ubuntu 20.04 servers. The Apache web server uses the default HTTP port 80 to serve dynamic web applications, while other LAMP stack components, such as MySQL (3306) and PHP-FPM (9000), use internal TCP ports. Follow the steps below to configure UFW to allow connections on port 80 for the web server and set up trusted SSL certificates to enable HTTPS on port 443.
Configure the Firewall
View the default firewall status and verify that it's active.
console$ sudo ufw status
Output:
Status: active
...
View the available UFW application profiles and verify that the Apache profile is available.
console$ sudo ufw app list
Output:
Apache
Apache Full
Apache Secure
OpenSSH
Allow the
Apache Fullprofile to enable HTTP and HTTPS connections on the server.console$ sudo ufw allow "Apache Full"
Reload the firewall rules to apply changes.
console$ sudo ufw reload
View the UFW status and verify that the Apache connection rules are available in the firewall table.
console$ sudo ufw status
Output:
To                         Action      From
--                         ------      ----
1022/tcp                   ALLOW       Anywhere
Apache Full                ALLOW       Anywhere
1022/tcp (v6)              ALLOW       Anywhere (v6)
Apache Full (v6)           ALLOW       Anywhere (v6)
Generate Trusted Let's Encrypt SSL Certificates
Install the Certbot Let's Encrypt client tool using Snap.
console$ sudo snap install certbot --classic
Request a new SSL certificate for your domain. Replace
app.example.comwith your actual domain andadmin@example.comwith your email.console$ sudo certbot --apache -d app.example.com -m admin@example.com --agree-tos
Output:
Requesting a certificate for app.example.com

Successfully received certificate.
Certificate is saved at: /etc/letsencrypt/live/app.example.com/fullchain.pem
Key is saved at:         /etc/letsencrypt/live/app.example.com/privkey.pem
This certificate expires on 2025-07-05.
These files will be updated when the certificate renews.
Certbot has set up a scheduled task to automatically renew this certificate in the background.

Deploying certificate
Successfully deployed certificate for app.example.com to /etc/apache2/sites-available/000-default-le-ssl.conf
Congratulations! You have successfully enabled HTTPS on https://app.example.com
Test the Certbot automatic SSL certificate renewal process.
console$ sudo certbot renew --dry-run
Restart the Apache web server to apply your SSL configuration changes.
console$ sudo systemctl restart apache2
Test the LAMP Stack Installation
Follow the steps below to create a new sample table in your existing content_database MySQL database. This table will connect with your PHP application and display the message Hello World! Greetings from Vultr when accessed through a web browser.
Log in to the MySQL console using the sample database user
dbadminyou created earlier.console$ mysql -u dbadmin -p
Enter the
dbadminuser password when prompted to access the MySQL console.Switch to the sample database
content_database.sqlmysql> USE content_database;
Create a new sample table
messageswith two columns,content_idandcontentto store your data.sqlmysql> CREATE TABLE IF NOT EXISTS messages ( content_id INT AUTO_INCREMENT PRIMARY KEY, content VARCHAR(255) NOT NULL );
The above SQL query creates a new table with the following specifications:
content_id: Contains numeric values and automatically increments unique data on each new row.content: Holds mixed content data with up to255characters.
Insert new data to the
messagestable. For example, add a newHello World! Greetings from Vultrstring to thecontentcolumn.sqlmysql> INSERT INTO messages (content) VALUES ('Hello World! Greetings from Vultr');
View all table data to verify that the new string is added to the column.
sqlmysql> SELECT * from messages;
Output:
+----+------------------------------------------+
| content_id | content                           |
+------------+-----------------------------------+
|  1         | Hello World! Greetings from Vultr |
+------------+-----------------------------------+
1 row in set (0.00 sec)
Exit the MySQL console.
sqlmysql> EXIT;
Create a new sample PHP application file
setup.phpin your web root directory/var/www/html/app.example.com.console$ sudo nano /var/www/html/app.example.com/setup.php
Add the following contents to the file.
php<?php $hostname = "localhost"; $username = "dbadmin"; $password = "Strong@@password123"; $dbname = "content_database"; // Establish Connection $conn = new mysqli($hostname, $username, $password, $dbname); // Check connection if ($conn->connect_error) { die("Connection Failed: " . $conn->connect_error); } $sql = "SELECT content FROM messages"; $result = $conn->query($sql); if ($result && $result->num_rows > 0) { $row = $result->fetch_assoc(); echo "<h2 style='color: blue; text-align: center; margin-bottom: 15px;'>" . htmlspecialchars($row["content"]) . "</h2>"; } else { echo "<h1>No records found.</h1>"; } $conn->close(); ?>
Save and close the file.
The PHP application code above connects to the
content_databaseMySQL database and retrieves data from thecontentcolumn in themessagestable. If no records are found in the database, it will display aNo records foundmessage. If the connection to the database server fails, it will show aConnection Failedmessage.Grant the Apache user
www-datafull privileges to your web root directory.console$ sudo chown -R www-data:www-data /var/www/html/app.example.com/
Access your domain using the
/setup.phppath in your web browser to verify that your PHP application displays theHello World! Greetings from Vultrstring content from your MySQL database.https://app.example.com/setup.php
Conclusion
You have successfully installed and configured Apache, MySQL, and PHP (LAMP stack) on your Ubuntu 20.04 server. Additionally, you created sample dynamic applications to test the interaction between all LAMP stack components and ensured secure execution on your server.