
How to Install Apache, MySQL, PHP (LAMP Stack) on Debian 12
Introduction
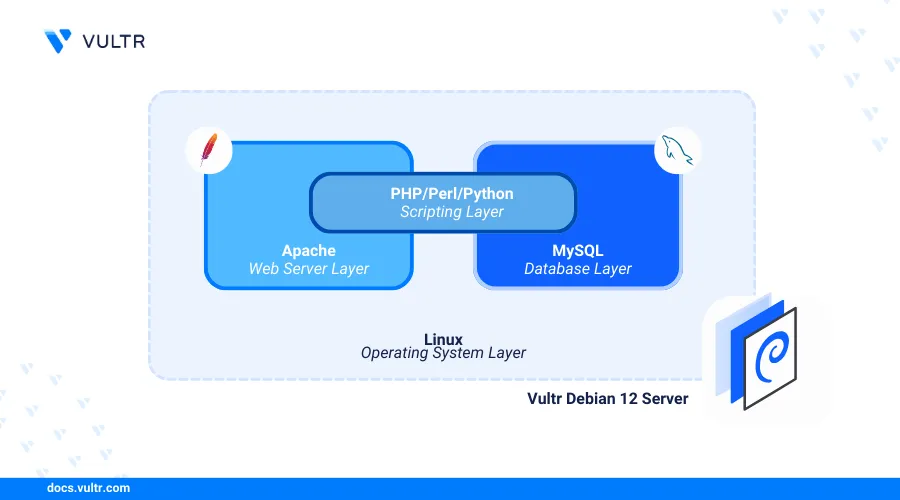
The Linux, Apache, MySQL, and PHP (LAMP) stack is a collection of open-source applications that enable the development and deployment of dynamic web applications on a server. Linux runs as the base operating system while Apache works as a webserver to handle web requests. MySQL functions as a backend database and PHP processes dynamic web application contents.
This article explains how to install the LAMP stack on a Debian 12 server.
Prerequisites
Before you begin:
- Deploy a Debian 12 instance on Vultr.
- Create a new domain A record pointing to the instance's public IP address. For example,
app.example.com. - Access the instance using SSH and log in as a non-root user with sudo privileges.
- Update the instance.
Install Apache Webserver
Apache is available in the default package repositories on Debian 12. Follow the steps below to install the Apache on your server.
Install the Apache webserver.
console$ sudo apt install apache2 -y
View the installed Apache version on your server..
console$ sudo apachectl -v
Your output should be similar to the one below.
Server version: Apache/2.4.61 (Debian)
Server built:   2024-07-07T12:08:26
Start the Apache service.
console$ sudo systemctl start apache2
Enable the Apache service to start automatically at boot.
console$ sudo systemctl enable apache2
View the Apache service status and verify that it's running on your server.
console$ sudo systemctl status apache2
Your output should be similar to the one below.
● apache2.service - The Apache HTTP Server
     Loaded: loaded (/lib/systemd/system/apache2.service; enabled; preset: enabled)
     Active: active (running) since Tue 2024-08-13 19:51:19 UTC; 1min 46s ago
       Docs: https://httpd.apache.org/docs/2.4/
   Main PID: 3080 (apache2)
      Tasks: 55 (limit: 2299)
     Memory: 9.6M
        CPU: 29ms
     CGroup: /system.slice/apache2.service
             ├─3080 /usr/sbin/apache2 -k start
             ├─3083 /usr/sbin/apache2 -k start
             └─3084 /usr/sbin/apache2 -k start
Install MySQL
MySQL is not available in the Debian 12 package repositories by default. Follow the steps below to add the MySQL APT repository information to your server and install the latest database server package.
Download the latest MySQL package repository setup file..
console$ sudo wget https://dev.mysql.com/get/mysql-apt-config_0.8.32-1_all.deb
Visit the MySQL APT repository page to verify the latest Debian package file to download on your server.
Run the file to install the latest MySQL repository information on your server.
console$ sudo dpkg -i mysql-apt-config_0.8.32-1_all.deb
Select MySQL Server & Cluster option and press Enter when prompted.
 ┌─────────────────────────────────┤ Configuring mysql-apt-config ├─────────────────────────────────┐
 │ Which MySQL product do you wish to configure?                                                    │
 │                                                                                                  │
 │                   MySQL Server & Cluster (Currently selected: mysql-8.4-lts)                     │
 │                   MySQL Connectors (Currently selected: Enabled)                                 │
 │                   Ok                                                                             │
 │                                                                                                  │
 │                                              <Ok>                                                │
 └──────────────────────────────────────────────────────────────────────────────────────────────────┘
Press Up and Down to select your preferred MySQL Server version and press Enter to proceed. For example, select
mysql-8.4-ltsversion.┌─────────────────────────────────┤ Configuring mysql-apt-config ├─────────────────────────────────┐ │ Which server version do you wish to receive? │ │ │ │ mysql-8.0 │ │ mysql-innovation │ │ mysql-8.4-lts │ │ mysql-cluster-8.0 │ │ mysql-cluster-innovation │ │ mysql-cluster-8.4-lts │ │ None │ │ │ │ <Ok> │ └──────────────────────────────────────────────────────────────────────────────────────────────────┘Press Down, select Ok, and press Enter to save changes.
 ┌─────────────────────────────────┤ Configuring mysql-apt-config ├─────────────────────────────────┐
 │ Which MySQL product do you wish to configure?                                                    │
 │                                                                                                  │
 │                   MySQL Server & Cluster (Currently selected: mysql-8.4-lts)                     │
 │                   MySQL Connectors (Currently selected: Enabled)                                 │
 │                   Ok                                                                             │
 │                                                                                                  │
 │                                              <Ok>                                                │
 └──────────────────────────────────────────────────────────────────────────────────────────────────┘
Update the server's package information index to apply the new MySQL package repository information.
console$ sudo apt update
Install the MySQL database server package.
console$ sudo apt install mysql-server -y
Enter a new
rootdatabase user password when prompted and press Enter.Enter root password:Enter the password again to validate it and press Enter to update the
rootdatabase user.Re-enter root password:
View the MySQL version on your server.
console$ mysql --version
Your output should be similar to the one below.
mysql Ver 8.4.2 for Linux on x86_64 (MySQL Community Server - GPL)Start the MySQL system service.
console$ sudo systemctl start mysql
Enable MySQL to start at boot.
console$ sudo systemctl enable mysql
View the MySQL service status and verify that it's running on your server.
console$ sudo systemctl status mysql
Your output should be similar to the one below.
● mysql.service - MySQL Community Server
     Loaded: loaded (/lib/systemd/system/mysql.service; enabled; preset: enabled)
     Active: active (running) since Tue 2024-08-13 20:20:56 UTC; 7min ago
       Docs: man:mysqld(8)
             http://dev.mysql.com/doc/refman/en/using-systemd.html
   Main PID: 4331 (mysqld)
     Status: "Server is operational"
      Tasks: 35 (limit: 2299)
     Memory: 443.5M
        CPU: 1.924s
     CGroup: /system.slice/mysql.service
             └─4331 /usr/sbin/mysqld
Run the MySQL secure installation script to secure the database server.
console$ sudo mysql_secure_installation
Enter the
rootdatabase user password you set earlier and press Enter.Enter password for user root:Enter Y when prompted to setup the VALIDATE PASSWORD component.
Would you like to setup VALIDATE PASSWORD component?

Press y|Y for Yes, any other key for No: Y
Set your preferred password strength policy for your MySQL database server. For example, enter 2 to enable strong password validation.
There are three levels of password validation policy:

LOW    Length >= 8
MEDIUM Length >= 8, numeric, mixed case, and special characters
STRONG Length >= 8, numeric, mixed case, special characters and dictionary file

Please enter 0 = LOW, 1 = MEDIUM and 2 = STRONG: 2
Enter N when prompted to change the
rootdatabase user password, or enter Y to change the password.Change the password for root ? ((Press y|Y for Yes, any other key for No) : NEnter Y when prompted to remove anonymous users from MySQL.
Remove anonymous users? (Press y|Y for Yes, any other key for No) : YEnter Y when prompted to disallow remote login for the
rootuser.Disallow root login remotely? (Press y|Y for Yes, any other key for No) : YEnter Y when prompted to remove the test database from your MySQL database server.
Remove test database and access to it? (Press y|Y for Yes, any other key for No) : YEnter Y to reload the MySQL privileges table and apply all configuration changes.
Reload privilege tables now? (Press y|Y for Yes, any other key for No) : YOutput:
All done!
Install PHP
PHP is available in the default package repositories on Debian 12. Follow the steps below to install PHP, PHP-FPM, and additional web application modules on your server.
Install PHP and PHP-FPM.
console$ sudo apt install php php-fpm -y
Install PHP modules.
console$ sudo apt install php-mysql php-cli libapache2-mod-php -y
The above command installs the following PHP modules:
php-mysql: Connects PHP to the MySQL database server to perform SQL operations.php-cli: Allows you to run PHP scripts from the Command Line Interface (CLI).libapache2-mod-php: Integrates PHP with the Apache webserver to enable processing and forwarding of PHP requests.
View the PHP version installed on your server.
console$ php -v
Your output should be similar to the one below.
PHP 8.2.20 (cli) (built: Jun 17 2024 13:33:14) (NTS)
Copyright (c) The PHP Group
Zend Engine v4.2.20, Copyright (c) Zend Technologies
    with Zend OPcache v8.2.20, Copyright (c), by Zend Technologies
Start the PHP-FPM service depending on your PHP version such as PHP
8.2.console$ sudo systemctl start php8.2-fpm
Enable PHP-FPM to start automatically at boot.
console$ sudo systemctl enable php8.2-fpm
View the PHP-FPM service status and verify that it's running.
console$ sudo systemctl status php8.2-fpm
Output:
● php8.2-fpm.service - The PHP 8.2 FastCGI Process Manager
     Loaded: loaded (/lib/systemd/system/php8.2-fpm.service; enabled; preset: enabled)
     Active: active (running) since Tue 2024-08-13 20:40:54 UTC; 1min 52s ago
       Docs: man:php-fpm8.2(8)
   Main PID: 13661 (php-fpm8.2)
     Status: "Processes active: 0, idle: 2, Requests: 0, slow: 0, Traffic: 0.00req/sec"
      Tasks: 3 (limit: 2299)
     Memory: 9.5M
        CPU: 31ms
     CGroup: /system.slice/php8.2-fpm.service
             ├─13661 "php-fpm: master process (/etc/php/8.2/fpm/php-fpm.conf)"
             ├─13662 "php-fpm: pool www"
             └─13663 "php-fpm: pool www"
Configure PHP-FPM
PHP-FPM (FastCGI Process Manager) is a process manager for PHP designed to handle webserver requests for dynamic PHP applications. PHP-FPM offers several enhancements, including process management, server-specific configuration, and improved performance. Follow the steps below to configure PHP-FPM on your server.
Enable the Apache FastCGI module
proxy_fcgito allow the webserver to communicate with PHP-FPM.console$ sudo a2enmod proxy_fcgi
Use the
ssutility to verify the active PHP-FPM Unix socket path.console$ ss -pl | grep php
Your output should be similar to the one below.
u_str LISTEN 0 4096 /run/php/php8.2-fpm.sock 45907 * 0Based on the above output,
/run/php/php8.2-fpm.sockis the active PHP-FPM Unix socket path.Enable Apache's default PHP-FPM configuration for PHP version
8.2.console$ sudo a2enconf php8.2-fpm
Restart the Apache webserver to apply the new configuration changes.
console$ sudo systemctl restart apache2
Open the default PHP-FPM pool configuration
www.confusing a text editor such asnano.console$ sudo nano /etc/php/8.2/fpm/pool.d/www.conf
View the PHP-FPM pool name and verify that it is set to
www.ini[www]Find the following directives and verify that the values are set to
www-data.iniuser = www-data group = www-data listen.owner = www-data listen.group = www-data
Find the
listendirective and verify that it is set to the PHP-FPM Unix socket path/run/php/php8.2-fpm.sock.inilisten = /run/php/php8.2-fpm.sock
Find the following pool configurations and modify them depending on your server specifications and available resources:
pm: Specifies the process manager type. Thedynamicvalue allows PHP child processes to adjust automatically based on server needs.pm.max_children: Defines the maximum number of PHP child processes that can run simultaneously.pm.start_servers: Sets the number of child processes created on startup, providing an initial pool to handle requests.pm.min_spare_servers: Sets the minimum number of idle child processes. If the number of idle processes is less than the specified value, then some child processes will be created.pm.max_spare_servers: Sets the maximum number of idle child processes allowed. If the number of idle child processes exceeds the specified value, then the excess idle child processes are stopped.
Save and close the file.
Restart the PHP-FPM service to apply the new changes.
console$ sudo systemctl restart php8.2-fpm
Configure Apache With PHP-FPM
PHP-FPM (FastCGI Process Manager) connects with Apache using the proxy_fcgi module and the PHP-FPM Unix socket. The proxy_fcgi module forwards requests to the PHP-FPM service which processes PHP scripts and returns the output to the webserver. Follow the steps below to configure Apache with PHP-FPM to serve dynamic web application files on the server.
Create a new Apache virtual host configuration file using a text editor like
nano. For example,website.conf.console$ sudo nano /etc/apache2/sites-available/website.conf
Add the following configurations to the file. Replace
app.example.comwith your actual domain name andwebmaster@app.example.comwith your administrative email.apacheconf<VirtualHost *:80> ServerAdmin webmaster@app.example.com ServerName app.example.com DocumentRoot /var/www/html DirectoryIndex index.html index.php <Directory /var/www/html> Options Indexes FollowSymLinks AllowOverride All Require all granted </Directory> <FilesMatch \.php$> SetHandler "proxy:unix:/run/php/php8.2-fpm.sock|fcgi://localhost/" </FilesMatch> ErrorLog ${APACHE_LOG_DIR}/error.log CustomLog ${APACHE_LOG_DIR}/access.log combined </VirtualHost>
The above Apache configuration creates a new virtual host that serves web application files from the web root directory
/var/www/html/using yourapp.example.comdomain. Within the configuration:<VirtualHost *:80>: Defines the virtual host to listen for connections on the HTTP port80.ServerAdmin webmaster@app.example.com: Sets the webserver administrator's email for receiving critical error notifications and alerts.ServerName app.example.com: Specifies the virtual host domain to deliver web applications..DocumentRoot /var/www/html/: Sets the virtual host's root directory.DirectoryIndex index.html index.php: Sets a list of files to look for when an HTTP client requests an index for the virtual host.<Directory /var/www/html/>: Sets the directory configurations for requests made to the/var/www/htmldirectory.Options Indexes FollowSymLinks: Allows directory listing and the use of symbolic links within the directory.AllowOverride All: Permits.htaccessfiles to override the settings in the virtual host configuration.Require all granted: Grants all users access to files in the web root directory.<FilesMatch \.php$>: Instructs Apache how to handle PHP files. TheSetHandlerdirective specifies that PHP files should be processed by PHP-FPM using the specified Unix socket.SetHandler "proxy:unix:/var/run/php/php8.2-fpm.sock|fcgi://localhost/": Enables Apache to connect to PHP-FPM and process PHP files using the Unix socket path/var/run/php/php8.2-fpm.sock.ErrorLog ${APACHE_LOG_DIR}/error.log: Specifies the virtual host error log filename and location.CustomLog ${APACHE_LOG_DIR}/access.log combined: Specifies the virtual host's access log file location and writes data in the combined log format.
Disable the default Apache virtual host configuration file.
console$ sudo a2dissite 000-default
Enable the new Apache virtual host configuration file.
console$ sudo a2ensite website
Test the new Apache configuration for errors.
console$ sudo apachectl configtest
Output:
Syntax OKRestart the Apache webserver to apply your configuration changes.
console$ sudo systemctl restart apache2
Allow the HTTP port
80through the firewall.console$ sudo ufw allow 80/tcp
Reload UFW to apply the firewall changes.
console$ sudo ufw reload
Create a new
index.phpfile in your web root directory/var/www/html.console$ sudo touch /var/www/html/index.php
Run the following command to add PHP information contents to the file.
console$ echo "<?php phpinfo(); ?>" | sudo tee /var/www/html/index.php
Access the
/index.phppath in your web browser and verify that your PHP information displays.http://app.example.com/index.php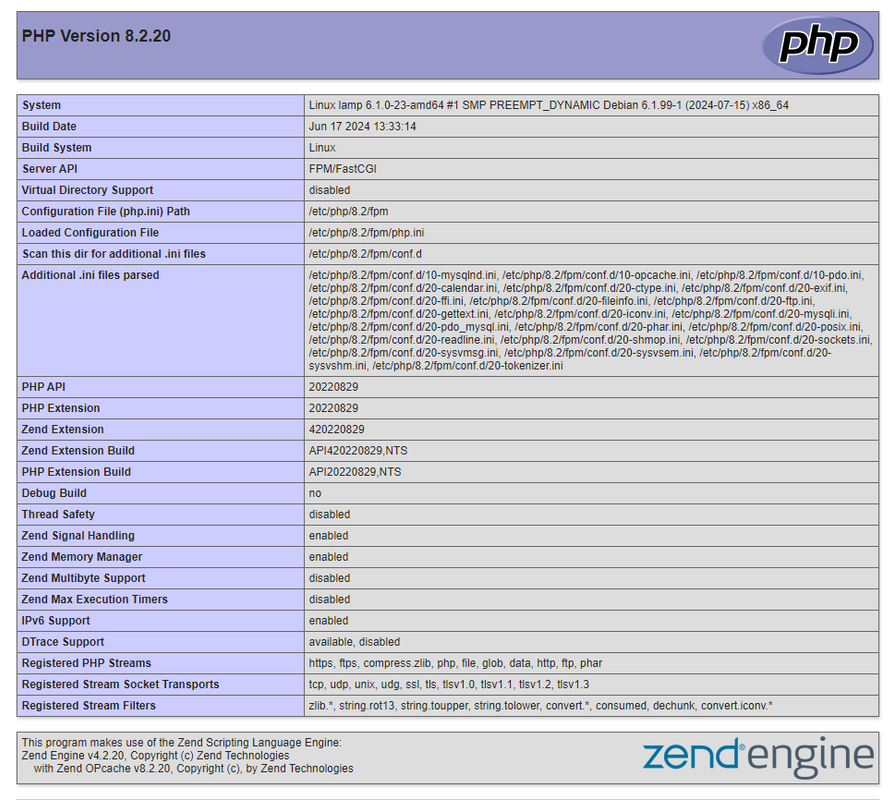
Secure Apache Webserver
Apache delivers dynamic web applications on the HTTP port 80 by default which enables unencrypted traffic to the server. Generate SSL certificates to enable HTTPS connections on port 443 and allow all Apache network ports through the default firewall configuration as described in the following sections.
Configure Uncomplicated Firewall (UFW)
Uncomplicated Firewall (UFW) is available and active on Vultr Debian 12 servers by default. Follow the steps below to configure UFW and allow connections to the Apache webserver.
Allow HTTP connections on port
80.console$ sudo ufw allow 443/tcp
Allow HTTPS connections on port
443.console$ sudo ufw allow 443/tcp
Reload UFW to apply the firewall changes.
console$ sudo ufw reload
View the firewall status and verify the new rules are available.
console$ sudo ufw status
Output:
To                         Action      From
--                         ------      ----
22/tcp                     ALLOW       Anywhere
80/tcp                     ALLOW       Anywhere
443/tcp                    ALLOW       Anywhere
22/tcp (v6)                ALLOW       Anywhere (v6)
80/tcp (v6)                ALLOW       Anywhere (v6)
443/tcp (v6)               ALLOW       Anywhere (v6)
Generate Let's Encrypt SSL Certificates
Install the Certbot Let's Encrypt client plugin for Apache.
console$ sudo apt install certbot python3-certbot-apache
Request a new Let's Encrypt SSL certificate on your server. Replace
app.example.comwith your domain andemail@example.comwith your actual email address.console$ sudo certbot --apache --agree-tos --redirect --email email@example.com -d app.example.com
Test the Certbot SSL certificate renewal process.
console$ sudo certbot renew --dry-run
Restart Apache to apply the SSL configuration changes.
console$ sudo systemctl restart apache2
Test the Installation
Follow the steps below to set up sample web applications, create a database table, and insert a new Greetings from Vultr record into the table. Then, connect to the database and fetch the Greetings from Vultr message from the MySQL database on your server.
Log in to MySQL as
root.console$ mysql -u root -p
Enter the
rootuser password you set earlier when prompted to access the MySQL console.Create a new sample database. For example,
VultrDB.sqlmysql> CREATE DATABASE VultrDB;
Switch to the
VultrDBdatabase.sqlmysql> USE VultrDB;
Create a new sample database user
db_userwith a strong password. ReplaceStr0ng_P@ssw0rd!with your desired password.sqlmysql> CREATE USER 'db_user'@'localhost' IDENTIFIED BY 'Str0ng_P@ssw0rd!';
Grant
db_userfull privileges to theVultrDBdatabase.sqlmysql> GRANT ALL PRIVILEGES ON VultrDB.* TO 'db_user'@'localhost';
Reload the MySQL privileges table to apply changes.
sqlmysql> FLUSH PRIVILEGES;
Exit the MySQL console.
sqlmysql> exit;
Create a new
insert.phpPHP file in your web root directory.console$ sudo nano /var/www/html/insert.php
Add the following contents to the file.
php<?php // Database configuration $servername = "localhost"; $username = "db_user"; $password = "Str0ng_P@ssw0rd!"; $dbname = "VultrDB"; // Create a database connection $conn = new mysqli($servername, $username, $password, $dbname); // Check the database connection if ($conn->connect_error) { die("Connection failed: " . $conn->connect_error); } // Check if the VultrTable exists $tableName = "VultrTable"; $tableCheckQuery = "SHOW TABLES LIKE '$tableName'"; $result = $conn->query($tableCheckQuery); if ($result && $result->num_rows > 0) { echo "The Table '$tableName' already exists in the '$dbname' database.<br>"; } else { // Create VultrTable table if it doesn't exist $tableCreateQuery = "CREATE TABLE $tableName ( id INT(11) AUTO_INCREMENT PRIMARY KEY, greetings VARCHAR(255) NOT NULL )"; if ($conn->query($tableCreateQuery) === TRUE) { echo "Table '$tableName' created successfully.<br>"; } else { echo "Error creating table: " . $conn->error . "<br>"; } } // Message to insert into the VultrTable $greetings = "Greetings from Vultr"; // Prepare and bind $stmt = $conn->prepare("INSERT INTO VultrTable (greetings) VALUES (?)"); $stmt->bind_param("s", $greetings); // Execute the statement if ($stmt->execute()) { echo "New record created successfully"; } else { echo "Error: " . $stmt->error; } // Close connections $stmt->close(); $conn->close(); ?>
Save and close the file.
The above PHP application connects to the MySQL database server as
db_userto create a newVultrTabletable in theVultrDBdatabase if it does not exist. The application then inserts a newGreetings from Vultrrecord into the table when the connection is successful.Create a new
display.phpapplication file in your web root directory.console$ sudo nano /var/www/html/display.php
Add the following contents to the file.
php<?php // Database configuration $servername = "localhost"; $username = "db_user"; $password = "Str0ng_P@ssw0rd!"; $dbname = "VultrDB"; // Create a database connection $conn = new mysqli($servername, $username, $password, $dbname); // Check the database connection if ($conn->connect_error) { die("Connection failed: " . $conn->connect_error); } // Query to select all entries from the VultrTable table. $sql = "SELECT * FROM VultrTable"; $result = $conn->query($sql); if ($result->num_rows > 0) { // Display each row while ($row = $result->fetch_assoc()) { echo "<h1>" . $row["id"] . " : " . $row["greetings"] . "</h1> <br>"; } } else { echo "0 results"; } // Close connection $conn->close(); ?>
Save and close the file.
The above PHP application fetches all records from the
VultrTabletable in theVultrDBsample database and displays the result when the connection is successful.Access the
/insert.phppath using your domain in a new browser window to create a new table and insert data.https://app.example.com/insert.php
Access the
/display.phppath using your domain in a new browser window to fetch all table records from the database.https://app.example.com/display.php
Conclusion
You have installed the Apache, MySQL, and PHP (LAMP) stack on your Debian 12 server. You can create and securely deploy multiple web applications using virtual host configurations and PHP-FPM pools on your server. For more information and configuration options, visit the following documentation resources.