
How to Install Apache Tomcat on Ubuntu 24.04
Introduction
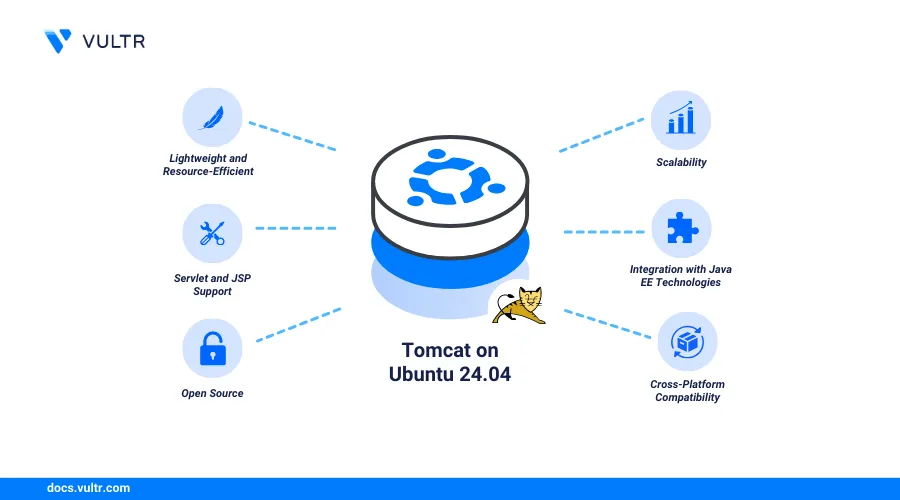
Apache Tomcat is an open-source web server application that allows developers to run Java applications in a secure and efficient environment. Tomcat implements Java Servlet and JavaServer Pages (JSP) specifications to deploy and manage Java-based web applications on a server.
Apache Tomcat supports load balancing, clustering, and high availability features to run applications with different workloads.
This article explains how to install Apache Tomcat on Ubuntu 24.04 to run dynamic web applications on a server.
Prerequisites
Before you begin:
- Deploy a Ubuntu 24.04 instance on Vultr to use as the production server and enable the
limited user loginfeature. - Set up a domain A record pointing to your instance's IP address. For example,
tomcat.example.com. - Access the instance using SSH.
- Update the instance's package index.
Install Java OpenJDK
Apache Tomcat requires the Java Development Kit (JDK) version 17 or later. Follow the steps below to install the required OpenJDK version and create a new dedicated user to run Tomcat on your server.
Install OpenJDK 17 on your server.
console$ sudo apt install openjdk-17-jdk -y
View the installed Java version.
console$ java -version
Output:
openjdk version "17.0.13" 2024-10-15
OpenJDK Runtime Environment (build 17.0.13+11-Ubuntu-2ubuntu124.04)
OpenJDK 64-Bit Server VM (build 17.0.13+11-Ubuntu-2ubuntu124.04, mixed mode, sharing)
Create a new
tomcatgroup to use with the Apache Tomcat service.console$ sudo groupadd tomcat
Create a new
tomcatuser with/opt/tomcatas the home directory and a member of thetomcatgroup.console$ sudo useradd -s /bin/false -g tomcat -d /opt/tomcat tomcat
Install Apache Tomcat
Apache Tomcat is not available in the default package repositories on Ubuntu. Follow the steps below to download the latest Apache Tomcat release file and install the application on your server.
Visit the Apache Tomcat releases page and download the latest Apache Tomcat 11 release file.
console$ wget -O tomcat.tar.gz https://dlcdn.apache.org/tomcat/tomcat-11/v11.0.1/bin/apache-tomcat-11.0.1.tar.gz
The above command downloads the Tomcat release version
11.0.1on your server. Ensure to download the latest version to install the latest application features and configurations.Create a new
tomcatdirectory in a system-wide location such as/optto extract the Tomcat package contents.console$ sudo mkdir /opt/tomcat
Extract files from the downloaded Tomcat archive to the
/opt/tomcatdirectory.console$ sudo tar -xvzf tomcat.tar.gz -C /opt/tomcat --strip-components=1
The
--strip-components=1option in the above command removes the top-level directory in the archive and extracts all Tomcat package contents to the/opt/tomcatdirectory.Remove the downloaded archive file to free up the server's disk space.
console$ sudo rm -rf tomcat.tar.gz
Grant the
tomcatuser and group ownership privileges to the/opt/tomcatdirectory.console$ sudo chown -R tomcat:tomcat /opt/tomcat
Grant the
tomcatgroup read privileges to theconfdirectory.console$ sudo chmod -R g+r /opt/tomcat/conf
Grant the
tomcatgroup execute permissions to the/opt/tomcat/confdirectory.console$ sudo chmod g+x /opt/tomcat/conf
Create Apache Tomcat Users
Apache Tomcat requires specific user accounts with administrative privileges to access the manager and host-manager applications in the web management dashboard. Follow the steps below to create privileged users and remove IP address restrictions to enable access to the manager and host-manager applications.
Open the
tomcat-users.xmluser configuration file using a text editor such asnano.console$ sudo nano /opt/tomcat/conf/tomcat-users.xml
Add the following configurations above the
</tomcat-users>directive. Replacemanager_passwordandadmin_passwordwith your desired administrative user passwords.ini<role rolename="manager-gui" /> <user username="manager" password="manager_password" roles="manager-gui" /> <role rolename="admin-gui" /> <user username="admin" password="admin_password" roles="manager-gui,admin-gui" />
Save and close the file.
The above configuration creates a new
managerandadminuser with manager, and administrator privileges respectively to access the Tomcat web management dashboard.Open the manager
context.xmlfile to remove restrictions to the manager application.console$ sudo nano /opt/tomcat/webapps/manager/META-INF/context.xml
Find and disable the following
Valvedirective using a<!-- -->comment.ini<!-- <Valve className="org.apache.catalina.valves.RemoteAddrValve" allow="127\.\d+\.\d+\.\d+|::1|0:0:0:0:0:0:0:1" /> -->
Save and close the file.
Open the host manager
context.xmlfile to remove restrictions to the host manager application.console$ sudo nano /opt/tomcat/webapps/host-manager/META-INF/context.xml
Find and disable the following
Valvedirective.ini<!-- <Valve className="org.apache.catalina.valves.RemoteAddrValve" allow="127\.\d+\.\d+\.\d+|::1|0:0:0:0:0:0:0:1" /> -->
Save and close the file.
Set Up Apache Tomcat as a System Service
Follow the steps below to create a new system service to run and manage the Apache Tomcat application processes on your server.
Run the following command to view and note the Java installation path in your output.
console$ sudo update-java-alternatives -l
Output:
java-1.17.0-openjdk-amd64 1711 /usr/lib/jvm/java-1.17.0-openjdk-amd64Create a new
tomcat.servicesystem service file.console$ sudo nano /etc/systemd/system/tomcat.service
Add the following configurations to the file. Modify the
JAVA_HOMEvalue to include your actual Java installation path if different.ini[Unit] Description=Tomcat After=network.target [Service] Type=forking User=tomcat Group=tomcat Environment="JAVA_HOME=/usr/lib/jvm/java-1.17.0-openjdk-amd64" Environment="JAVA_OPTS=-Djava.security.egd=file:///dev/urandom" Environment="CATALINA_BASE=/opt/tomcat" Environment="CATALINA_HOME=/opt/tomcat" Environment="CATALINA_PID=/opt/tomcat/temp/tomcat.pid" Environment="CATALINA_OPTS=-Xms512M -Xmx1024M -server -XX:+UseParallelGC" ExecStart=/opt/tomcat/bin/startup.sh ExecStop=/opt/tomcat/bin/shutdown.sh RestartSec=10 Restart=always [Install] WantedBy=multi-user.target
Save and close the file.
The above system service configuration creates a new
tomcatservice that runs thestartup.shandshutdown.shscripts in the Apache Tomcat project directory to manage the application's processes.Reload the systemd daemon to apply the new service configuration.
console$ sudo systemctl daemon-reload
Enable the Apache Tomcat service to start at boot.
console$ sudo systemctl enable tomcat
Start the Apache Tomcat service.
console$ sudo systemctl start tomcat
View the Apache Tomcat service status and verify that it's running.
console$ sudo systemctl status tomcat
Output:
● tomcat.service - Tomcat
     Loaded: loaded (/etc/systemd/system/tomcat.service; enabled; preset: enabled)
     Active: active (running) since Thu 2024-12-05 12:12:25 UTC; 6s ago
    Process: 12213 ExecStart=/opt/tomcat/bin/startup.sh (code=exited, status=0/SUCCESS)
   Main PID: 12220 (java)
      Tasks: 31 (limit: 2269)
     Memory: 112.5M (peak: 115.7M)
        CPU: 2.430s
     CGroup: /system.slice/tomcat.service
             └─12220 /usr/lib/jvm/java-1.17.0-openjdk-amd64/bin/java -Djava.util.logging.config.file=/opt/tomcat/conf/logging.proper>
Secure Apache Tomcat with Trusted SSL Certificates
Apache Tomcat listens for incoming connections using the insecure HTTP port 8080 and the HTTPS port 8443 for secure connections. Follow the steps below to generate trusted Let's Encrypt SSL certificates using the tomcat.example.com domain to enable secure HTTPS connections to the Apache Tomcat service.
View the UFW status and verify that the firewall is active.
console$ sudo ufw status
If the status is
inactive, allow the SSH port22and enable UFW using the command below.console$ sudo ufw allow 22 && sudo ufw enable
Allow HTTP connections through the firewall.
console$ sudo ufw allow http
Reload UFW to apply the firewall configuration changes.
console$ sudo ufw reload
Install the Snapd package.
console$ sudo apt install snapd -y
Install the Certbot Let's Encrypt client using Snap.
console$ sudo snap install --classic certbot
Generate a new SSL certificate to use with Apache Tomcat. Replace
tomcat.example.comandadmin@example.comwith your actual details.console$ sudo certbot certonly --standalone -d tomcat.example.com -m admin@example.com --agree-tos
Your output should be similar to the one below when successful.
Saving debug log to /var/log/letsencrypt/letsencrypt.log
Requesting a certificate for tomcat.example.com

Successfully received certificate.
Certificate is saved at: /etc/letsencrypt/live/tomcat.example.com/fullchain.pem
Key is saved at:         /etc/letsencrypt/live/tomcat.example.com/privkey.pem
This certificate expires on 2025-02-27.
These files will be updated when the certificate renews.
Certbot has set up a scheduled task to automatically renew this certificate in the background.

- - - - - - - - - - - - - - - - - - - - - - - - - - - - - - - - - - - - - - - -
If you like Certbot, please consider supporting our work by:
 * Donating to ISRG / Let's Encrypt:   https://letsencrypt.org/donate
 * Donating to EFF:                    https://eff.org/donate-le
- - - - - - - - - - - - - - - - - - - - - - - - - - - - - - - - - - - - - - - -
Copy your domain's Let's Encrypt SSL certificate files to the
/opt/tomcat/conf/Tomcat configurations directory. Replacetomcat.example.comwith your actual domain.console$ sudo bash -c 'cp /etc/letsencrypt/live/tomcat.example.com/*.pem /opt/tomcat/conf/'
Grant the Apache Tomcat user and group full privileges to all
.pemcertificate files in the/opt/tomcat/conf/directory.console$ sudo bash -c 'chown -R tomcat:tomcat /opt/tomcat/conf/*.pem'
Allow network connections to the Apache Tomcat HTTP port
8080and HTTPS port8443through the firewall.console$ sudo ufw allow 8080,8443/tcp
Reload UFW to apply the firewall configuration changes.
console$ sudo ufw reload
View the UFW status and verify all available firewall rules.
console$ sudo ufw status
Output:
Status: active

To                         Action      From
--                         ------      ----
22/tcp                     ALLOW       Anywhere
80/tcp                     ALLOW       Anywhere
8080/tcp                   ALLOW       Anywhere
8443/tcp                   ALLOW       Anywhere
22/tcp (v6)                ALLOW       Anywhere (v6)
80/tcp (v6)                ALLOW       Anywhere (v6)
8080/tcp                   ALLOW       Anywhere (v6)
8443/tcp (v6)              ALLOW       Anywhere (v6)
Open the
server.xmlfile to enable the SSL files in the Apache Tomcat configuration.console$ sudo nano /opt/tomcat/conf/server.xml
Add the following configuration before the
<Connectorsection to load your SSL certificate files.ini<Connector port="8443" protocol="org.apache.coyote.http11.Http11NioProtocol" maxThreads="150" SSLEnabled="true"> <SSLHostConfig> <Certificate certificateFile="conf/cert.pem" certificateKeyFile="conf/privkey.pem" certificateChainFile="conf/chain.pem" /> </SSLHostConfig> </Connector>
Save and close the file.
The above configuration enables Apache Tomcat to accept HTTPS network connections on port
8443using the.pemcertificate files in the/opt/tomcat/confdirectory.Restart the Apache Tomcat service to apply the configuration changes.
console$ sudo systemctl restart tomcat
Access the Apache Tomcat Web Management Dashboard
Follow the steps below to access the Apache Tomcat web management dashboard to view and manage web applications on your server.
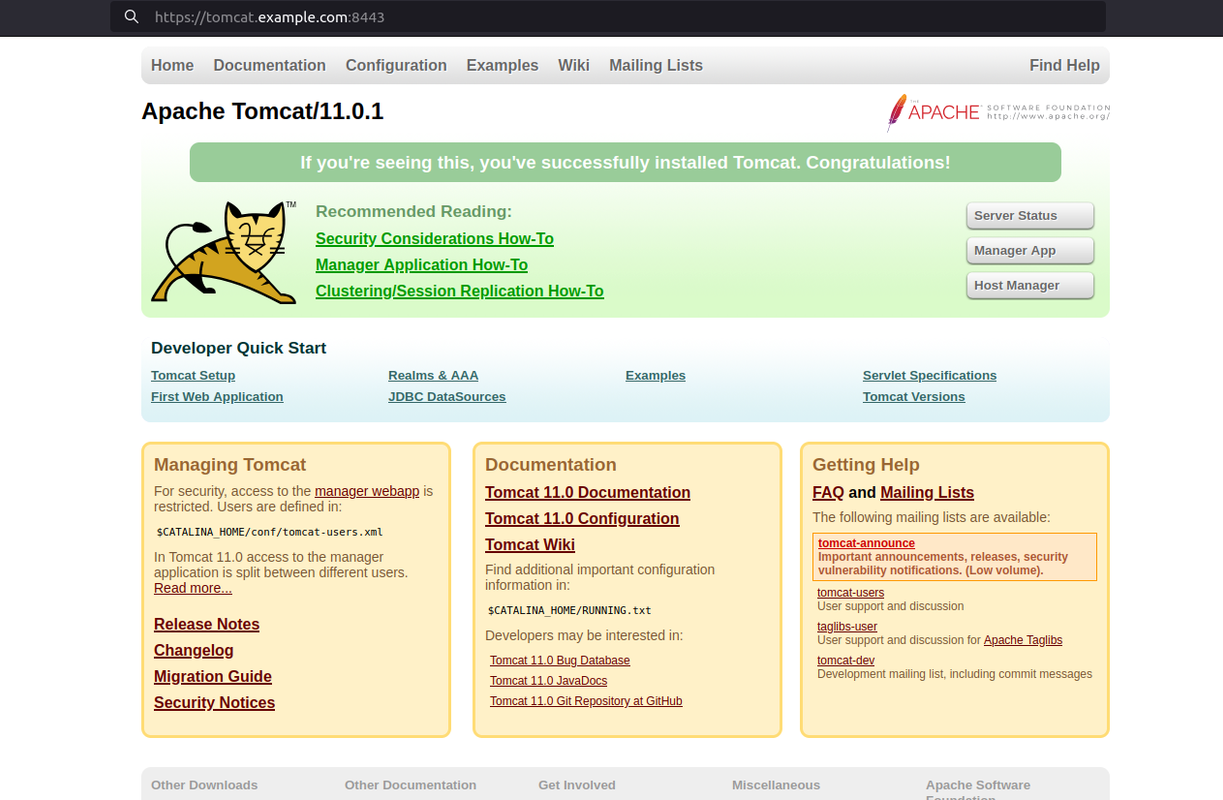
Visit your Apache Tomcat domain on port
8443using a web browser such as Chrome.https://tomcat.example.com:8443Verify that the default Apache Tomcat page displays in your web browser.
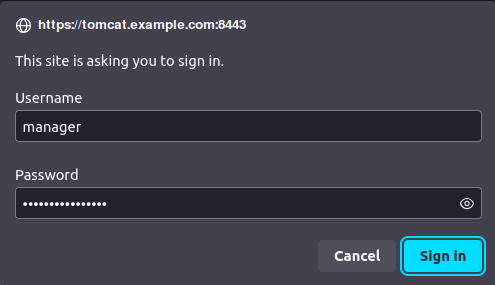
Click Manager App to access the Apache Tomcat manager application, and enter your manager username and password when prompted to Sign In.
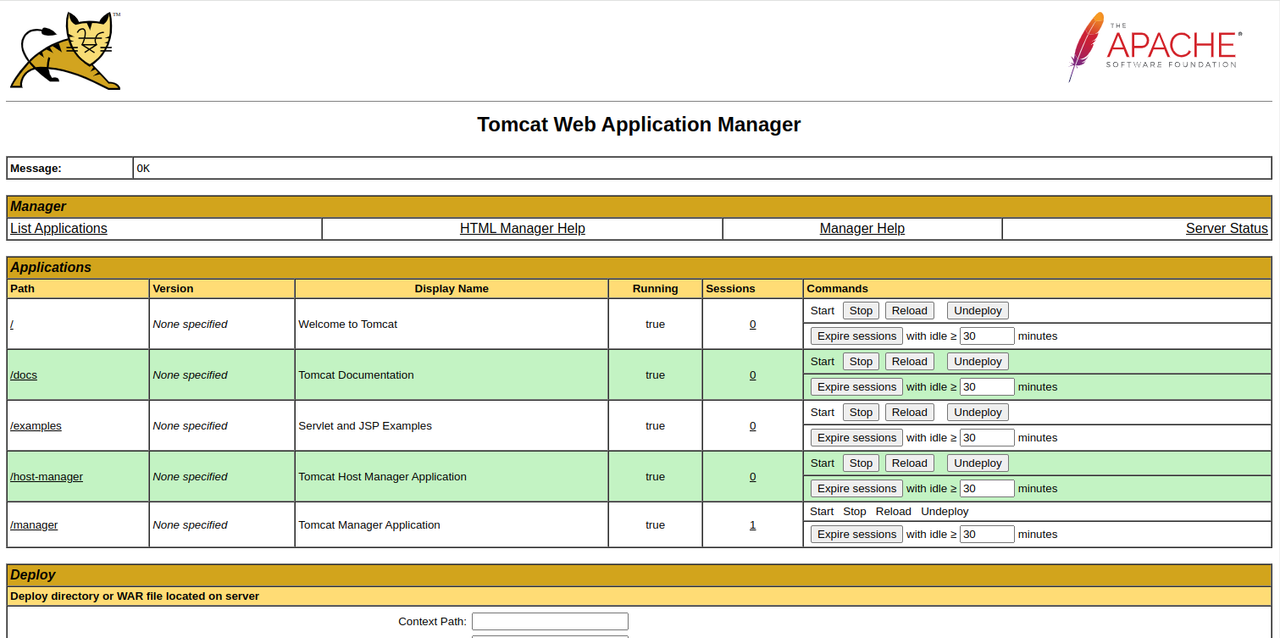
Verify that the Apache Tomcat manager application loads correctly.
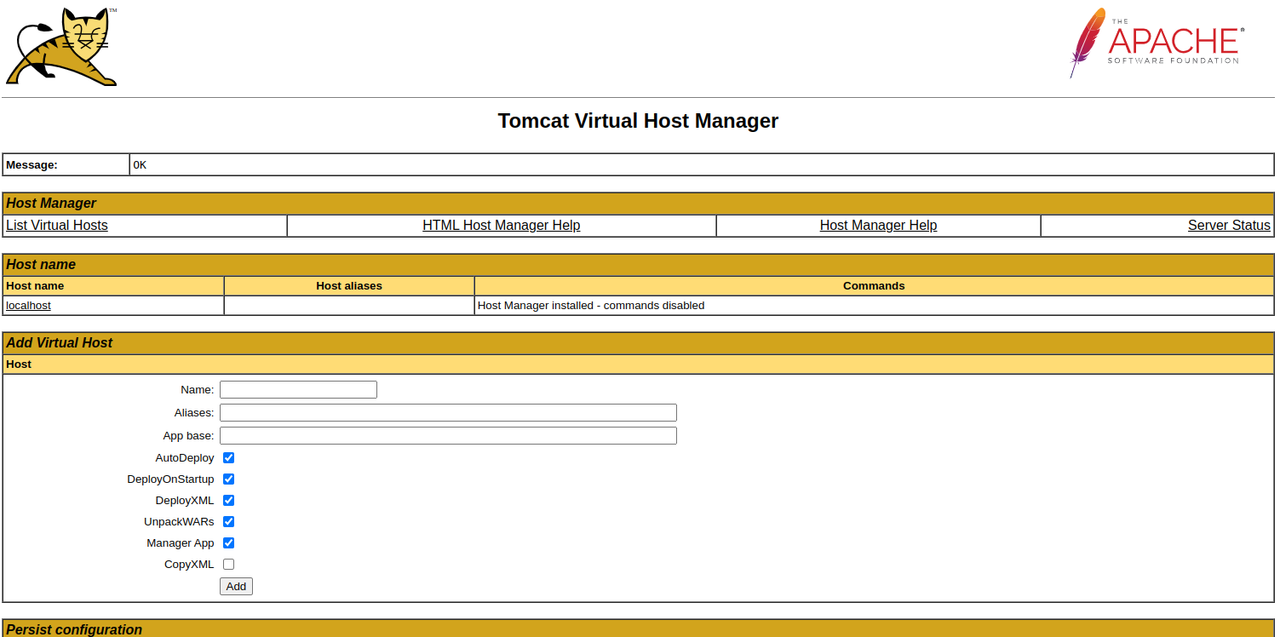
Click Host Manager from the list of applications to access the host manager interface. Enter your administrator user credentials when prompted to log in.
Create a Java Web Application to Run on Apache Tomcat
Follow the steps below to create a sample Java web application with the following structure and run it using Apache Tomcat on your server.
/home/linuxuser/example-app/
    ├── WEB-INF/
    │   ├── web.xml
    │   └── classes/
    │       └── GreetingsServlet.class
Create a new
example-appproject directory.console$ mkdir example-app
Switch to the
example-appdirectory.console$ cd example-app
Create a
WEB-INFsubdirectory in theexample-appproject directory.console$ mkdir WEB-INF
Create a
classessubdirectory inside theWEB-INFdirectory.console$ mkdir WEB-INF/classes
Create a new
GreetingsServlet.javaJava web application file.console$ nano GreetingsServlet.java
Add the following contents to the
GreetingsServlet.javafile.javaimport jakarta.servlet.*; import jakarta.servlet.http.*; import java.io.IOException; public class GreetingsServlet extends HttpServlet { @Override protected void doGet(HttpServletRequest request, HttpServletResponse response) throws IOException { response.setContentType("text/html"); response.getWriter().println("<h1 align='center'>Hello, World! Greetings from Vultr</h1>"); } }
Save and close the file.
The above configuration creates a new
GreetingsServletthat extends theHttpServletand displaysHello, World! Greetings from Vultrmessage when it runs.Create a new
web.xmlfile in theWEB-INFdirectory.console$ nano WEB-INF/web.xml
Add the following contents to the
web.xmlfile.xml<web-app xmlns="https://jakarta.ee/xml/ns/jakartaee" xmlns:xsi="http://www.w3.org/2001/XMLSchema-instance" xsi:schemaLocation="https://jakarta.ee/xml/ns/jakartaee https://jakarta.ee/xml/ns/jakartaee/web-app_5_0.xsd" version="5.0"> <servlet> <servlet-name>GreetingsServlet</servlet-name> <servlet-class>GreetingsServlet</servlet-class> </servlet> <servlet-mapping> <servlet-name>GreetingsServlet</servlet-name> <url-pattern>/helloworld</url-pattern> </servlet-mapping> </web-app>
Save and close the file.
The above XML configuration maps the
GreetingsServletto the/helloworldURL pattern to enable Apache Tomcat to run theexample-appJava web application using the/helloworldpath.Compile the
GreetingsServlet.javaapplication file using theservlet-api.jarApache Tomcat library to create aGreetingsServlet.classfile.console$ sudo javac -cp /opt/tomcat/lib/servlet-api.jar -d . GreetingsServlet.java
Move the
GreetingsServlet.classfile to theWEB-INF/classesdirectory.console$ mv GreetingsServlet.class WEB-INF/classes/
List files in the
classessubdirectory and verify that a newGreetingsServerlet.classfile is available.console$ ls WEB-INF/classes
Output:
GreetingsServerlet.classSwitch to your parent directory.
console$ cd ..
Move the
example-appproject to the/opt/tomcat/webappsdirectory to enable the new web application.console$ sudo mv example-app /opt/tomcat/webapps/example-app
Restart Apache Tomcat to apply the configuration changes.
console$ sudo systemctl restart tomcat
Open the Apache Tomcat web management interface and click Manager App to view all available web applications.
https://tomcat.example.com:8443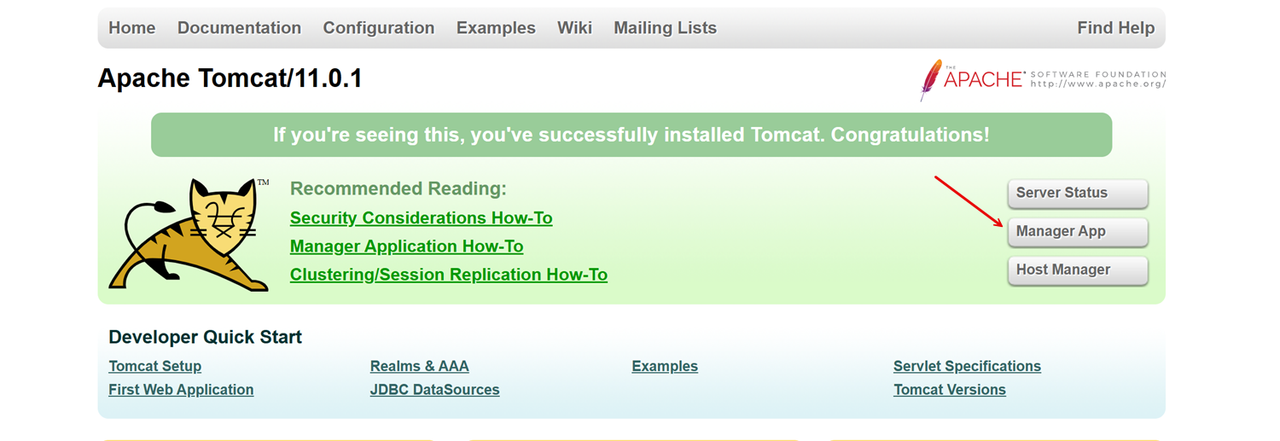
Verify that the
example-appweb application is available on the list of applications.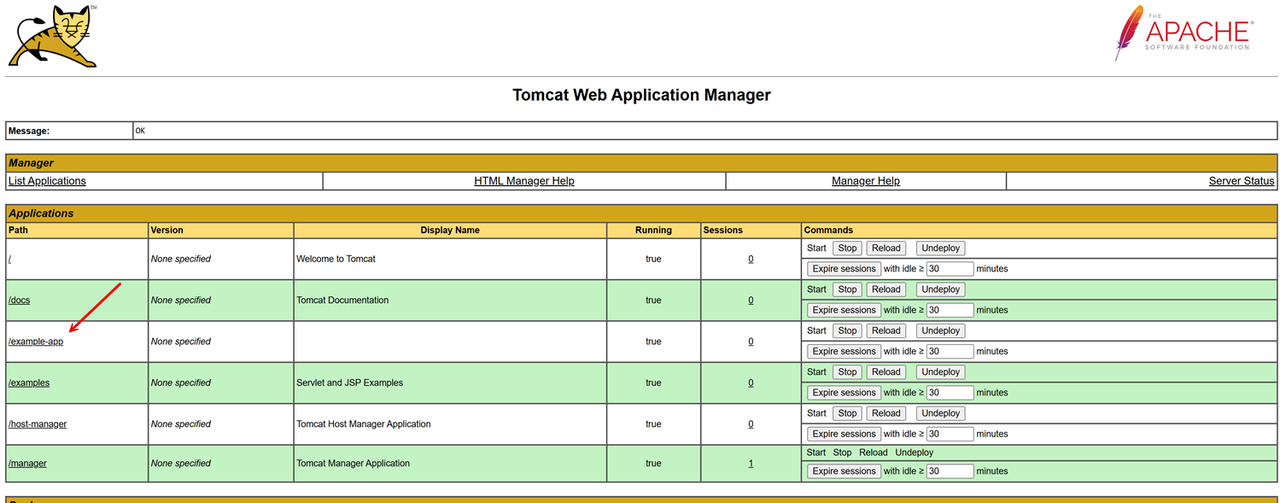
Modify your Apache Tomcat URL and include the
/example-app/helloworldpath to verify that theexample-appweb application runs correctly.https://tomcat.example.com:8443/example-app/helloworld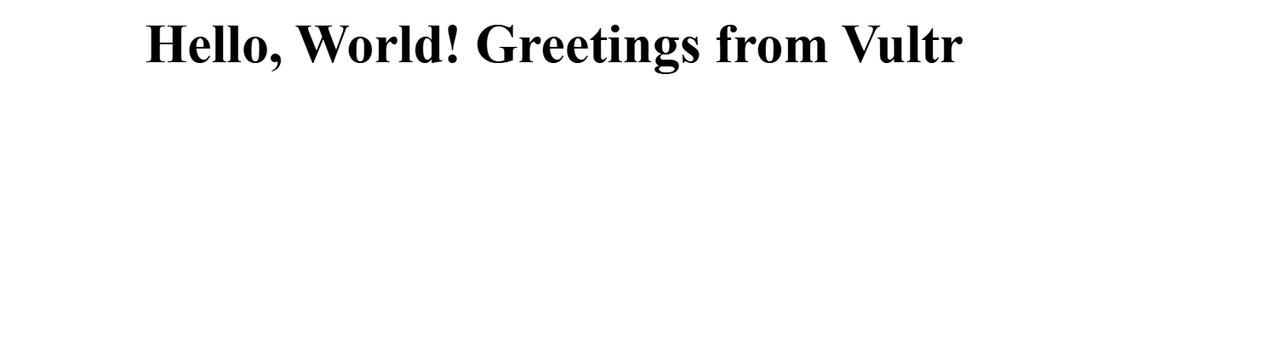
Conclusion
You have installed Apache Tomcat on Ubuntu 24.04 and secured the server with trusted Let's Encrypt SSL certificates to run Java-based web applications. You can use Apache Tomcat to deploy multiple web applications and run specific services to match your development needs. For more information and configuration options, visit the Tomcat documentation.