Cockpit is an open-source web-based control panel used to perform system administration tasks, including service management, monitoring applications, devices, and resources on Linux. Cockpit supports multiple addon modules and applications that extend its functionality to run or manage multiple system components.
This article explains how to install Cockpit on Rocky Linux 9 and manage the server.
Prerequisites
Before you begin, you need to:
- Have access to a Rocky Linux 9 instance.
- Create a domain A record pointing to the instance such as
cockpit.example.com.
Install Cockpit
Cockpit is installed but not active on most Rocky Linux 9 instances by default. You can install Cockpit using the DNF package manager if it’s not available and activate it using systemd. Follow the steps below to install Cockpit on Rocky Linux 9.
Update the server's package index.
console$ sudo dnf update
Install Cockpit.
console$ sudo dnf install cockpit -y
Enable Cockpit to automatically start at boot.
console$ sudo systemctl enable cockpit.socket
Output:
Created symlink /etc/systemd/system/sockets.target.wants/cockpit.socket → /usr/lib/systemd/system/cockpit.socket.Start the Cockpit system service.
console$ sudo systemctl start cockpit
Verify that the Cockpit service is active and running.
console$ sudo systemctl status cockpit
Output:
● cockpit.service - Cockpit Web Service
     Loaded: loaded (/usr/lib/systemd/system/cockpit.service; static)
     Active: active (running) since Wed 2025-02-12 10:11:04 UTC; 4s ago
TriggeredBy: ● cockpit.socket
       Docs: man:cockpit-ws(8)
    Process: 62303 ExecStartPre=/usr/libexec/cockpit-certificate-ensure --for-cockpit-tls (code=exited, status=0/SUCCESS)
   Main PID: 62322 (cockpit-tls)
      Tasks: 1 (limit: 4424)
     Memory: 1.9M
        CPU: 1.328s
     CGroup: /system.slice/cockpit.service
             └─62322 /usr/libexec/cockpit-tls

Feb 12 10:11:03 cockpit-test systemd[1]: Starting Cockpit Web Service...
Feb 12 10:11:04 cockpit-test systemd[1]: Started Cockpit Web Service.
Create a dedicated non-root user such as
cockpit-adminto manage Cockpit.console$ sudo adduser cockpit-admin
Assign the user a strong password.
console$ sudo passwd cockpit-admin
Add the user to the
wheelsudo users group to perform administrative tasks using Cockpit.console$ sudo usermod -aG wheel cockpit-admin
Secure Cockpit with Trusted SSL Certificates
Cockpit uses the TCP port 9090 by default to handle incoming network connections without end-to-end encryption using plain HTTP. Encrypting connections to the Cockpit port enables secure data transfer and authentication using HTTPS on all client web browsers. Follow the steps below to generate trusted SSL certificates using your domain to encrypt connections to the Cockpit control panel interface.
Confirm the Firewalld status and verify that it's active on your server.
console$ sudo systemctl status firewalld
Install Firewalld and allow SSH connections if its not available.
console$ sudo dnf install firewalld -y && sudo systemctl start firewalld && sudo firewall-cmd --permanent --add-service=ssh
Temporarily allow HTTP network connections to enable Let’s Encrypt validations.
console$ sudo firewall-cmd --add-service=http --permanent
Restart Firewalld to apply the firewall changes.
console$ sudo firewall-cmd --reload
Enable the EPEL repository.
console$ sudo dnf install epel-release -y
Install the Certbot Let’s Encrypt client.
console$ sudo dnf install certbot -y
Request for a new SSL certificate from Let’s Encrypt using your domain. Replace
cockpit.example.comwith your domain andadmin@example.comwith your email.console$ sudo certbot certonly --standalone -d cockpit.example.com -m admin@example.com --agree-tos
Your output should appear like the one below when the certificate is generated.
Successfully received certificate.
Certificate is saved at: /etc/letsencrypt/live/cockpit.example.com/fullchain.pem
Key is saved at:         /etc/letsencrypt/live/cockpit.example.com/privkey.pem
This certificate expires on 2025-05-13.
These files will be updated when the certificate renews.
Certbot has set up a scheduled task to automatically renew this certificate in the background.

- - - - - - - - - - - - - - - - - - - - - - - - - - - - - - - - - - - - - - - -
If you like Certbot, please consider supporting our work by:
 * Donating to ISRG / Let's Encrypt:   https://letsencrypt.org/donate
 * Donating to EFF:                    https://eff.org/donate-le
- - - - - - - - - - - - - - - - - - - - - - - - - - - - - - - - - - - - - - - -
Test the Certbot automatic renewal process.
console$ sudo certbot renew --dry-run
Link the
fullchain.pemSSL certificate to the/etc/cockpit/ws-certs.dCockpit directory.console$ sudo ln -sf /etc/letsencrypt/live/cockpit.example.com/fullchain.pem /etc/cockpit/ws-certs.d/certificate.cert
The above command links the SSL certificate file to the Cockpit SSL certificates directory as
cockpit.cert. Linking the certificate ensures that it’s auto-renewed upon expiry.Link the
privkey.pemprivate key file to the/etc/cockpit/ws-certs.dCockpit directory.console$ sudo ln -sf /etc/letsencrypt/live/cockpit.example.com/privkey.pem /etc/cockpit/ws-certs.d/certificate.key
Restart Cockpit to apply the SSL configuration changes.
console$ sudo systemctl restart cockpit
Allow network connections to the Cockpit port
9090through the firewall.console$ sudo firewall-cmd --permanent --add-port=9090/tcp
Restart Firewalld to apply the firewall configuration changes.
console$ sudo firewall-cmd --reload
Access Cockpit
You can access the Cockpit web console using its default port 9090. To define a different port, modify the cockpit.conf file with a new port directive. Follow the steps below to access Cockpit and manage your Rocky Linux 9 server.
Access port
9090using your domain in a new web browser window to open the Cockpit login page.https://cockpit.example.com:9090Log in to the Cockpit web console using the
cockpit-adminnon-root sudo user details you created earlier.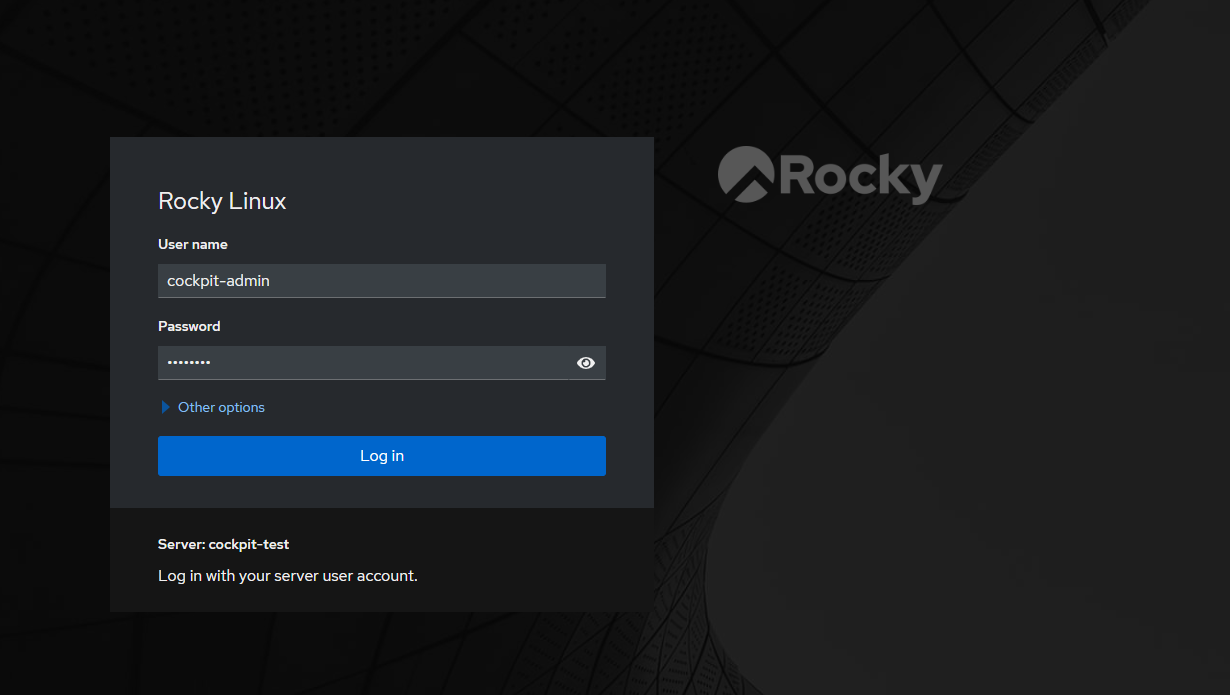
The
rootuser login is disabled, and you can only use non-root users to access Cockpit. Sudo users can perform administrative tasks using Cockpit, while regular non-root users can view active processes, system information, and resources.
Manage a Rocky Linux 9 Server Using Cockpit
You can manage a Rocky Linux 9 server using Cockpit to install packages, monitor system processes, manage users, and enable or disable specific features. Follow the steps below to manage your Rocky Linux 9 server using the Cockpit web console.
Click Turn on administrative access within the Cockpit interface and enter your sudo user password to enable administrative privileges.
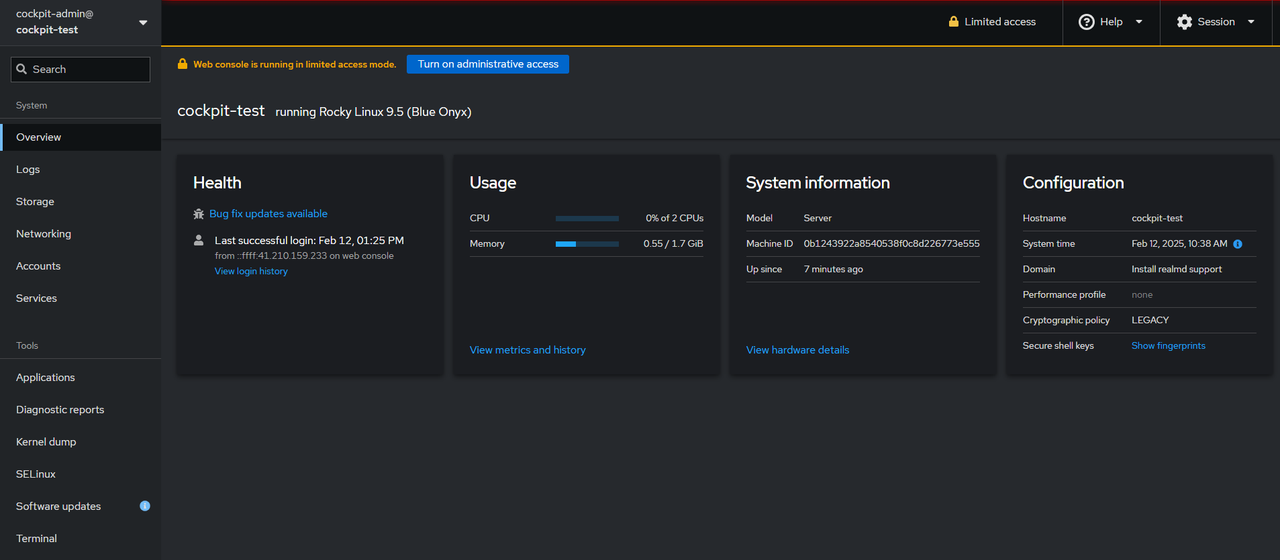
Monitor the server status and basic information within the Overview tab, including Health, Usage,`System information, and Configuration.
Click Logs on the main navigation menu to monitor the server logs. Click last 24 hours to change the duration, Priority to set the log type, Identifier, and Filters to modify your log results.

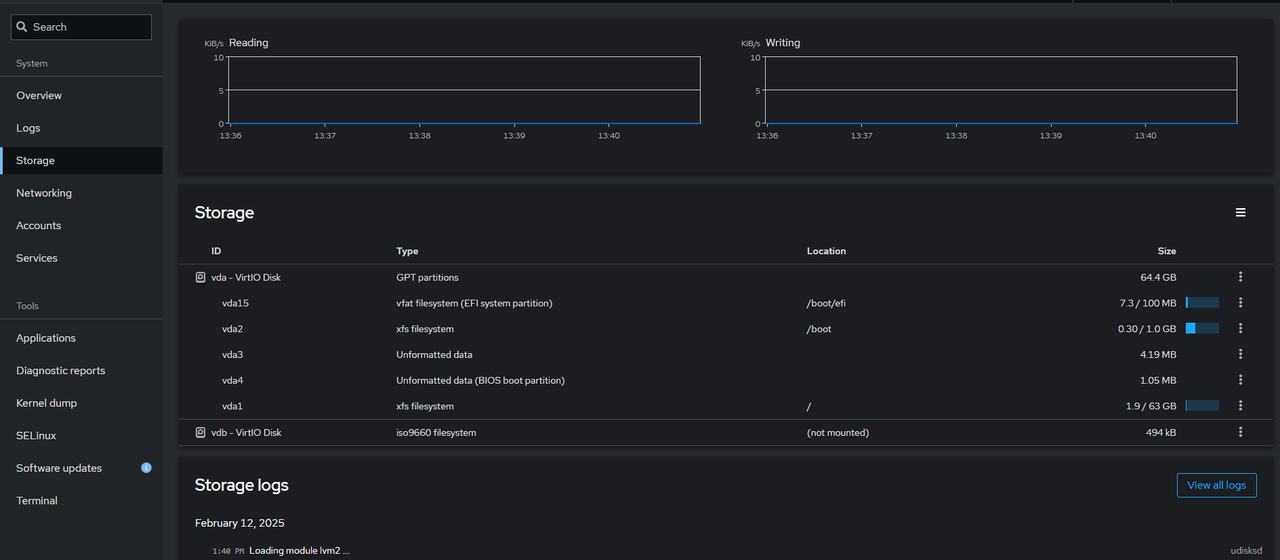
Click Storage to manage the server’s storage devices, view the status and read-write information.
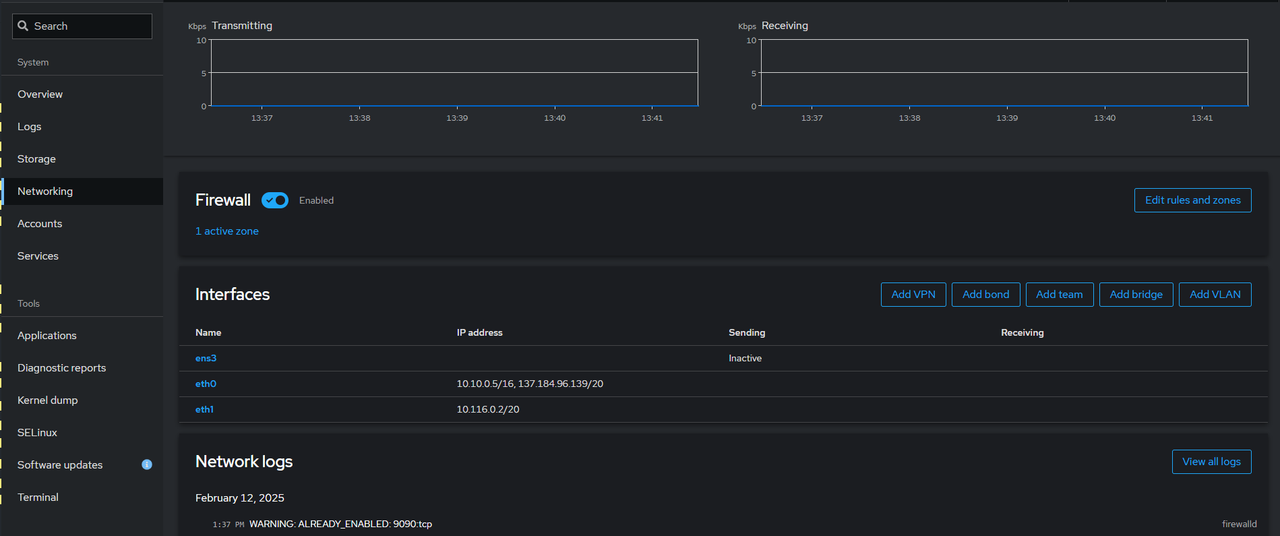
Click Networking to monitor the incoming and outgoing network traffic statistics. Monitor your server’s network interfaces within the Interfaces section and view all traffic logs within the Network logs section.
Click Accounts to manage user accounts and groups. Click Create new group to add a new group on your Rocky Linux 9 server and click Create new account to enter a new user's details, then click Create a non-root user account.

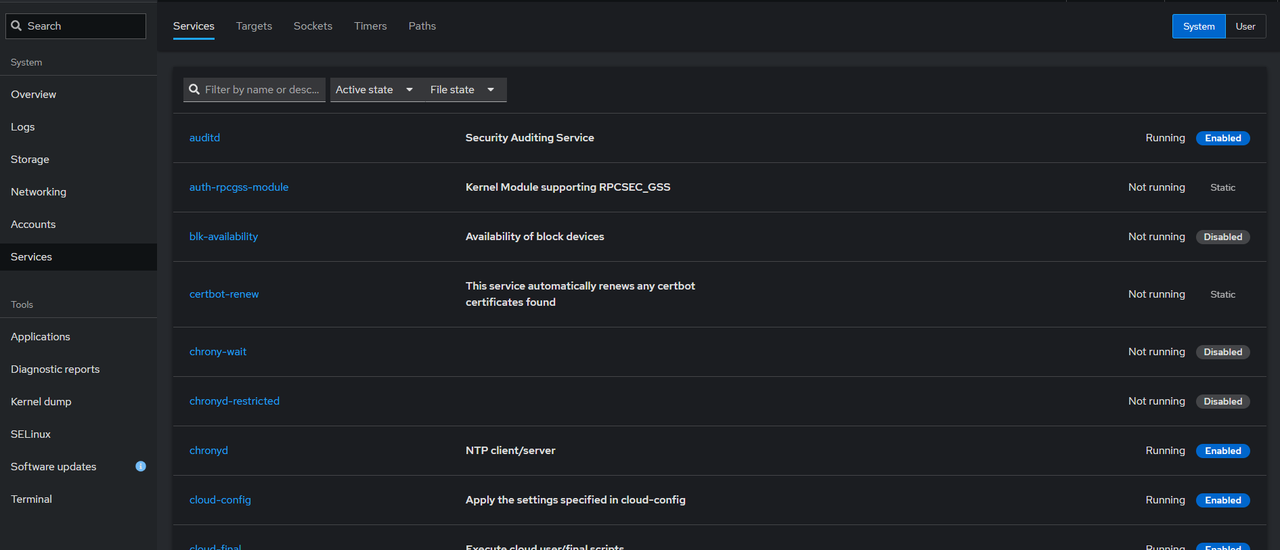
Click Services to manage all system and user services. Click the Targets,Sockets,Timers, and Paths tabs to filter the additional service types.
Click Applications to manage the Cockpit addon applications on your server. Click Install if you receive an
application information is missingprompt to update the application information.
Click Diagnostic reports to manage the system reports and click Run report to generate an SOS report to diagnose problems on your Rocky Linux 9 server.

Click Kernel dump to manage the
kdumpsystem service to recover your Kernel configurations in case of errors.
Click SELinux to manage the SELinux policy and monitor any access control errors on your system.

Click Software updates to monitor all install applications, update, restart, and update packages. Monitor your general packages status within the Status tab and click Restart services to restart installed packages. Monitor the Available updates section and click Install all updates or Install security updates to update your Rocky Linux 9 server.

Click Terminal to open a new terminal session and manage your server using Cockpit. Click Font size and Appearance to modify the terminal display.
Install Cockpit-Podman to Deploy Containerized Applications
Cockpit-Podman is an addon application for Cockpit that allows you to deploy containerized applications on your Rocky Linux 9 server. Follow the steps below to install the Cockpit-Podman application in your terminal session.
Click Terminal to open a new session.

Update the server.
console$ sudo dnf update
Install the Cockpit module.
console$ sudo dnf install cockpit-podman -y
Refresh the Cockpit interface to apply the Cockpit-Podman changes.
Click Podman Containers to manage container images and containers on your Rocky Linux 9 server.
Click Start Podman to start the Podman service on your server.
Click Create Container to open the container setup page.

Click Image within details to search for your target container image in all available registries. For example, enter
docker.io/nginxand select the official build image for Nginx.Enter the following command to replace existing contents in the Command field.
consolesh -c "echo '<h1>The Nginx Container is Running!....Greetings from Vultr</h1>' > /usr/share/nginx/html/index.html && nginx -g 'daemon off;'"Click Integration, and select Add port mapping to map the container ports to the host. Maintain IP address as an empty field, enter
80in the Host port and Container port fields, respectively.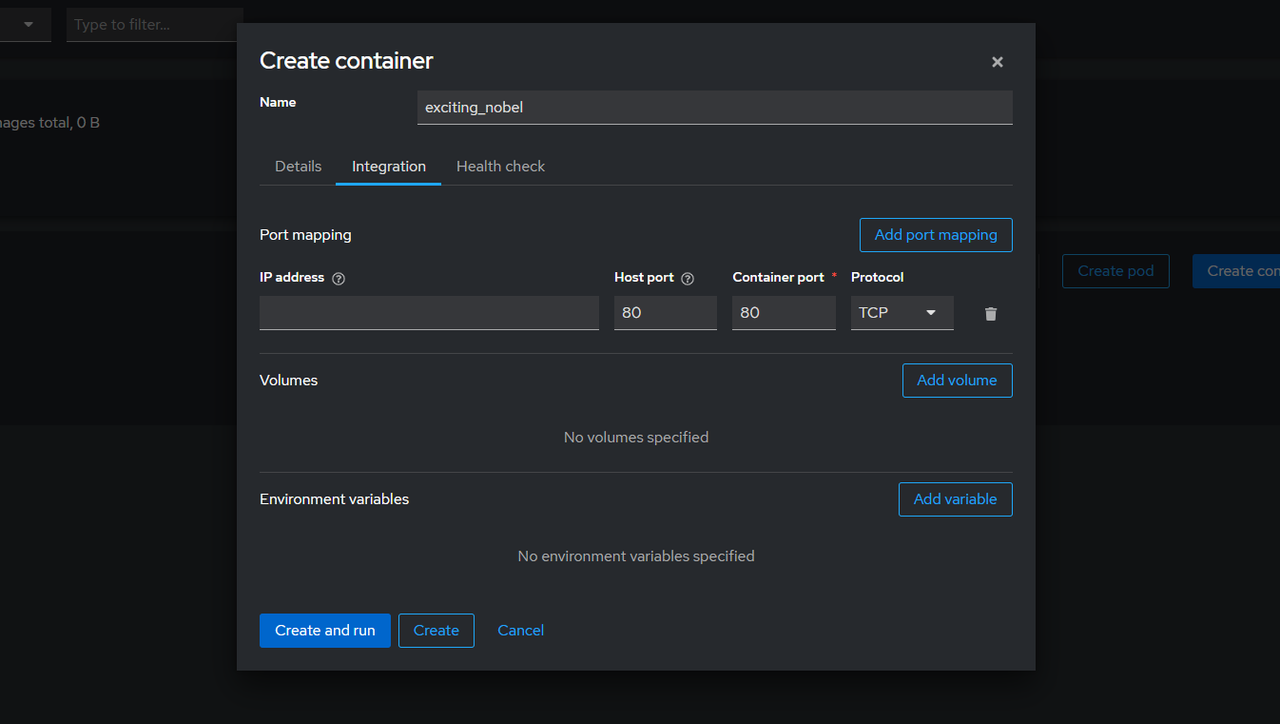
Click Create and run to deploy the container application using Podman on your server.
Monitor the container deployment within Containers and click the container to manage it.

Access your Rocky Linux 9 server’s IP address in a new web browser window and confirm that your custom web application page displays well.

Conclusion
You have successfully installed Cockpit on your Rocky Linux 9 server and installed Cockpit-Podman as an additional module to manage the server. Cockpit is a powerful web-based control panel you can use to manage all aspects of your server. For more details, visit the Cockpit documentation.