
How to Install PHP 5.6 on Rocky Linux 9
PHP (Hypertext Preprocessor) is a popular server-side scripting language widely used in web development. PHP 5.6 offers multiple performance benefits, integrates with different and supports legacy PHP extensions required by some dynamic applications. It's highly extensible and lets you build dynamic websites, process data, and integrate PHP 5.6 with databases like MySQL, Valkey, and PostgreSQL using modules.
This article explains how to install PHP 5.6 on Rocky Linux 9. While PHP 5.6 reached its end-of-life, multiple applications still depend on it and require specific modules installed on your system. You will install PHP 5.6 on your Rocky Linux 9 instance and configure PHP-FPM to integrate it with your backend applications.
Prerequisites
Before you begin, you need to:
- Have access to a Rocky Linux 9 instance as a non-root user with sudo privileges
Install Required PHP 5.6 Dependencies
PHP 5.6 is not available in the default package repositories and thirdy party sources on Rocky Linux 9. PHP 5.6 requires OpenSSL 1.0.2 to run on Rocky Linux. Follow the steps below to install all required dependencies and install PHP 5.6 from source code.
Verify the default OpenSSL version.
console$ openssl --version
Your output should be similar to the one below.
OpenSSL 3.2.2 4 Jun 2024 (Library: OpenSSL 3.2.2 4 Jun 2024)Update the DNF package index.
console$ sudo dnf update -y
Install all required dependency packages.
console$ sudo dnf install -y gcc gcc-c++ make bison autoconf libxml2-devel bzip2-devel curl-devel libjpeg-devel libpng-devel libXpm-devel freetype-devel gmp-devel libmcrypt-devel readline-devel libxslt-devel libicu-devel libxml2-devel bzip2-devel libcurl-devel libjpeg-devel libpng-devel freetype-devel libxslt-devel perl-core zlib-devel
The above command installs all the required PHP 5.6 and OpenSSL dependency packages.
Navigate to the
/usr/local/srcdirectory.console$ cd /usr/local/src
Download the OpenSSL 1.0.2 archive.
console$ sudo wget https://www.openssl.org/source/openssl-1.0.2u.tar.gz
Extract all files from the downloaded OpenSSL archive.
console$ sudo tar -xvzf openssl-1.0.2u.tar.gz
Switch to the extracted OpenSSL directory.
console$ cd openssl-1.0.2u
Run the OpenSSL configuration script using
./config.console$ sudo ./config --prefix=/usr/local/openssl-1.0.2 --openssldir=/usr/local/openssl-1.0.2 shared zlib
Compile the OpenSSL source code.
console$ sudo make -j$(nproc)
Install the compiled OpenSSL binaries.
console$ sudo make install
Add the OpenSSL environment variables to your
.bashrcconfiguration.Add the OpenSSL library path to the linker flags
console$ echo 'export LDFLAGS="-Wl,-rpath,/usr/local/openssl-1.0.2/lib"' >> ~/.bashrc
Add the OpenSSL include path to the compiler flags.
console$ echo 'export CPPFLAGS="-I/usr/local/openssl-1.0.2/include"' >> ~/.bashrc
Add the OpenSSL pkg-config path.
console$ echo 'export PKG_CONFIG_PATH="/usr/local/openssl-1.0.2/lib/pkgconfig"' >> ~/.bashrc
Add the OpenSSL binary path to your system PATH.
console$ echo 'export PATH="/usr/local/openssl-1.0.2/bin:$PATH"' >> ~/.bashrc
Apply the
bashrcenvironment configuration changes.console$ source ~/.bashrc
View the active OpenSSL version and verify that it's OpenSSL 1.0.2u.
console$ openssl version -a
Output:
OpenSSL 1.0.2u  20 Dec 2019
built on: reproducible build, date unspecified
platform: linux-x86_64
.................................
Compile and Install PHP 5.6 from Source Code on Rocky Linux 9
Follow the steps below to compile and install PHP 5.6 from source code on your Rocky Linux 9 instance.
Navigate to the
/usr/local/srcdirectory.console$ cd /usr/local/src
Visit the PHP 5 archives page, note and download your target PHP 5.6 version using
wget. For example, run the following command to download the PHP5.6.40version.console$ sudo wget https://museum.php.net/php5/php-5.6.40.tar.gz
Extract files from the PHP 5.6 archive.
console$ sudo tar -xzf php-5.6.40.tar.gz
Switch to the extracted PHP 5.6 directory.
console$ cd php-5.6.40
Configure the PHP 5.6 build with all required options, including the OpenSSL path and PHP extensions like
mysql.console$ sudo ./configure --prefix=/usr/local/php-5.6.40 --with-openssl=/usr/local/openssl-1.0.2 --enable-mbstring --with-pdo-mysql --with-mysqli --enable-fpm --with-openssl=/usr/local/openssl-1.0.2
The above command configures the PHP 5.6 build information with
/usr/localas the target installation directory, specifies the PHP extensions to install and enables the OpenSSL1.0.2version you installed earlier. The configuration process may take between3to5minutes to complete, re-install all required dependency packages if the configuration process returns any errors.Compile the PHP 5.6 source code.
console$ sudo make -j$(nproc)
The compilation process may take between
5to8minutes to complete depending on the configured PHP 5.6 extensions for installation. Reconfigure the PHP 5.6 build if the compilation fails. Your output should be similar to the one below when successful.Generating phar.php Generating phar.phar PEAR package PHP_Archive not installed: generated phar will require PHP's phar extension be enabled. invertedregexiterator.inc directorytreeiterator.inc pharcommand.inc directorygraphiterator.inc clicommand.inc phar.inc Build complete. Don't forget to run 'make test'.Install PHP 5.6 from the compiled binaries.
console$ sudo make install
Your output should be similar to the one below when the installation is successful.
Installing shared extensions:     /usr/local/php-5.6.40/lib/php/extensions/no-debug-non-zts-20131226/
Installing PHP CLI binary:        /usr/local/php-5.6.40/bin/
Installing PHP CLI man page:      /usr/local/php-5.6.40/php/man/man1/
Installing PHP FPM binary:        /usr/local/php-5.6.40/sbin/
......................................................
Wrote PEAR system config file at: /usr/local/php-5.6.40/etc/pear.conf
You may want to add: /usr/local/php-5.6.40/lib/php to your php.ini include_path
/usr/local/src/php-5.6.40/build/shtool install -c ext/phar/phar.phar /usr/local/php-5.6.40/bin
ln -s -f phar.phar /usr/local/php-5.6.40/bin/phar
Installing PDO headers:           /usr/local/php-5.6.40/include/php/ext/pdo/
Verify the installed PHP version.
console$ /usr/local/php-5.6.40/bin/php -v
Output:
PHP 5.6.40 (cli) (built: Mar 19 2025 20:03:18)
Copyright (c) 1997-2016 The PHP Group
Zend Engine v2.6.0, Copyright (c) 1998-2016 Zend Technologies
Install and Configure PHP 5.6 FPM
PHP-FPM is available in the PHP 5.6 source code and improves PHP performance by efficiently managing processes and PHP requests. Follow the steps below to install PHP 5.6 FPM and configure it as a system service to run on your Rocky Linux 9 instance.
Copy the PHP 5.6 production configuration to the installation directory.
console$ sudo cp /usr/local/src/php-5.6.40/php.ini-production /usr/local/php-5.6.40/lib/php.ini
Copy the PHP 5.6 configuration template to the installation directory.
console$ sudo cp sapi/fpm/php-fpm.conf.in /usr/local/php-5.6.40/etc/php-fpm.conf
Create a new
/etc/php-fpm.dPHP FPM directory to store FPM pool configurations.console$ sudo mkdir -p /usr/local/php-5.6.40/etc/php-fpm.d
Copy the default FPM pool configuration to PHP-FPM directory.
console$ sudo cp sapi/fpm/www.conf.in /usr/local/php-5.6.40/etc/php-fpm.d/www.conf
Add PHP 5.6 FPM path to your system PATH.
console$ echo 'export PATH="/usr/local/php-5.6.40/bin:$PATH"' >> ~/.bashrc
Reload your shell configuration to apply the changes.
console$ source ~/.bashrc
Create a new
www-datadedicated PHP-FPM user.console$ sudo useradd -r -s /sbin/nologin www-data
Open the
/usr/local/php-5.6.40/etc/php-fpm.confconfiguration using a text editor such asnano.console$ sudo nano /usr/local/php-5.6.40/etc/php-fpm.conf
Find the
piddirective, remove the;to uncomment and change the defaultrun/php-fpm.pidto/run/php56-fpm/php56-fpm.pid.inipid = /run/php56-fpm/php56-fpm.pid
Find the
userdirective and change the default@php_fpm_user@value towww-data.iniuser = www-data
Find the
groupdirective and change the default@php_fpm_group@value towww-data.inigroup = www-data
Save and close the file.
Open the
/usr/local/php-5.6.40/etc/php-fpm.d/www.confdefault pool configuration.console$ sudo nano /usr/local/php-5.6.40/etc/php-fpm.d/www.conf
Find the
userdirective and change the default@php-fpmuser@value towww-data.iniuser = www-data
Find the
groupdirective and change the default@php-fpmgroup@value towww-data.inigroup = www-data
Find the
listendirective and verify that it's set to127.0.0.1:9000.inilisten = 127.0.0.1:9000
Find the
listen.ownerdirective, uncomment it and change the default@php-fpmuser@value towww-data.inilisten.owner = www-data
Find the
listen.groupdirective, uncomment it and change the default@php-fpmgroup@value towww-data.inilisten.group = www-data
Find the
listen.modedirective, uncomment it and verify that it's set0660.inilisten.mode = 0660
Save and close the file.
The above pool configurations enable PHP 5.6 FPM to listen for connections on the localhost port
9000and read or write files using thewww-datauser you created earlier.
Create the
/run/php56-fpmruntime directory to store the PHP-FPM PID files.console$ sudo mkdir -p /run/php56-fpm
Grant the
www-datauser ownership privileges to the/run/php56-fpmdirectory.console$ sudo chown -R www-data:www-data /run/php56-fpm
Change the
/run/php56-fpmdirectory permissions mode to755to grant thewww-datauser full read, write, execute privileges.console$ sudo chmod 755 /run/php56-fpm
Create a new
/usr/local/php-5.6.40/var/logdirectory to store the PHP 5.6 log files.console$ sudo mkdir -p /usr/local/php-5.6.40/var/log
Grant the
www-dataownership privileges to the/usr/local/php-5.6.40/var/logdirectory.console$ sudo chown -R www-data:www-data /usr/local/php-5.6.40/var/log
Change the
/usr/local/php-5.6.40/var/logpermissions mode to755to grant thewww-datafull privileges to all log files.console$ sudo chmod -R 755 /usr/local/php-5.6.40/var/log
Test the PHP FPM configuration for errors.
console$ sudo /usr/local/php-5.6.40/sbin/php-fpm -t
Output:
[18-Apr-2025 20:34:37] NOTICE: configuration file /usr/local/php-5.6.40/etc/php-fpm.conf test is successful
Configure PHP 5.6 FPM as a System Service
Follow the steps below to create a new system service for PHP 5.6 FPM and configure it to start at boot.
Create a new
php56-fpm.servicesystemd service configuration file.console$ sudo nano /etc/systemd/system/php56-fpm.service
Add the following configurations to the
php56-fpm.servicefile.ini[Unit] Description=PHP 5.6 FastCGI Process Manager After=network.target [Service] Type=simple ExecStart=/usr/local/php-5.6.40/sbin/php-fpm --nodaemonize --fpm-config /usr/local/php-5.6.40/etc/php-fpm.conf ExecReload=/bin/kill -USR2 $MAINPID Restart=always PrivateTmp=true User=www-data Group=www-data WorkingDirectory=/usr/local/php-5.6.40 [Install] WantedBy=multi-user.target
Save and close the file.
The above system service configuration enables PHP 5.6 to run as a system service using the
www-datauser and group. It uses the/usr/local/php-5.6.40working directory and runs PHP-FPM in non-daemon mode, allowing you to control all PHP processes.Reload Systemd to apply the configuration changes.
console$ sudo systemctl daemon-reload
Enable the PHP FPM service to start at boot.
console$ sudo systemctl enable php56-fpm
Start the PHP FPM service.
console$ sudo systemctl start php56-fpm
View the PHP FPM service status and verify that it's running.
console$ sudo systemctl status php56-fpm
Output:
● php56-fpm.service - PHP 5.6 FastCGI Process Manager
  Loaded: loaded (/etc/systemd/system/php56-fpm.service; enabled; preset: disabled)
  Active: active (running) since Wed 2025-03-19 20:28:17 UTC; 19s ago
Main PID: 223702 (php-fpm)
   Tasks: 3 (limit: 23116)
  Memory: 2.5M
     CPU: 32ms
  CGroup: /system.slice/php56-fpm.service
          ├─223702 "php-fpm: master process (/usr/local/php-5.6.40/etc/php-fpm.conf)"
          ├─223703 "php-fpm: pool www"
          └─223704 "php-fpm: pool www"
The PHP FPM is active and runing based on the
active (running)prompt in the above output.
Test and Use PHP 5.6 on Rocky Linux 9
Follow the steps below to test and use PHP 5.6 on your Rocky Linux 9 instance.
Check the active PHP version and verify that it's PHP 5.6
console$ php --version
Output:
PHP 5.6.40 (cli) (built: Apr 18 2025 14:44:08)
Copyright (c) 1997-2016 The PHP Group
Zend Engine v2.6.0, Copyright (c) 1998-2016 Zend Technologies
Create a new
app.phpfile in your working directory.console$ sudo nano app.php
Add the following PHP code to the file.
php<?php echo "Greetings from Vultr! \n"; ?>
Save and close the file.
Execute the
app.phpscript with PHP.console$ php app.php
Output:
Greetings from Vultr!
Test PHP 5.6 with a Web Server
PHP 5.6 FPM enables you to integrate PHP with web server applications such as Nginx and Apache. Follow the steps below to install and configure Nginx to process dynamic application requests using PHP FPM.
Create a domain A record pointing to your Rocky Linux 9 instance's public IP address.
Install Nginx if it's not installed.
console$ sudo dnf install -y nginx
Start the Nginx service.
console$ sudo systemctl start nginx
View the Nginx service status and verify that it's running.
console$ sudo systemctl status nginx
Output:
● nginx.service - The nginx HTTP and reverse proxy server
     Loaded: loaded (/usr/lib/systemd/system/nginx.service; disabled; preset: disabled)
     Active: active (running) since Fri 2025-04-18 20:29:03 UTC; 14s ago
    Process: 176949 ExecStartPre=/usr/bin/rm -f /run/nginx.pid (code=exited, status=0/SUCCESS)
    Process: 176950 ExecStartPre=/usr/sbin/nginx -t (code=exited, status=0/SUCCESS)
    Process: 176951 ExecStart=/usr/sbin/nginx (code=exited, status=0/SUCCESS)
   Main PID: 176952 (nginx)
      Tasks: 2 (limit: 11059)
     Memory: 2.0M
        CPU: 26ms
     CGroup: /system.slice/nginx.service
             ├─176952 "nginx: master process /usr/sbin/nginx"
             └─176953 "nginx: worker process"
Create a new
app.example.confNginx virtual host configuration.console$ sudo nano /etc/nginx/conf.d/app.example.conf
Add the following configurations to the file. Replace
app.example.comwith your actual domain.iniserver { listen 80; server_name app.example.com; root /var/www/app.example.com; index index.php index.html index.htm; location ~ \.php$ { include fastcgi_params; fastcgi_pass 127.0.0.1:9000; fastcgi_index index.php; fastcgi_param SCRIPT_FILENAME $document_root$fastcgi_script_name; } }
Save and close the file.
The above Nginx configuration listens for HTTP connection requests using your
app.example.comdomain and forwards all PHP requests to the PHP FPM localhost port9000.Test the Nginx configuration for errors.
console$ sudo nginx -t
Output:
nginx: the configuration file /etc/nginx/nginx.conf syntax is ok
nginx: configuration file /etc/nginx/nginx.conf test is successful
Restart Nginx to apply the configuration changes.
console$ sudo systemctl restart nginx
Create the
app.example.comvirtual host web root directory.console$ sudo mkdir -p /var/www/app.example.com
Create a new
info.phpfile in the/var/www/app.example.comdirectory.console$ sudo nano /var/www/app.example.com/info.php
Add the following PHP code to the
info.phpfile.php<?php phpinfo(); ?>
Save and close the file.
The above configuration displays the full PHP information page when accessed in a web browser.
Configure SELinux to enable Nginx to connect to the PHP FPM network socket.
console$ sudo setsebool -P httpd_can_network_connect 1
Allow HTTP traffic through the default firewall configuration.
console$ sudo firewall-cmd --add-service=http --permanent
Reload Firewalld to apply the firewall configuration changes.
console$ sudo firewall-cmd --reload
Restart PHP 5.6 FPM.
console$ sudo systemctl restart php56-fpm
Restart Nginx.
console$ sudo service nginx restart
Visit your
app.example.comdomain in a web browser such as Chrome and verify the full PHP 5.6 information page displays.http://app.example.com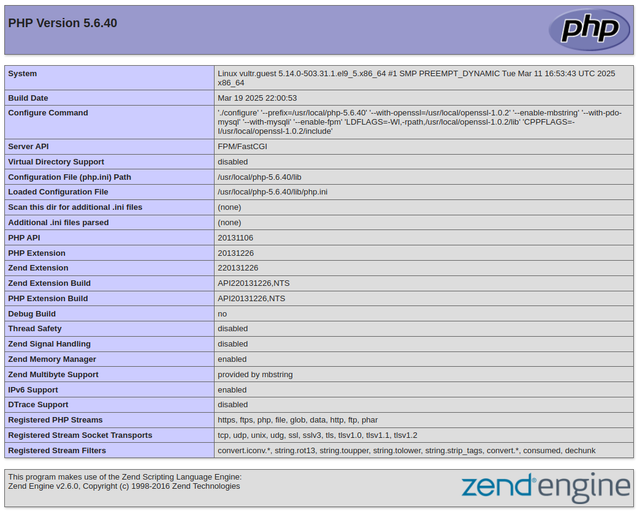 PHP 5.6 reached its end-of-life and lacks security updates. Use PHP 5.6 only for legacy applications that cannot be upgraded.Warning
Conclusion
You have installed PHP 5.6 and PHP-FPM on Rocky Linux 9. You can build and serve dynamic web applications with PHP 5.6 on your instanc, ensuring compatibility with legacy frameworks. Due to security risks associated with old PHP versions, consider migrating to a newer supported PHP version to run modern applications. For more information and options, visit the PHP documentation.