
How to Install PHP 5.6 on Ubuntu 22.04

PHP (Hypertext Preprocessor) is a widely used open-source server-side scripting language for web development. While PHP 5.6 has reached end-of-life, developers can still Install PHP 5.6 on Ubuntu to support dynamic websites, process forms, manage sessions, and connect to MySQL or PostgreSQL databases. Many organizations continue to rely on this version due to legacy applications or compatibility concerns. PHP also supports various extensions, making it flexible for modern use cases.
This article explains how to install PHP 5.6 on Ubuntu 22.04. You'll install all required repositories, install PHP modules, configure PHP-FPM, and integrate it into your applications with PHP-FPM.
Prerequisites
- Have access to an Ubuntu 22.04 instance as a non-root sudo user.
Install the PHP PPA Repository
PHP 5.6 is outdated and no longer available in the default Ubuntu repositories. You need to add a Personal Package Archive (PPA) that maintains older PHP versions. The Ondřej Surý PPA is a commonly used repository for installing older PHP versions. Follow the steps below to install the PHP PPA repository.
Update the APT package index.
console$ sudo apt update
Add the
ondrej/phpPPA to your APT repository sources.console$ sudo add-apt-repository ppa:ondrej/php
Press Enter to continue with adding the repository to your system.
...
WARNING: add-apt-repository is broken with non-UTF-8 locales, see
https://github.com/oerdnj/deb.sury.org/issues/56 for workaround:

# LC_ALL=C.UTF-8 add-apt-repository ppa:ondrej/php
More info: https://launchpad.net/~ondrej/+archive/ubuntu/php
Adding repository.
Press [ENTER] to continue or Ctrl-c to cancel.
Run the following command if you encounter errors with non-UTF-8 locales while adding the repository.
console$ sudo LC_ALL=C.UTF-8 add-apt-repository ppa:ondrej/php
Update the APT package index to apply the repository changes.
console$ sudo apt update
Install PHP 5.6 on Ubuntu
Follow the steps below to install PHP 5.6 and configure essential PHP modules required for web applications.
Install PHP 5.6.
console$ sudo apt install -y php5.6
Install common PHP 5.6 modules.
console$ sudo apt install -y php5.6-mysql php5.6-xml php5.6-curl php5.6-cli
When prompted to restart services, use the Tab key to select <Ok> and press Enter.
Verify the installed
phpversion.console$ php -v
Your output should be similar to the one below.
PHP 5.6.40-81+ubuntu22.04.1+deb.sury.org+1 (cli)
Copyright (c) 1997-2016 The PHP Group
Zend Engine v2.6.0, Copyright (c) 1998-2016 Zend Technologies
    with Zend OPcache v7.0.6-dev, Copyright (c) 1999-2016, by Zend Technologies
Install PHP 5.6 FPM
PHP-FPM (FastCGI Process Manager) is a FastCGI implementation that handles PHP requests efficiently. It provides better resource management and improved performance compared to traditional PHP processing methods. PHP-FPM manages PHP processes independently, offering improved memory management, better handling of concurrent requests, and enables integration. Follow the steps below to install PHP 5.6 FPM.
Install the PHP 5.6 FPM package.
console$ sudo apt install php5.6-fpm
When prompted to restart services, use the Tab key to select <Ok> and press Enter.
Start the PHP 5.6 FPM service.
console$ sudo systemctl start php5.6-fpm
Enable PHP 5.6 FPM to start automatically on system boot.
console$ sudo systemctl enable php5.6-fpm
Verify that the PHP 5.6 FPM status is active and running.
console$ sudo systemctl status php5.6-fpm
Your output should be similar to the one below.
● php5.6-fpm.service - The PHP 5.6 FastCGI Process Manager
     Loaded: loaded (/lib/systemd/system/php5.6-fpm.service; enabled; vendor preset: enabled)
     Active: active (running) since Thu 2025-03-20 22:54:20 UTC; 3min 27s ago
       Docs: man:php-fpm5.6(8)
   Main PID: 16489 (php-fpm5.6)
     Status: "Processes active: 0, idle: 2, Requests: 0, slow: 0, Traffic: 0req/sec"
      Tasks: 3 (limit: 2217)
     Memory: 11.9M
        CPU: 42ms
     CGroup: /system.slice/php5.6-fpm.service
             ├─16489 "php-fpm: master process (/etc/php/5.6/fpm/php-fpm.conf)" "" "" "" "" "" "" "" "" "" "" "" "" "" "" "" "" "" "" "" "" "" ""
             ├─16490 "php-fpm: pool www" "" "" "" "" "" "" "" "" "" "" "" "" "" "" "" "" "" "" "" "" "" "" "" "" "" "" "" "" "" "" "" "" "" "" "" "" "" "" "">
             └─16491 "php-fpm: pool www" "" "" "" "" "" "" "" "" "" "" "" "" "" "" "" "" "" "" "" "" "" "" "" "" "" "" "" "" "" "" "" "" "" "" "" "" "" "" "">
Mar 20 22:54:20 test-server systemd[1]: php5.6-fpm.service: Deactivated successfully.
Mar 20 22:54:20 test-server systemd[1]: Stopped The PHP 5.6 FastCGI Process Manager.
Mar 20 22:54:20 test-server systemd[1]: Starting The PHP 5.6 FastCGI Process Manager...
Mar 20 22:54:20 test-server systemd[1]: Started The PHP 5.6 FastCGI Process Manager.
Test and Use PHP 5.6
Follow the steps below to create a test PHP file. configure your web server and PHP-FPM to handle the PHP requests to serve dynamic application requests on the server.
Create a PHP information file using any text editor such as
nano.console$ sudo nano /var/www/html/info.php
Add the following PHP code to display configuration details.
php<?php phpinfo(); ?>
Save and close the file.
Enable the
proxy_fcgimodule for Apache to communicate with PHP-FPM and thesetenvifmodule to manage environment variables.console$ sudo a2enmod proxy_fcgi setenvif
Your output should be similar to the one below:
Considering dependency proxy for proxy_fcgi:
Enabling module proxy.
Enabling module proxy_fcgi.
Module setenvif already enabled
To activate the new configuration, you need to run:
  systemctl restart apache2
Restart the Apache service to apply module changes.
console$ sudo systemctl restart apache2
Configure Apache web server to process PHP requests through PHP-FPM.
console$ sudo nano /etc/apache2/sites-available/000-default.conf
Add the following configuration block inside the
<VirtualHost *:80>section.apache<FilesMatch \.php$> SetHandler "proxy:unix:/var/run/php/php5.6-fpm.sock|fcgi://localhost/" </FilesMatch>
Save and close the file.
Test the Apache configuration for syntax errors.
console$ sudo apache2ctl -t
Your output should be similar to the one below:
Syntax OKIf you see Syntax OK, your configuration is valid.
Restart the Apache web server service to apply the changes.
console$ sudo systemctl restart apache2
Allow HTTP connections through the firewall.
console$ sudo ufw allow 80
Reload the firewall configuration.
console$ sudo ufw reload
Access the
/info.phppath using your server IP in a web browser such as Chrome.http://<SERVER-IP>/info.php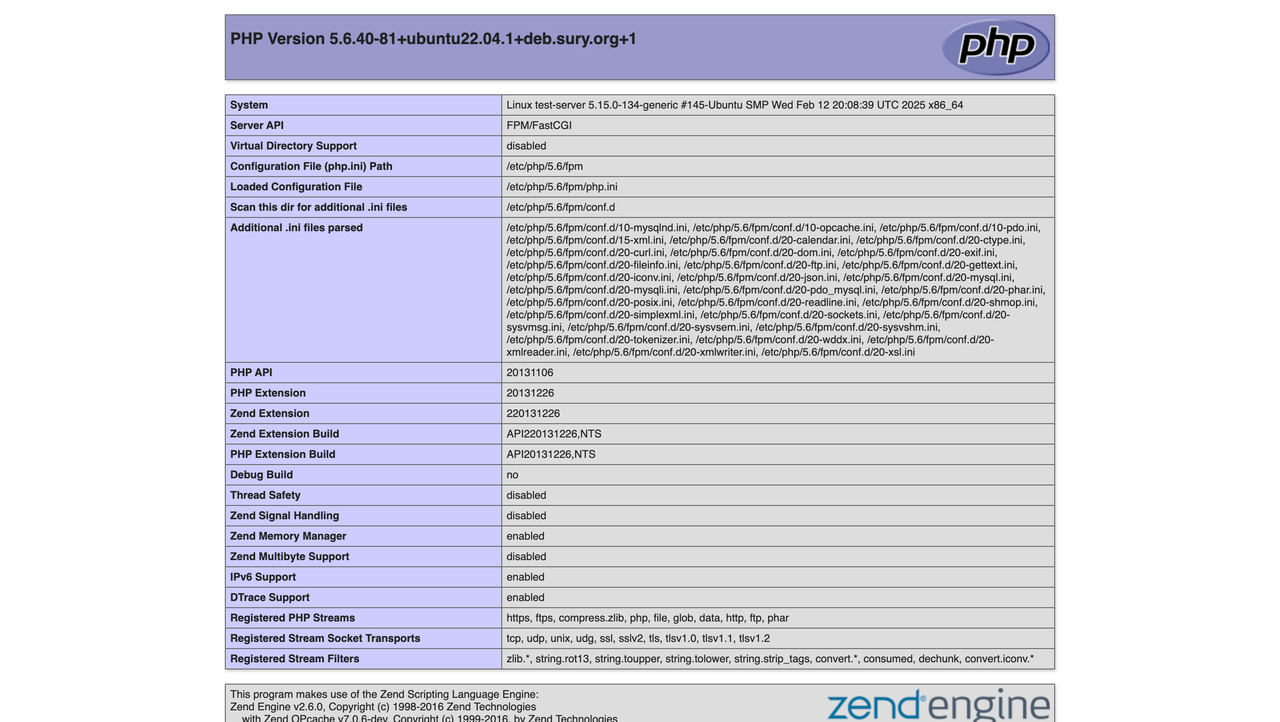
Conclusion
You have installed PHP 5.6 on Ubuntu 22.04 and configured PHP-FPM to handle web requests efficiently. You install PHP 5.6 from a custom PPA repository, set up PHP-FPM for improved performance, and set up PHP-FPM to handle PHP requests on the server. Visit the official PHP documentation for more information about PHP 5.6 security best practices and configurations.