
How to Install PHP 7.4 on Rocky Linux 9
PHP is a widely used server-side scripting language for building dynamic web applications. PHP 7.4 is the final minor release of the PHP 7 series and includes key features such as typed properties, arrow functions, and enhanced performance. Many legacy applications still rely on PHP 7.4 for compatibility with existing codebases and services.
This article explains how to install PHP 7.4 on Rocky Linux 9. You will install PHP, configure PHP-FPM, and enable essential extensions required to run dynamic web applications.
Prerequisites
Before you start, you need to:
- Have access to a Rocky Linux 9 instance as a non-root sudo user.
Install the EPEL and REMI Repositories
PHP 7.4 is not available in the DNF package manager sources by default. Installing the EPEL and Remi repositories enables access to the latest dependency packages for Rocky Linux 9 including multiple PHP version sources like PHP 7.4. Follow the steps below to install the EPEL and Remi repositories on your Rocky Linux 9 instance.
Update the DNF package index.
console$ sudo dnf makecache
Install the EPEL repository.
console$ sudo dnf install epel-release -y
Install the Remi repository.
console$ sudo dnf install https://rpms.remirepo.net/enterprise/remi-release-9.rpm -y
Verify that the Remi repository is listed and enabled.
console$ sudo dnf repolist | grep remi
The above command lists active Remi repositories available on the system.
Install PHP 7.4
To install PHP 7.4 on Rocky Linux 9, you must first enable the correct module and then install the required packages and extensions. Follow the steps below to install PHP 7.4 and common extensions using the Remi repository.
Update the DNF package index.
console$ sudo dnf makecache
Search for PHP 7.4 packages and verify that they're available.
console$ sudo dnf search php74
Output:
=============================================================== Name Exactly Matched: php74 ================================================================
php74.x86_64 : Package that installs PHP 7.4
============================================================== Name & Summary Matched: php74 ===============================================================
php74-php-pecl-http-message-devel.x86_64 : php74-php-pecl-http-message developer files (headers)
php74-php-pecl-pcsc-devel.x86_64 : php74-php-pecl-pcsc developer files (header)
php74-php-pecl-propro-devel.x86_64 : php74-php-pecl-propro developer files (header)
......
Enable the PHP 7.4 module in the Remi repository.
console$ sudo dnf module enable php:remi-7.4 -y
Install the main PHP 7.4 package.
console$ sudo dnf install php74 -y
Install common PHP 7.4 extensions required by most web applications.
console$ sudo dnf install php74-php-mysql php74-php-zip php74-php-xml php74-php-json php74-php-mbstring php74-php-pdo php74-php-gd -y
The above command installs the following PHP extensions.
php74-php-mysql: Enables PHP to communicate with MySQL databases.php74-php-zip: Adds support for creating, reading, and modifying ZIP compressed archives in PHP.php74-php-xml: Provides XML parsing support using DOM, SimpleXML, and related libraries.php74-php-json: Adds JSON encoding and decoding capabilities to PHP (json_encode, json_decode).php74-php-mbstring: Enables multibyte string processing, useful for handling non-ASCII character sets (for example: UTF-8).php74-php-pdo: Provides the PHP Data Objects interface, a database abstraction layer for accessing various databases.php74-php-gd: Adds image processing capabilities to PHP (resize, crop, watermark, etc.), commonly used for CAPTCHA or thumbnail generation.
Verify the installed PHP version.
console$ php74 --version
Output:
PHP 7.4.33 (cli) (built: Mar 18 2025 06:44:58) ( NTS )
Copyright (c) The PHP Group
Zend Engine v3.4.0, Copyright (c) Zend Technologies
Install PHP7.4-FPM
PHP-FPM (FastCGI Process Manager) is a high-performance PHP handler that manages PHP processes using a pool-based model. It allows PHP to communicate efficiently with web servers and other services through UNIX sockets or TCP ports. PHP 7.4 FPM runs a dedicated process pool for PHP 7.4, making it essential for serving dynamic applications. Follow the steps below to install and configure PHP 7.4 FPM.
Install the PHP 7.4 FPM package.
console$ sudo dnf install php74-php-fpm -y
Verify that PHP 7.4 FPM is installed.
console$ sudo dnf list installed | grep php-fpm
The above command will display the installed PHP-FPM package details.
Enable the PHP 7.4 FPM service to start automatically at boot.
console$ sudo systemctl enable php74-php-fpm
Start the PHP 7.4 FPM service.
console$ sudo systemctl start php74-php-fpm
View the status of the PHP 7.4 FPM service.
console$ sudo systemctl status php74-php-fpm
Your output should be similar to the one below:
● php74-php-fpm.service - The PHP FastCGI Process Manager
     Loaded: loaded (/usr/lib/systemd/system/php74-php-fpm.service; enabled; preset: disabled)
     Active: active (running) since Fri 2025-06-06 03:22:20 UTC; 1h 2min ago
   Main PID: 5790 (php-fpm)
     Status: "Processes active: 0, idle: 5, Requests: 17, slow: 0, Traffic: 0req/sec"
......
Configure PHP7.4-FPM
PHP-FPM uses pool configurations to run worker processes with specific listening addresses, user permissions, and performance settings to handle PHP requests efficiently. Follow the steps below to view the default PHP-FPM configurations directory, and configure the default www pool to handle PHP requests.
List all files in the
/etc/opt/remi/php74/directory and verify the available configuration files.console$ ls /etc/opt/remi/php74/
Output:
opt php.d php-fpm.conf php-fpm.d php.ini pki pm skel sysconfig X11 xdg xinetd.dPHP-FPM uses the following configuration files and directories by default:
php-fpm.conf: Includes global configuration directives that control how PHP-FPM runs before any pool configurations.php-fpm.d: Contains the PHP-FPM pool configuration files.
Open the default pool configuration file
www.confusing a text editor such asnano.console$ sudo nano /etc/opt/remi/php74/php-fpm.d/www.conf
Check the default pool name and verify that it is
[www]or change it to your desired pool name if required.ini[www]Locate the user and group directives to check which user PHP-FPM runs as.
ini; RPM: apache user chosen to provide access to the same directories as httpd user = apache ; RPM: Keep a group allowed to write in log dir. group = apache
Change
userandgroupfromapachetonginxif you are using the Nginx web server on Rocky Linux 9.Locate the
listendirective and verify the default/var/opt/remi/php74/run/php-fpm/www.sockPHP-FPM socket path.inilisten = /var/opt/remi/php74/run/php-fpm/www.sock
Configure the process management (
pm) settings to optimize PHP-FPM child processes based on your server’s resources.inipm = dynamic pm.max_children = 50 pm.start_servers = 5 pm.min_spare_servers = 5 pm.max_spare_servers = 35
These are the default values. You can modify them to suit your server's available memory and traffic requirements.
Save the file and close the text editor.
Restart PHP-FPM to apply the pool configuration changes.
console$ sudo systemctl restart php74-php-fpm
Test PHP 7.4
PHP includes a built-in web server by default used to run scripts with a specific listening address, and PHP CLI to run scripts directly in a terminal. PHP-FPM manages all connections to PHP, allowing you to integrate PHP with web servers like Nginx and Apache. Follow the steps below to test your PHP 7.4 installation using both the CLI and Apache web server with PHP-FPM.
Test PHP Using CLI
Create a
test.phpfile in your present directory.console$ sudo nano test.php
Add the following PHP code to the file.
php<?php echo "Greetings from Vultr"; ?>
Save and close the file.
The above PHP script displays a
Greetings from Vultrheading when it’s executed.Run the PHP script using the PHP 7.4 CLI.
console$ php74 test.php
Output:
Greetings from Vultr
Test PHP-FPM Using a web server
Follow the steps below to test PHP using PHP-FPM with a web server like Apache.
Verify if the
httpdApache web server is installed.console$ rpm -q httpd
Your output should be similar to the one below:
package httpd is not installedInstall Apache if it’s not installed.
console$ sudo dnf install httpd -y
Enable the
httpdApache system service to start at boot.console$ sudo systemctl enable httpd
Start the
httpdApache system service.console$ sudo systemctl start httpd
Navigate to the
/etc/httpd/conf.dApache virtual host configurations directory.console$ cd /etc/httpd/conf.d
Open the
welcome.confdefault virtual host configuration.console$ sudo nano welcome.conf
Add the following
<FilesMatchblock for PHP-FPM before the<LocationMatch>block.ini<FilesMatch \.php$> SetHandler "proxy:unix:/var/opt/remi/php74/run/php-fpm/www.sock|fcgi://localhost/" </FilesMatch>
Save and close the file.
The above
FilesMatchblock forwards all PHP requests to the default/var/opt/remi/php74/run/php-fpm/www.sockpath that’s specified in the defaultwww.confPHP-FPM configuration.Navigate to the default Apache web root directory.
console$ cd /var/www/html
Create a new
info.phpfile in the directory.console$ sudo nano info.php
Add the following PHP code to the file.
php<?php phpinfo(); ?>
Save the file and close the text editor.
The
phpinfo()function in the aboveinfo.phpfile displays the installed PHP version information and extensions on the server.Allow the
httpdApache web server to make outbound connections to the backend services like PHP-FPM using sockets.console$ sudo setsebool -P httpd_can_network_connect 1
Allow HTTP traffic through the system firewall.
console$ sudo firewall-cmd --permanent --add-service=http
Reload the firewall configuration.
console$ sudo firewall-cmd --reload
Visit the following URL in your browser to view the PHP information page.
http://your_server_ip/info.php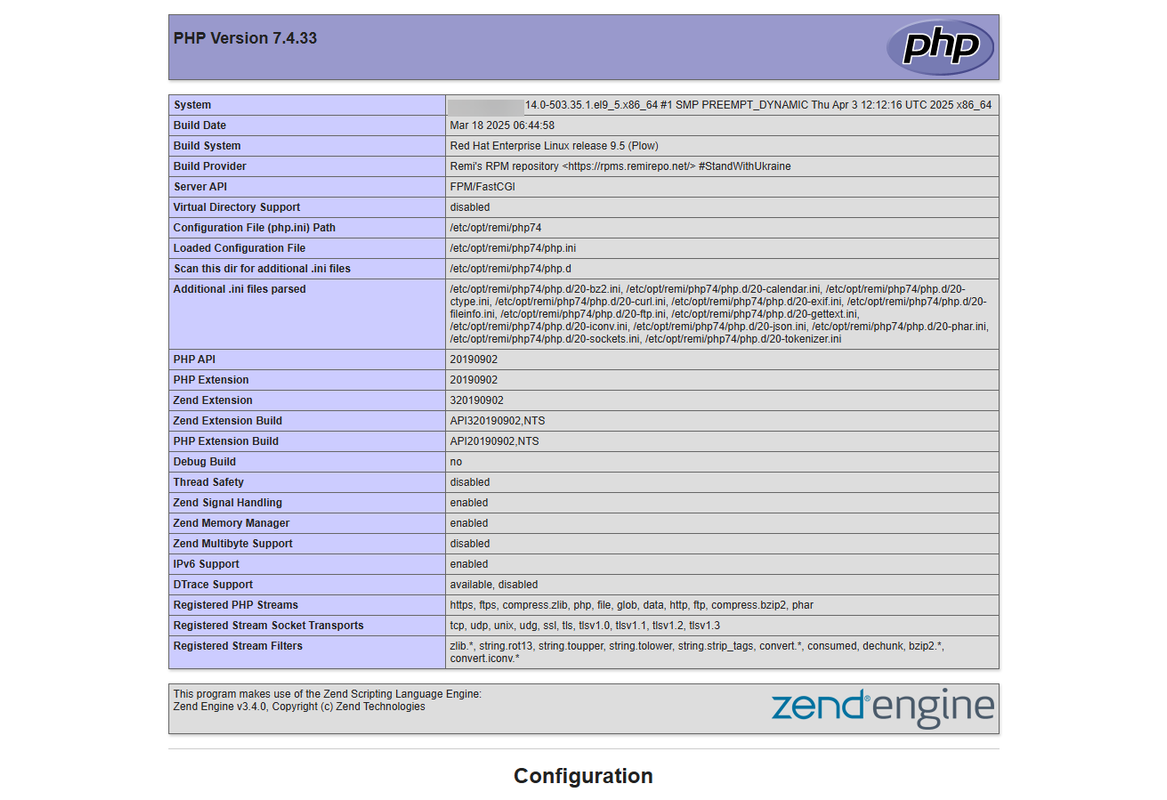
Conclusion
In this article, you have installed PHP 7.4 on Rocky Linux 9 and configured PHP-FPM to serve web applications with a web server. PHP is a modern server-side scripting language used to develop dynamic web applications. You can use PHP 7.4 with specific applications and frameworks like Laravel, Symfony, and WordPress version that require it since it reached its end of life and not safe to run unless required. For more information, refer to the official PHP documentation.