PHP (Hypertext Preprocessor) is an open-source server-side scripting language used extensively in web development. To leverage its latest features and improvements, you can install PHP 8 on Rocky Linux 9. PHP is also a general-purpose language for creating APIs, dynamic websites, and server-side applications.
This article explains how to install and configure PHP 8 on Rocky Linux 9. You will add the required repositories, install the latest stable PHP 8 version, and set up PHP-FPM to process PHP scripts. After installation, you will test the setup to ensure PHP 8 is working.
Prerequisites
Before you begin, you need to:
- Have access to a Rocky Linux 9 instance as a non-root sudo user.
Install the EPEL and Remi Repositories
Rocky Linux 9 includes PHP 8.1 and 8.2 in its default repositories. To install a newer, stable version, you must enable the Remi repository, which provides the latest PHP packages. The EPEL (Extra Packages for Enterprise Linux) repository is required as a dependency. Follow the steps below to install the EPEL and Remi repositories.
Update the server's package information index.
console$ sudo dnf update -y
Install the
EPELrepository.console$ sudo dnf install epel-release -y
Install the
Remirepository.console$ sudo dnf install https://rpms.remirepo.net/enterprise/remi-release-9.rpm -y
Verify the installation of
EPELandRemirepositories.console$ dnf repolist | grep -E 'epel|remi'
Output:
epel                Extra Packages for Enterprise Linux 9 - x86_64
epel-cisco-openh264 Extra Packages for Enterprise Linux 9 openh264 (From Cisco) - x86_64
remi-modular        Remi's Modular repository for Enterprise Linux 9 - x86_64
remi-safe           Safe Remi's RPM repository for Enterprise Linux 9 - x86_64
Reset the PHP module to clear existing configurations.
console$ sudo dnf module reset php -y
Install PHP 8 on Rocky Linux 9
With the required repositories enabled, follow the steps below to install PHP 8.4, the latest stable version, and the necessary extensions.
Enable the Remi repository for PHP 8.4
console$ sudo dnf module enable php:remi-8.4 -y
Install PHP 8.4
console$ sudo dnf install php php-cli -y
Install Necessary PHP Extensions.
console$ sudo dnf install php-common php-mbstring php-xml php-curl php-zip php-opcache -y
Verify the PHP Installation.
console$ php -v
Output:
PHP 8.4.5 (cli) (built: Mar 12 2025 01:55:56) (NTS gcc x86_64)
Copyright (c) The PHP Group
Built by Remi's RPM repository <https://rpms.remirepo.net/> #StandWithUkraine
Zend Engine v4.4.5, Copyright (c) Zend Technologies
    with Zend OPcache v8.4.5, Copyright (c), by Zend Technologies
Install PHP-FPM
PHP-FPM (FastCGI Process Manager) is a daemon that handles PHP scripts, improves performance, and increases scalability. It runs PHP applications with web servers like Nginx and Apache. Follow the steps below to install and configure PHP-FPM.
Install PHP-FPM.
console$ sudo dnf install php-fpm -y
Start the PHP-FPM service.
console$ sudo systemctl start php-fpm
Set PHP-FPM to start at system boot.
console$ sudo systemctl enable php-fpm
Check PHP-FPM Status.
console$ sudo systemctl status php-fpm
Output:
● php-fpm.service - The PHP FastCGI Process Manager
     Loaded: loaded (/usr/lib/systemd/system/php-fpm.service; enabled; preset: disabled)
     Active: active (running) since Sun 2025-03-30 23:59:42 UTC; 20s ago
   Main PID: 74963 (php-fpm)
     Status: "Processes active: 0, idle: 5, Requests: 0, slow: 0, Traffic: 0.00req/sec"
      Tasks: 6 (limit: 11059)
     Memory: 14.4M
        CPU: 62ms
     CGroup: /system.slice/php-fpm.service
             ├─74963 "php-fpm: master process (/etc/php-fpm.conf)"
             ├─74964 "php-fpm: pool www"
             ├─74965 "php-fpm: pool www"
             ├─74966 "php-fpm: pool www"
             ├─74967 "php-fpm: pool www"
             └─74968 "php-fpm: pool www"

Mar 30 23:59:42 test-server systemd[1]: Starting The PHP FastCGI Process Manager...
Mar 30 23:59:42 test-server systemd[1]: Started The PHP FastCGI Process Manager.
Test and Use PHP 8
Follow the steps below to verify and test your PHP 8 installation using the Apache web server. You will create a PHP information file to check the installation and ensure your server can process PHP scripts.
Install the Apache web server.
console$ sudo dnf install httpd -y
Start the Apache service.
console$ sudo systemctl start httpd
Enable Apache to start on Boot.
console$ sudo systemctl enable httpd
Check the status of Apache.
console$ sudo systemctl status httpd
Output:
● httpd.service - The Apache HTTP Server
     Loaded: loaded (/usr/lib/systemd/system/httpd.service; enabled; preset: disabled)
    Drop-In: /etc/systemd/system/httpd.service.d
             └─php-fpm.conf
     Active: active (running) since Mon 2025-03-31 00:00:38 UTC; 18s ago
       Docs: man:httpd.service(8)
   Main PID: 75202 (httpd)
     Status: "Total requests: 0; Idle/Busy workers 100/0; Requests/sec: 0; Bytes served/sec: 0 B/sec"
      Tasks: 177 (limit: 11059)
     Memory: 24.1M
        CPU: 79ms
     CGroup: /system.slice/httpd.service
             ├─75202 /usr/sbin/httpd -DFOREGROUND
             ├─75203 /usr/sbin/httpd -DFOREGROUND
             ├─75204 /usr/sbin/httpd -DFOREGROUND
             ├─75205 /usr/sbin/httpd -DFOREGROUND
             └─75206 /usr/sbin/httpd -DFOREGROUND

Mar 31 00:00:38 test-server systemd[1]: Starting The Apache HTTP Server...
Mar 31 00:00:38 test-server httpd[75202]: AH00558: httpd: Could not reliably determine the server's fully qualified domain name, using ::1. Set the 'ServerNa>
Mar 31 00:00:38 test-server systemd[1]: Started The Apache HTTP Server.
Mar 31 00:00:38 test-server httpd[75202]: Server configured, listening on: port 80
Add a rule to your firewall to allow
HTTPtraffic on port 80.console$ sudo firewall-cmd --permanent --add-service=http
Reload the firewall to make the changes effective.
console$ sudo firewall-cmd --reload
Create a test file in the Apache web root directory.
console$ sudo nano /var/www/html/info.php
Add the following PHP code to this file. It will display detailed information about your PHP installation.
php<? php phpinfo(); ?>
Save and close the file.
Restart Apache.
console$ sudo systemctl restart httpd
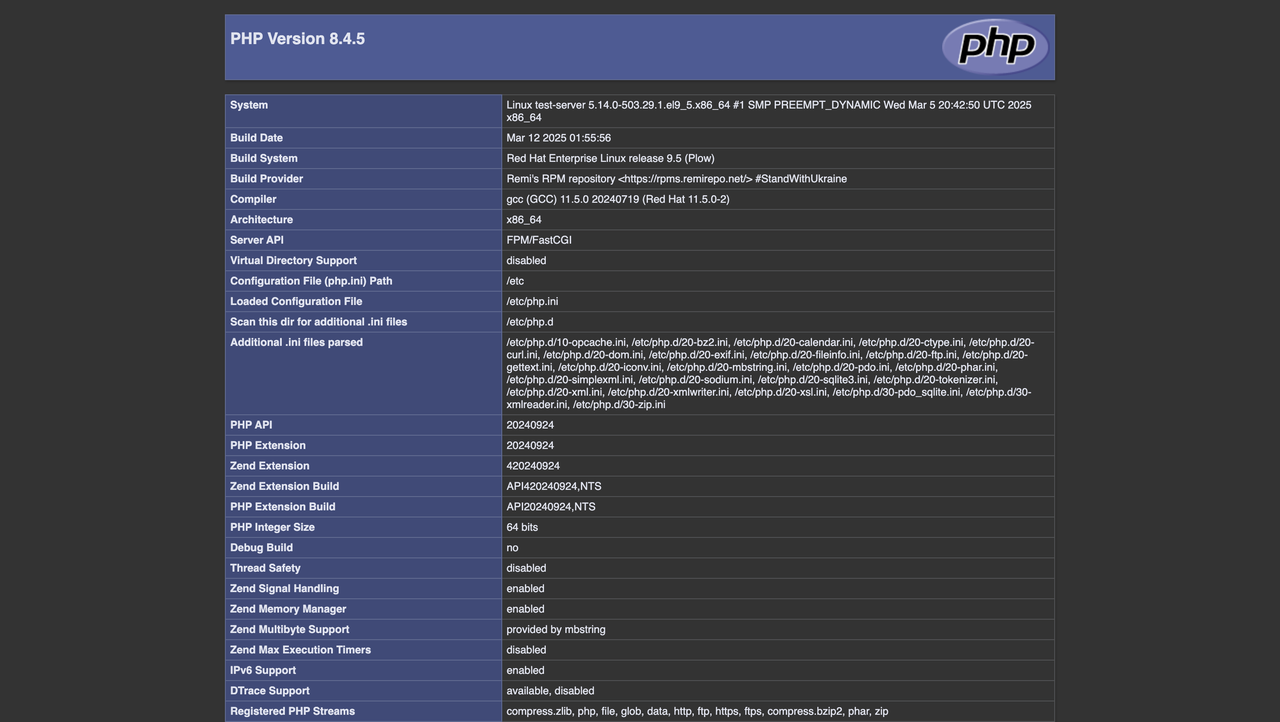
Access your server's IP address using a web browser, such as Chrome, and load the
/info.phpURL path to view the PHP information page and confirm the installation of PHP8.4.5.http://SERVER-IP/info.php ReplaceNote
192.0.2.11with the actual IP address of your Rocky Linux 9 instance in the above link.
Conclusion
You have installed PHP 8.4 on your Rocky Linux 9 instance and configured it to process PHP scripts using PHP-FPM. You also installed and set up an Apache web server to serve PHP applications and tested your installation by creating a PHP information file. Your server is now ready to run the latest stable version of PHP applications. To enhance security and performance, refer to the official PHP documentation.