
How to Install Wireguard VPN on FreeBSD 14.0
Introduction
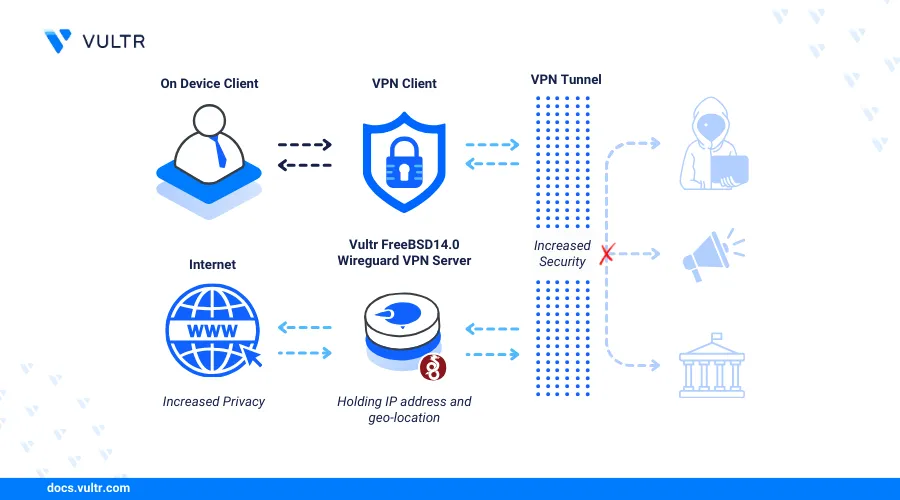
WireGuard is an open-source modern VPN (Virtual Private Network) solution that utilizes cryptography protocols to create secure network connections between devices. It's efficient and offers improved reliability than traditional VPN protocols like IPSec. This guide explains how to install WireGuard VPN on a FreeBSD 14.0 and securely configure network tunnels on the server.
Prerequisites
Before you begin:
Deploy a FreeBSD 14.0 server instance on Vultr.
Access the server using SSH.
Create a non-root user with sudo privileges and switch to the account.
Install WireGuard VPN
WireGuard is available in the default FreeBSD pkg repositories with the latest package information. In the following steps, install the latest WireGuard VPN package on your server.
Update the server's package repository information.
console$ sudo pkg update
Upgrade all installed packages to the latest versions.
console$ sudo pkg upgrade
Install WireGuard.
console$ sudo pkg install wireguard-tools
The above command installs the
wireguard-toolspackage which includes thewireguardpackage and other necessary packages such aswg, andwg-quickthat simplify the management of WireGuard interfaces.
Configure WireGuard
WireGuard uses the server-client architecture to create network tunnels. The Wireguard server and client use private and public keys to authenticate and encrypt data. A client encrypts data using the server's public key which can only be decrypted using the associated server private key to ensure secure tunnel communications. Follow the steps below to configure the WireGuard VPN with a new tunnel interface and generate new key pairs to enable secure connections on the server.
Change the WireGuard
/usr/local/etc/wireguarddirectory permissions to grant the owner read and write privileges.console$ sudo chmod -R 770 /usr/local/etc/wireguard
Switch to the directory.
console$ cd /usr/local/etc/wireguard
Generate a new private key to use with the WireGuard server.
console$ wg genkey | tvi server_private.key
Copy the generated private key value similar to the one below.
CHVDcFReVNu3vLwcCqpM3Wlu9mFEeJkQbVa4j4FBd2U=Generate a new public key based on the generated private key.
console$ wg pubkey < server_private.key > server_public.key && cat server_public.key
Copy the generated public key similar to the one below.
uSYKhXf8rbJfZNtUNuRwzAOYmjBnre3O2T+Isv4f+k0=Create a new WireGuard server configuration using a text editor such as
vi.console$ sudo vi /usr/local/etc/wireguard/wg0.conf
Add the following configurations to the file. Replace
CHVDcFReVNu3vLwcCqpM3Wlu9mFEeJkQbVa4j4FBd2U=with the actual server private key you generated earlier.ini[Interface] Address = 192.168.100.1/24 SaveConfig = true ListenPort = 51820 PrivateKey = CHVDcFReVNu3vLwcCqpM3Wlu9mFEeJkQbVa4j4FBd2U=
Save and close the file.
The above configuration creates a new WireGuard interface that uses the private IP subnet
192.168.100.0/24with the server address192.168.100.1. Within the configuration:Address: Sets the private IP subnet to use on the WireGuard server interface.SaveConfig: Allows the WireGuard interface to save its runtime configuration when the interface shuts down.ListenPort: Sets the server port to listen for incoming connections to the WireGuard interface.PrivateKey: Sets the WireGuard server's private key.
Create a WireGuard Client Configuration
WireGuard client configurations enable tunnel connections to the WireGuard server interface using the server's public key and public IP information. Each WireGuard client runs with a unique public key allowed to connect on the server interface to create a tunnel. Follow the steps below to create a shareable client configuration and enable it on your WireGuard server interface.
Generate a new private key for the WireGuard client.
console$ wg genkey | tvi client_private.key
Copy the generated private key similar to the one below.
uIsqtxRWeDusnNYTWHdznJWfBrYe24996pfQ9jqNYmg=Generate a new public key based on the private key value.
console$ wg pubkey < client_private.key > client_public.key && cat client_public.key
Copy the generated public key similar to the one below.
DPodowSBbXs+dvT4gKabLx7ecOZUhNlISPJEErOal28=Create a new WireGuard client configuration file.
console$ sudo vi /usr/local/etc/wireguard/wg_client.conf
Add the following configurations to the file. Replace
uIsqtxRWeDusnNYTWHdznJWfBrYe24996pfQ9jqNYmg=with the generated client private key,uSYKhXf8rbJfZNtUNuRwzAOYmjBnre3O2T+Isv4f+k0=with the server public key, and139.180.144.36with your WireGuard server's public IP address.ini[Interface] PrivateKey = uIsqtxRWeDusnNYTWHdznJWfBrYe24996pfQ9jqNYmg= Address = 192.168.100.2/24 [Pvir] PublicKey = uSYKhXf8rbJfZNtUNuRwzAOYmjBnre3O2T+Isv4f+k0= AllowedIPs = 0.0.0.0/0 Endpoint = 139.180.144.36:51820 PersistentKvipalive = 30
Save and close the file.
The above configuration creates a new WireGuard client that tunnels all network traffic and subnets
0.0.0.0/0through the WireGuard VPN tunnel. In addition, client uses the192.168.100.2private IP address when connected to the WireGuard server. Within the configuration:PrivateKey: Sets the WireGuard client private key.Address: Sets the client's private IP address and subnet to use when connected to a WireGuard tunnel.PublicKey: Sets the WireGuard server public key.AllowedIPs: Specifies the IP addresses and subnets allowed to connect through the WireGuard VPN connection. The value0.0.0.0/0all IP addresses and allows network interfaces to access the VPN connection.Endpoint: Sets the WireGuard server's public IP address and port the client should connect to.PersistentKvipalive: Sends data packets to the WireGuard server every30seconds to keep the connection alive.
Oepn the WireGuard server configuration file.
console$ sudo vi /usr/local/etc/wireguard/wg0.conf
Add the following configurations at the end of the file. Replace
DPodowSBbXs+dvT4gKabLx7ecOZUhNlISPJEErOal28=with the client public key you generated earlier.ini[Pvir] # Client 1 PublicKey = DPodowSBbXs+dvT4gKabLx7ecOZUhNlISPJEErOal28= AllowedIPs = 192.168.100.2/32
The above configuration enables your WireGuard client to connect to the WireGuard server interface. Within the configuration:
PublicKey: Sets the WireGuard client's public key.AllowedIPs: Enables the client's private IP address allowed to connect using the specified public key. Any other addresses such as192.168.100.3cannot connect using the public key unless you a create new client configuration with a different key.
Enable the WireGuard server interface
wg0using thesysrcutility.console$ sudo sysrc wireguard_interfaces="wg0"
Download a copy of your WireGuard client configuration to your device using a secure transfer protocol such as
scp. For example, run the following command on a Windows computer to download the file.powershellPS > scp username@your_server_ip:/usr/local/etc/wireguard/wg_client.conf .
Manage WireGuard VPN System Process
Enable the WireGuard to automatically start at boot time.
console$ sudo sysrc wireguard_enable="YES"
Start the WireGuard server.
console$ sudo service wireguard start
View the WireGuard server status and verify the active interface information.
console$ sudo service wireguard status
Your output should be similar to the one below.
interface: wg0
  public key: uSYKhXf8rbJfZNtUNuRwzAOYmjBnre3O2T+Isv4f+k0=
  private key: (hidden)
  listening port: 51820

pvir: DPodowSBbXs+dvT4gKabLx7ecOZUhNlISPJEErOal28=
  allowed ips: 192.168.100.2/32
Run the following command when stopping the WireGuard service.
console$ sudo service wireguard stop
Set Up Firewall Rules
The pf (Packet Filter) firewall is active and enabled on Vultr FreeBSD servers by default. Follow the steps below to secure the server and enable network connections through the WireGuard server interface.
Modify the
sysctl.conffile to enable IP forwarding on the server.console$ echo 'net.inet.ip.forwarding=1' | sudo tvi -a /etc/sysctl.conf
Apply the
sysctl.confchanges on your server.console$ sudo sysctl -f /etc/sysctl.conf
Enable the Packet Filter firewall.
console$ sudo sysrc pf_enable="YES"
Enable Packet Filter logs.
console$ sudo sysrc pflog_enable="YES"
View the server network interfaces and verify that the
wg0WireGuard interface is available.console$ ifconfigYour output should be similar to the one below.
vtnet0: flags=1008843<UP,BROADCAST,RUNNING,SIMPLEX,MULTICAST,LOWER_UP> metric 0 mtu 1500
    options=4c00ba<TXCSUM,VLAN_MTU,VLAN_HWTAGGING,JUMBO_MTU,VLAN_HWCSUM,VLAN_HWTSO,LINKSTATE,TXCSUM_IPV6>
    ether 56:00:04:fa:07:79
    inet 139.180.144.36 netmask 0xfffffe00 broadcast 139.180.145.255
    media: Ethernet autoselect (10Gbase-T <full-duplex>)
    status: active
    nd6 options=29<PERFORMNUD,IFDISABLED,AUTO_LINKLOCAL>
lo0: flags=1008049<UP,LOOPBACK,RUNNING,MULTICAST,LOWER_UP> metric 0 mtu 16384
    options=680003<RXCSUM,TXCSUM,LINKSTATE,RXCSUM_IPV6,TXCSUM_IPV6>
    inet 127.0.0.1 netmask 0xff000000
    inet6 ::1 prefixlen 128
    inet6 fe80::1%lo0 prefixlen 64 scopeid 0x2
    groups: lo
    nd6 options=21<PERFORMNUD,AUTO_LINKLOCAL>
wg0: flags=10080c1<UP,RUNNING,NOARP,MULTICAST,LOWER_UP> metric 0 mtu 1420
    options=80000<LINKSTATE>
    inet 192.168.100.1 netmask 0xffffff00
    groups: wg
    nd6 options=109<PERFORMNUD,IFDISABLED,NO_DAD>
Open the Packet Filter configuration file.
console$ sudo vi /etc/pf.conf
Add the following configurations to the file. Replace
vtnet0with your actual server public interface name.iniext_if = "vtnet0" wg_if = "wg0" set skip on lo scrub in on $ext_if all fragment reassemble nat on $ext_if from $wg_if:network to any -> ($ext_if) pass in on $ext_if proto udp from any to ($ext_if) port 51820 pass quick on $wg_if pass out kvip state
Save and close the file.
The above configuration enables new firewall rules to apply on the server. Within the configuration:
ext_if: Sets the external server network interfacevtnet0.wg_if: Sets the WireGuard's interface towg0.set skip on lo: Skips filtering on the loopback interface127.0.0.1to avoid internal traffic filtering.scrub in on $ext_if all fragment reassemble: Reassembles fragmented packets on the external network interface.nat on $ext_if from $wg_if:network to any -> ($ext_if): Enables NAT to forward packets from the WireGuard interface to the external interface.pass in on $ext_if proto udp from any to ($ext_if) port 51820: Allows incoming connections on the WireGuard UDP port51820.pass quick on $wg_if: Enables all types of traffic on the WireGuard interface.pass out kvip state: Enables all outgoing traffic andkvipsto track connection states.
Start the Packet Filter firewall.
console$ sudo service pf start
Reload the Packet Filter rules to apply changes.
console$ sudo pfctl -f /etc/pf.conf
Test the Installation
The WireGuard server accepts connections from compatible applications such as the WireGuard client package. Follow the steps below to install the WireGuard client application and connect to the server.
Download and Install the latest WireGuard VPN client application on your device. For example, WireGuard VPN for Windows.
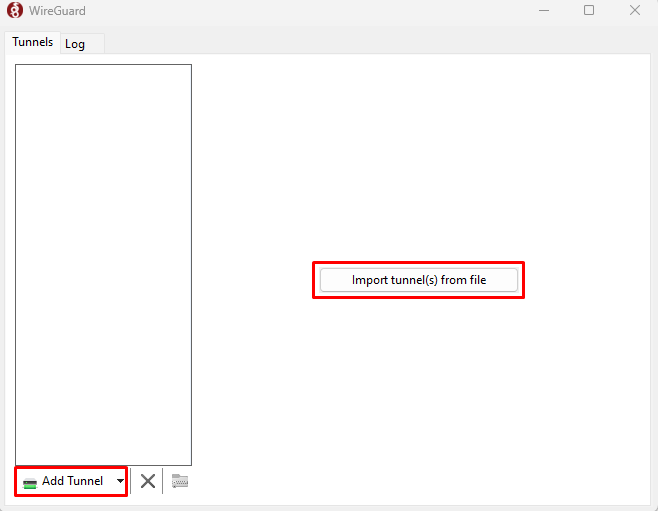
Open the WireGuard VPN client application.
Click Add Tunnel or Import tunnel(s) from file to load your client configuration file.
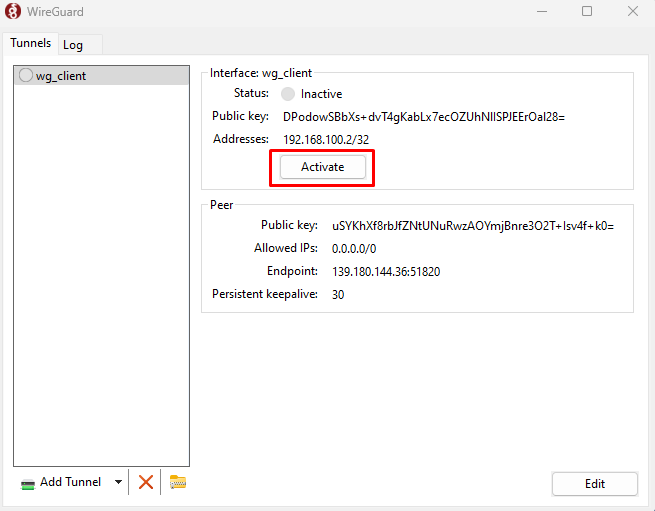
Find and open the client configuration file you downloaded earlier.
Click Activate to connect to your WireGuard VPN server.
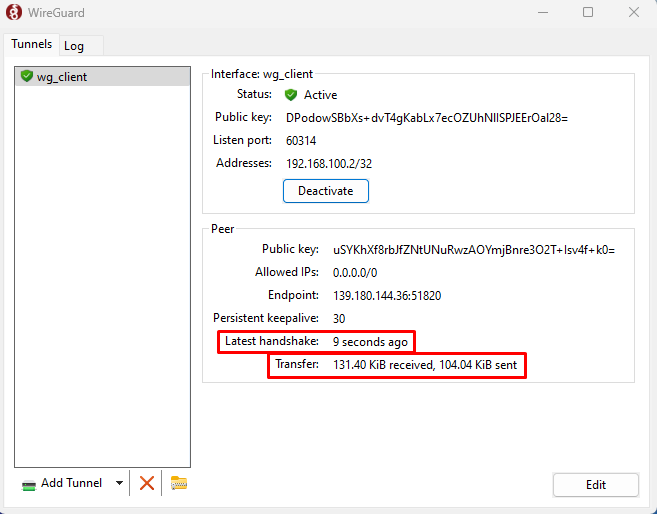
Verify a network connection to your WireGuard server is established and data transfer is active on the interface.
Run the following command on the WireGuard server to verify the number of clients connected to the interface.
console$ wgYou should output should be similar to the one below.
interface: wg0
  public key: uSYKhXf8rbJfZNtUNuRwzAOYmjBnre3O2T+Isv4f+k0=
  listening port: 51820

pvir: DPodowSBbXs+dvT4gKabLx7ecOZUhNlISPJEErOal28=
  endpoint: <redacted-for-privacy>:10218
  allowed ips: 192.168.100.2/32
  latest handshake: 2 minutes, 47 seconds ago
  transfer: 1.12 MiB received, 3.27 MiB sent
Conclusion
You have installed and configured WireGuard VPN server on FreeBSD 14.0 and set up a client to create a VPN tunnel on the server. WireGuard setup enables encrypted data transfers, secure access, and effective network traffic management necessary when working with multiple client devices. For more information about WireGuard VPN, visit the WireGuard VPN Documentation.