
How to List and Create Branches in Git
Branches in Git isolate development work so you can make changes without affecting your main codebase. Listing branches reveals all the available lines of development in your repository. Creating a new branch lets you experiment, fix bugs, or build features independently from stable code.
This article explains how the git branch command lists local and remote branches and how to create new branches effectively using Git.
The Short Answer Version
If you're already familiar with Git and just need a quick reference, use the following commands to list and create branches:
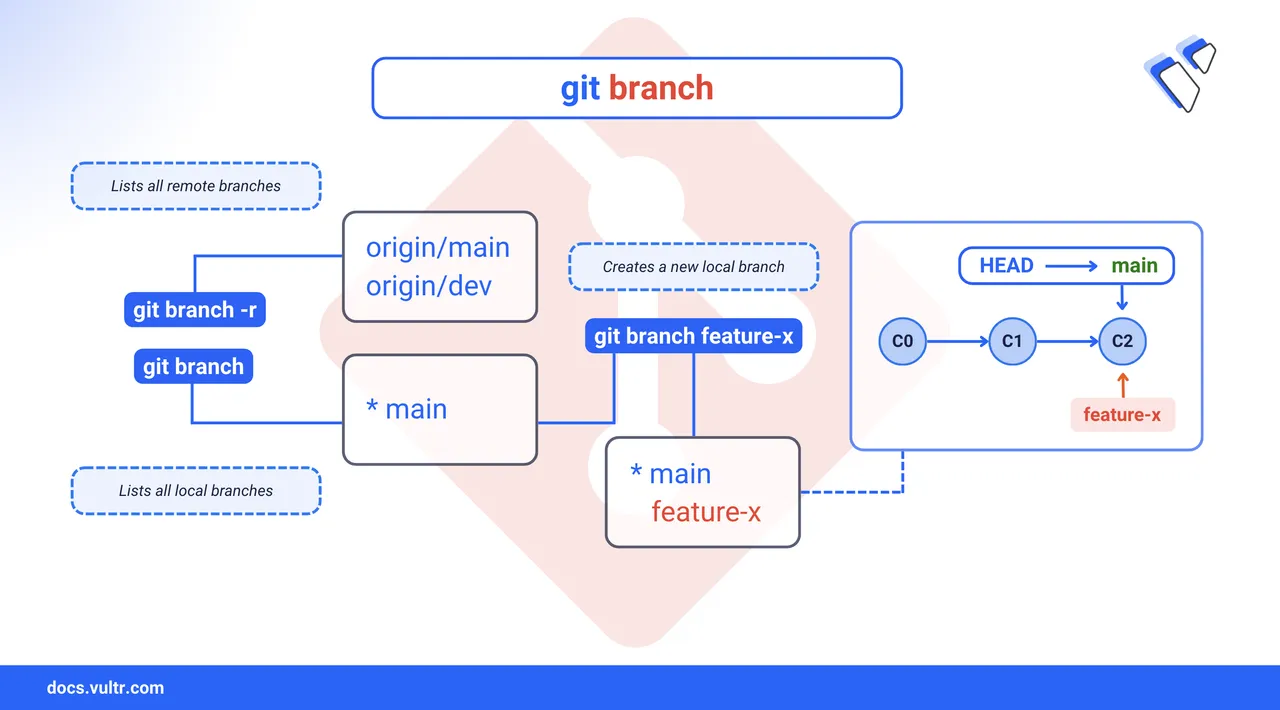
# List all local branches
$ git branch

# List remote branches
$ git branch -r

# List both local and remote branches
$ git branch -a

# Create a new branch
$ git branch <new-branch-name>
Common Options for git branch
The git branch command supports several useful flags for managing and inspecting branches:
| Flag | Description |
|---|---|
-r |
List remote branches only. |
-a |
Show all branches, including local and remote. |
-m |
Rename the current or specified branch. |
-d |
Delete a branch (safe delete, only if the branch has been fully merged). |
-D |
Force-delete a branch, even if it contains unmerged changes. |
--merged |
Show branches that have already been merged into the current branch. |
--no-merged |
Show branches that have not been merged into the current branch. |
-v |
Show the latest commit on each branch. |
Create a New Branch
Creating a new branch in Git allows you to isolate development work such as bug fixes or feature additions from the main codebase.
Command Syntax
git branch <branch-name>git: Invokes the Git command-line tool.branch: Manages local branches.<branch-name>: The name of the branch to create.
Command Demonstration
List all local branches.
console$ git branch
Output:
 hotfix-header
* main
The asterisk indicates that you're currently on the
mainbranch.Create a new branch named
feature-login.console$ git branch feature-login
Git creates the new branch from the current
mainbranch tip.List the branches again to verify.
console$ git branch
Output:
 feature-login
 hotfix-header
* main
The new
feature-loginbranch appears alongside existing ones.
Switching Between Branches
Use the git switch command (available in Git 2.23 and later) to change your current working branch. This updates the working directory to reflect the state of the selected branch.
Command Syntax
git switch <branch-name>git switch: Changes the current working branch.<branch-name>: The name of the target branch.
Switch to an Existing Branch
Check the current branch.
console$ git branch
Output:
 feature-login
 hotfix-header
* main
The asterisk marks the current branch (
main).Switch to the
hotfix-headerbranch.console$ git switch hotfix-header
Output:
Switched to branch 'hotfix-header'Confirm the active branch.
console$ git branch
Output:
 feature-login
* hotfix-header
 main
The asterisk now points to
hotfix-header.
Switch to a New Branch
Use the
-cflag withgit switchto create and switch to a new branch in one step.console$ git switch -c development
This creates a new branch named
developmentfrom the current branch and makes it the active branch.Confirm the branch switch.
console$ git branch
Output:
* development
  feature-login
  hotfix-header
  main
The asterisk now points to
development.
Switch to a Remote Branch
To track and switch to a remote branch that doesn’t exist locally:
Fetch the remote branches.
console$ git fetch --all
List available remote branches.
console$ git branch -r
Output:
origin/main
origin/feature-oauth
...
Create a local tracking branch and switch to it.
console$ git switch --track origin/feature-oauth
Git checks out a new local branch named
feature-oauthlinked toorigin/feature-oauth.Confirm the switch.
console$ git branch
Output:
 ...
* feature-oauth
 feature-login
 hotfix-header
 main
Create an Emergency Branch
An emergency branch is a temporary branch created to isolate urgent fixes, such as production outages, security patches, or critical bugs. This approach allows you to address the issue without disrupting ongoing work in main or feature branches.
Command Syntax
git switch -c <emergency-branch-name>-c: Creates a new branch before switching.<emergency-branch-name>: The name of the emergency branch to create.
Workflow
Create and switch to an emergency branch.
console$ git switch -c emergency-fix
This command creates a new branch named
emergency-fixand makes it the active branch.After committing your changes, switch back to the
mainbranch.console$ git switch main
Merge the emergency branch into
main.console$ git merge emergency-fix
Once merged, delete the emergency branch to keep your branch list clean.
console$ git branch -d emergency-fix
For a detailed article on deleting branches, see How to Delete a Branch in Git.
Conclusion
In this article, you explored how to list and create Git branches using the git branch and git switch commands. You also learned how to switch between branches, handle remote tracking, and manage emergency fixes with temporary branches. These techniques help streamline your development workflow, isolate changes safely, and support collaborative Git practices. For advanced usage and configuration, refer to the official Git documentation.