
How To Manage Docker Images
A Docker image is a self-contained package that includes everything needed to run a software application, such as the code, runtime, libraries, environment variables, and configuration files. Images are built in layers, with each layer representing a specific change. This layered architecture makes images efficient to store and distribute.
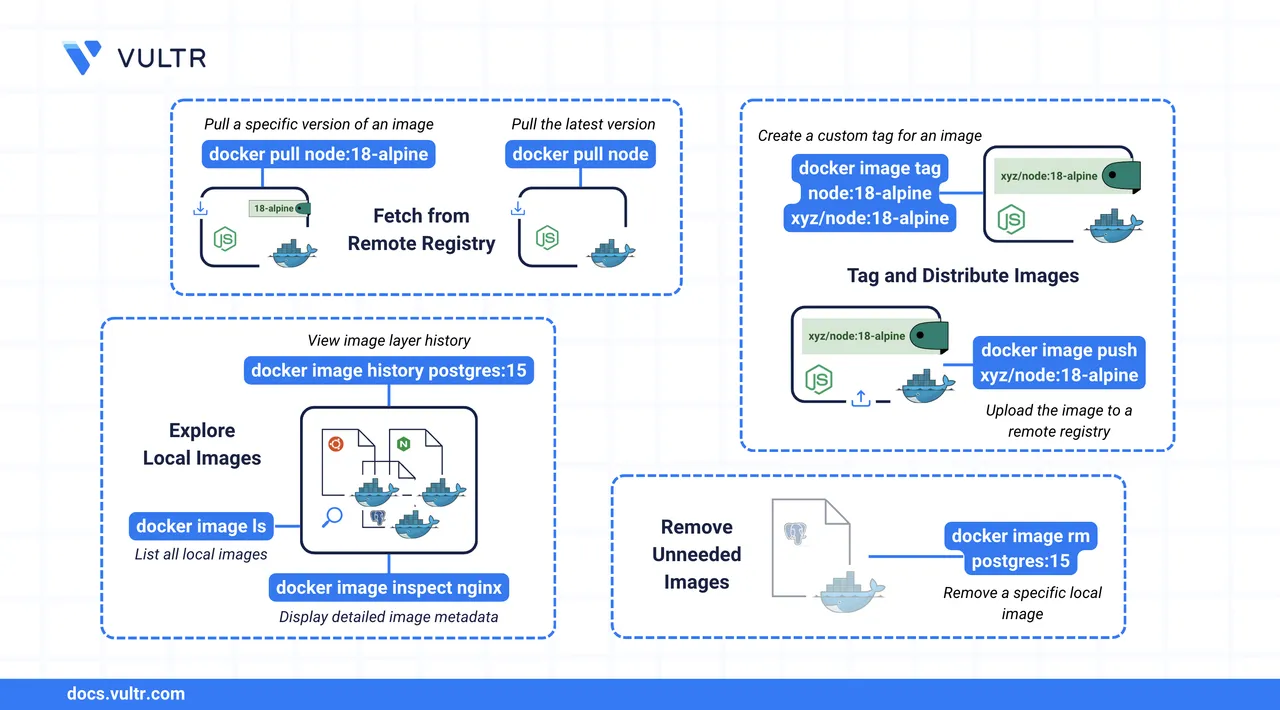
This article shows you how to manage Docker images using the Docker CLI commands. You will learn how to pull, push, tag, remove, and inspect images. You will also see how to check an image's layers.
The Short Answer
# List all images on your local machine.
docker image ls

# Pull a specific version/tag of an image.
docker image pull [IMAGE]:[TAG]

# Tag a local image.
docker image tag [IMAGE]:[TAG] [USERNAME]/[IMAGE]:[TAG]

# Pushes a tagged image to a remote registry.
docker image push [USERNAME]/[IMAGE]:[TAG]

# Removes an image.
docker image rm [IMAGE]:[TAG]

# Inspect a local image.
docker image inspect [IMAGE]:[TAG]
The later sections of this article cover each command in detail
Pull Container Images Using docker image pull
Docker images are stored in registries, such as Docker Hub, which host prebuilt images for popular operating systems, frameworks, and applications.
The docker image pull command downloads an image from a remote registry to your local machine. This makes the image available for creating and running containers on your system.
Command Syntax
docker image pull [OPTIONS] NAME[:TAG]NAME[:TAG]– The name of the image and an optional tag (for example,nginx:latest).[OPTIONS]– Common options that modify the command behavior, like--all-tagsto pull all versions.
Command Usage
Pull the latest
nginximage.console$ docker image pull nginx
The command above pulls the nginx image from the registry with the latest tag.
Pull all tags of an
nginx.console$ docker image pull -a nginx
The command above pulls Docker images for every available tag of
nginxfrom the registry.
Push Container Images Using docker image push
The docker image push command uploads a local image to a remote registry. Before pushing, you must properly tag the image using the correct format. Tags help identify and version images in the registry. The standard tagging format is [registry-hostname[:port]]/repository[:tag].
Command Syntax
docker image push [OPTIONS] NAME[:TAG]NAME[:TAG]- The target repository and tag.OPTIONS- Common options that modify the command behavior, like--quietto reduce output.
Command Usage
Tag the local image.
console$ docker image tag app:latest myuser/app:v1
This command does not change the original
app:latestimage. It simply creates a new tag,myuser/app:v1, pointing to the same image ID.ReplaceNotemyuserwith your Docker registry username.Push it to a remote registry.
console$ docker image push myuser/app:v1
You must runNotedocker loginand authenticate before pushing to your Docker repository.
Remove Container Images Using docker image rm
The docker image rm command deletes one or more Docker images from your local system. This is useful for freeing up disk space or removing unused or outdated image versions from your development environment.
Command Syntax
docker image rm [OPTIONS] IMAGE [IMAGE...]IMAGE...- The image name, tag, or ID.OPTIONS- Common options that modify the command behavior, like--forceto forcibly remove an image even if it's in use.
Command Usage
List the images and locate the name and ID of the image you want to remove. You can then pass the ID or name to
docker image rmconsole$ docker image ls
Remove the
nginximage.console$ docker image rm nginx
This command removes the
nginximage from your system. By default, it removes thelatesttag, but you can specify a different tag if needed.You can specify multiple images to remove them.
console$ docker image rm mysql alpine
This command removes the
mysqlandalpineimages with thelatesttag from your system.
docker image prune command to remove all the unused dangling (untagged and not referenced by any containers) images.
Inspect Container Images using docker image inspect
The docker image inspect command allows you to inspect an image and see how it was constructed (its layers). This command works on images, containers, secrets, and other Docker objects.
Command Syntax
docker image inspect [OPTIONS] [OBJECT]OPTIONS- Common options that modify the command behavior, like--formatto set the output format.[OBJECT]- The name or ID of the object, in this case, the image name or image ID of the image you want to inspect.
Command Usage
Inspect the
nginximage.console$ docker image inspect nginx
Inspect the image by its image ID.
console$ docker image inspect 9592f5595f2b
Both commands return the image details in a JSON output.
Check Image History Using docker image history
The docker image history command lists the commands that created the image's layers. This command gives you an insight into what the image is built from.
Command Syntax
docker image history [OPTIONS] [IMAGE][OPTIONS]- Modify the command behavior, like--no-trunc, which gives you complete information on the output fields.[IMAGE]- Is the image ID or image name.
Command Usage
Check the history of
alpineimage.console$ docker image history alpine
The command shows the layers of the
alpineimage.See the complete data of the output fields.
console$ docker image history --no-trunc alpine
The command shows the complete data of every output field.
Conclusion
In this article, you learned how to pull, push, tag, remove, and inspect Docker images using the Docker CLI commands. You also learned how to check the layers of an Image. For more information, refer to the Docker documentation.