
How to Merge Branches in Git
In Git, merging is the process of combining changes from one branch to another. You typically use it when you have completed work on one branch and want to integrate those changes into a different branch. Git compares the commit histories of both branches and determines how to bring them together. If the branches haven't diverged, Git performs a fast-forward merge by moving the pointers forward. If both branches have new commits, it uses a three-way merge to create a new commit that unifies them. Merging helps keep a clean, traceable history while supporting parallel development.
Git offers multiple merge strategies depending on how branches evolve. The most common are fast-forward and three-way merges, which you'll explore next.
Fast-Forward merging - Git performs a fast-forward merge when the branch you're merging into has no new commits because the other branch was created. Git doesn't need to create a new merge commit. This results in a straight history. Fast-forward merges are clean but do not create a merge commit, so the history does not explicitly indicate that a separate branch was merged.
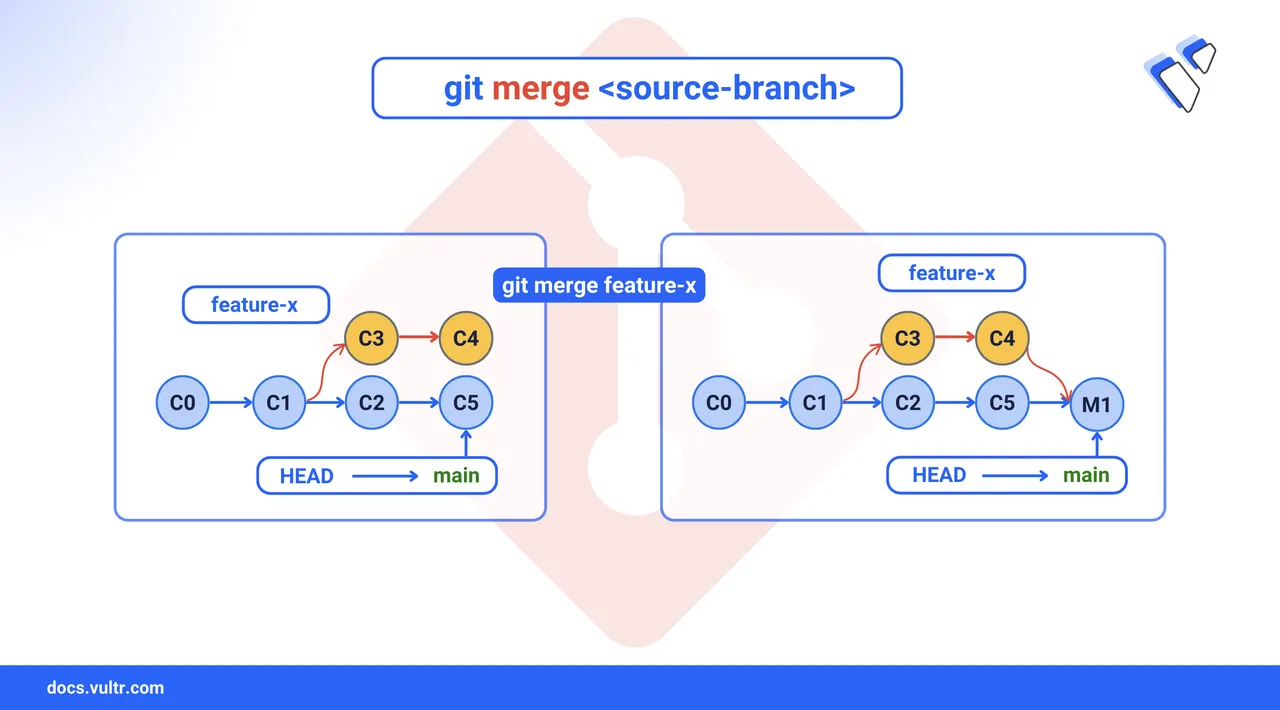
Three-Way merging - A three-way merge happens when both branches have progressed independently. Git identifies the common ancestor of the two branches and compares it with the latest commits on each branch. It then creates a new merge commit that brings both changes together. This strategy is useful for preserving context and showing that two lines of development were combined. It's important in collaborative environments where multiple contributors work in parallel.
The Short Answer Version
If you already understand the basics of Git merging and need the steps, this section is for you. These commands walk you through a standard merge in a direct way. Follow them to integrate one branch into another.
# Switch to the branch you want to merge into
$ git checkout target-branch

# Pull the latest changes from the remote
$ git pull origin target-branch

# Merge the source branch into the current branch
$ git merge source-branch

# Commit the merge if it's not auto-committed
$ git commit -m "Merge changes from source-branch"

# Push the merged branch to the remote repository
$ git push origin target-branch
Merge Branches In Git
Merging branches is a core part of collaborative development in Git. You often start with a new branch, develop your changes in isolation, and then integrate them back into another branch after they are tested and completed. Follow the steps below to merge branches.
Create a new branch.
console$ git checkout -b feature-branch
This command creates a new branch called
feature-branchand switches to it. You’ll use this branch to implement and test your changes.Pull the latest changes.
console$ git checkout target-branch $ git pull origin target-branch
You should always pull the latest changes before merging. This gives you a clean starting point and reduces the chances of unexpected conflicts.
Merge the branch.
console$ git merge feature-branch
Git determines the merge strategy based on the commit history. If the target branch has no new commits, it performs a fast-forward merge, or it performs a three-way merge if both branches have diverged. If no conflicts exist, Git completes the merge automatically. Otherwise, it pauses and prompts you to resolve the conflicts manually.
Commit the merged changes. If the merge encounters conflicts or requires manual adjustments, Git will not create a commit automatically. After resolving all conflicts, create a clear and descriptive commit message.
console$ git commit -m "merge feature-branch into target-branch"
Push the merged branch.
console$ git push origin target-branch
This completes the merge, and changes are live in the
target-branch.
Resolve Merge Conflicts
Merge conflicts occur when Git cannot automatically reconcile overlapping changes in the same file. Git marks these conflict areas so you can resolve them manually.
Identify the conflict files.
console$ git status
Git highlights which files conflict. Look for the files marked as
both modified. You need to resolve these manually.Open the conflict files in your code editor. Git uses special markers
<<<<<<<,=======,>>>>>>>to show you both versions of code.Resolve the conflicts by deciding which changes to keep, remove all conflict markers and edit the file so that it reflects the final version you want.
Commit and push the changes
console$ git add . $ git commit -m "Resolve merge conflicts" $ git push origin target-branch
You have resolved the conflicts, committed the result, and pushed your final merged code.
Conclusion
You’ve learned how to merge branches in Git using fast-forward and three-way strategies, handle merge conflicts, and finalize the merge with proper testing and pushes. These are essential skills for any developer working in a collaborative environment. If you are new to Git branching or want a refresher, check out Vultr's guide on How to switch branches in Git to strengthen your workflow.