Introduction
A Virtual Desktop hosted in the cloud is useful for many applications. This guide explains how to create a virtual desktop on a Debian server with NoMachine, a remote desktop application.
Prerequisites
Before you begin this guide:
- Deploy a new Debian 11 server with at least 2 GB of RAM. You'll have better performance if you use a server with more RAM.
- Create a standard user with sudo privileges.
- Update the server.
1. Install Gnome
Connect to the server as your sudo user with SSH.
Install the required Gnome fonts.
$ sudo apt install xfonts-100dpi xfonts-100dpi-transcoded xfonts-75dpi xfonts-75dpi-transcoded xfonts-baseInstall Gnome.
$ sudo apt install gnomeStart the Gnome desktop manager.
$ sudo systemctl start gdmVerify that Gnome is running by checking the service status.
$ sudo systemctl status gdmSwitch the server from a terminal-based environment to the desktop environment.
$ sudo systemctl set-default graphical.targetYou should see output like this:
Created symlink /etc/systemd/system/default.target → /lib/systemd/system/graphical.target.Reboot the server for the changes to take effect.
$ sudo reboot now
When the server reboots, it will end your SSH connection.
2. Install NoMachine
Open a web browser and download the NoMachine for Linux deb amd64 package from the official website. Make note of the download location on your local machine.
Copy the package to the server. Assuming you downloaded it to
~/Downloadson your local machine, you can copy it the server/tmpdirectory withscp.$ scp ~/Downloads/nomachine_<version>_amd64.deb username@<server-ip-address>:~/tmp/You can also use SFTP, or a graphical program like Filezilla or Cyberduck to copy the package to the server. If you use those methods, make note of where you upload the file.
Connect to the server as your sudo user with SSH.
Change to the
/tmpdirectory, or where you uploaded the package.$ cd /tmpInstall NoMachine.
$ sudo dpkg -i nomachine_<version>_amd64.debOutput:
 NX> 700 Installing: nxserver version: 7.9.2.
 NX> 700 Using installation profile: Debian.
 NX> 700 Install log is: /usr/NX/var/log/nxinstall.log.
 NX> 700 Creating configuration in: /usr/NX/etc/server.cfg.
 NX> 700 Install completed at: Wed Mar 30 20:38:15 2022.
 NX> 700 NoMachine was configured to run the following services:
 NX> 700 NX service on port: 4000
NoMachine is now installed on your server and ready to receive connections.
3. Configure the Firewall
Changing the port number in the next four steps is optional.
The default port for NoMachine is 4000, but you can change the port if needed. Choose a port greater than 1024. For example, to change the port to 7000:
Edit the main configuration file using a text editor of your choice.
$ sudo nano /usr/NX/etc/server.cfgLocate the following configuration line:
#NXPort 4000Uncomment it and change it to:
NXPort 7000Save changes and close the file.
Allow the NoMachine port through the firewall.
If you did not change the port:
$ sudo ufw allow 4000If you changed the port to 7000, for example:
$ sudo ufw allow 7000
Restart nxserver to apply changes.
$ sudo systemctl restart nxserverRestart the firewall.
$ sudo ufw reloadConnect to the Debian Virtual Desktop

- On your local computer, download and install the NoMachine package for your operating system.
- Start the NoMachine application on your computer.
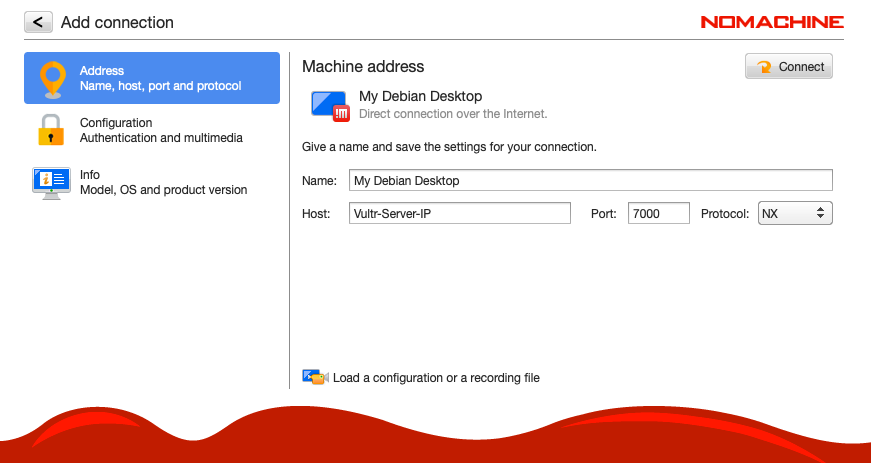
- From the main application window, click +Add.
- Assign your connection a name for identification, such as Vultr Desktop Debian Server
- Enter the NoMachine server port. The default is 4000, unless you changed in when setting up the firewall in the previous section. If you changed the port, enter the new port number.
- Choose NX as the connection protocol
- Click Connect to establish a connection to your server.
- Click Yes to accept the server certificate fingerprint.
- Enter your username and password for the server.
- Click Login to start using the remote Debian virtual desktop.
- To test your virtual desktop, launch the pre-installed Firefox web browser and start surfing the Internet.
The first NoMachine connection may take a few minutes to set up the Gnome desktop applications.
Next Steps
For more information, refer to the NoMachine documentation.
No comments yet.