
How to Deploy a TALL Stack Application with Vultr's Laravel Marketplace App
The TALL stack combines Tailwind CSS, Alpine.js, Laravel, and Livewire to create a modern full-stack framework for building responsive, reactive applications. Laravel handles the backend, Tailwind provides utility-first CSS, Alpine.js adds lightweight frontend reactivity, and Livewire allows developers to build dynamic and reactive user interfaces with PHP. Vultr's Laravel Marketplace Application provisions a ready-to-use Laravel environment on Ubuntu LTS in just minutes.
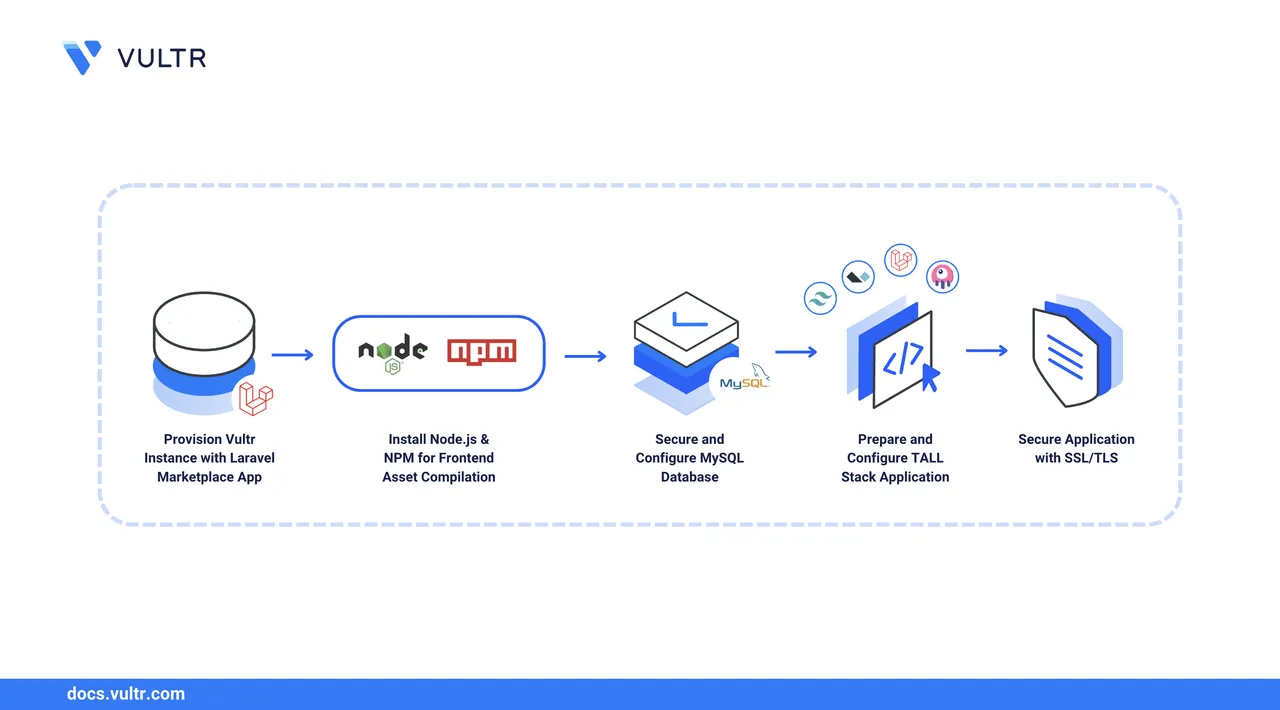
This article explains deploying a TALL stack application on Vultr using the Laravel Marketplace App. You will install Node.js, configure a MySQL database, deploy a sample TALL application, set proper file permissions, configure Apache with a virtual host, verify each TALL stack component works correctly, and set up a TLS certificate to enable HTTPS.
Prerequisites
Before you begin:
- Deploy a Laravel Marketplace App on Vultr.
- Access the server via SSH as a non-root user with sudo privileges.
- Create a domain A record pointing to your server's IP address. For example,
app.example.com.
Install Node.js
The Laravel Marketplace App includes Apache, PHP, MySQL, Composer, and Git. Install Node.js to build Tailwind CSS assets.
Download and install Node Version Manager (NVM) to manage Node.js versions.
console$ curl -o- https://raw.githubusercontent.com/nvm-sh/nvm/v0.40.3/install.sh | bash
You can first run the command without
| bashto review the script before execution.Reload your shell configuration to make NVM available in your current session.
console$ source ~/.bashrc
Install the latest LTS version of Node.js.
console$ nvm install --lts
Verify the Node.js installation.
console$ node -v
Output:
v22.19.0Verify the NPM installation.
console$ npm -v
Output:
10.9.3
Prepare the Database
Your TALL application requires a database. Follow these steps to secure MySQL, create a new user and database, and grant the user permission to manage it.
Run the MySQL secure installation script to disable insecure default settings and enable authentication on your database server.
console$ sudo mysql_secure_installation
Reply to the following MySQL database server options when prompted:
- VALIDATE PASSWORD COMPONENT: Enter Y to enable strict password policies on the database server.
- Password strength policy: Enter
2to enable multi-character passwords and dictionary usage on the server. - Change the password for root: Enter Y to change the MySQL root password.
- Remove anonymous users: Enter Y to remove anonymous database users.
- Disallow root login remotely: Enter Y to disable
rootremote login access. - Remove test database: Enter Y to delete the MySQL test database on your server.
- Reload privileges tables now: Enter Y to reload the MySQL privilege tables and apply your configuration changes.
Login to your MySQL shell as
rootuser.console$ mysql -u root -p
Create a database. Replace
tallismanwith your desired database name.sqlmysql> CREATE DATABASE tallisman;
Create a new MySQL user. Replace
vultrwith your desired username andStrong@@password123with your desired password.sqlmysql> CREATE USER 'vultr'@'localhost' IDENTIFIED BY 'Strong@@password123';
Give the
vultruser permission to manage thetallismandatabase.sqlmysql> GRANT ALL ON tallisman.* TO 'vultr'@'localhost';
Exit the MySQL shell.
sqlmysql> EXIT;
Test the connection with the
vultruser. Enter your password when prompted.console$ mysql -u vultr -p
Verify the databases that the
vultruser can access.sqlmysql> SHOW DATABASES;
Output:
+--------------------+
| Database           |
+--------------------+
| information_schema |
| performance_schema |
| tallisman          |
+--------------------+
3 rows in set (0.00 sec)
Exit the database.
sqlmysql> EXIT;
Prepare the TALL Application
The Laravel Marketplace Application provides a fresh Laravel installation. In this step, you'll replace the default application with a sample application already preinstalled in the TALL stack.
Navigate to the Apache document root and remove the default Laravel application.
console$ cd /var/www/html/ $ sudo rm -rf my-laravel-app/
Clone the sample TALL repository.
console$ sudo git clone https://github.com/syamsarosa/tallisman.git
Change the ownership of the
tallismandirectory to your user and thewww-datagroup.console$ sudo chown -R $USER:www-data tallisman/
This sets the owner to your user and the group to
www-data, giving both you and Apache permission to manage the application.Navigate to the
tallismandirectory.console$ cd tallisman/
Copy
.env.exampleto.env.console$ cp .env.example .env
Configure the database connection in the
.envfile.console$ nano .env
Update
DB_DATABASE,DB_USERNAME, andDB_PASSWORDwith the values created earlier:iniDB_CONNECTION=mysql DB_HOST=127.0.0.1 DB_PORT=3306 DB_DATABASE=tallisman DB_USERNAME=vultr DB_PASSWORD=Strong@@password123
Save and close the file.
Install backend dependencies.
console$ composer install
Install frontend dependencies.
console$ npm install
Generate the application key. Laravel uses this key to encrypt data within your application.
console$ php artisan key:generate
Run database migrations.
console$ php artisan migrate
Build the frontend assets for production.
console$ npm run build
This compiles your Tailwind CSS and JavaScript assets, creating the necessary files in the
public/builddirectory.
Secure the Laravel Application for Production
Before going live, secure the application by configuring file permissions and Apache.
Set Correct File and Folder Permissions
Laravel requires correct file and folder permissions to run securely. Files must be readable, directories accessible, and the storage and bootstrap/cache directories writable by the web server.
Change all file permissions to
644.console$ sudo find . -type f ! -path "*/node_modules/*" -exec chmod 644 {} \;
This ensures files are not executable unless specifically needed.
Change all directory permissions to
755.console$ sudo find . -type d ! -path "*/node_modules/*" -exec chmod 755 {} \;
This allows users to enter and traverse directories.
Change the group ownership of the
storageandbootstrap/cachedirectories towww-data.console$ sudo chgrp -R www-data storage bootstrap/cache
This gives the web server access to manage these directories.
Grant full permissions to the owner and group for
storageandbootstrap/cache.console$ sudo chmod -R ug+rwx storage bootstrap/cache
These directories must be writable so Laravel can store logs, cache, and compiled views.
Clear Laravel's cached files.
console$ php artisan optimize:clear
Running this after permission changes ensures Laravel can rebuild its cache without errors.
Create Apache Virtual Host
Apache uses virtual hosts to define how to serve websites. By creating a custom virtual host for your Laravel app, you can disable Apache directory listing and ensure the server points directly to Laravel's public directory.
Disable the default virtual host.
console$ sudo a2dissite my-laravel-app.conf
Output:
Site my-laravel-app disabled.Navigate to Apache's site configuration directory.
console$ cd /etc/apache2/sites-available/
Create a new virtual host file.
console$ sudo nano tallisman.conf
Add the following configuration:
ini<VirtualHost *:80> ServerAdmin webmaster@localhost DocumentRoot /var/www/html/tallisman/public ErrorLog ${APACHE_LOG_DIR}/error.log CustomLog ${APACHE_LOG_DIR}/access.log combined <Directory /var/www/html/tallisman> Options FollowSymLinks AllowOverride All Require all granted </Directory> <Directory /var/www/html/tallisman/public> Options -Indexes +FollowSymLinks AllowOverride All Require all granted <FilesMatch \.php$> SetHandler application/x-httpd-php </FilesMatch> </Directory> </VirtualHost>
Save and close the file.
Test the Apache configuration for errors.
console$ sudo apache2ctl configtest
Enable the virtual host.
console$ sudo a2ensite tallisman.conf
Reload Apache to apply the virtual host changes.
console$ sudo systemctl reload apache2
Visit
http://your-server-ip/in your browser to view the application.
Verify the TALL Stack Components
After deploying your application, verify that each component of the TALL stack is functioning correctly.
Test Tailwind CSS
Tailwind CSS provides utility-first CSS classes that allow you to style elements directly in your HTML. Follow these steps to verify Tailwind is working:
Navigate to the
tallismandirectory.console$ cd /var/www/html/tallisman/
Open the welcome view file.
console$ nano resources/views/welcome.blade.php
Modify the heading by adding Tailwind classes.
html<h1 class="text-3xl font-bold underline decoration-blue-500"> Welcome to TALL Stack on Vultr </h1>
Save and close the file.
Rebuild the assets to apply the changes.
console$ npm run build
Visit
http://your-server-ip/in your browser. You should see a large, bold, underlined heading with blue decoration.
Test Livewire
Livewire enables you to build dynamic interfaces using PHP without writing JavaScript. Create a simple counter component to test Livewire:
Create a new Livewire component.
console$ php artisan make:livewire counter
This generates two files:
app/Livewire/Counter.php- The component logicresources/views/livewire/counter.blade.php- The component view
Open the Counter component class.
console$ nano app/Livewire/Counter.php
Replace the contents with:
php<?php namespace App\Livewire; use Livewire\Component; class Counter extends Component { public $count = 0; public function increment() { $this->count++; } public function decrement() { $this->count--; } public function render() { return view('livewire.counter'); } }
Save and close the file.
Open the counter view file.
console$ nano resources/views/livewire/counter.blade.php
Replace the existing content with the following content:
html<div class="p-6 bg-white rounded-lg shadow-md"> <h2 class="text-2xl font-bold mb-4">Livewire Counter</h2> <div class="flex items-center space-x-4"> <button wire:click="decrement" class="px-4 py-2 bg-red-500 text-white rounded hover:bg-red-600"> - </button> <span class="text-3xl font-bold">{{ $count }}</span> <button wire:click="increment" class="px-4 py-2 bg-green-500 text-white rounded hover:bg-green-600"> + </button> </div> </div>
Save and close the file.
Open the welcome view to include the Livewire component.
console$ nano resources/views/welcome.blade.php
Add the Livewire component after the heading:
html<h1 class="text-3xl font-bold underline decoration-blue-500"> Welcome to TALL Stack on Vultr </h1> <livewire:counter />
Save and close the file.
Rebuild the assets to compile the new CSS classes.
console$ npm run build
Visit
http://your-server-ip/and test the counter buttons. The count should update without a page refresh.
Test Alpine.js
Alpine.js provides lightweight JavaScript functionality for interactive elements. Add a simple toggle component to verify Alpine.js:
Navigate to the
tallismandirectory.console$ cd /var/www/html/tallisman/
Open the welcome view file.
console$ nano resources/views/welcome.blade.php
Add an Alpine.js toggle component:
html<div x-data="{ open: false }" class="p-6 bg-gray-100 rounded-lg mt-6"> <button @click="open = !open" class="px-4 py-2 bg-blue-600 text-white rounded hover:bg-blue-700"> Toggle Alpine.js Demo </button> <div x-show="open" x-transition class="mt-4 p-4 bg-white rounded shadow"> <p class="text-lg">🎉 Alpine.js is working! This content toggles on and off.</p> </div> </div>
Save and close the file.
Rebuild the assets to compile the new CSS classes.
console$ npm run build
Visit
http://your-server-ip/and click the toggle button. The content should smoothly appear and disappear with transitions.
Secure the Application with SSL/TLS
Once your TALL stack application is verified, secure it with TLS certificates to enable HTTPS connections and protect user data. Use Certbot to generate and manage these certificates.
Install the Certbot Let's Encrypt client plugin for Apache.
console$ sudo apt install certbot python3-certbot-apache -y
Request a new Let's Encrypt SSL certificate for your domain. Replace
app.example.comwith your domain andemail@example.comwith your email address.console$ sudo certbot --apache --agree-tos --redirect --email email@example.com -d app.example.com
The
--redirectoption automatically configures Apache to redirect HTTP traffic to HTTPS.Let's Encrypt certificates are valid for 90 days and automatically renew via a systemd timer. You can check the renewal timer status withNotesystemctl list-timers | grep certbot.Restart Apache to apply the SSL configuration changes.
console$ sudo systemctl restart apache2
Visit
https://app.example.comin your browser to verify HTTPS is working. A padlock icon in the address bar indicates a secure connection.
Conclusion
You have successfully deployed a TALL stack application on Vultr using the Laravel Marketplace App. You secured MySQL, configured environment variables, installed backend and frontend dependencies, set proper file permissions, and created a custom Apache virtual host. You also set TLS encryption to enable secure HTTPS access.