
How to Deploy Akaunting – An Opensource FreshBooks Alternative
Introduction
Akaunting is an open-source web-based accounting software that offers a range of business management features such as invoicing, financial reporting, expense management, and payment tracking. You can deploy Akaunting as an alternative to applications such as QuickBooks, WaveApps, and FreshBooks, with self-hosting features that grant you full control over your accounting information.
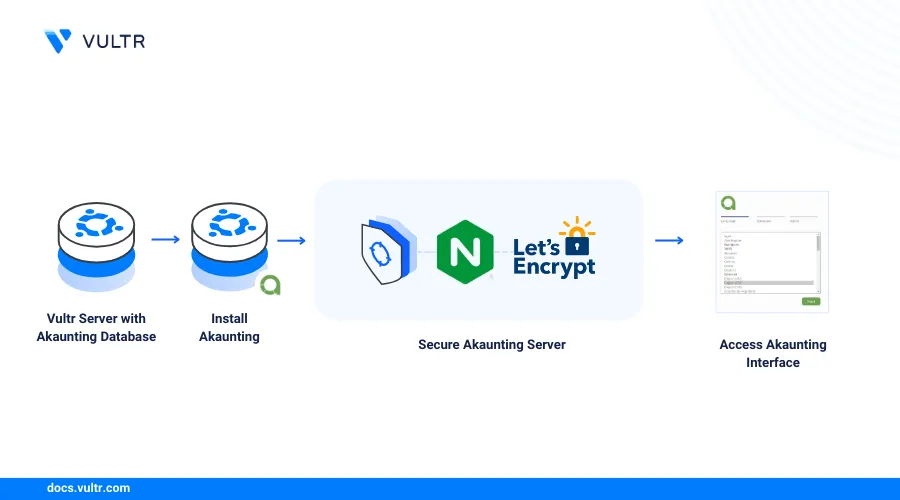
This guide explains how to deploy Akaunting on a Vultr Cloud Server and set up the application to securely perform accounting tasks using a graphical web interface. In addition, you will integrate a Vultr Managed Database for MySQL to improve the Akaunting application server reliability and availability for production use.
Prerequisites
Before you begin:
- Deploy a Vultr Managed Database for MySQL to use with Akaunting.
- Deploy a Vultr Debian Server with at least
2 GBRAM to host Akaunting. - Set up a new domain A record pointing to the server IP address.
- Access and log in to the server using SSH.
- Create a non-root user with sudo privileges and switch to the user.
- Update the server.
- Install the Nginx, MySQL, and PHP (LEMP) stack on the server.
- Create or log in to your Akaunting profile and copy your account API key.
Set Up the Database
Akaunting uses a MySQL, PostgreSQL, or SQLite database to store data. In a production environment, use an external database server such as a Vultr Managed Database for MySQL to ensure improved uptime and high availability by offloading most database functionalities from the Akaunting server to the database server. Follow the steps below to create a new MySQL database to use with your Akaunting application.
Log in to your Vultr Managed Database for MySQL cluster. Replace
dbhost.vultrdb.com,16751andvultradminwith your actual database details.console$ mysql -h dbhost.vultrdb.com -P 16751 -u vultradmin -p
Enter your Vultr Managed Database for MySQL administrator password to access the database console.
Create a new Akaunting database
akauntingdb.sqlmysql> CREATE DATABASE akauntingdb;
Switch to the database.
sqlmysql> USE akauntingdb;
Create a new MySQL user
akauntingadminwith a strong password.sqlmysql> CREATE USER 'akauntingadmin'@'localhost' IDENTIFIED BY 'secure-password';
Grant the user full privileges to the Akaunting database.
sqlmysql> GRANT ALL PRIVILEGES ON akauntingdb.* TO 'akauntingadmin'@'localhost';
Flush the MySQL privileges table to apply the new permission changes.
sqlmysql> FLUSH PRIVILEGES;
Exit the MySQL console.
sqlmysql> EXIT
Install Akaunting
Akaunting uses your existing web server configuration to correctly run and serve the application files on your domain name. Follow the steps below to install all required PHP modules, verify your web server package, and download the latest Akaunting release package to run on your server.
Install all required PHP extensions to use with Akaunting.
console$ sudo apt install php php-fpm php-mysql php-bcmath php-ctype php-curl php-dom php-fileinfo php-intl php-gd php-json php-mbstring php-xml php-zip
View the installed PHP version and verify the version number to use with your PHP-FPM configurations.
console$ php -v
Output:
PHP 8.1.2-1ubuntu2.14 (cli) (built: Aug 18 2023 11:41:11) (NTS)
Copyright (c) The PHP Group
Zend Engine v4.1.2, Copyright (c) Zend Technologies
    with Zend OPcache v8.1.2-1ubuntu2.14, Copyright (c), by Zend Technologies
Based on the above output, PHP 8.1 is the available version on the server. You can use the version number to access PHP-FPM and verify the service status using the following command.
console$ sudo systemctl status php8.1-fpm status
View the Nginx web server status and verify that it's up and running.
console$ sudo systemctl status nginx
Output:
● nginx.service - A high performance web server and a reverse proxy server
Loaded: loaded (/lib/systemd/system/nginx.service; enabled; preset: enabled)
Active: active (running) since Sun 2024-04-07 18:48:52 UTC; 4min 21s ago
  Docs: man:nginx(8)
Main PID: 5501 (nginx)
 Tasks: 3 (limit: 2299)
Memory: 2.4M
   CPU: 23ms
CGroup: /system.slice/nginx.service
        ├─5501 "nginx: master process /usr/sbin/nginx -g daemon on; master_process on;"
        ├─5503 "nginx: worker process"
        └─5504 "nginx: worker process"
Navigate to the default web root directory
/var/www/html/.console$ cd /var/www/html/
Create a new directory to store the Akaunting web application files. For example,
akaunting.example.com.console$ sudo mkdir akaunting.example.com
Switch to the directory.
console$ cd akaunting.example.com
Download the latest Akaunting release file and save it as
akaunting.zip.console$ sudo wget -O akaunting.zip https://akaunting.com/download.php?version=latest
The above
wgetcommand downloads the latest Akaunting version from the official project website to your server as a new archive fileakaunting.zipin your working directory.Extract files from the Akaunting release file using the Unzip utility.
console$ sudo unzip akaunting.zip
If you receive the following error:
Command 'unzip' not found, but can be installed with:Install the Zip and Unzip archive utilities.
console$ sudo apt install zip unzip
List the directory files and verify that new Akaunting files are available including a
nginx.example.com.conftemplate file.console$ lsOutput:
LICENSE.txt  akaunting.zip  artisan    composer.json  database   manifest.json  nginx.example.com.conf  public     routes            storage  web.config
README.md    app            bootstrap  config         index.php  modules        overrides               resources  serviceworker.js  vendor
Delete the original Akaunting archive file to free your server space.
console$ sudo rm akaunting.zip
Switch to the parent
/var/www/html/directory.console$ cd /var/www/html/
Grant the Nginx web server user
www-datafull permissions to all files in the Akaunting web root directory.console$ sudo chown -R www-data:www-data akaunting.example.com
Configure Nginx to Enable Access to Akaunting
Akaunting supports the Nginx and Apache web server applications to deliver all dynamic files on the server. Follow the steps below to configure the Nginx web server to enable access to the Akaunting application interface using your domain akaunting.example.com.
Navigate to the Nginx virtual host configurations directory
/etc/nginx/sites-available.console$ cd /etc/nginx/sites-available
Create a new Akaunting configuration file such as
akaunting.conf.console$ sudo touch akaunting.conf
Open the file using your preferred text editor such as Vim.
console$ sudo vim akaunting.conf
Add the following configurations to the file. Replace
akaunting.example.comwith your domain.nginxserver { listen 80; server_name akaunting.example.com; root /var/www/html/akaunting.example.com; add_header X-Frame-Options "SAMEORIGIN"; add_header X-XSS-Protection "1; mode=block"; add_header X-Content-Type-Options "nosniff"; index index.html index.htm index.php; error_page 404 /index.php; charset utf-8; location / { try_files $uri $uri/ /index.php?$query_string; } location ~ \.(env|log) { deny all; } location ~ ^/(^app$|bootstrap|config|database|overrides|resources|routes|storage|tests|artisan) { deny all; } location ~ ^/(modules|vendor)\/(.*)\.((?!ico|gif|jpg|jpeg|png|js\b|css|less|sass|font|woff|woff2|eot|ttf|svg|xls|xlsx).)*$ { deny all; } location ~ \.php$ { fastcgi_split_path_info ^(.+\.php)(/.+)$; fastcgi_pass unix:/var/run/php/php8.1-fpm.sock; fastcgi_index index.php; fastcgi_param SCRIPT_FILENAME $document_root$fastcgi_script_name; include fastcgi_params; } location ~ /\.(?!well-known).* { deny all; } }
Save and close the file.
The above Nginx configuration creates a new Akaunting virtual host profile that points to the
/var/www/html/akauntingapplication directory and uses the availablePHP8.1-FPMmodule to serve all dynamic PHP application files on the server.Activate the Akaunting virtual host configuration by linking the configuration to the
sites-enableddirectory.console$ sudo ln -s /etc/nginx/sites-available/akaunting.conf /etc/nginx/sites-enabled/
Test the Nginx configuration changes to verify any syntax errors.
console$ sudo nginx -t
Output:
nginx: the configuration file /etc/nginx/nginx.conf syntax is ok
nginx: configuration file /etc/nginx/nginx.conf test is successful
Restart the Nginx web server to apply all configuration changes.
console$ sudo systemctl restart nginx
Secure the Server
The Akaunting virtual host configuration for Nginx includes security options that block access to specific files and requests on the server. To secure the server, set up the default UFW firewall application to allow incoming connections to the Akaunting application. Then, generate trusted SSL certificates using a CA (Certificate Authority) such as Let’s Encrypt to secure your domain with encrypted HTTPS connections.
Set Up the Firewall Application Rules
Verify that the UFW firewall is active on the server.
console$ sudo ufw status
If the UFW application is inactive, allow connections to the default SSH port
22and activate the firewall using the following command.console$ sudo ufw allow 22 && sudo ufw enable
Allow connections to the server HTTP port
80.console$ sudo ufw allow 80
Allow connections to the HTTPS port
443.console$ sudo ufw allow 443
Restart UFW to apply the new firewall changes.
console$ sudo ufw reload
Generate Trusted SSL Certificates
Install the Certbot Let’s Encrypt client application for Nginx.
console$ sudo apt install python3-certbot-nginx
Request for a new SSL certificate using your Akaunting domain. Replace
akaunting.example.comwith your domain andakaunting@example.comwith your email address to bing with the SSL certificate request.console$ sudo certbot --nginx -d akaunting.example.com -m akaunting@example.com --agree-tos
Your output should look like the one below when successful.
Successfully received certificate.
Certificate is saved at: /etc/letsencrypt/live/akaunting.example.com/fullchain.pem
Key is saved at:         /etc/letsencrypt/live/akaunting.example.com/privkey.pem
This certificate expires on 2024-07-06.
These files will be updated when the certificate renews.
Certbot has set up a scheduled task to automatically renew this certificate in the background.

Deploying certificate
Successfully deployed certificate for akaunting.example.com to /etc/nginx/sites-enabled/akaunting.conf
Congratulations! You have successfully enabled HTTPS on https://akaunting.example.com
Test the Cerbot SSL certificate automatic renewal process.
console$ sudo certbot renew --dry-run
Output:
Account registered.
Simulating renewal of an existing certificate for akaunting.example.com

- - - - - - - - - - - - - - - - - - - - - - - - - - - - - - - - - - - - - - - -
Congratulations, all simulated renewals succeeded:
 /etc/letsencrypt/live/akaunting.example.com/fullchain.pem (success)
- - - - - - - - - - - - - - - - - - - - - - - - - - - - - - - - - - - - - - - -
Access the Akaunting Interface
Access your Akaunting application domain in a web browser such as Google Chrome.
https://akaunting.example.comVerify that the Akaunting setup interface displays in your web browser.
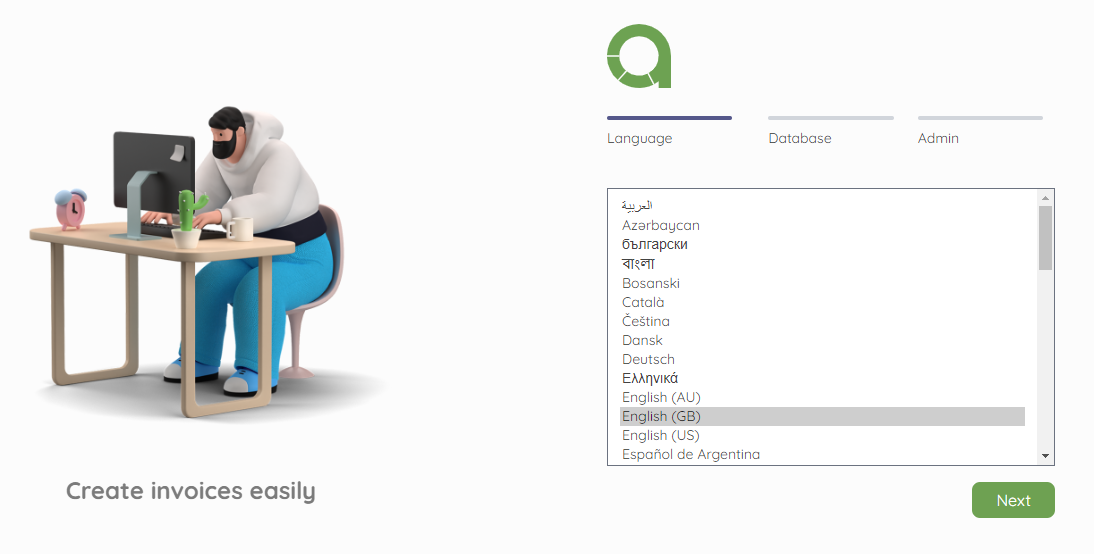
Select your default Akaunting application language, for example,
English (GB)and press Next to start the configuration process.Enter your Vultr Managed Database for MySQL host URL in the Hostname field.
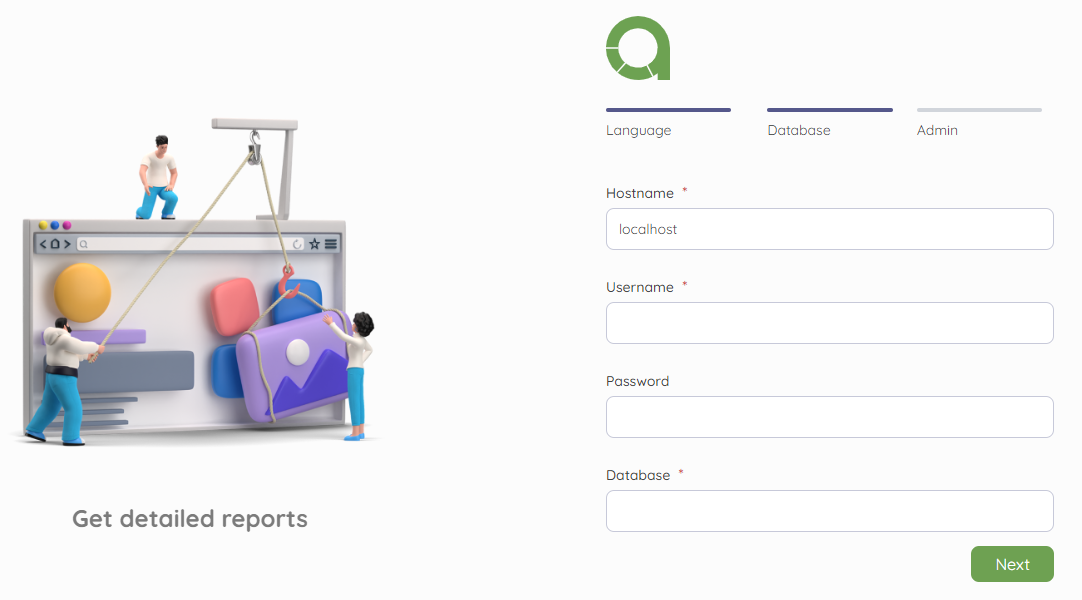
Enter the MySQL user you created earlier in the Username field.
Enter the associated MySQL user password in the Password field.
Enter the Akaunting database name you created earlier in the Database field.
Click Next to test your Akaunting database connection.
Enter your business name in the Company Name field to set up your main Akaunting application information.
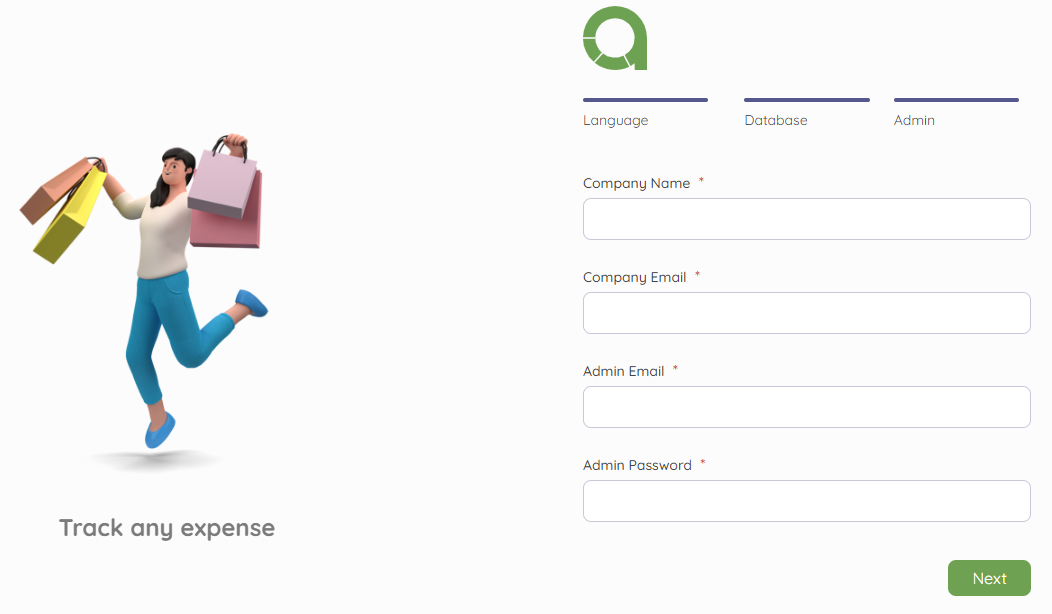
Enter your business email in the Company Email field.
Enter your new Akaunting administrative user email in the Admin Email field and a strong password in the Admin Password field.
Click Next to save your Akaunting configuration changes.
Enter your administrator email and account password, then click login to access the Akaunting setup page.
Enter your Akaunting account API key in the API Key field or click the
Get your API Keyprompt to generate a new key.Fill in your company tax number, and choose a financial year start date to use with Akaunting.
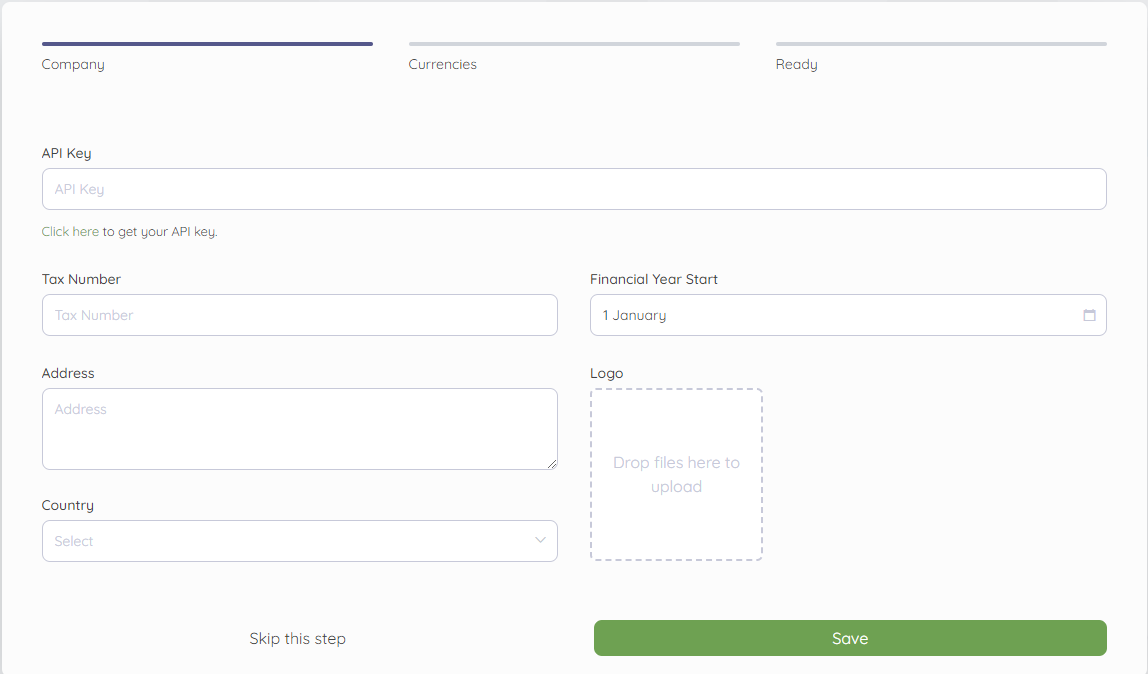
Enter your company address, select the country of operation, and click the Logo field to upload your company logo to use with your Akaunting-generated documents.
Click Save to apply the application changes and set your default currencies to use with Akaunting documents.
Keep
US Dollarselected or click New Currency to set up additional values.Click Next to save your accounting currency changes.

Click Create your first Invoice to set up a sample Akaunting invoice.
Set up your Invoice details with a title in the Title field, upload a logo, and enter an optional invoice subheading.
Click Add a Customer in the billing section and select New Customer from the list of options to create a new customer profile.
Enter the new customer details in the pop-up dialog and click Save to add your first client.
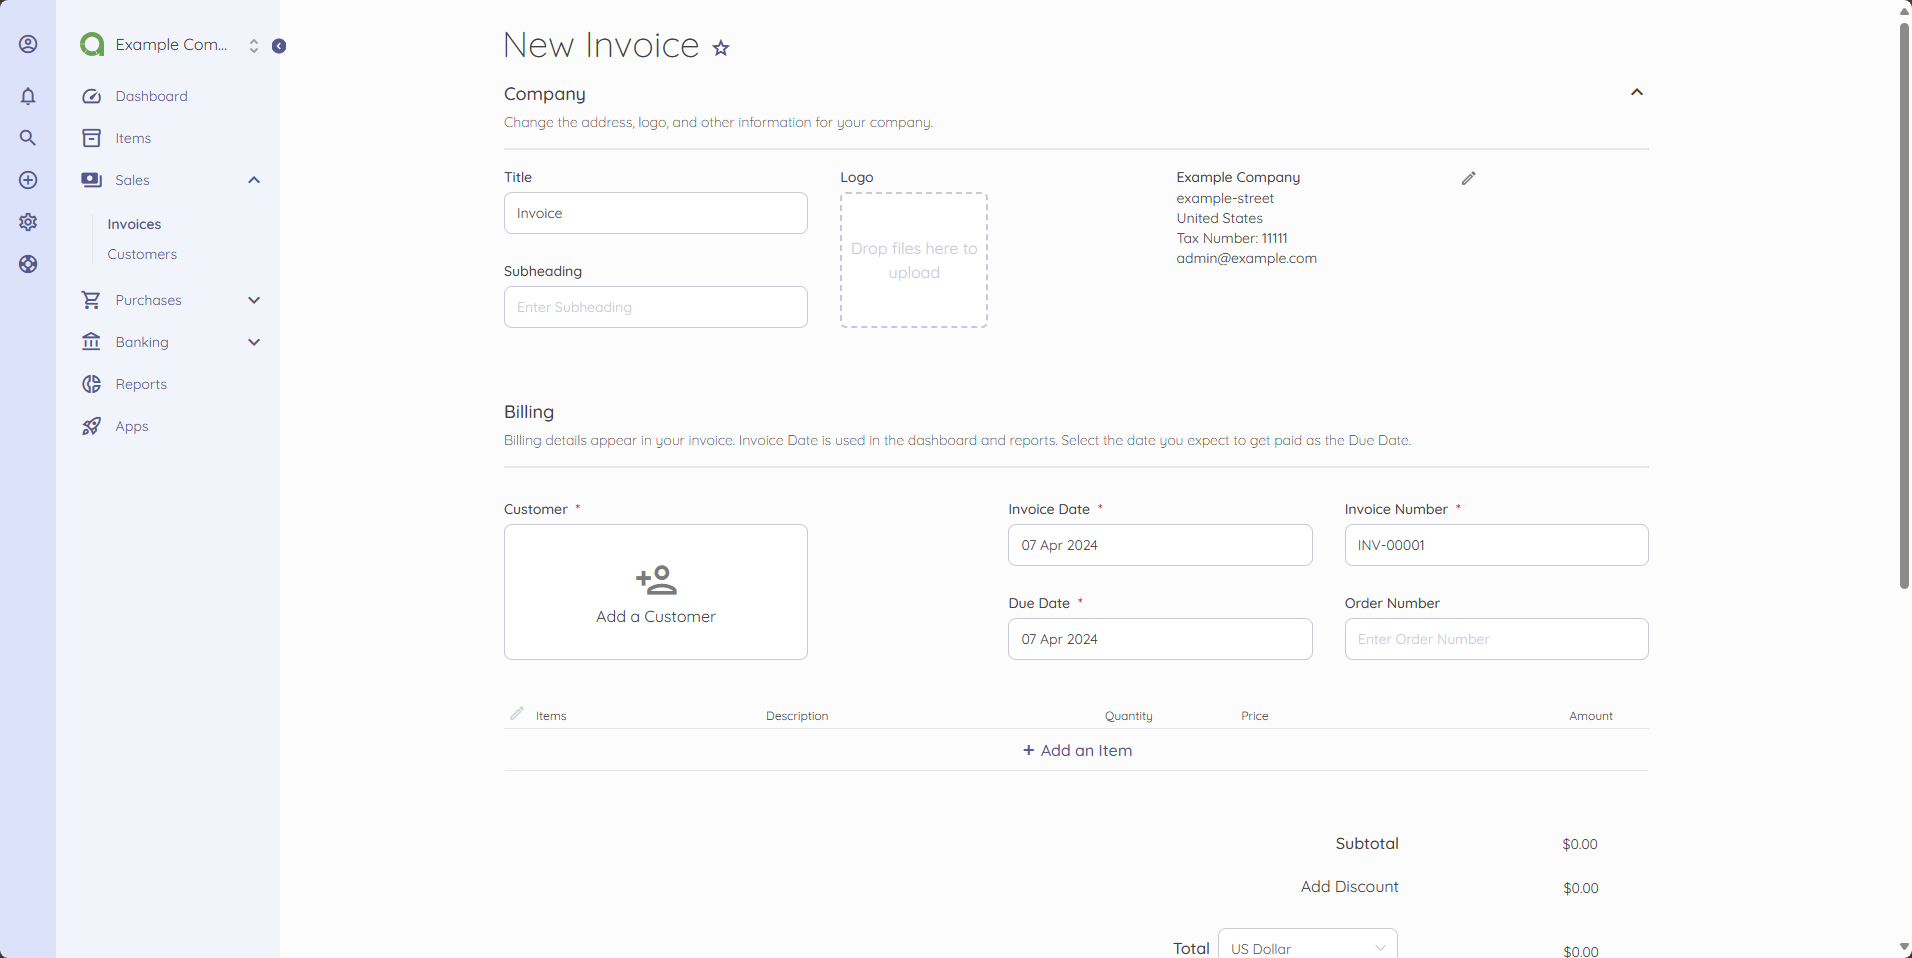
Enter the additional invoice details including the date, invoice, and order numbers. Then click Add an Item to add your invoice values.
Click Save at the bottom of the invoice page to preview your Akaunting invoice.
Click the options symbol in the top right corner next to Edit to download the invoice in PDF format, print, customize, or send the document in a new email.
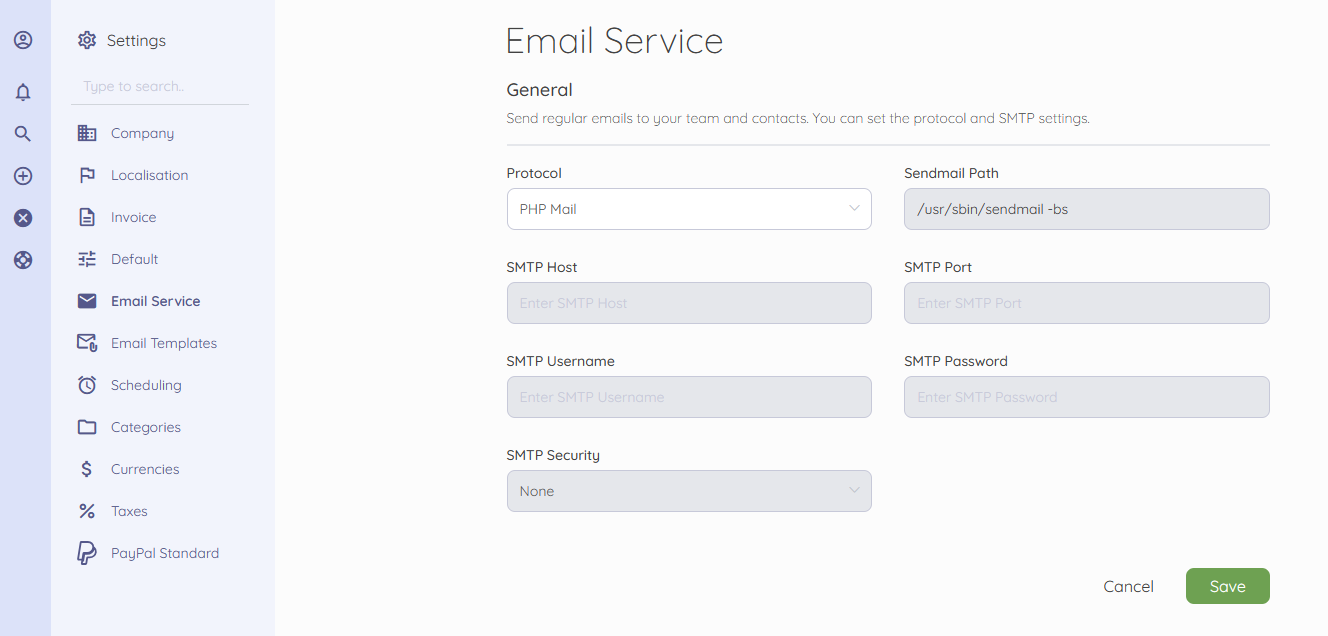
Navigate to Settings on the left navigation menu and click Email Service to enable your SMTP server details to use with email communications on the server. All generated invoices and additional items are sent over email when you integrate an active SMTP server with your Akaunting application.
You have set up your Akaunting application information and created an example invoice document. For every invoice or company tracking document you create, you can share it with multiple users using links or email messages depending on your SMTP account settings.
Troubleshooting
The Akaunting application may display errors or fail to run on your server after installation due to several issues. Follow the troubleshooting steps below to fix the following common installation and application errors to enable Akaunting on your server.
Connection Timed Out
A connection time-out error is a result of your web server or firewall configurations. Follow the steps below to verify the error source.
View the firewall table and verify that connections to the HTTPS port
443are allowed to the server.console$ sudo ufw status
View the Nginx web server status and verify that it’s actively running.
console$ sudo systemctl status nginx
View the Nginx web server logs to verify the latest entries associated with your application error.
console$ sudo cat /var/log/nginx/error.log
Restart the Nginx to refresh all connections to your Akaunting application.
console$ sudo systemctl restart nginx
Error: Could not connect to the database! Please, make sure the details are correct.
Log in to your MySQL server using the Akaunting database user.
console$ mysql -u akauntingadmin -p
View all databases and verify that the user has access to the Akaunting database.
sqlmysql> SHOW DATABASES;
Output:
+--------------------+
| Database           |
+--------------------+
| akauntingdb        |
+--------------------+
1 rows in set (0.02 sec)
If the Akaunting database is not available on the list, log out of the user, then log in to the MySQL server as an administrator to assign the user full privileges to the database.
Visit your Akaunting configuration page and set up the database user details again to test connectivity to the MySQL database server.
https://akaunting.example.com
Unable to save admin user and company information
Delete your Akaunting web root directory files.
console$ sudo rm -r /var/www/html/akaunting/*
Download the latest Akaunting version again.
console$ sudo wget -O /var/www/html/akaunting/akaunting.zip https://akaunting.com/download.php?version=latest
Extract files from the Akaunting archive file using
unzip.console$ sudo unzip /var/www/html/akaunting/akaunting.zip
Grant the web server user
www-datafull privileges to all directory files.console$ sudo chown -R www-data:www-data /var/www/html/akaunting/
Create a new database and grant your MySQL user full privileges to the database.
Access your Akaunting configuration screen again and set up the application with a new database.
502 Bad Gateway
View the available PHP version on your server.
console$ php -v
View the PHP-FPM status and confirm that it's active. For example, for PHP 8.1, run the following command.
console$ sudo systemctl status php8.1-fpm status
Output:
● php8.1-fpm.service - The PHP 8.1 FastCGI Process Manager
   Loaded: loaded (/lib/systemd/system/php8.1-fpm.service; enabled; preset: enabled)
   Active: active (running) since Sun 2024-04-07 18:51:58 UTC; 16min ago
   Docs: man:php-fpm8.1(8)
Main PID: 14691 (php-fpm8.1)
   Status: "Processes active: 0, idle: 2, Requests: 5, slow: 0, Traffic: 0req/sec"
   Tasks: 3 (limit: 2299)
   Memory: 69.6M
       CPU: 911ms
   CGroup: /system.slice/php8.1-fpm.service
           ├─14691 "php-fpm: master process (/etc/php/8.1/fpm/php-fpm.conf)"
           ├─14692 "php-fpm: pool www"
           └─14693 "php-fpm: pool www"
Open the Akaunting Nginx configuration and verify that the PHP-FPM directive matches your installed version to handle dynamic Akaunting application requests.
console$ vim /etc/nginx/sites-available/akaunting.conf
Output:
fastcgi_pass unix:/var/run/php/php8.1-fpm.sock;Change the PHP-FPM version number depending on the available version on your server.
Missing API key
Log in or create a new account on the Akaunting website.
Click your new user API Key field within the dashboard to copy your custom key.
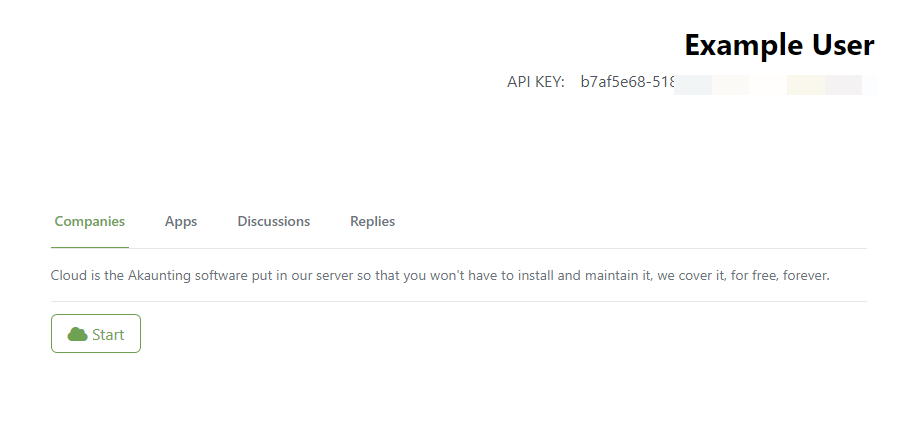
Access your Akaunting dashboard and add your new account key to activate all the application features.
Conclusion
You have deployed Akaunting on a Vultr Cloud Server, secured the application and set up sample invoice documents. Akaunting offers extended features that allow you to perform multiple accounting tasks on your server. Upgrade your API key to use multiple company profiles, or integrate the application with supported modules to enhance your application interface and features. For more information, visit the Akaunting self-hosting documentation.