
How to Deploy MariaDB on Kubernetes
Introduction
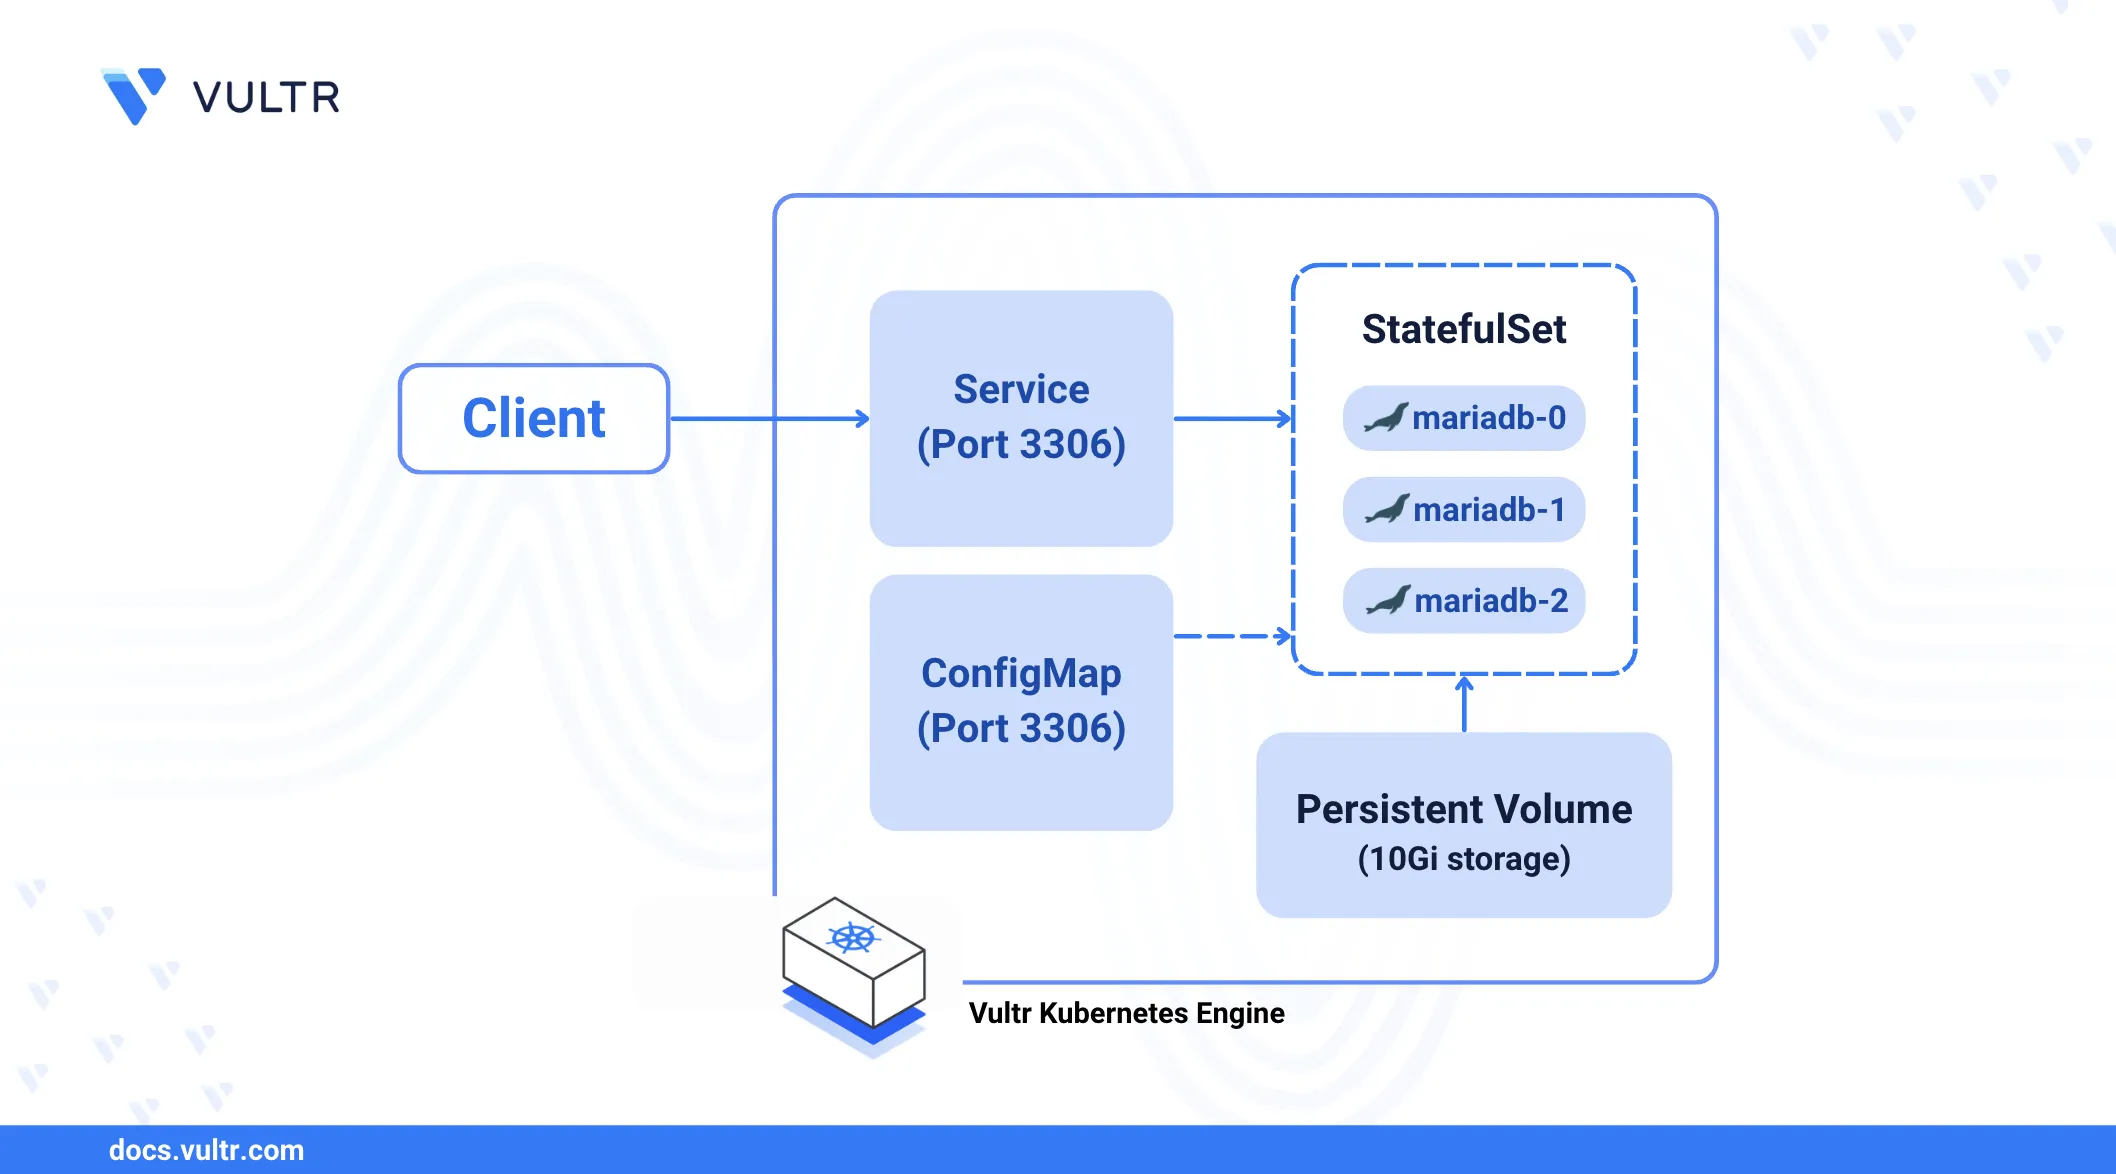
MariaDB is a popular open-source relational database management system that enables storage of data in the form of tables using the Standard Query Language (SQL). Deploying MariaDB on Kubernetes offers multiple benefits such as scalability, high availability, and efficient resource management. Kubernetes offers portability across cloud and on-premises environments, integrates well with CI/CD pipelines, and supports automated backup and recovery making it efficient to run MariaDB deployments.
This article explains how to deploy MariaDB on Kubernetes.
Prerequisites
Before you begin:
- Deploy a Vultr Kubernetes Engine (VKE) cluster with at least three nodes.
- Deploy a Ubuntu instance on Vultr to use as the management workstation.
- Access the workstation using SSH as a non-root user with sudo privileges.
- Install and Configure Kubectl to access the VKE cluster.
Create PV and PVCs
Persistent Volumes (PVs) and Persistent Volume Claims (PVCs) enable the persistent storage of MariaDB data in a cluster. Follow the below steps to create PV and PVCs to use with MariaDB.
Create a new
mariadb-pv.yamlYAML file for Persistent Volumes.console$ nano mariadb-pv.yaml
Add the following contents to the file.
yamlapiVersion: v1 kind: PersistentVolume metadata: name: mariadb-pv spec: capacity: storage: 10Gi accessModes: - ReadWriteOnce persistentVolumeReclaimPolicy: Retain hostPath: path: /mnt/data/mariadb
Save and close the file.
The above configuration defines a PersistentVolume (PV) resource
mariadb-pvwith a10GBstorage capacity. TheaccessModesfield specifies that the volume can be mounted as read-write by a single node at a time. You've set thepersistentVolumeReclaimPolicytoRetainwhich preserves the volume data when the PV is deleted. ThehostPathfield backs up the volume to your/mnt/data/mariadbworkstation directory.Apply the PV configuration to your cluster.
console$ kubectl apply -f mariadb-pv.yaml
View all PVs in your cluster and verify that the resource is available.
console$ kubectl get pv mariadb-pv
Output:
NAME         CAPACITY   ACCESS MODES   RECLAIM POLICY   STATUS      CLAIM   STORAGECLASS   VOLUMEATTRIBUTESCLASS   REASON   AGE
mariadb-pv   10Gi       RWO            Retain           Available                          <unset>                          8s
Create a new Persistent Volume Claim (PVC) resource file
mariadb-pvc.yaml.console$ nano mariadb-pvc.yaml
Add the following contents to the file.
yamlapiVersion: v1 kind: PersistentVolumeClaim metadata: name: mariadb-pvc spec: accessModes: - ReadWriteOnce resources: requests: storage: 10Gi
Save and close the file.
The above configuration creates a new PersistentVolumeClaim (PVC) resource
mariadb-pvcwith a request for10 GBof storage. It uses theReadWriteOnceaccess mode meaning that the volume can be mounted as read-write by a single node.Apply the PVC configuration to your cluster.
console$ kubectl apply -f mariadb-pvc.yaml
View the PVC resource and verify that it's state changes to
BOUND.console$ kubectl get pvc mariadb-pvc
Output:
NAME          STATUS   VOLUME                 CAPACITY   ACCESS MODES   STORAGECLASS          VOLUMEATTRIBUTESCLASS   AGE
mariadb-pvc   Bound    pvc-98b892534d53439e   10Gi       RWO            vultr-block-storage   <unset>                 19s
Deploy the MariaDB StatefulSet
StatefulSets manage the deployment and scaling of a set of Pods. Follow the below steps to create a new ConfigMap and deploy the MariaDB StatefulSet to your cluster.
Create a new ConfigMap resource file
mariadb-config.yaml.console$ nano mariadb-config.yaml
Add the following contents to the file.
yamlapiVersion: v1 kind: ConfigMap metadata: name: mariadb-config data: my.cnf: | [mysqld] bind-address=0.0.0.0 default_storage_engine=InnoDB innodb_file_per_table=1 max_connections=1000
Save and close the file.
The above configuration creates a new ConfigMap
mariadb-configthat contains the defaultmy.cnfconfiguration file for a MariaDB instance including listening on all network interfaces, InnoDB, and support for up to1000connections.Apply the ConfigMap resource to your cluster.
console$ kubectl apply -f mariadb-config.yaml
Create a new MariaDB StatefulSet YAML file.
console$ nano mariadb-statefulset.yaml
Add the following contents to the file. Replace
strong_passwordwith your desiredrootdatabase user password.yamlapiVersion: apps/v1 kind: StatefulSet metadata: name: mariadb spec: serviceName: "mariadb" replicas: 1 selector: matchLabels: app: mariadb template: metadata: labels: app: mariadb # Ensure this label matches the selector spec: containers: - name: mariadb image: mariadb:latest ports: - containerPort: 3306 name: mariadb env: - name: MYSQL_ROOT_PASSWORD value: "strong_password" volumeMounts: - name: mariadb-storage mountPath: /var/lib/mysql - name: config-volume mountPath: /etc/mysql/conf.d volumes: - name: config-volume configMap: name: mariadb-config volumeClaimTemplates: - metadata: name: mariadb-storage spec: accessModes: [ "ReadWriteOnce" ] resources: requests: storage: 10Gi
Save and close the file.
The above configuration creates a new StatefulSet
mariadbthat deploys a single instance of the MariaDB database. It creates a new PersistentVolumeClaim with10 GBof storage and mounts it using the/var/lib/mysqlpath. The database container uses the latest MariaDB image, exposes port3306, and sets therootdatabase user password using an environment variable. In addition, the ConfigMapmariadb-configis mounted to apply custom configurations to the instance.Apply the resource to your cluster.
console$ kubectl apply -f mariadb-statefulset.yaml
Verify that the StatefulSet is created.
console$ kubectl get statefulset mariadb
Output:
NAME      READY   AGE
mariadb   1/1     31s
View the MariaDB Pods and verify that they're running.
console$ kubectl get pods -l app=mariadb
Output:
NAME        READY   STATUS    RESTARTS   AGE
mariadb-0   1/1     Running   0          49s
Access MariaDB
Follow the steps below to create a service resource that exposes the MariaDB Pod and enable access to MariaDB.
Create a new Service resource file
mariadb-service.yaml.console$ nano mariadb-service.yaml
Add the following contents to the file.
yamlapiVersion: v1 kind: Service metadata: name: mariadb spec: ports: - port: 3306 targetPort: 3306 selector: app: mariadb
Save and close the file.
Apply the resource to your cluster.
console$ kubectl apply -f mariadb-service.yaml
Verify that the new service is created.
console$ kubectl get svc mariadb
Output:
NAME      TYPE        CLUSTER-IP       EXTERNAL-IP   PORT(S)    AGE
mariadb   ClusterIP   10.107.200.143   <none>        3306/TCP   4s
Access the MariaDB console using
kubectl. Replacestrong_passwordwith yourrootdatabase user password you set earlier.console$ kubectl run -it --rm --image=mysql:latest --restart=Never mysql-client -- mysql -h mariadb -u root -pstrong_password
The above command starts an interactive MySQL client pod using the latest MySQL image and connects to the MariaDB server using the
rootdatabase user password. The connection Pod is removed when the session ends without restarting it. Your database console should look like the one below when the command is successful.sqlmysql>
View all available MariaDB databases.
sqlmysql> show databases;
Output:
+---------------------+
| Database            |
+---------------------+
| #mysql50#lost+found |
| information_schema  |
| mysql               |
| performance_schema  |
| sys                 |
+---------------------+
5 rows in set (0.00 sec)
Exit the MySQL console.
sqlmysql> exit;
Scale the MariaDB Deployment (Up & Down)
Scaling a MariaDB deployment up or down is important when managing resource allocation based on demand. Scaling up increases capacity to handle higher loads or more connections, ensuring optimal performance during peak times. Scaling down reduces resource usage when the demand decreases to save costs and optimize infrastructure usage. Follow the below steps to scale the MariaDB deployment up and down.
Scale up the MariaDB deployment to
3replicas.console$ kubectl scale statefulset mariadb --replicas=3
Verify that the MariaDB deployment is scaled.
console$ kubectl get statefulset mariadb
Output:
NAME      READY   AGE
mariadb   3/3     13m
View all Pods created by the StatefulSet.
console$ kubectl get pods -l app=mariadb
Output:
NAME        READY   STATUS    RESTARTS   AGE
mariadb-0   1/1     Running   0          14m
mariadb-1   1/1     Running   0          47s
mariadb-2   1/1     Running   0          27s
Scale down the MariaDB deployment to
2replicas.console$ kubectl scale statefulset mariadb --replicas=2
Verify that the MariaDB deployment is scaled down.
console$ kubectl get statefulset mariadb
Output:
NAME      READY   AGE
mariadb   2/2     15m
View the remaining Pod created by the StatefulSet.
console$ kubectl get pods -l app=mariadb
Output:
NAME        READY   STATUS    RESTARTS   AGE
mariadb-0   1/1     Running   0          15m
mariadb-1   1/1     Running   0          92s
Conclusion
You have deployed MariaDB on Kubernetes using a Vultr Kubernetes Engine (VKE) cluster. You set up Persistent Volumes for data storage, deployed MariaDB as a StatefulSet, accessed the database, and scaled the deployment. You can further enhance MariaDB with advanced configurations and monitoring tools to suit your production needs.