
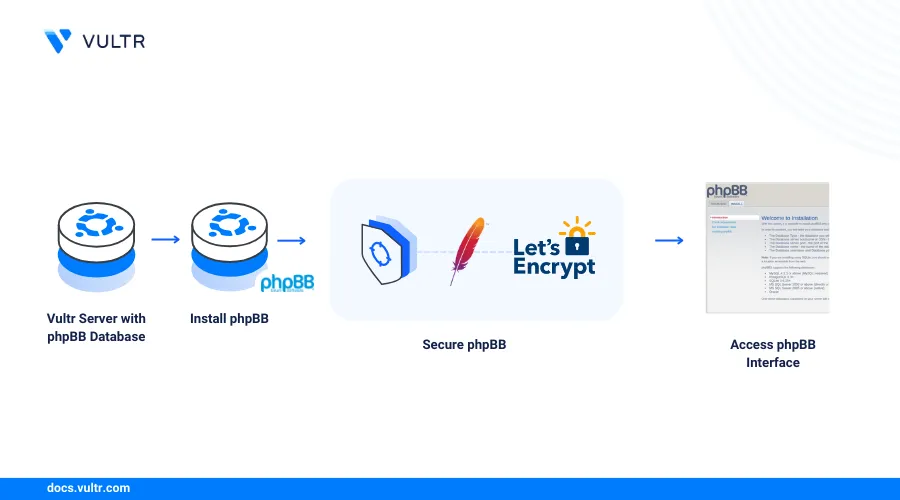
How to Deploy phpBB on Ubuntu 22.04
Introduction
phpBB (PHP Bulletin Board) is an open-source, scalable, flat forum application designed to improve user interactions and engagement. phpBB provides a platform for users to engage in discussions, share ideas, and securely exchange information in a single web interface. Forums empower users to connect, learn, and grow by enriching their online experience and facilitating meaningful interactions.
This article explains how to deploy phpBB on a Ubuntu 22.04 server and secure the application to host multiple forums.
Prerequisites
Before you begin:
- Deploy a Vultr Ubuntu 22.04 server to use as the production server.
- Deploy a Vultr Managed Database for MySQL to use with phpBB.
- Set Up a new subdomain A record pointing to your server IP address.
- Access the server using SSH as a non-root user with sudo privileges.
- Update the server.
- Install the Apache, MySQL, and PHP (LAMP) stack
Create a phpBB Database
Log in to your Vultr Managed Database for MySQL cluster. Replace
examplehost.vultrdb.comwith your actual host URL.console$ mysql -h examplehost.vultrdb.com -P 16751 -u vultradmin -p
Enter your Vultr Managed Database for MySQL password when prompted.
Create a new database to use with phpBB. For example,
phpbbdb.sqlmysql> CREATE DATABASE phpbbdb;
Switch to the database.
sqlmysql> USE phpbbdb;
Create a new user MySQL user
phpbbuserwith a strong password.sqlmysql> CREATE USER 'phpbbuser'@'localhost' IDENTIFIED BY 'securepassword';
Grant the user full privileges to the phpBB database.
sqlmysql> GRANT ALL ON phpbbdb.* to 'phpbbuser'@'localhost';
Reload the MySQL privileges to apply the new user permissions.
sqlmysql> FLUSH PRIVILEGES;
Exit the MySQL console
sqlmysql> EXIT;
Install phpBB
Install all required PHP modules to use with phpBB.
console$ sudo apt install php-mysql php-xml php-mbstring -y
Download the latest phpBB release package using
wgetand save it asphpbb.zip.console$ wget -O phpbb.zip https://download.phpbb.com/pub/release/3.3/3.3.11/phpBB-3.3.11.zip
The above command downloads the phpBB version
3.3.11, visit the releases page to verify the latest version to install on your server.Extract files from the release file using Unzip.
console$ unzip phpbb.zip
Move the extracted directory to your web root directory
/var/www/html.console$ sudo mv phpBB3 /var/www/html/phpbb
Grant the Apache web server user and group
www-dataownership privileges to the directory.console$ sudo chown -R www-data:www-data /var/www/html/phpbb
Set the phpBB directory permissions to
775to grant the web server full read and write privileges.console$ sudo find /var/www/html/phpbb -type d -exec chmod 755 {} \;
Set the directory file permissions to
644to enable only read privileges for other users and the web server group.console$ sudo find /var/www/html/phpbb -type f -exec chmod 644 {} \;
Configure Apache to Serve phpBB Application Files
Create a new Apache virtual host configuration file. For example,
phpbb.conf.console$ sudo nano /etc/apache2/sites-available/phpbb.conf
Add the following configurations to the file. Replace
phpbb.example.comwith your actual domain.apache<VirtualHost *:80> ServerAdmin admin@example.com DocumentRoot /var/www/html/phpbb ServerName phpbb.example.com <Directory /var/www/html/phpbb> Options FollowSymlinks AllowOverride All Require all granted </Directory> ErrorLog ${APACHE_LOG_DIR}/phpbb_error.log CustomLog ${APACHE_LOG_DIR}/phpbb_access.log combined </VirtualHost>
Save and close the file.
The above configuration creates a new phpBB virtual host profile that listens for incoming connections on the HTTP port
80and serves files from the/var/www/html/phpbbdirectory.Enable the phpBB virtual host configuration.
console$ sudo a2ensite phpbb
Enable the Apache rewrite module to enable phpBB rewrite rules.
console$ sudo a2enmod rewrite
Restart the Apache web server to apply the configuration changes.
console$ sudo systemctl restart apache2
Secure phpBB
The Apache web server accepts incoming connections and serves phpBB on the HTTP port 80. By default, Uncomplicated Firewall (UFW) is active on Vultr Ubuntu servers, configure the application to allow all connection requests to the HTTP port 80 and the HTTPS port 443. Follow the sections below to create new firewall rules and generate trusted SSL certificates to use with phpBB.
Set Up UFW Firewall Rules
View the UFW status and verify that the application is active.
console$ sudo ufw status
If you receive a
Status: inactivemessage, allow the SSH port22and run the following command to activate UFW.console$ sudo ufw allow 22 && sudo ufw enable
Allow the HTTP port
80through the firewall.console$ sudo ufw allow 80/tcp
Allow the HTTPS port
443.console$ sudo ufw allow 80/tcp
Reload the UFW table to apply the firewall changes.
console$ sudo ufw reload
View the UFW table to verify the firewall changes.
console$ sudo ufw status
Output:
Status: active

To                         Action      From
--                         ------      ----
22/tcp                     ALLOW       Anywhere
80/tcp                     ALLOW       Anywhere
443/tcp                    ALLOW       Anywhere
22/tcp (v6)                ALLOW       Anywhere (v6)
80/tcp (v6)                ALLOW       Anywhere (v6)
443/tcp (v6)               ALLOW       Anywhere (v6)
Generate Trusted Let's Encrypt SSL Certificates
Install the Certbot Let's Encrypt client using Snap.
console$ sudo snap install --classic certbot
Install the Snapd package if it's unavailable on your server.
console$ sudo apt install snapd -y
Generate a new SSL certificate for your phpBB domain. Replace
phpbb.example.comandadmin@example.comwith your actual details.console$ sudo certbot --apache --redirect -d phpbb.example.com -m username@example.com --agree-tos
When successful, your output should look like the one below:
Account registered.
Requesting a certificate for phpbb.example.com

Successfully received certificate.
Certificate is saved at: /etc/letsencrypt/live/phpbb.example.com/fullchain.pem
Key is saved at:         /etc/letsencrypt/live/phpbb.example.com/privkey.pem
This certificate expires on 2024-07-09.
These files will be updated when the certificate renews.
Certbot has set up a scheduled task to automatically renew this certificate in the background.

Deploying certificate
Successfully deployed certificate for phpbb.example.com to /etc/apache2/sites-available/phpbb-le-ssl.conf
Congratulations! You have successfully enabled HTTPS on https://phpbb.example.com
Verify that Certbot auto-renews the SSL certificate upon expiry.
console$ sudo certbot renew --dry-run
Output:
Saving debug log to /var/log/letsencrypt/letsencrypt.log
Processing /etc/letsencrypt/renewal/phpbb.example.com.conf

Account registered.
Simulating renewal of an existing certificate for phpbb.example.com

Congratulations, all simulated renewals succeeded:
  /etc/letsencrypt/live/phpbb.example.com/fullchain.pem (success)
Access phpBB
Access your phpBB application using a web browser such as Chrome.
https://phpbb.example.comVerify that the phpBB splash screen displays in your browser session.
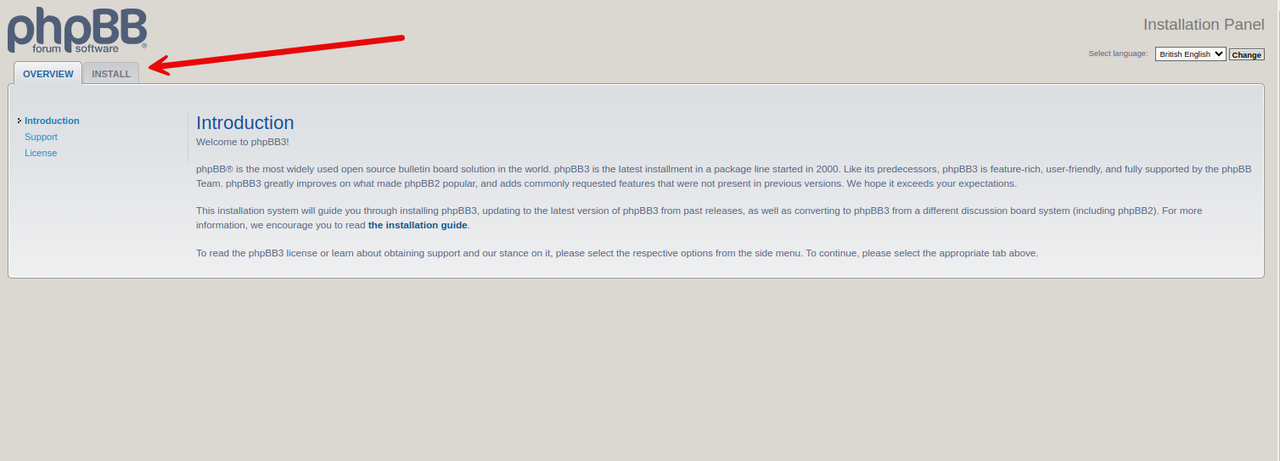
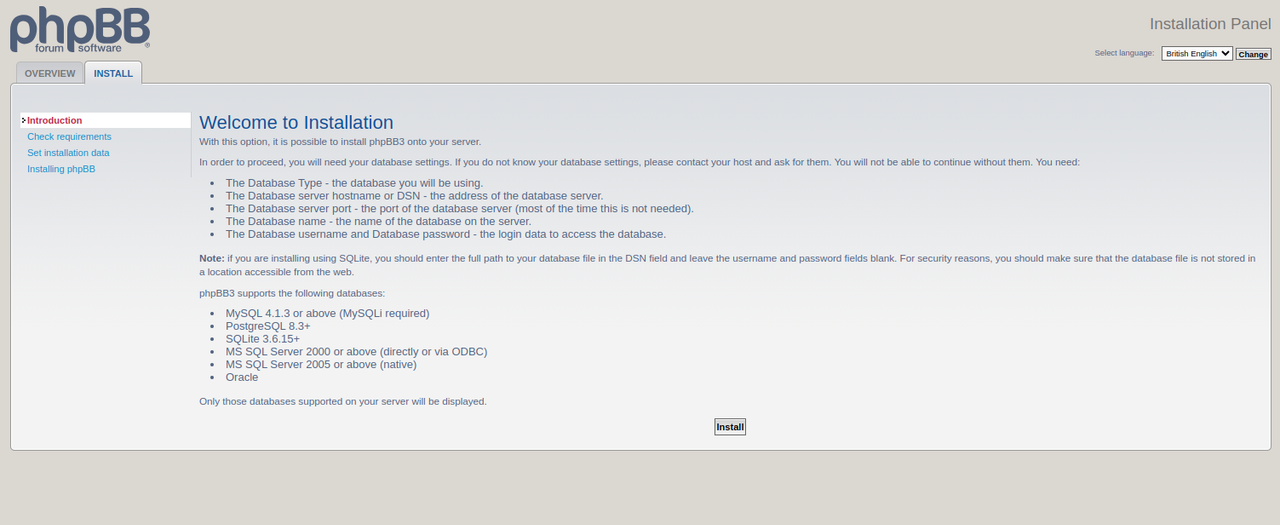
Click INSTALL next to the Overview tab to start the application configuration process.
Verify the phpBB system requirements and click Install to test your server environment.
Enter your phpBB administrator username, email address, and password in the respective fields.
Click Submit to apply the new platform administrative user changes.
Keep
MYSQLselected as the database type. Then, enter your Vultr Managed Database for MySQL hostname, port, and the database, user and password you created earlier. Click Submit to apply the database configuration.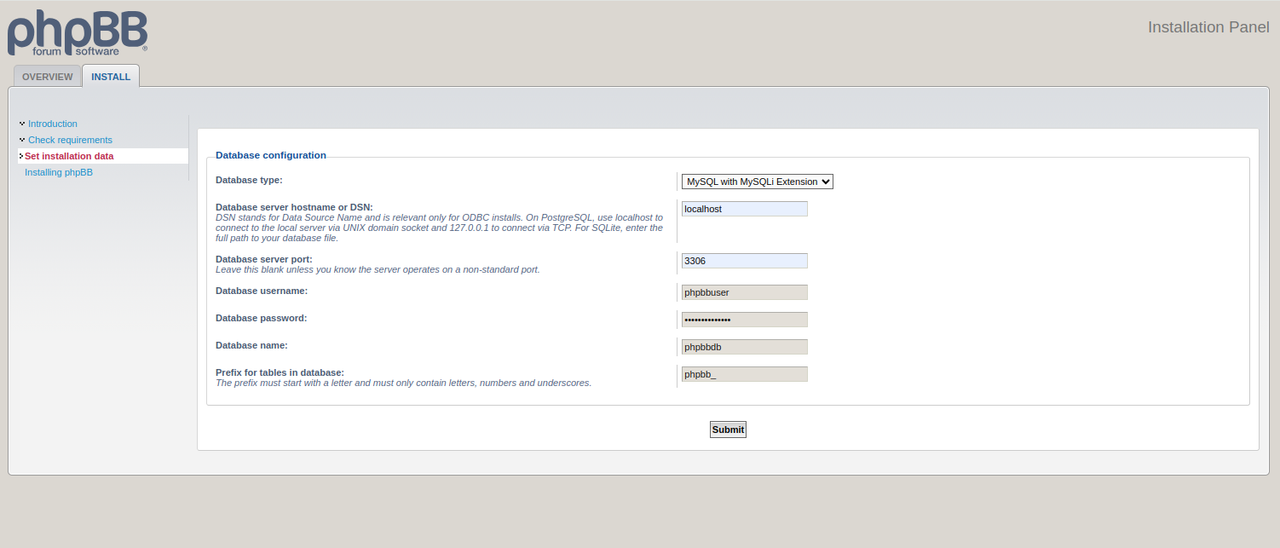
Click Yes to enable the Force server URL settings option and keep
httpsas the server protocol. Verify your phpBB domain value, and click Submit to save the application configurations.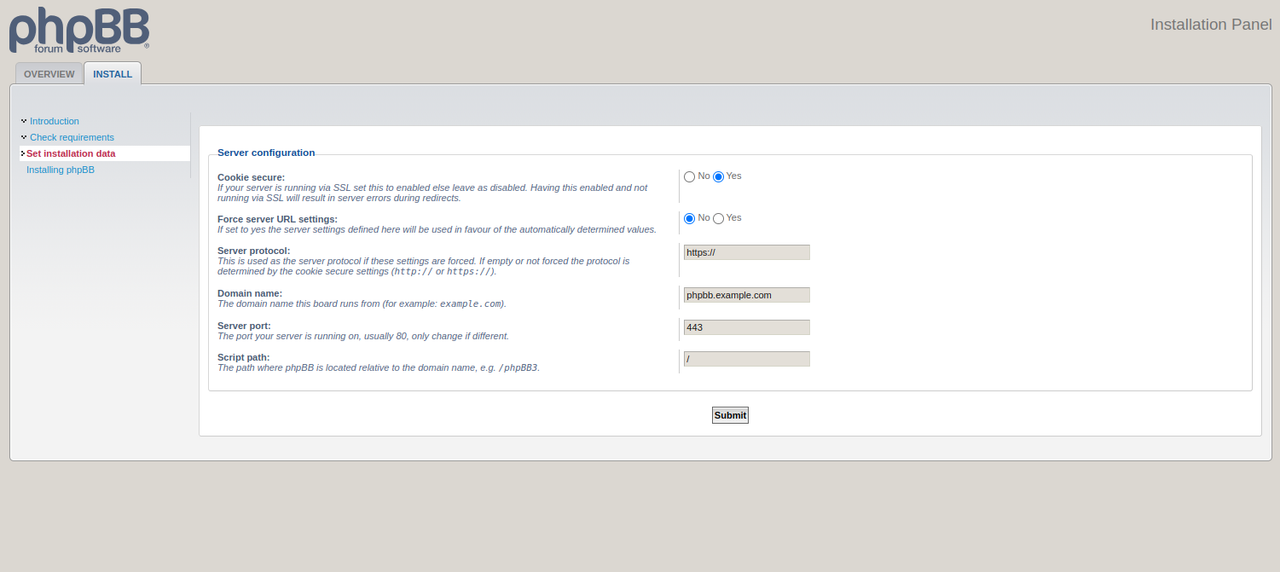
Click Yes to activate SMTP server options to use with phpBB or keep NO selected to use the application without email settings. Then, click Submit to save changes.
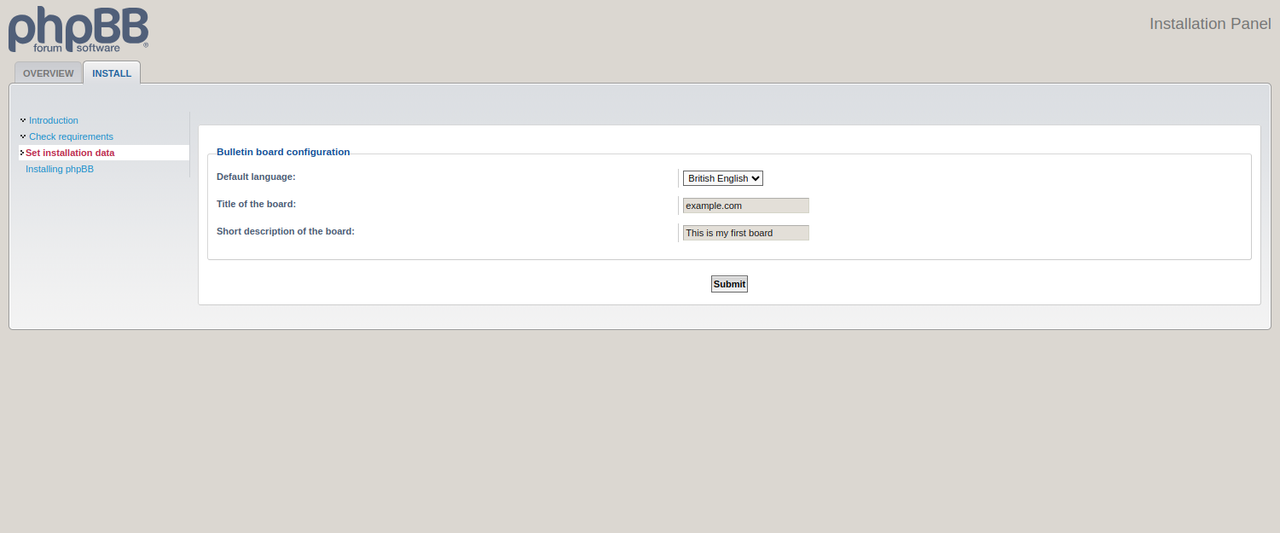
Select your forum language, enter a new board title, and a description to identify the forum.
Click Submit to save the new forum settings.
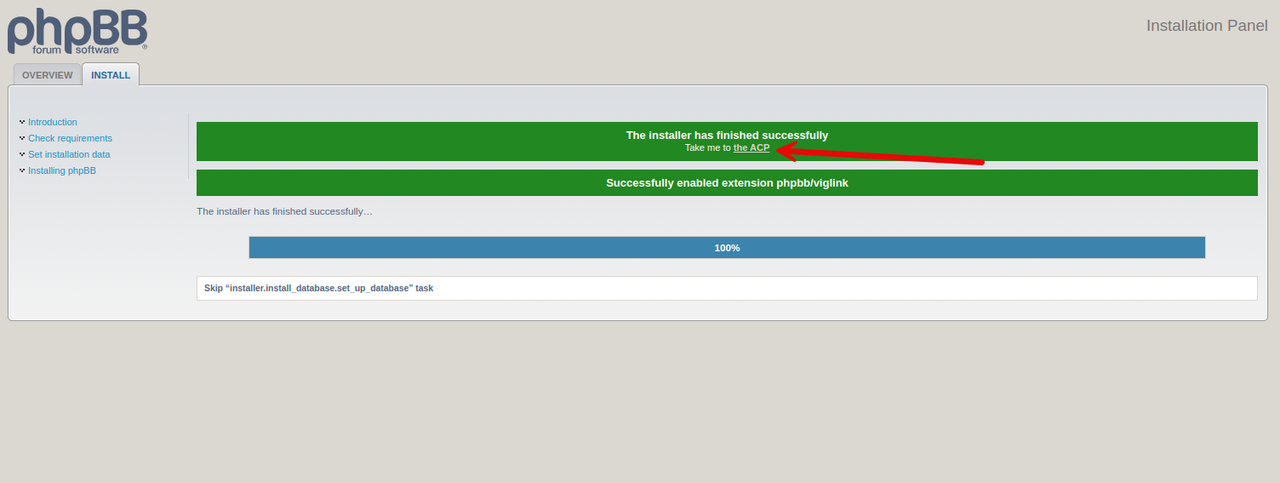
Click Take me to the ACP to finish the configuration process and redirect to the phpBB control panel.
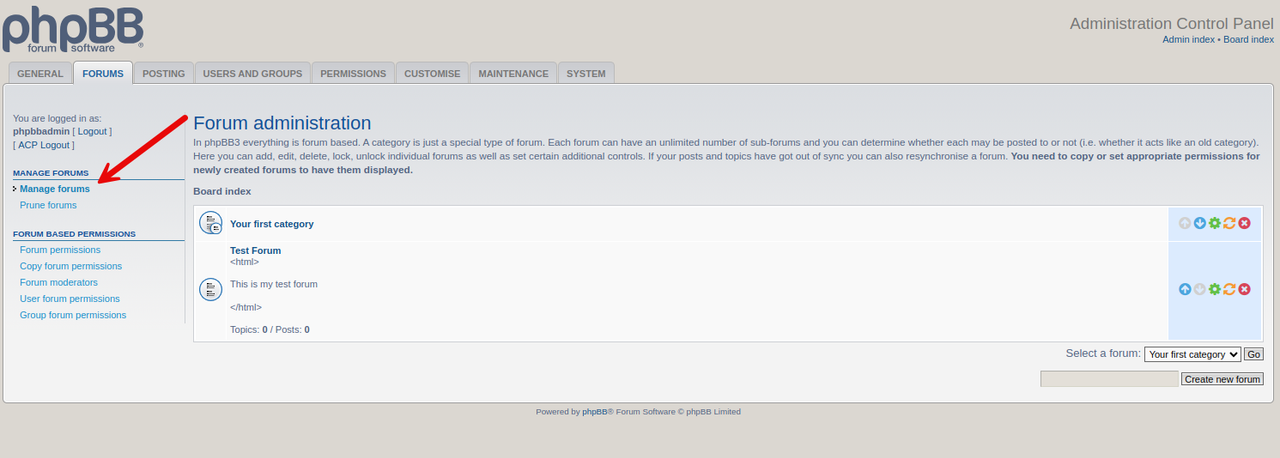
Navigate to the Forums tab on the main phpBB control panel menu to create a new forum.
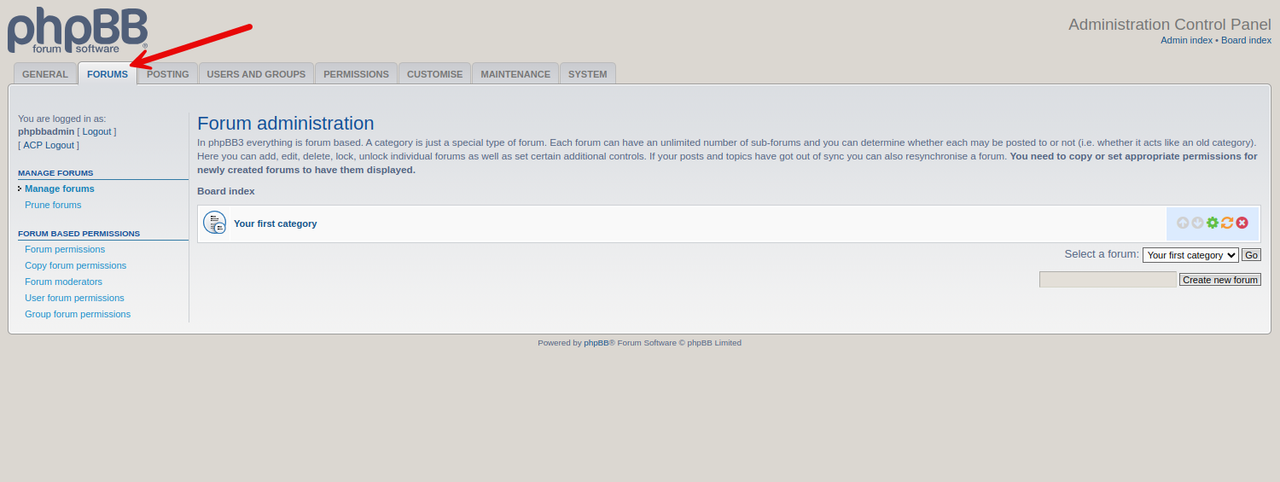
Click Create new forum.
Enter your forum name, description, password, style, and posting rules.
Verify any advanced options to modify with the forum settings.

Scroll and click Submit to create the new phpBB forum.
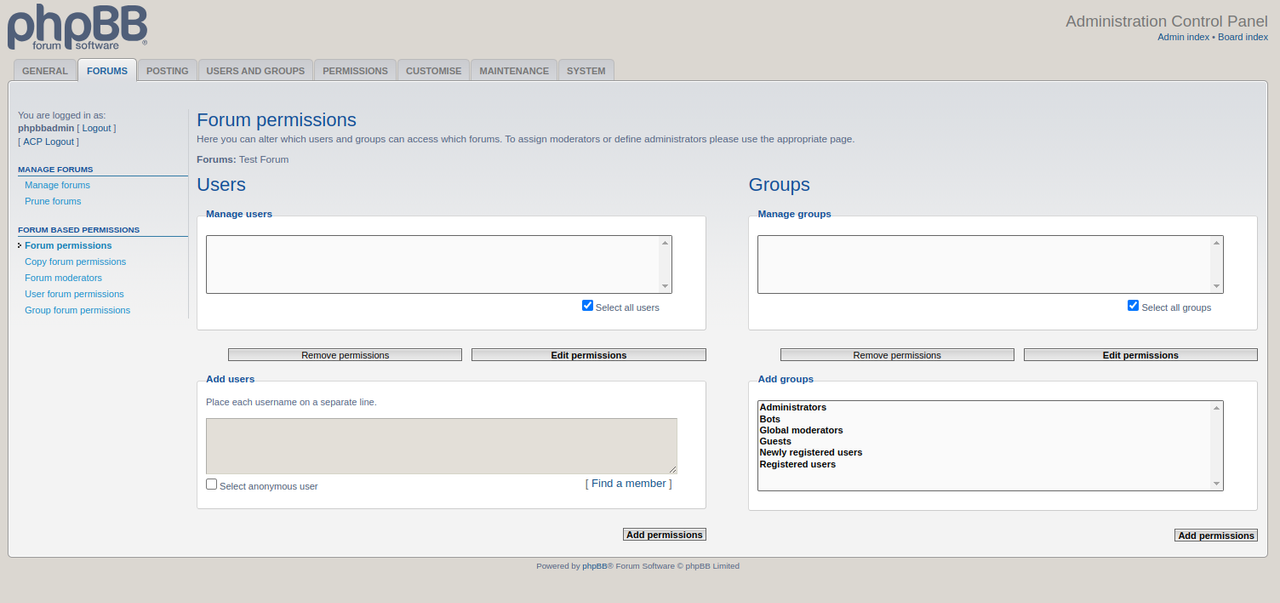
Set up the user and group permissions and click Add Permissions to save the forum permissions.
Click Manage forums on the left navigation menu to verify the new phpBB forum.
Visit your main phpBB domain to view the public forums and test the application functionalities.
https://phpbb.example.com
Conclusion
You have deployed phpBB on a Ubuntu 22.04 Vultr cloud server and secured the application for public use. You can create an online community with public or private access to specific forums on the server to serve your target audience. For more information and configuration options, visit the phpBB documentation.