
Introduction
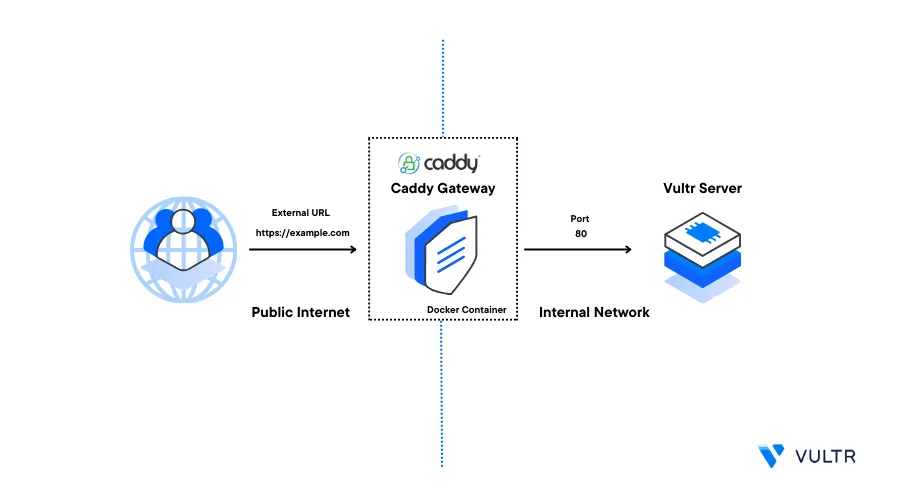
Caddy is an open-source highly extensive web server application that allows you to securely expose applications on a server. Docker is a container orchestration platform that allows you to build and deploy applications. To expose Docker applications, you can install Caddy using Docker as a reverse proxy to securely process requests over HTTP and HTTPS Ports.
This guide explains how you can install Caddy using Docker on a Vultr Cloud Server. When installed, you will create a sample Docker application and set up Caddy configuration files to securely expose your internal application.
Prerequisites
Before you begin:
Deploy a Vultr Docker Server.
Using SSH, access the server
Create a non-root sudo user
Add the user to the Docker users group.
$ sudo usermod -aG docker myuserSwitch to the non-root sudo user account.
$ su - myuser
Install Caddy
To install Caddy, you can either use Docker CLI or Docker Compose to run the application. Caddy uses two host locations to persistently read and write configuration data. To run Caddy, the application needs at least two host locations to store cached data and configurations. Set up the necessary Caddy host directories as described below.
Create a new Caddy files directory in a location such as
/opt$ sudo mkdir -p /opt/caddy/Switch to the directory
$ cd /opt/caddyCreate a new Caddy
datadirectory$ sudo mkdir dataCreate the
caddy_configdirectory$ sudo mkdir caddy_configCreate a new Caddy configuration file
Caddyfile$ sudo touch CaddyfileUsing a text editor such as Nano, edit the file
$ sudo nano CaddyfileAdd the following Configurations to the file
 :80 {
         respond "The Caddy Configuration Works!!"
 }
Save and close the file
List files and verify your Caddy files directory structure
$ ls /opt/caddyOutput:
caddy_config Caddyfile dataVerify that the
Caddyfileconfiguration file,data, andcaddy_configdirectories are available.
You have set up the Caddy host files structure. Install Caddy using Docker on your server with Docker CLI or Docker Compose.
Install Caddy Using Docker CLI
Pull the latest Caddy image
$ docker pull caddyInstall Caddy as a new Docker container with the name
caddy$ docker run -d -p 80:80 -p 443:443 -p 443:443/udp \ -v /opt/caddy/Caddyfile:/etc/caddy/Caddyfile \ -v /opt/caddy/data:/data \ -v /opt/caddy/caddy_config:/config \ --name caddy caddyBelow is a breakdown of the above command:
-d: Runs the Docker container in detached mode and enables background operations-p 80:80: Binds the localhost HTTP port80to the Caddy container port80. When running Caddy in with another host application such as Nginx, replace the host port with any custom value such as9000-p 443:443: Binds the localhost HTTPS port443to the Caddy container port443.443:443/udpenables HTTP/3 for Caddy operations-v /opt/caddy/Caddyfile:/etc/caddy/Caddyfile: Mounts the host Caddy configuration fileCaddyfileto the/etc/caddy/Caddyfilecontainer configuration file. Any changes made to the file sync with the Caddy container-v /opt/caddy/data:/data: Binds the host data directory/opt/caddy/datato the/dataCaddy container directory. The data may include TLS/SSL certificates and other important files used by the Caddy web server-v /opt/caddy/caddy_config:/config: Mounts the Caddy container configuration/configdata directory to the host/opt/var/caddy/caddy_configdirectory
View the list of running Docker containers
$ docker psOutput:
 CONTAINER ID   IMAGE     COMMAND                  CREATED         STATUS         PORTS                                                                                                                       NAMES
 b4e7a3a27f3a   caddy     "caddy run --config …"   4 seconds ago   Up 3 seconds   0.0.0.0:80->80/tcp, :::80->80/tcp, 0.0.0.0:443->443/tcp, :::443->443/tcp, 0.0.0.0:443->443/udp, :::443->443/udp, 2019/tcp   caddy
Verify that the container is up and running
Using Curl, test access to the Caddy host port
$ curl 127.0.0.1:80Verify that your configured Caddy prompt displays in your output:
The Caddy Configuration Works!!
Install Caddy Using Docker Compose
Verify the installed Docker compose that it's version
2and above$ docker compose versionOutput:
Docker Compose version v2.21.0In your working directory, create a new Docker Compose file
caddy-install.yaml$ touch caddy-install.yamlEdit the file
$ nano caddy-install.yamlAdd the following configurations to the file
 version: "3.9"

 services:
   caddy:
     image: caddy:latest
     container_name: caddy
     restart: unless-stopped
     ports:
       - "80:80"
       - "443:443"
       - "443:443/udp"
     networks:
       - caddy-net
     volumes:
       - /opt/caddy/Caddyfile:/etc/caddy/Caddyfile
       - /opt/caddy/caddy_data:/data
       - /opt/caddy/caddy_config:/config

 volumes:
   caddy_data:
     external: true
   caddy_config:

 networks:
   caddy-net:
     driver: bridge
Save and close the file.
The above Docker compose configuration uses the latest Caddy image and creates a new container with the name
caddy. Then, the following declarations configure the application to use the respective values listed below:ports: Binds the host network ports to the respective internal docker network ports. For example,80:80binds the host port80to the Caddy container port80.networks: Attaches the Caddy container to the defined internal Docker networkcaddy-net.volumes: Mounts host directories to the respective Caddy container directories. For example,/opt/caddy/Caddyfilemounts the local Caddy configuration to the/etc/caddy/Caddyfileinside the docker container.volumes: caddy_data: external_data: Defines the data volume as external and prevents volume deletion when you rundocker compose downto stop the container.networks: caddy-net: driver: bridge: Creates a newcaddy-netnetwork using the Docker bridge driver
Run the Docker Compose file to install Caddy
$ docker compose -f caddy-install.yamlView the list of running Docker containers
$ docker psYour output should look like the one below:
 CONTAINER ID   IMAGE          COMMAND                  CREATED          STATUS          PORTS                                                                                                                       NAMES
 6f64fe1513bb   caddy:latest   "caddy run --config …"   14 minutes ago   Up 14 minutes   0.0.0.0:80->80/tcp, :::80->80/tcp, 0.0.0.0:443->443/tcp, :::443->443/tcp, 0.0.0.0:443->443/udp, :::443->443/udp, 2019/tcp   caddy
Verify that the Caddy container is running and available
Using Curl, test access to your Caddy host port
$ curl 127.0.0.1:80Output:
The Caddy Configuration Works!!Verify that Caddy correctly handles the request.
Configure Docker Networking
To enable network communications across different Docker containers, configure Docker networking to allow access from one container to another. Caddy requires a working Docker network bridge to connect to other containers. Set up a new Docker network and attach the running Caddy container to the network bridge as described below.
Create a new Docker network
caddy-net$ docker network create caddy-netView the list of Docker networks and verify that it's created
$ docker network listOutput:
 NETWORK ID     NAME            DRIVER    SCOPE
 5866da745c7a   bridge          bridge    local
 4ebed0ed20a2   caddy-net       bridge    local
Connect the Caddy Docker container to the network
$ docker network connect caddy-net caddyView the network information and verify that the Caddy container attaches to the network
$ docker network inspect caddy-netYour output should look like the one below:
 "ConfigOnly": false,
         "Containers": {
             "4c86469088226a1691ee229002cc535d9cfc002319a8e79229766d120120c074": {
                 "Name": "caddy",
                 "EndpointID": "2af1a90a7c830f1a4e624f88315965dcf7fe341cb03b213a2f1e3c4f0e71e026",
                 "MacAddress": "02:42:ac:15:00:02",
                 "IPv4Address": "172.21.0.2/16",
                 "IPv6Address": ""
             }
         },
         "Options": {},
         "Labels": {}
Expose Docker Applications Using Caddy
To expose Docker containers using Caddy, create reverse proxy records to forward traffic from the host port to the respective application. In this section, create a sample docker application that listens on the internal port 8080, then, set up your Caddyfile configuration and forward connections to the container port.
Using Docker CLI, deploy a sample Nginx application that runs on the internal port
80and attached to the Caddy networkcaddy-net$ docker run -d -p 80 --name nginx --network caddy-net nginxView the list of running docker applications and verify that the application is active
$ docker psOutput:
 CONTAINER ID   IMAGE          COMMAND                  CREATED              STATUS              PORTS                                                                                                                       NAMES
 6ce6ffb3117e   nginx          "/docker-entrypoint.…"   About a minute ago   Up About a minute   0.0.0.0:32768->80/tcp, :::32768->80/tcp                                                                                     nginx
 4c8646908822   caddy:latest   "caddy run --config …"   4 minutes ago        Up 4 minutes        0.0.0.0:80->80/tcp, :::80->80/tcp, 0.0.0.0:443->443/tcp, :::443->443/tcp, 0.0.0.0:443->443/udp, :::443->443/udp, 2019/tcp   caddy
View the
caddy-netDocker network$ docker network inspect caddy-netYour output should look like the one below:
 "6ce6ffb3117edacda0b2e687024a0441558b2771bb285f8beb0c7404c922544f": {
                 "Name": "nginx",
                 "EndpointID": "e4617e4a843f7a90fc65b1ad7065e036fb4be4a20d250db860fe4cd1a6d49b40",
                 "MacAddress": "02:42:ac:15:00:03",
                 "IPv4Address": "172.21.0.3/16",
                 "IPv6Address": ""
             }
Verify that the new docker application attaches to the network
Edit your Caddy configuration file
Caddyfile$ sudo nano /opt/caddy/CaddyfileComment out
#any file serving directives. Then, change the configuration to include areverse_proxydirective with the sample application container name and port as the value:80 { reverse_proxy nginx:80 #respond "The Caddy Configuration Works!!" }Save and close the file.
Reload your Caddy docker configuration to apply changes
$ docker exec -w /etc/caddy caddy caddy reloadUsing Curl, test access to your Caddy host port
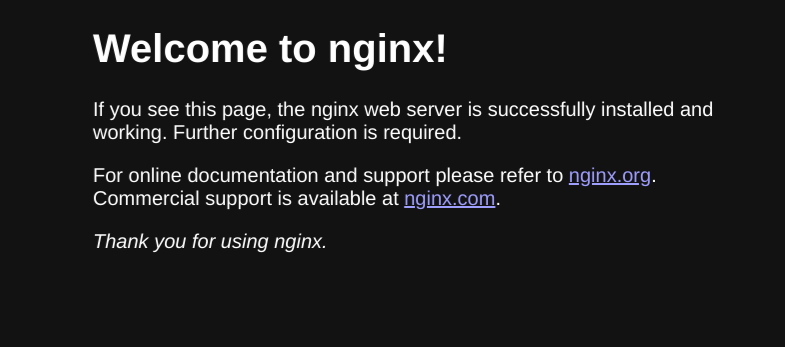
$ curl 127.0.0.1:80Verify that your deployed docker application correctly handles your request like the one below:
<!DOCTYPE html> <html> <head> <title>Welcome to nginx!</title> <style> html { color-scheme: light dark; } body { width: 35em; margin: 0 auto; font-family: Tahoma, Verdana, Arial, sans-serif; } </style> </head> <body> <h1>Welcome to nginx!</h1> <p>If you see this page, the nginx web server is successfully installed and working. Further configuration is required.</p>
You have exposed a docker application using Caddy. You can expand your configuration file to expose more applications using custom host ports by adding more values to the ports field.
Security
When using Caddy as the main web server application in your Docker environment, configure the host machine firewall to allow incoming traffic to the Caddy network ports. For example, if you are exposing Caddy using the HTTP port 80 and HTTPS port 443, allow both ports to accept incoming requests through the host ports as described below.
Verify the Uncomplicated Firewall (UFW) status on your Docker server
$ sudo ufw statusOutput:
Status: active To Action From -- ------ ---- 22/tcp ALLOW Anywhere 22/tcp (v6) ALLOW Anywhere (v6)Allow the HTTP port 80 through the firewall table
$ sudo ufw allow 80Allow the HTTPS port 443
$ sudo ufw allow 443Reload the firewall table to save changes
$ sudo ufw reload
Configure Automatic SSL Certificates
To handle incoming connections over HTTPS, Caddy enables automatic trusted SSL certificates for all configured domain names. To add a new domain name, edit the Caddy configuration file and create new virtual host directives that point to specific resources in your Docker environment. Set up a new sample domain with automatic HTTPS as described below.
- Configure a new domain record that points to your Docker Server IP Address. For example
app.example.com
Edit your Caddy configuration file
$ sudo nano /opt/caddy/CaddyfileAdd a new site block for your domain name
app.example.com { tls mymail@example.com reverse_proxy nginx:80 }Save and close the file.
In the above configuration:
app.example.com: Creates a new site block with your domain nametls: Sets the email address to associate with your Let's Encrypt account. Replacemymail@example.comwith your actual email addressreverse_proxy nginx:80: Creates a new reverse proxy connection that points to a running docker container attached to the Caddy network in the format[container_name:port].nginx:80points to the Nginx container running on the docker port80
Your edited Caddy configuration file should look like the one below:
:80 { reverse_proxy nginx:80 #respond "The Caddy Configuration Works!!" } app.example.com { tls mymail@example.com reverse_proxy nginx:80 }Reload your Caddy configuration to apply changes
$ docker exec -w /etc/caddy caddy caddy reloadWait for at least 1 minute for the SSL certificate generation process to complete, then, use a web browser of your choice to access your domain name
https://app.example.comVerify that your request runs and the backend docker application loads correctly using Caddy
Troubleshooting
When running Caddy using Docker, you may experience challenges in container communications or encounter configuration errors. Depending on the displayed error, fix Caddy runtime errors as described in the steps below.
View Caddy Docker Logs
Run the following command to view the Caddy Docker container logs and investigate the source of any runtime errors
$ docker logs caddyOutput:
{"level":"error","ts":1697075331.8155975,"logger":"http.log.error","msg":"dial tcp: lookup nginx on 108.61.10.10:53: no such host","request":{"remote_ip":"172.17.0.1","remote_port":"47222","client_ip":"172.17.0.1","proto":"HTTP/1.1","method":"GET","host":"127.0.0.1","uri":"/","headers":{"User-Agent":["curl/7.88.1"],"Accept":["*/*"]}},"duration":0.178574085,"status":502,"err_id":"kjvvzmew9","err_trace":"reverseproxy.statusError (reverseproxy.go:1248)"}In the above output, the Caddy container reports a failed communication to the configured reverse proxy container nginx. To fix the error, verify that the backend container is running and connected to the same network as the Caddy container.
Caddy Format Errors
Depending on your Caddy configuration file, you may receive the following error
Error: Caddyfile:2: Caddyfile input is not formatted; Tip: use '--overwrite' to update your Caddyfile in-place instead of previewing it. Consult '--help' for more optionsFix it by running the caddy fmt command to clean any misconfigurations in your Caddyfile
$ docker exec -w /etc/caddy caddy caddy fmt --overwriteReload the Caddy configuration to save changes
$ docker exec -w /etc/caddy caddy caddy reloadConclusion
In this guide, you have installed and configured Caddy using Docker on a Vultr Cloud Server. Caddy is a modern web server application that you can extend by creating custom images to enhance its functionality. To explore more configuration options, please visit the Caddy documentation.
Next Steps
To enhance the Caddy web server functionality and implement more applications on your Vultr Cloud Server, visit the following guides:
No comments yet.