
How to Install Memcached on Rocky Linux 9
Introduction
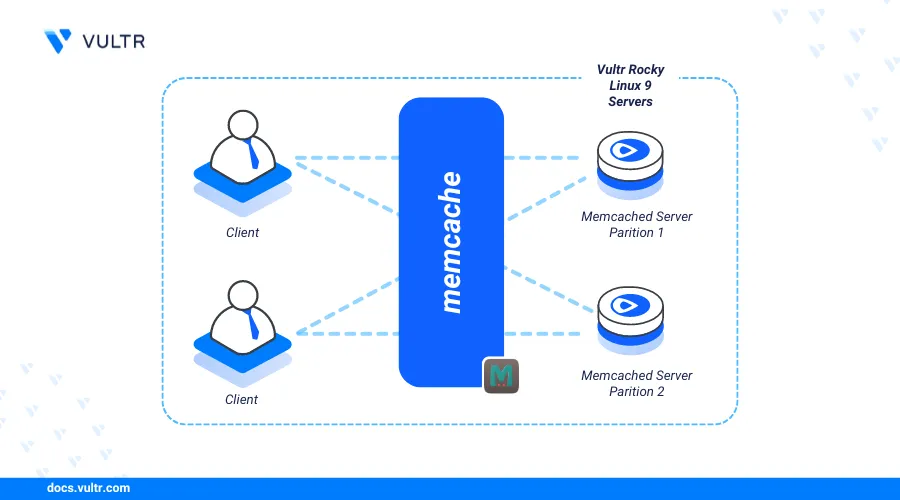
Memcached is an open-source, distributed memory caching system that stores frequently requested data in memory (RAM) to speed up application processes. Memcached serves the cached data to avoid repeated queries to applications making it ideal for web applications, API responses, and database queries.
This article explains how to install Memcached on Rocky Linux 9 and secure the server to enable data caching for applications.
Prerequisites
Before you begin:
- Deploy a Rocky Linux 9 instance on Vultr.
- Access the instance using SSH as a non-root user with sudo privileges.
Install Memcached
Memcached is available in the default package repositories on Rocky Linux 9. Follow the steps below to install Memcached using the DNF package manager on your server.
Update the server's package index.
console$ sudo dnf update -y
Install all required dependency packages such as the
libmemcachedlibrary.console$ sudo dnf --enablerepo=crb install libmemcached-awesome libmemcached-awesome-tools libmemcached-awesome-devel -y
Install Memcached.
console$ sudo dnf install memcached -y
Enable the Memcached service to automatically start at system boot.
console$ sudo systemctl enable memcached
Start the Memcached service.
console$ sudo systemctl start memcached
View the Memcached service status and verify that it's running.
console$ sudo systemctl status memcached
Output:
● memcached.service - memcached daemon
  Loaded: loaded (/usr/lib/systemd/system/memcached.service; enabled; preset: disabled)
  Active: active (running) since Mon 2024-08-05 18:12:23 WAT; 21s ago
Main PID: 15425 (memcached)
   Tasks: 10 (limit: 22714)
  Memory: 1.7M
     CPU: 30ms
  CGroup: /system.slice/memcached.service
          └─15425 /usr/bin/memcached -p 11211 -u memcached -m 64 -c 1024 -l 127.0.0.1,::1
Configure Memcached
Memcached uses the /etc/sysconfig/memcached main configuration file to run on your server. Follow the steps below to configure Memcached and adjust the default configuration values such as the listening port, cache size, and maximum connection limits.
Open the Memcached configuration file
/etc/sysconfig/memcachedusing a text editor such asnano.console$ sudo nano /etc/sysconfig/memcached
Add the
-Svalue to theOPTIONSdirective within the file to enable SASL authentication.ini... OPTIONS="-l 127.0.0.1,::1 -S"
Modify the following Memcached configurations to match your needs.
iniPORT="11211" USER="memcached" MAXCONN="1024" CACHESIZE="64" OPTIONS="-l 127.0.0.1,::1"
Save and close the file.
Within the above configuration:
PORT: Sets the TCP port Memcached should use to listen for incoming connections on the server, port11211by default.USER: Sets the user profile to run the Memcached service.MAXCONN: Sets the maximum number of simultaneous connections Memcached can process on the server.CACHESIZE: Sets the amount of cached memory Memcached can store data (in MB).OPTIONS: Sets additional options to enable on the Memcached daemon such as the listening network address.
Restart Memcached to apply the configuration changes.
console$ sudo systemctl restart memcached
Secure Memcached
Memcached runs without any authentication requirements for all users by default. Follow the steps below to enable the SASL (Simple Authentication and Security Layer) protocol and protect cached data by requiring authentication for all users on the server.
Install SASL dependency packages for Memcached.
console$ sudo dnf install cyrus-sasl-devel cyrus-sasl-plain -y
Create a new
/etc/sasl2/directory to store the SASL configuration files.console$ sudo mkdir -p /etc/sasl2
Create a new
memcached.conffile in the/etc/sasl2/directory.console$ sudo nano /etc/sasl2/memcached.conf
Add the following contents to the file.
inimech_list: plain log_level: 5 sasldb_path: /etc/sasl2/memcached-sasldb2
Save and close the file.
The above configuration enables SASL to use the PLAIN authentication method and sets the logging level to
5using the Memcached SASL database fileetc/sasl2/memcached-sasldb2for authentication.Create a new user with a strong password. Replace
memcached_userwith your desired username and enter the user password when prompted.console$ sudo saslpasswd2 -a memcached -f /etc/sasl2/memcached-sasldb2 -c memcached_user
Within the above command:
-a: Specifies thememcachedauthentication service name.-f: Sets the SASL database path/etc/sasl2/memcached-sasldb2.-c: Creates a new SASL usermemcached_user.
Grant the Memcached user
memcachedownership privileges to the SASL database file.console$ sudo chown memcached:memcached /etc/sasl2/memcached-sasldb2
List the SASL database file permissions and verify that the Memcached user has read and write privileges.
console$ ls -l /etc/sasl2/memcached-sasldb2
Output:
-rw-------. 1 memcached memcached 16384 Aug 6 14:57 /etc/sasl2/memcached-sasldb2Restart the Memcached service to apply the configuration changes.
console$ sudo systemctl restart memcached
Use the
memstattool to test your SASL authentication credentials. Replacememcached_userandstrong_passwordwith your actual user details.console$ memstat --servers="127.0.0.1:11211" -b --username=memcached_user --password=strong_password
Your output should be similar to the one below when successful.
Server: 127.0.0.1 (11211)
 pid: 44725
 uptime: 45
 time: 1721842013
 version: 1.6.9
 libevent: 2.1.12-stable
 pointer_size: 64
 rusage_user: 0.045270
 rusage_system: 0.022635
 max_connections: 1024
 curr_connections: 1
 total_connections: 2
  ...
In case your receive the following error:
Failed to 'STAT ': (0xfffff8641840) AUTHENTICATION FAILURE, host: 127.0.0.1:11211 -> /builddir/build/BUILD/libmemcached-0ff88be3322a493773956028d4022d995f3cb193/src/libmemcached/sasl.cc:253Temporarily disable SELinux.
console$ sudo setenforce 0
Run the
memstatcommand again.
Connect to Memcached
Memcached is compatible with multiple programming languages and frameworks such as Python, Ruby, and Java. Follow the steps below to connect to Memcached using PHP.
Install the Extra Packages for Enterprise Linux (EPEL) repository.
console$ sudo dnf install epel-release -y
Install PHP and the Memcached extension using the following command.
console$ sudo dnf install php php-pecl-memcached -y
Create a new PHP application file.
console$ nano test_memcached.php
Add the following contents to the file. Replace
memcached_userandstrong_passwordwith the actual user credentials you created earlier.php<?php $m = new Memcached(); $m->addServer('127.0.0.1', 11211); $m->setOption(Memcached::OPT_BINARY_PROTOCOL, true); $m->setSaslAuthData('memcached_user', 'strong_password'); $m->set('key', 'Greetings from Vultr'); $result = $m->get('key'); echo $result; ?>
Save and exit the file.
The above PHP application connects to Memcached and authenticates using SASL to ensure secure access on the server, stores the string
Greetings from Vultr, and displays the key value when accessed.Run the PHP script to test access to Memcached on your server.
console$ php test_memcached.php
Output:
Greetings from Vultr
Conclusion
You have installed Memcached on your Rocky Linux 9 server and configured SASL to require authentication for all users. Memcached works as a caching solution you can integrate with multiple applications on your server. For more information and configuration options, visit the Memcached Wiki.