
How to Migrate your WordPress Site to Vultr with BackupBuddy
BackupBuddy is a WordPress migration plugin that lets you clone or transfer your website from one host to another. It is a premium plugin, easy to use, and offers multiple backup destinations including FTP, SFTP, Cloud storage services, among others.
In this article, you will use BackupBuddy to migrate your WordPress Site to a Vultr Cloud Server. For purposes of this article, we’ll migrate WordPress to a Ubuntu 20.04 Server running the LAMP Stack.
Prerequisites
- Deploy a fresh Vultr Cloud Server.
- Access the Server.
- Update the Server.
- Install LAMP.
- Buy the BackupBuddy plugin.
Prepare the Server
It’s not recommended to use your server as root, and Backup Buddy requires a valid server user account to transfer files to the server. SSH and login as root, then, create a new standard user with sudo privileges.
Login to the server.
ssh -l root@vultr-server-ipCreate a new user. Replace example with your preferred username.
# adduser exampleLogin as the new user.
# su exampleFor further information on setting up user accounts on your server, refer to the articles below:
- Create a new sudo user.
- Create SFTP-Only User accounts.
Create a New WordPress Database
Login to MySQL.
# mysql Create a new database.
mysql> create database wordpressdb;Create a new user with a hard-to-guess secure password.
mysql> create user 'wp'@'localhost' identified by 'password';Grant the user full privileges to the database.
mysql> grant all privileges on wordpressdb.* to wp@localhost;Refresh MySQL rights.
mysql> FLUSH PRIVILEGES;Exit MySQL.
mysql> EXITSetup BackupBuddy and Migrate WordPress
Through a web browser, log in to your WordPress website, and install the BackupBuddy plugin with an active license.
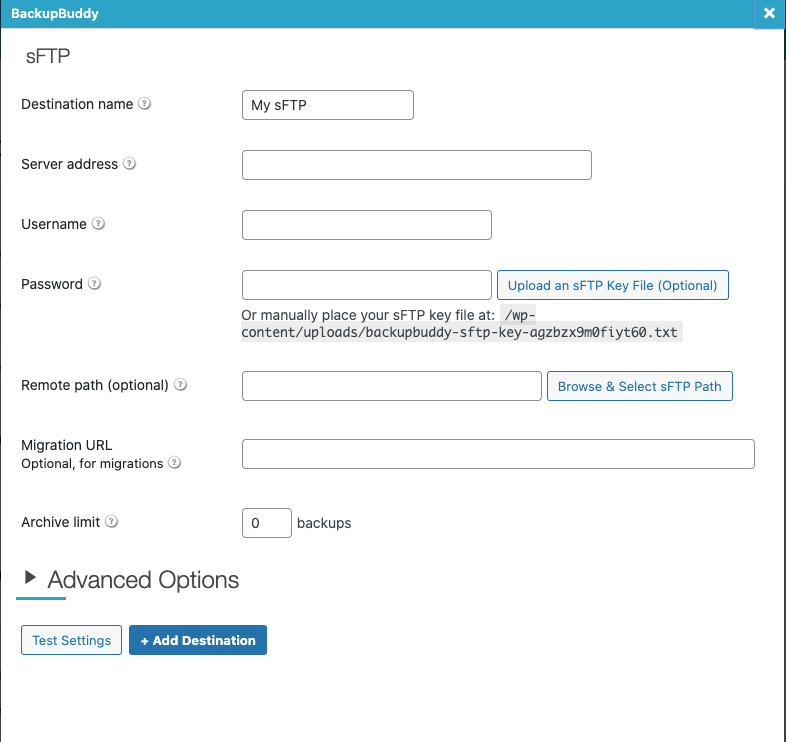
https://example.com/wp-adminNavigate to the BackupBuddy plugin page on the left WordPress navigation bar, then, enter your email address, a secure password for restoring backups, then, choose SFTP from the 3. Where do you want to send your backups? destinations option.
Give your backup option a name, then, enter your Vultr Server IP, username, and password for the sudo user created earlier. Click Test Settings to create a sample connection to the server. Once the test is a success, click+ Add destination to save your backup destination.
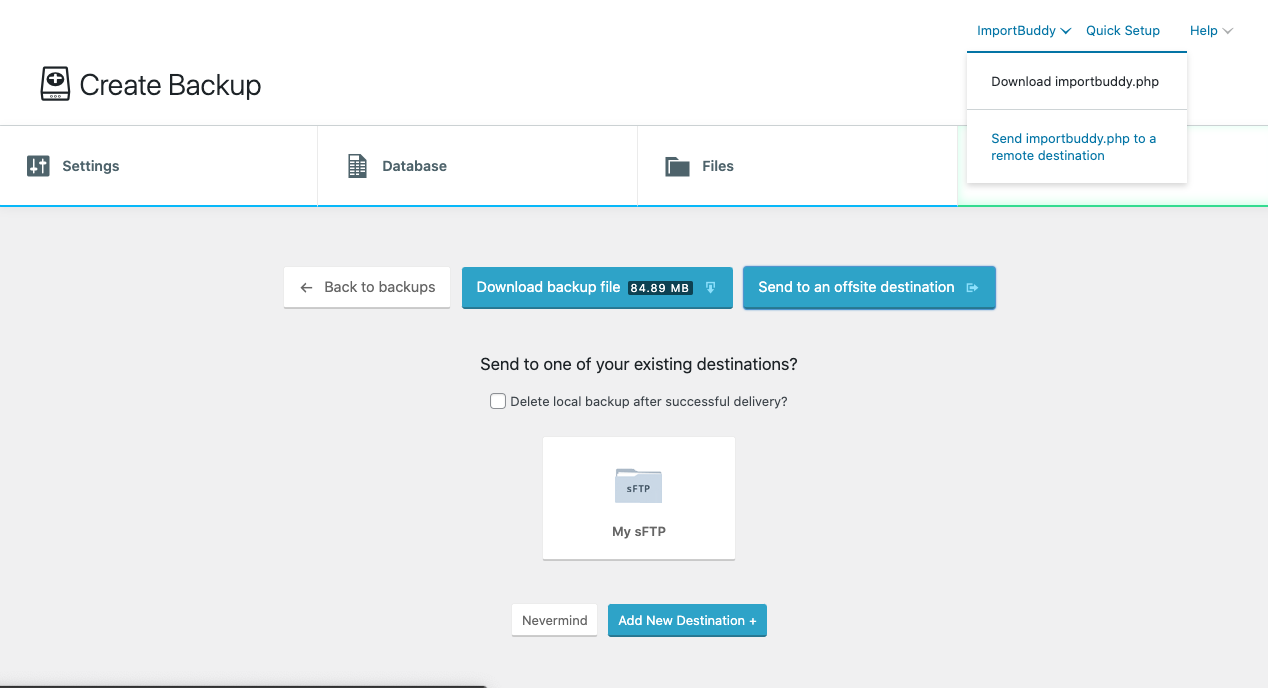
Now, save settings, and select Complete Backup under the Create Backup tab. The full backup process will begin, once finished, click Send an offsite destination, and select the SFTP destination to upload the WordPress backup file to your Vultr server.
Next, click the Import Buddy, and select Send importbuddy.php to a remote destination from the drop-down list, as well, choose the SFTP destination to send the file.
Set up Your WordPress Site on the New Server
In your remote server SSH session, change to the SFTP user home directory.
# cd /home/example/List all files, and verify that both the backup.zip file and importbuddy.php exist.
# ls -lOutput:
total 90080
drwxr-xr-x 5 example example     4096 Feb 10 12:34 Hello
-rw-r--r-- 1 example example   137882 Feb 10 11:07 backup-136_244_95_194-2022_02_10-11_00am-full-jnk51h3y69.dat
-rw-r--r-- 1 example example 89010721 Feb 10 11:06 backup-136_244_95_194-2022_02_10-11_00am-full-jnk51h3y69.zip
-rw-r--r-- 1 example example  3077629 Feb 10 12:36 importbuddy.php
Delete all files in the /var/www/html webroot directory, and confirm it’s empty before moving files.
# rm -r /var/www/html/*

# ls /var/www/html
Now, move the files to the Apache webroot directory, by default, it’s /var/www/html.
# mv backup-136_244_95_194-2022_02_10-11_00am-full-jnk51h3y69.zip /var/www/html

# mv importbuddy.php /var/www/html
Give the Apache web server full permissions to the directory.
# chown -R www-data:www-data /var/www/html/Next, allow HTTP network traffic on the Server Firewall.
# ufw allow in httpIf you plan to use HTTPS with your domain name, allow the network port 443.
# ufw allow in httpsRestart the Firewall.
# ufw reloadComplete and Configure WordPress Website
If you installed the LAMP stack and followed all the steps above, your WordPress site is ready for recovery, through a web browser, load the importbuddy.php page on your Vultr Server IP Address.
http://Vultr-Server-IP/importbuddy.phpEnter the BackupBuddy recovery password you set earlier, and click Authenticate. The script will automatically discover your WordPress backup.zip file, then, click Restore Backup to start the website recovery process.
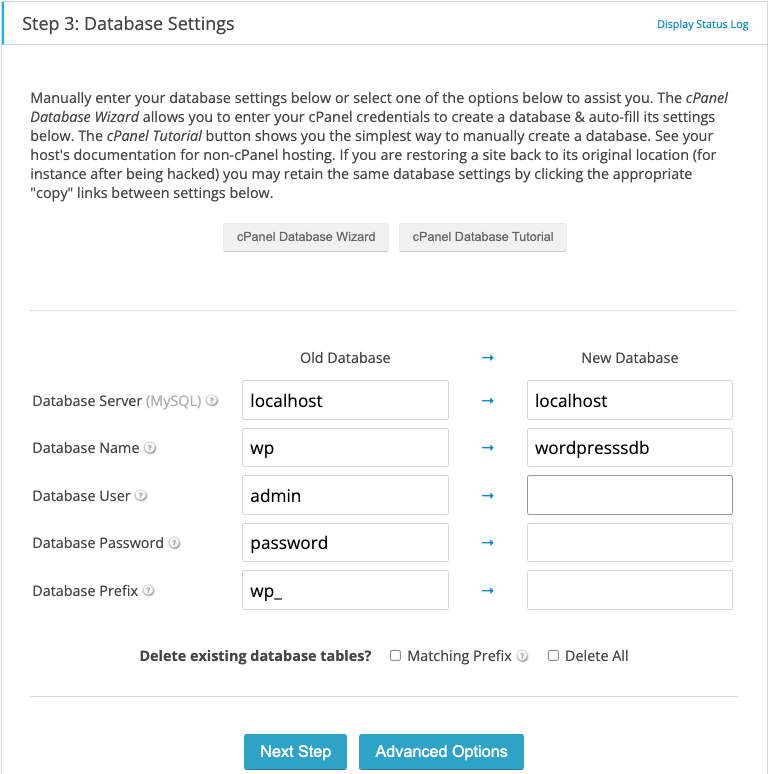
Next, enter localhost as the MySQL database server, then, enter the database name, user, and password created earlier.
Now, under Site URL settings, enter your Server IP in the New URL option box (You will change it to your domain name later through WordPress settings). Verify that your site has fully recovered by visiting the Server IP to check your website appearance, and log in with a valid administrator username.
http://Vultr-Server-IP/wp-adminTo free server space, and delete the used backup files, check through the ImportBuddy Cleanup options, then, click Finish Cleanup to complete your site recovery process.
Edit Your Domain Settings and Test the WordPress Website
Edit your domain name settings through your provider, and change the name servers to Vultr.
Then, log in to the Vultr Console, add a new domain, and enter your Server IP Address as an A record. Once ready, your domain will be ready to use in about 10minutes depending on the propagation period which can take up to 48hours to finish.
To secure your WordPress website with an SSL certificate to serve HTTPS, install Certbot on the server, and request a free Let’s Encrypt certificate.
Install Certbot.
# apt install certbotRun Certbot, and request for a new SSL certificate.
# certbotNow, login to WordPress through the server IP, and change the default URL to your domain name instead of the server address.
Once added, visit your WordPress website through your domain name, and everything should work fine just like on the old version of your site.
https://example.comConclusion
You have successfully used BackupBuddy to migrate your WordPress site to a Vultr Cloud server. For further information on setting up your website on the server, refer to the Install WordPress on Apache article here.