
How to Deploy a Next.js Application with Vultr Supabase Marketplace App
Supabase is an open-source Backend-as-a-Service (BaaS) platform built on PostgreSQL. It offers database management, authentication, real-time subscriptions, file storage, edge functions, and a robust API layer, letting you focus on application logic instead of backend infrastructure. Its modular architecture scales easily from small prototypes to enterprise-grade applications.
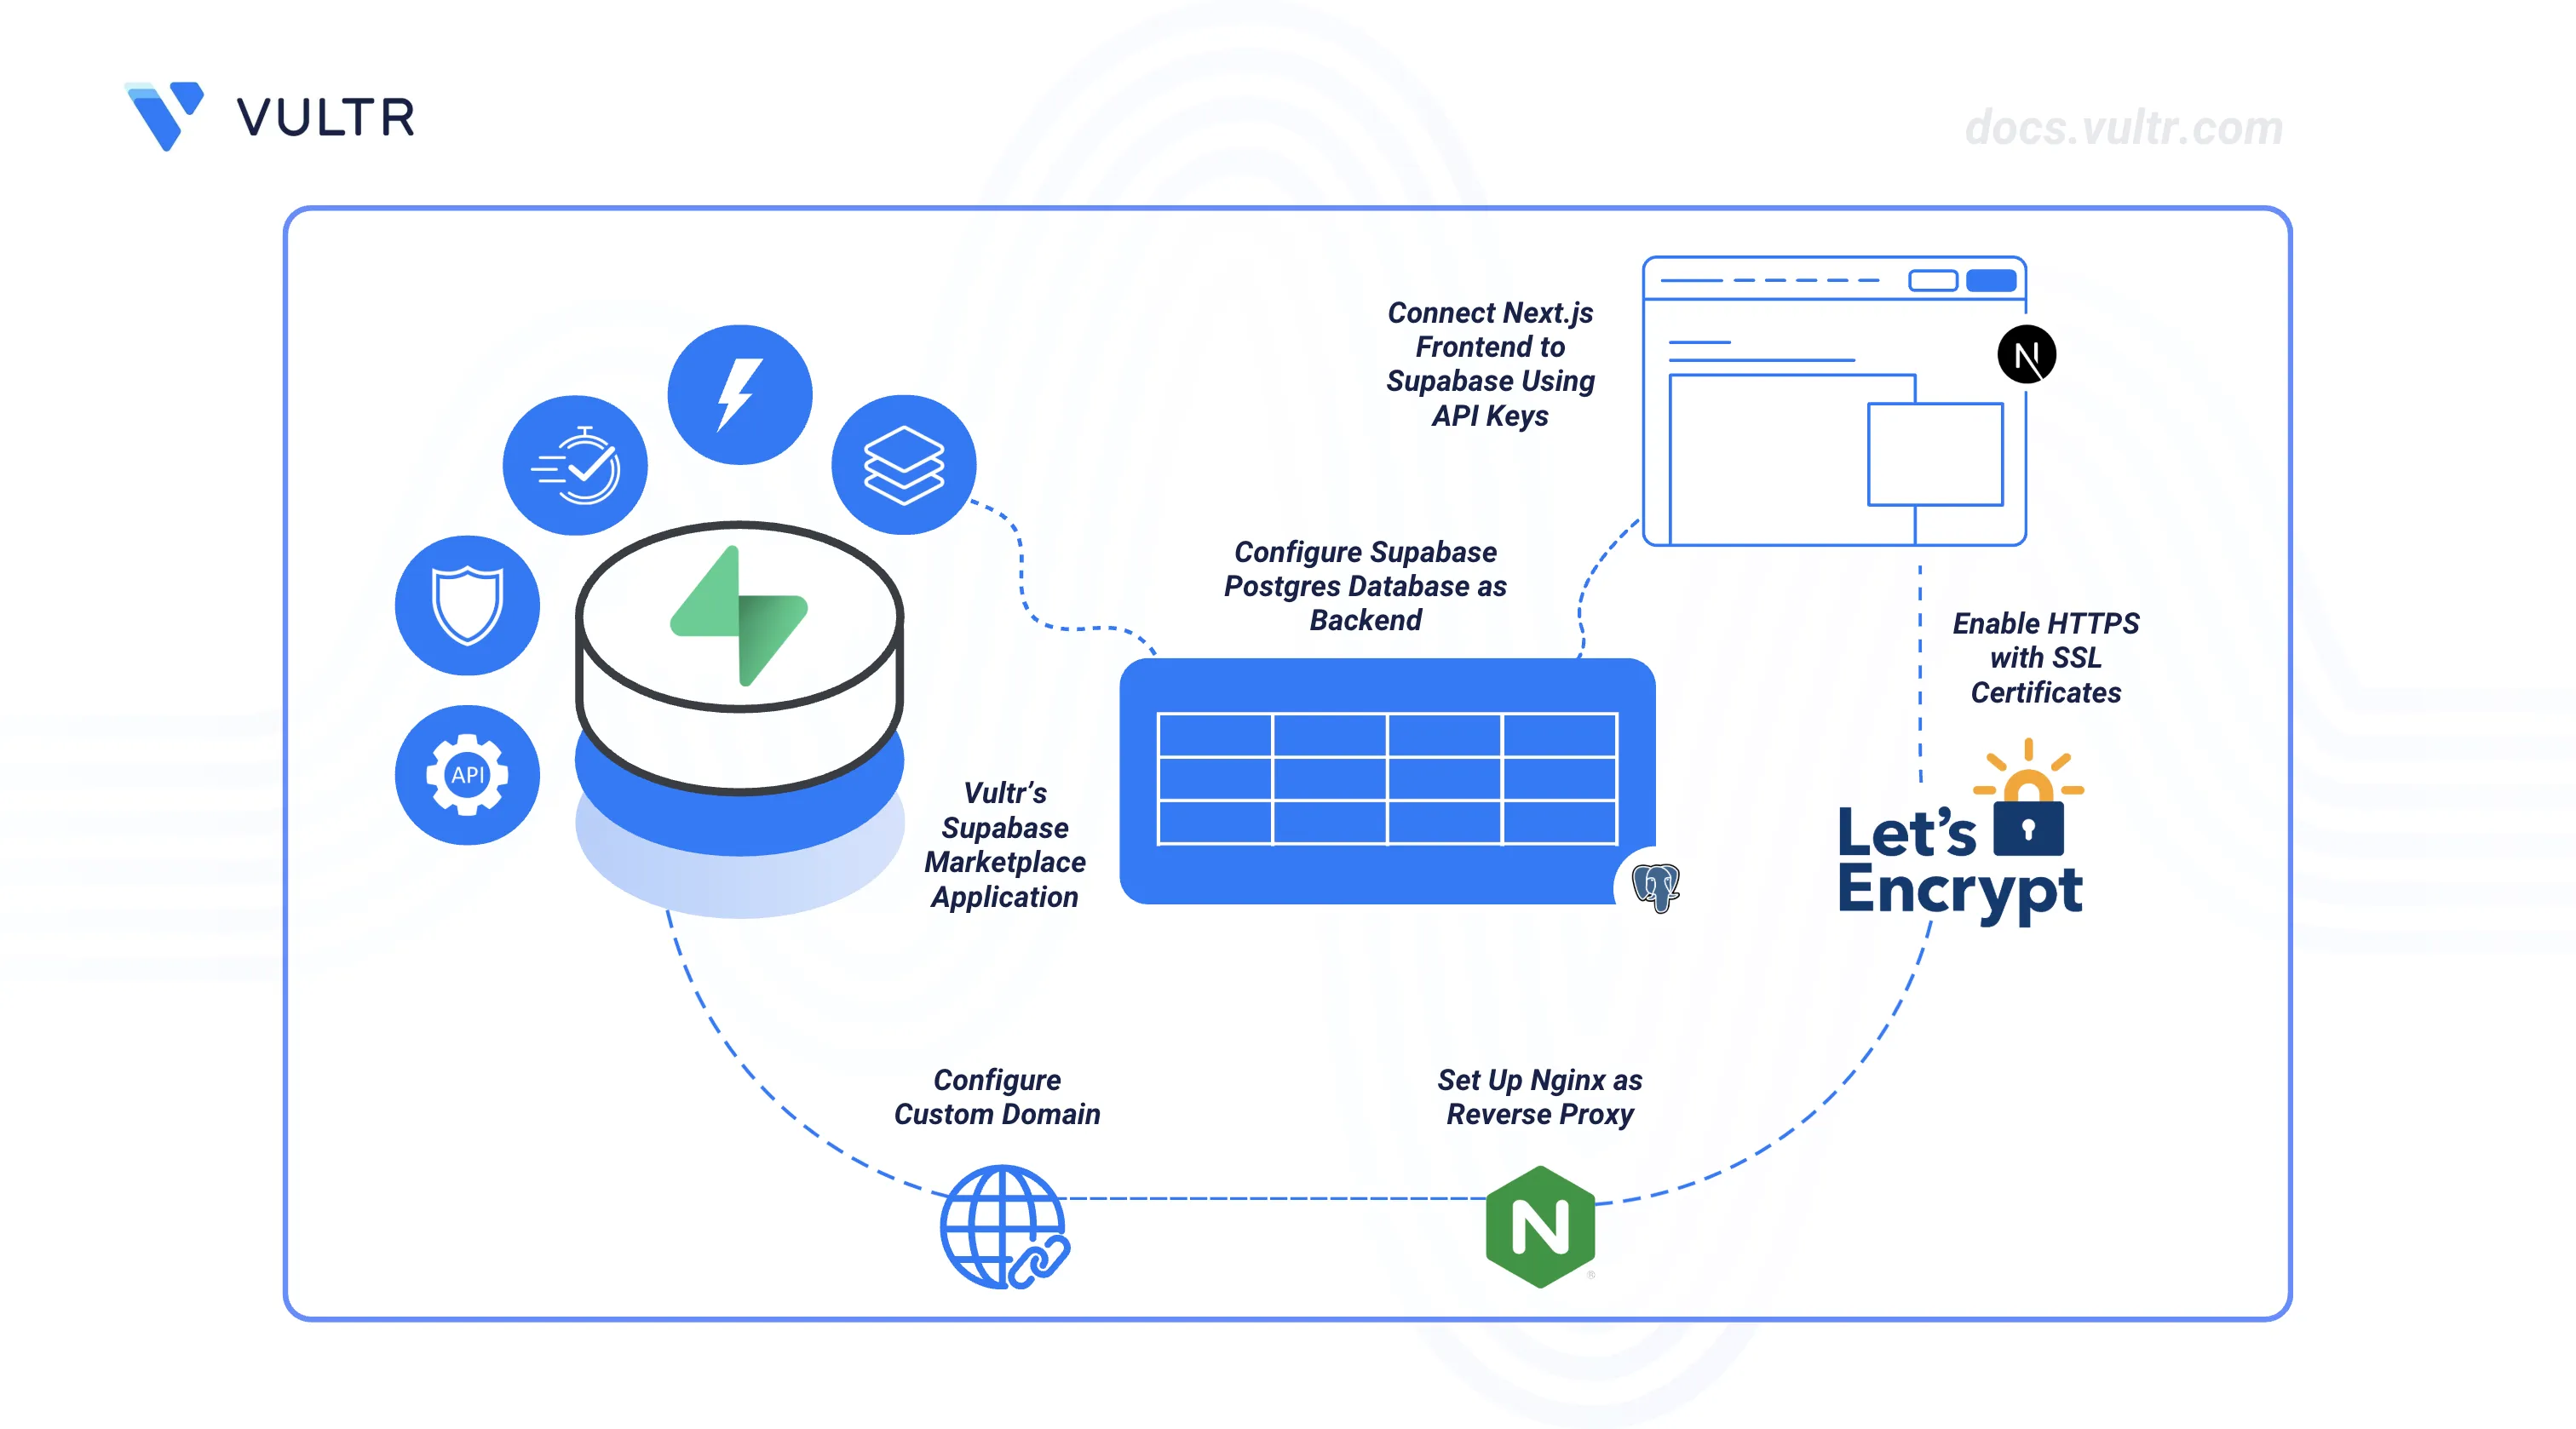
When paired with the Vultr Marketplace Application, you can deploy a self-hosted, production-ready Supabase instance in minutes on a server you manage. This guide walks you through setting up the Supabase backend on a Vultr server, configuring the database and access rules, connecting a frontend application, and setting up a custom domain with SSL certificates. A simple Next.js notes app is used as an example to demonstrate the process. However, the instructions can be applied to most web projects with minimal modification.
Deploy the Vultr Marketplace Application for Supabase
Deploying Supabase on Vultr is quick and seamless. You can provision a new Vultr Compute instance from the Vultr Console by selecting your preferred server type, region, and plan, then switching to Marketplace Apps and choosing Supabase as the image. During setup, configure essential parameters such as SSH access, the hostname, and enable Limited User Login with sudo privileges under Additional Features for improved security. Once the instance is live, you can connect via SSH to perform environment configuration. For a complete, step-by-step deployment walkthrough, see How to Use Vultr’s Supabase Marketplace Application.
- Vultr API or Terraform: Set
image_idtosupabaseto use the Supabase Marketplace Application. - Vultr CLI: Use
--image "supabase"withvultr-cli instance createcommand.
Configure Supabase Environment
After deploying the Supabase Marketplace Application, the next step is to configure the environment with secure API keys. Supabase uses an ANON_KEY for client-side operations and a SERVICE_ROLE_KEY for server-side tasks that require elevated privileges. While default keys are generated during deployment, it is recommended to regenerate them using the JWT secret provided in the instance’s App Instructions. This ensures secure communication between your frontend and the Supabase instance by replacing the weak default keys.
To regenerate the keys, follow the steps outlined in the Update Supabase API Keys section of the How to Use Vultr’s Supabase Marketplace Application guide. After generating the new keys, update the .env file in your Supabase Docker directory with the new values, and restart the containers to apply the changes.
Configure Your Domain Name and Set up Nginx as a Reverse Proxy
By default, the application is accessible directly via your instance's IP address. However, configuring a custom domain and setting up Nginx as a reverse proxy enables you to access both your application and Supabase services through a unified domain, ensuring proper CORS handling and providing a professional deployment foundation. While this guide uses a Next.js notes application as an example, a similar configuration can be applied to any web application.
Add DNS Records
The following steps establish the minimal DNS configuration required for your domain to work with your Vultr Cloud Compute instance.
Purchase or use an existing domain name from any domain registrar (e.g., Namecheap, GoDaddy, or Cloudflare).
In your domain registrar’s DNS management console or by using Vultr DNS, create
Arecords that point to the public IP address of your Vultr instance.Root domain (@):
Record Type: A
Name/Host: @
Value: YOUR_VULTR_INSTANCE_IP_ADDRESS
TTL: 300
Subdomain (www):
Record Type: A
Name/Host: www
Value: YOUR_VULTR_INSTANCE_IP_ADDRESS
TTL: 300
This ensures both
yourdomain.comandwww.yourdomain.compoint to your instance.Save the DNS configuration and allow 5-60 minutes for global DNS propagation.
Verify DNS propagation by testing domain resolution.
console$ nslookup yourdomain.com
The above command should return your Vultr instance's IP address, confirming successful DNS configuration.
Install and Set Up Nginx
Update the package index to ensure access to the latest software versions.
console$ sudo apt update
Install Nginx.
console$ sudo apt install nginx -y
Start Nginx immediately so it can serve requests.
console$ sudo systemctl start nginx
Enable Nginx to start automatically after system reboots.
console$ sudo systemctl enable nginx
Verify that Nginx is active and running.
console$ sudo systemctl status nginx
The output should show
active (running)status, indicating successful installation.Create an Nginx configuration file for your domain. Replace
yourdomain.comwith your actual domain name:console$ sudo nano /etc/nginx/sites-available/yourdomain.com
Add the following server configuration. Replace
yourdomain.comand ports to match your setup.iniserver { listen 80; server_name yourdomain.com www.yourdomain.com; # Proxy requests to your application location / { proxy_pass http://127.0.0.1:3000; proxy_http_version 1.1; proxy_set_header Upgrade $http_upgrade; proxy_set_header Connection 'upgrade'; proxy_set_header Host $host; proxy_set_header X-Real-IP $remote_addr; proxy_set_header X-Forwarded-For $proxy_add_x_forwarded_for; proxy_set_header X-Forwarded-Proto $scheme; proxy_cache_bypass $http_upgrade; } # Proxy Supabase API requests location /supabase/ { proxy_pass http://127.0.0.1:8000/; proxy_http_version 1.1; proxy_set_header Upgrade $http_upgrade; proxy_set_header Connection 'upgrade'; proxy_set_header Host $host; proxy_set_header X-Real-IP $remote_addr; proxy_set_header X-Forwarded-For $proxy_add_x_forwarded_for; proxy_set_header X-Forwarded-Proto $scheme; proxy_cache_bypass $http_upgrade; } }
This configuration defines two proxy rules:
* `/` routes to the application running on port `3000`.
* `/supabase/` routes to the Supabase API running on port `8000`.
If your application listens on a different port, update the
proxy_passdirective accordingly. To expose additional Supabase services such as Auth or Realtime, add separate proxy blocks pointing to their respective ports. Save the file and exit the editor when finished.Enable the site by creating a symbolic link.
console$ sudo ln -s /etc/nginx/sites-available/yourdomain.com /etc/nginx/sites-enabled/
Test the Nginx configuration for syntax errors.
console$ sudo nginx -t
If the configuration is valid, you should see a message confirming the syntax is ok and the test is successful.
Reload Nginx to apply the new configuration.
console$ sudo systemctl reload nginx
Verify domain and proxy configuration by testing connectivity.
console$ curl -I http://yourdomain.com
An HTTP response from Nginx confirms that the domain and proxy configuration are working. A
502 Bad Gatewayerror is expected at this stage because the frontend application is not running and is not listening on the configured port. When the application runs, Nginx forwards requests successfully, and the error disappears.
Set Up the Project
This section is dedicated to project setup and configuration. It covers preparing the backend database, defining tables and access policies, and connecting the frontend application to Supabase. The Notes App serves as an example to demonstrate how to structure tables, implement row-level security, configure environment variables, and connect a frontend to the backend. For your own project, follow the same steps while customizing tables, policies, and frontend configuration to match your application’s requirements.
Configure the PostgreSQL Database
Before your frontend application can interact with Supabase, the database must be properly configured. Supabase uses PostgreSQL as its core database engine and provides features such as authentication, row-level security (RLS), and API keys to control access. Understanding these essentials ensures your application can securely read, write, and manage data:
Tables and Columns: The frontend interacts with tables in the database. Each project defines its own schema (tables, columns, and data types) depending on the functionality required. At minimum, define a table structure that matches your app’s data model.
Row-Level Security (RLS): Supabase enforces RLS by default to ensure production safety. RLS defines which users can access or modify specific rows. Enabling and configuring RLS protects sensitive data while allowing authorized operations.
API Keys and Roles:
ANON_KEY: A public key for client-side operations such as fetching data or inserting new records with restricted privileges.SERVICE_ROLE_KEY: A secret key for server-side operations requiring elevated privileges, such as admin tasks.
The combination of RLS and properly configured API keys ensures your frontend can securely access the database.
Extensions: PostgreSQL supports optional packages called extensions that add extra functionality to your database. Extensions can provide new data types, functions, operators, or utilities that simplify common tasks. Supabase is pre-configured with over 50 extensions, including common PostgreSQL extensions such as UUID generation (
uuid-ossp) and cryptographic functions (pgcrypto). To see the full list of supported extensions, visit the Supabase Postgres Extensions Documentation.
Follow this method to use the Docker command-line interface to access the running Supabase PostgreSQL container and execute SQL commands directly inside the container for custom database configurations.
To run Docker commands without
sudo, add your user to thedockergroup.console$ sudo usermod -aG docker $USER
Apply the group changes to your current session so they take effect immediately.
console$ newgrp docker
List running containers to identify the Supabase database container.
console$ docker ps
Look for the container name or image associated with Supabase’s database, typically something like
supabase-db.Open an interactive shell inside the PostgreSQL container. Replace
supabase-dbwith the actual container name if different.console$ docker exec -it supabase-db bash
Connect to PostgreSQL using the default
postgresuserconsoleroot@<container_id>:/# psql -U postgres
PostgreSQL automatically connects you to the default database named
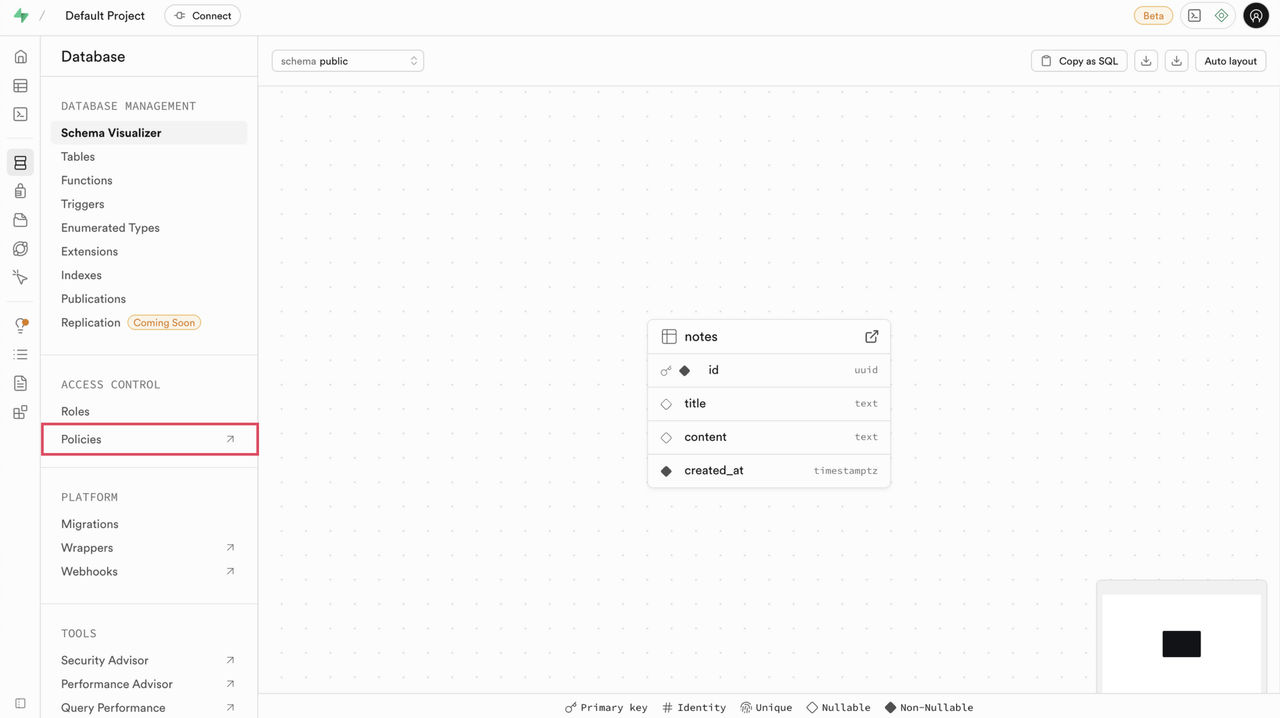
postgres.Create a table that matches your application's data model.
sqlpostgres=> CREATE TABLE notes ( id UUID PRIMARY KEY DEFAULT gen_random_uuid(), title TEXT NOT NULL, content TEXT, created_at TIMESTAMPTZ DEFAULT NOW() );
Supabase enforces RLS by default in production. Enable RLS on a table before defining policies.
sqlpostgres=> ALTER TABLE notes ENABLE ROW LEVEL SECURITY;
Policies control which roles can read or modify specific rows in a table. Define them according to the access requirements of your application to ensure secure and appropriate data access.
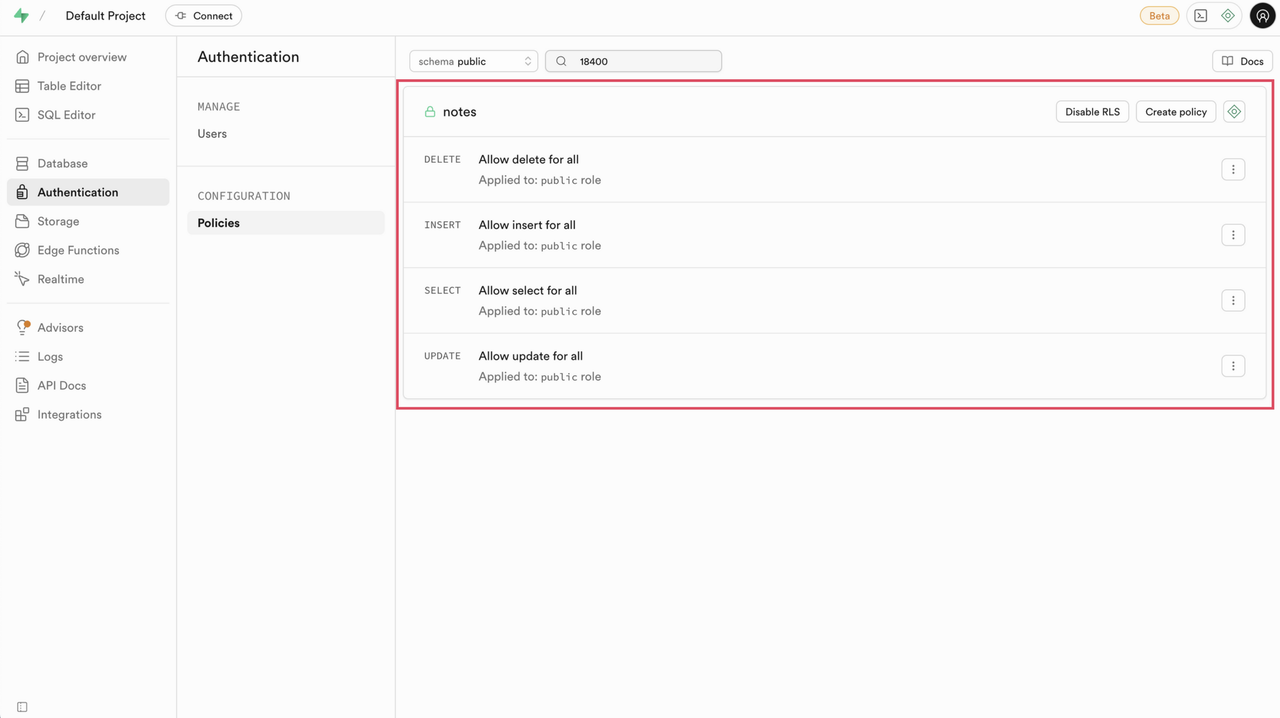
sqlpostgres=> CREATE POLICY "Allow select for all" ON notes FOR SELECT USING (true); postgres=> CREATE POLICY "Allow insert for all" ON notes FOR INSERT WITH CHECK (true); postgres=> CREATE POLICY "Allow update for all" ON notes FOR UPDATE USING (true); postgres=> CREATE POLICY "Allow delete for all" ON notes FOR DELETE USING (true);
Exit the PostgreSQL shell.
sqlpostgres=> \q
Exit the container shell.
consoleroot@<container_id>:/# exit
Follow this method to use the Supabase Dashboard to visually manage your PostgreSQL database, create tables, configure columns, and define row-level security (RLS) policies for your application.
Navigate to your instance's Management Page in the Vultr Console. Scroll down to App Instructions and retrieve the Supabase endpoint (e.g.,
http://<server-ip>:8000). Copy the provided Username and Password.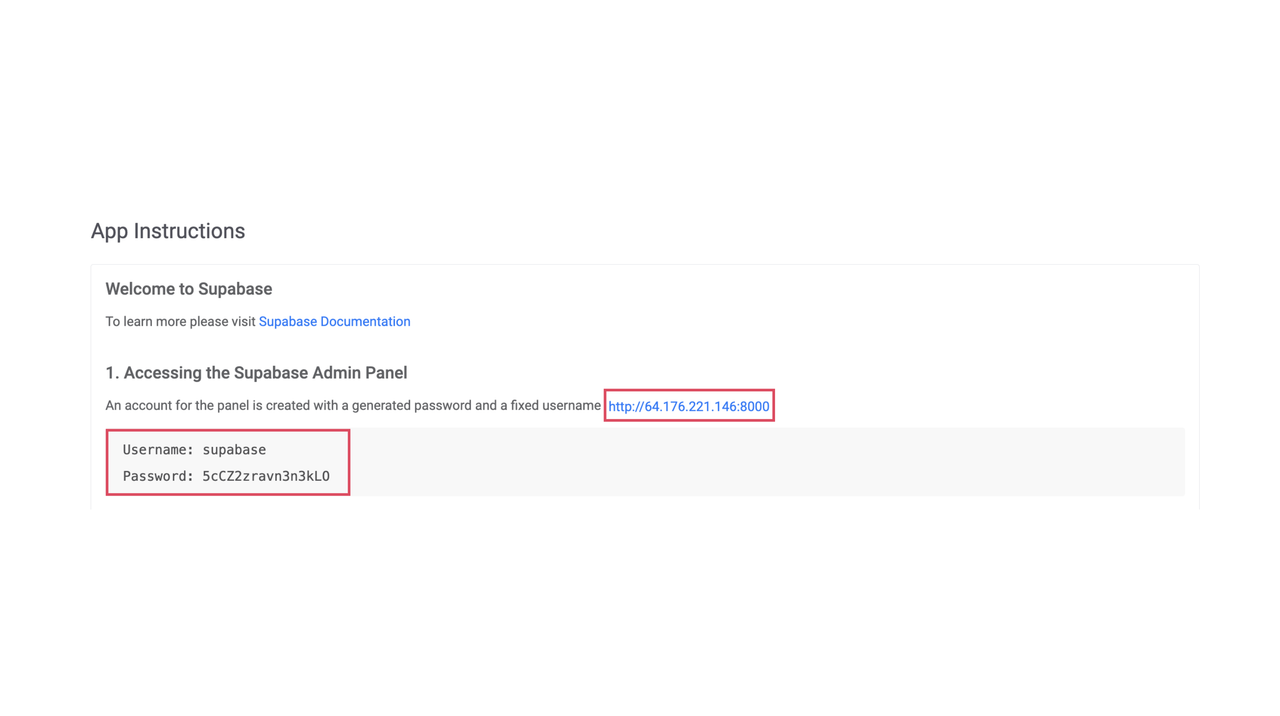
Open the retrieved endpoint in a browser and enter the copied credentials to log in to the Supabase Dashboard.
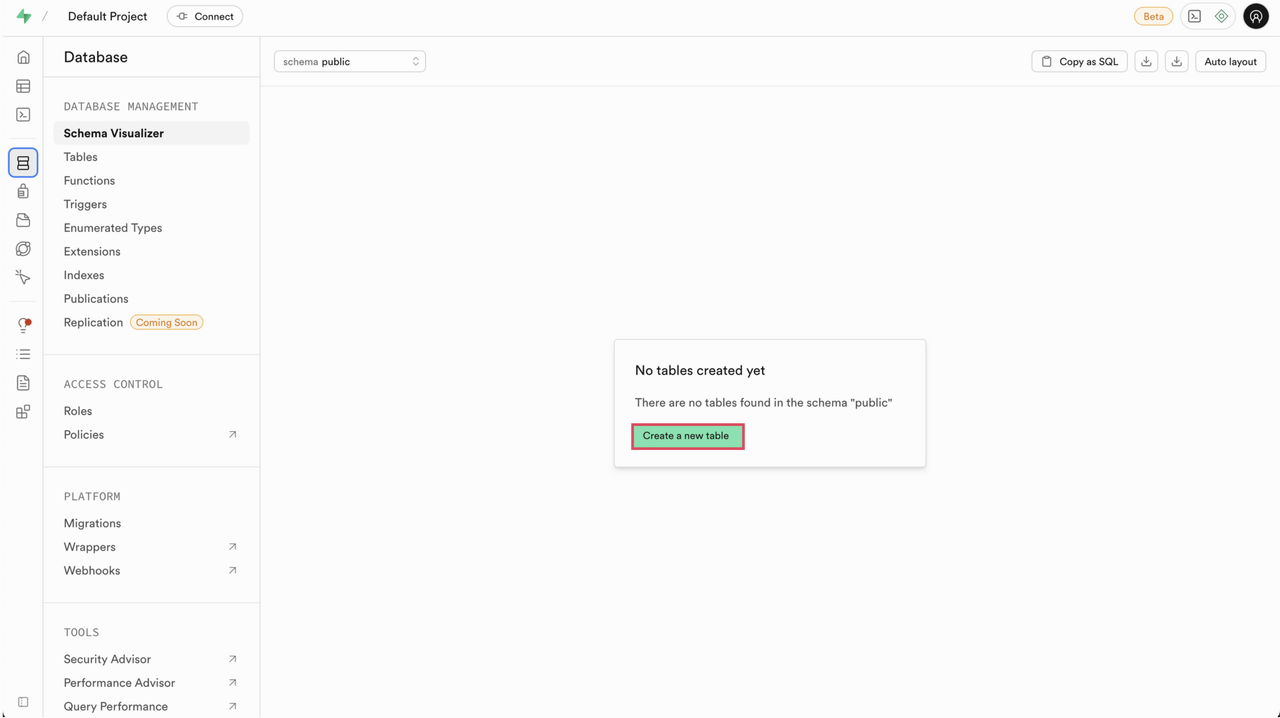
In the left-hand navigation menu, select Database.

Click Create a new table.
Enter a Name for the table and optionally provide a Description. Make sure Row-Level Security (RLS) is enabled if your application requires granular access control.

Under the Columns section, add each column required for your application, specifying the Type, Default Value, and whether the column is nullable or required.
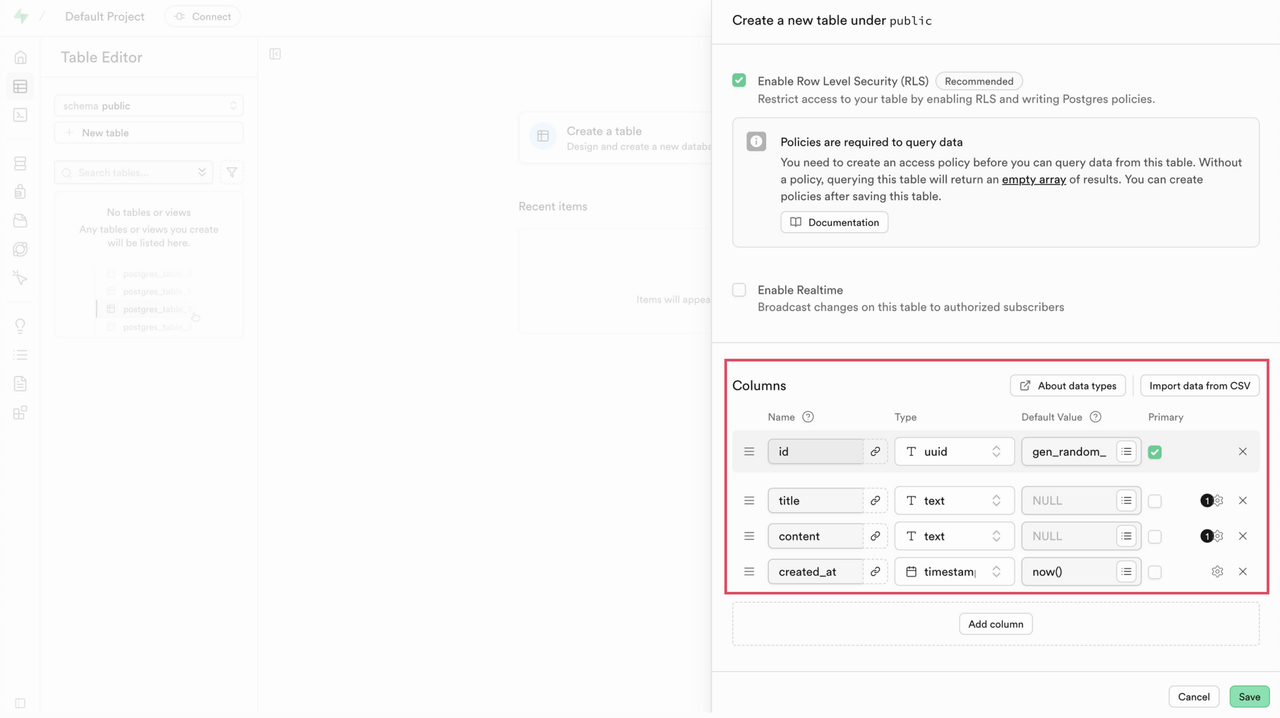
Click Save to create the table. The table is owned by the
supabase_adminrole and appear under the public schema in the Database canvas.Tables created through the Supabase Studio (Dashboard) interface are owned by theNotesupabase_adminrole, which is a superuser created for application-level operations. This differs from tables created directly via PostgreSQL CLI, where tables are owned by whichever database user executes theCREATE TABLEcommand (such aspostgreswhen usingpsql -U postgres). Both approaches create functionally identical tables. The ownership difference doesn't affect your application's functionality, RLS policies, or API access. Choose the method that best fits your workflow.To define policies, select Policies under Access Control.
Click Create policy.

Provide a Policy Name, choose the Table, and specify the Policy Behavior. Pick the Policy Command (
SELECT,INSERT,UPDATE,DELETE) and assign the Target Roles, or simply select a Template from the available pre-defined options to populate the policy definitions.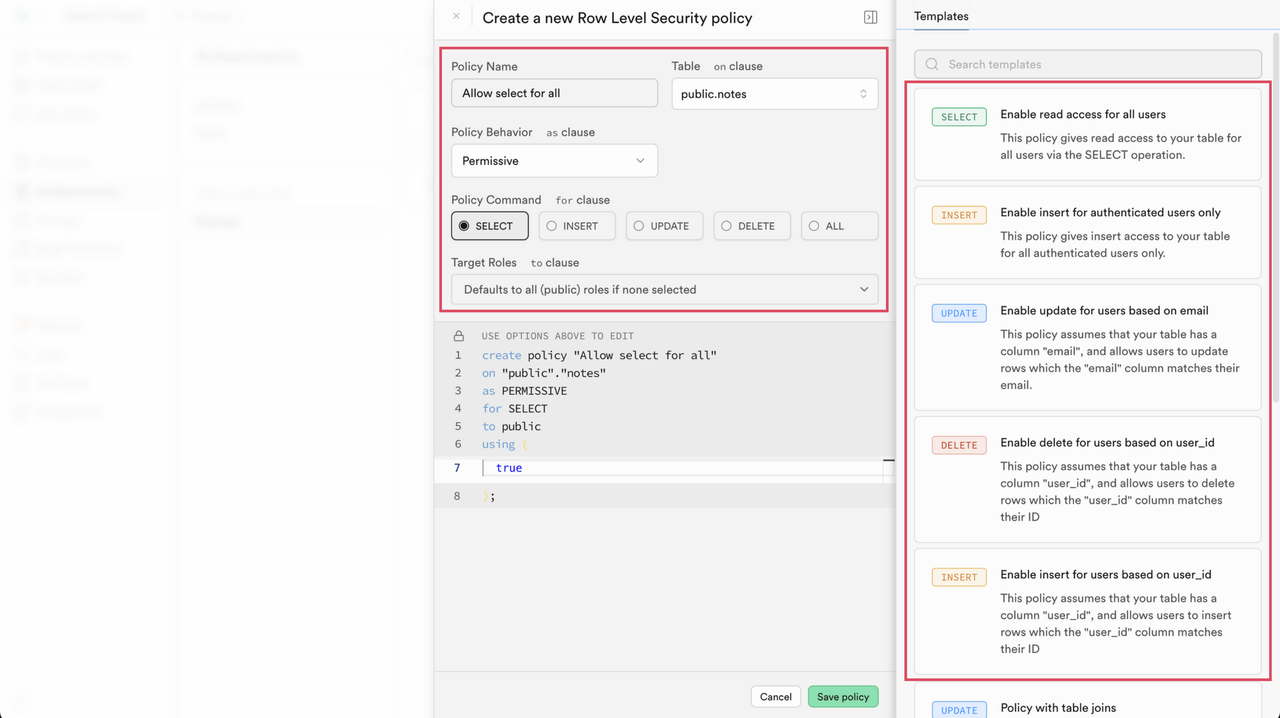
After configuring the policy, click Save policy. The newly created policies appear under the Policies section, associated with the corresponding table.
Connect the Frontend Application
Next, deploy the frontend application and connect it to the Supabase backend. The example used here is a full-stack notes application built with Next.js and Supabase. The app lets you create, read, update, and delete notes while handling authentication and real-time updates via Supabase.
Clone the application repository. Replace the repository URL with your own GitHub repository.
console$ git clone https://github.com/SanskritiHarmukh/supabase-notes-app.git
Navigate into the project directory.
console$ cd supabase-notes-app
Examine the project structure:
console$ ls -la
Key files and directories include:
src/- Contains the application source code and components, including thelib/directory where the Supabase client is initialized.package.json- Defines project dependencies and build scripts.Dockerfile- Specifies container configuration for deployment.docker-compose.yml- Defines service orchestration and container setup..env.example- Provides a template for required environment variables.
Create your environment configuration file.
console$ cp .env.example .env
Update the
.envfile with Supabase credentials and domain:console$ nano .env
Configure the required variables.
NEXT_PUBLIC_SUPABASE_URL=http://yourdomain.com/supabase/ NEXT_PUBLIC_SUPABASE_ANON_KEY=your_anon_key_hereNEXT_PUBLIC_SUPABASE_URL: This URL points to your domain with the/supabase/path, which Nginx proxies to port8000. TheNEXT_PUBLIC_prefix makes this variable available in the browser for client-side API calls.[!Note] For now, use
httpin theNEXT_PUBLIC_SUPABASE_URL.NEXT_PUBLIC_SUPABASE_ANON_KEY: The anonymous key you generated earlier, used for public API operations with Row-Level Security policies applied.
TheWarningSUPABASE_SERVICE_ROLE_KEYgenerated earlier, bypasses Row-Level Security and should only be used in server-side code for administrative operations. Never expose this key in client-side code or commit it to public repositories.
Deploy the Application
The Vultr Supabase Marketplace instance comes pre-installed with Node.js, npm, and Docker, giving you flexible deployment options. You can run the application directly with Node.js/npm or use Docker for consistent containerized deployment.
Using Node.js (npm)
Running the application directly via Node.js is ideal for development, testing, or lightweight production deployments where Docker is not required.
Install Node.js packages defined in
package.json.console$ npm install
Compile the Next.js application into an optimized production build.
console$ npm run build
Launch the application on the configured port (default is
3000).console$ npm start
RunningNotenpm startdirectly occupies your terminal session. The process stops if the SSH connection is closed. To prevent this, run the process in the background usingnohup npm start &.
Using Docker
Using Docker is recommended when you want a self-contained, portable deployment that works consistently across environments. Docker isolates the application, its dependencies, and its runtime, which simplifies scaling, updates, and migration.
Review the Docker configuration
console$ cat Dockerfile
The Dockerfile defines how to build your application container, including dependency installation, application building, and runtime configuration.
Examine the Docker Compose configuration:
console$ cat docker-compose.yml
This file orchestrates the container deployment, including port mapping, environment variable injection, and networking configuration.
Build and deploy the application.
console$ docker compose up -d
This builds a Docker image containing your application, creates and starts a container in detached mode (background), maps port
3000from the container to the host, injects environment variables from the.envfile, and configures restart policies for reliability.Verify the deployment.
console$ docker compose ps
The output should show your application container running with status "Up" and port mapping
0.0.0.0:3000->3000/tcp.Inspect the container logs to view startup messages and confirm that the application is running correctly. Replace
<service-name>with the name of the service defined in yourdocker-compose.ymlfile (e.g.,notes-app).console$ docker compose logs -f <service-name>
Access the Application
After deploying the frontend application and configuring Nginx to proxy requests to your instance, the application becomes accessible through the configured domain. Open a web browser and navigate to,
http://yourdomain.com
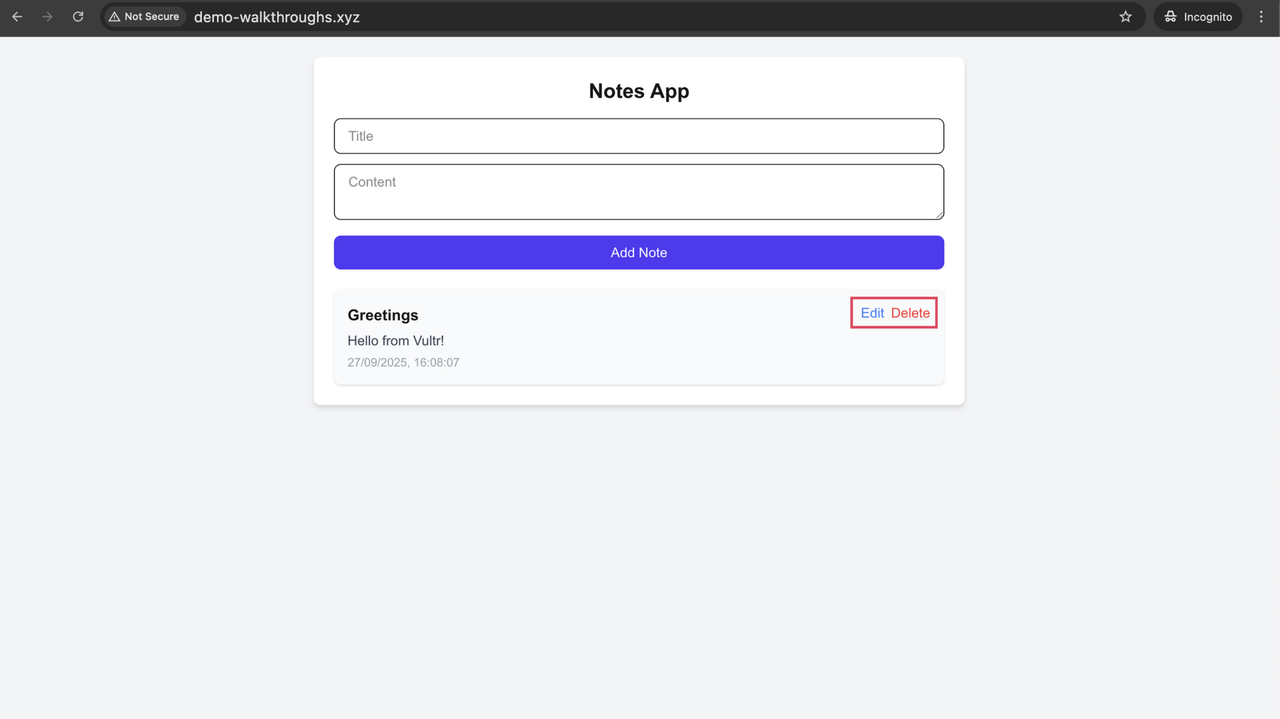
Once the page loads, you should see the Notes App interface. This interface allows you to create, view, edit, and delete notes. All interactions are backed by Supabase, with data stored in your PostgreSQL database and row-level security (RLS) enforced.
To verify the application's functionality:
Enter a Title and Content for a new note, then click Add Note.
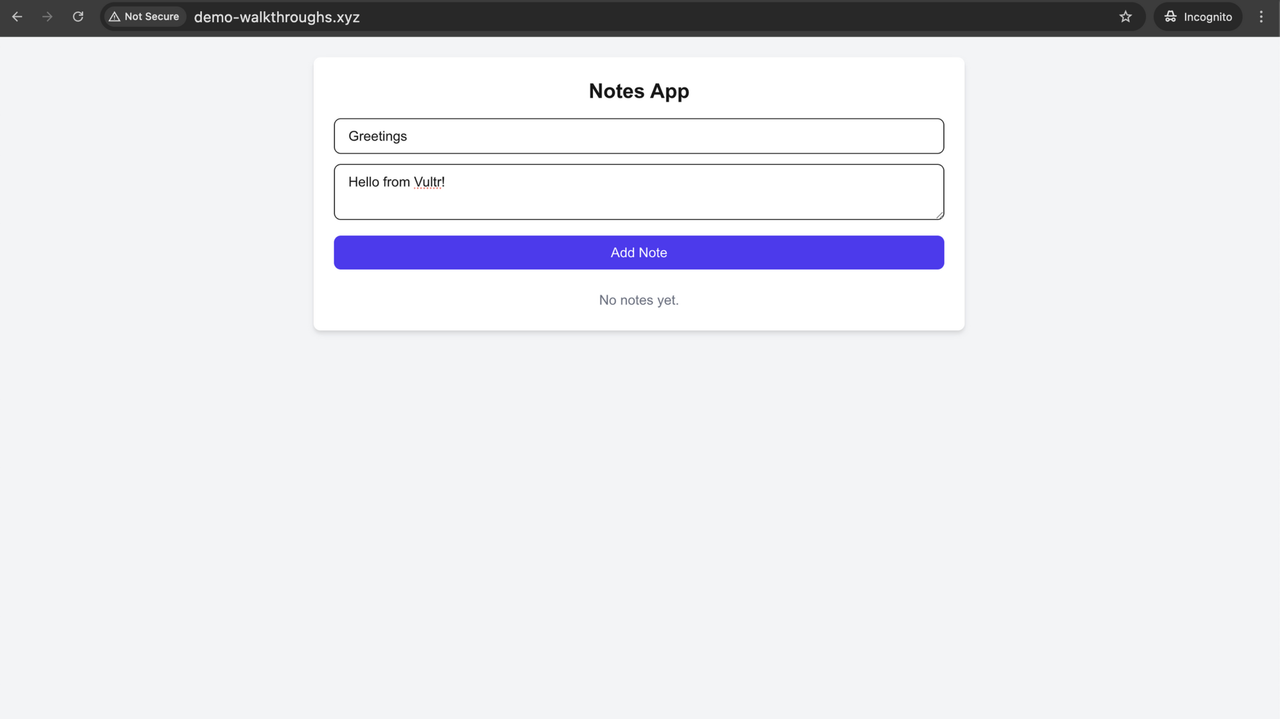
The newly added notes appear in the list and are stored in the database. From here, you can Edit or Delete any existing note. Editing updates the database in real time, and deletion removes the corresponding row.
Open your PostgreSQL database and check the
notestable. Any changes made through the frontend (adding, editing, or deleting notes) should be reflected in the table immediately. This confirms that the frontend is correctly connected to Supabase and RLS policies are applied as expected.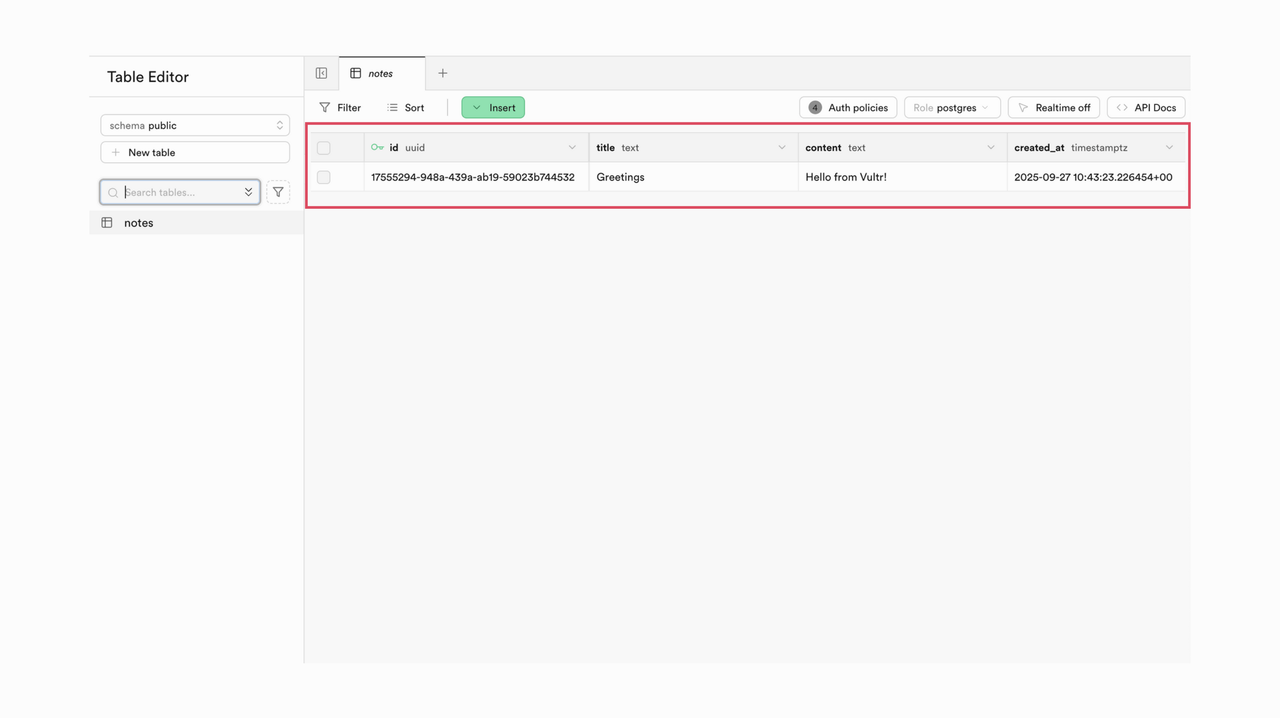
Open the application in multiple tabs or devices. Adding or editing notes in one tab should update the view in other tabs instantly, demonstrating Supabase’s real-time subscription functionality.
Optional: Enable HTTPS with SSL/TLS Certificates
HTTPS encrypts data transmission between users and your server, protects against man-in-the-middle attacks, and is required by modern browsers for many features like geolocation and camera access. Plus, search engines favor HTTPS sites, and users expect the security assurance provided by the padlock icon in their browser.
This section uses Let's Encrypt, a free, automated certificate authority that provides SSL/TLS certificates trusted by all major browsers. The process is automated using Certbot, which integrates directly with Nginx to obtain and configure certificates.
Install Certbot with required system dependencies.
console$ sudo apt install ca-certificates curl gnupg lsb-release certbot python3-certbot-nginx -y
ca-certificates: Contains trusted certificate authorities needed to verify Let's Encrypt's SSL certificates.curl: Used by Certbot to communicate with Let's Encrypt servers.gnupg: Provides cryptographic functions for certificate validation.lsb-release: System information utilities used by Certbot.certbot: The core certificate management tool.python3-certbot-nginx: Plugin that automatically configures Nginx for SSL.
Generate SSL certificates for your domain. Replace
yourdomain.comwith your actual domain andadmin@example.comwith your email address.console$ sudo certbot --nginx -d yourdomain.com -d www.yourdomain.com --email admin@example.com --agree-tos --non-interactive
Verify the certificate installation.
console$ sudo certbot certificates
Let's Encrypt certificates expire after 90 days. To simulate and test certificate renewal, run:
console$ sudo certbot renew --dry-run
A successful dry run confirms that automatic renewal works when certificates approach expiration.
Now that HTTPS is enabled, update your application’s environment variables to use the
httpsprotocol.If you are not already in your application directory, navigate to it first:
console$ cd supabase-notes-app
Open the environment configuration file for editing.
console$ nano .env
Change the
NEXT_PUBLIC_SUPABASE_URLto use HTTPS.NEXT_PUBLIC_SUPABASE_URL=https://yourdomain.com/supabase/
Restart the application to apply changes.
If you deployed the application directly using npm without containerization, you need to restart the Node.js process.
Identify the running Next.js process.
console$ ss -ltnp | grep 3000
Stop the current process.
console$ kill [PID_from_previous_step]
Rebuild the application to apply the updated
.envvalues.console$ npm run build
Restart the application.
console$ npm start
If you deployed using Docker Compose, the application needs to be restarted to pick up the updated environment variables from the
.envfile.Stop the running container.
console$ docker compose down
Rebuild the image with updated configuration and start the container.
console$ docker compose up -d --build
Access the application again by visiting,
https://yourdomain.com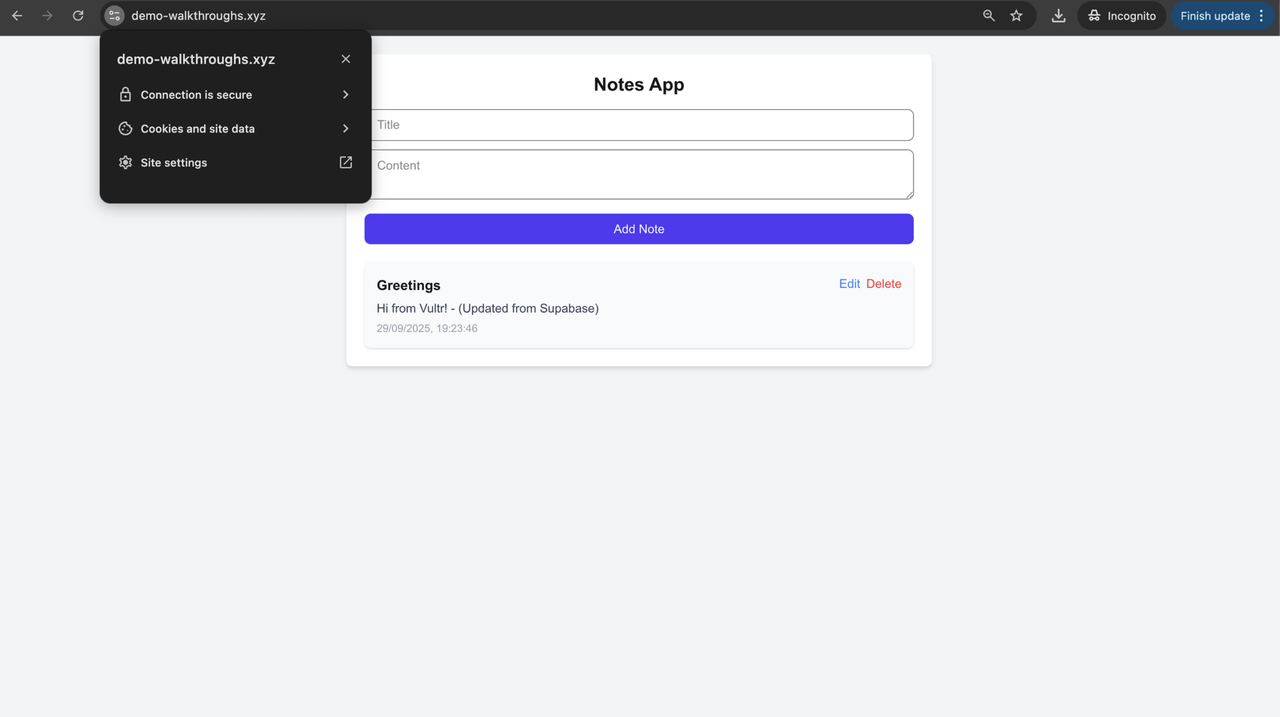
Your browser should now display a padlock icon, confirming that the connection is secure and the SSL certificate is active. All data transmitted between users and your server is encrypted. The application continues to function as before, now with production-grade security.
Conclusion
You have successfully deployed a Next.js application with Vultr’s Supabase Marketplace Application, configured PostgreSQL with row-level security, and secured the deployment with Nginx and SSL certificates. Your Supabase instance now delivers a complete backend with database, authentication, and API services accessible through your custom domain. By using the Vultr Supabase Marketplace, you reduce setup effort and can focus on building application features with Supabase’s full capabilities.